
Filtering Responses
What's on this page
About Filtering Responses
Sometimes, you only want to work on a subset of your respondents’ data. Maybe you just want to glance at the last 3 months of data, or you’re interested in exporting only the responses given by single mothers aged 18-35. No matter how specific the needs of your analysis, you can build filters for your response data and save them for later reuse.
Qtip: These filters you build in Data & Analysis are also accessible in Advanced-Reports and Results-Reports!
Qtip: Filters don’t stay in place when you navigate away from the page. However, you can save filters so you can quickly reapply them whenever you need.
Adding Filters
Warning: When filtering by a number set (e.g., the set of numbers from 0 to 5) or text set (e.g., the set of possible responses ranging from “Dissatisfied” to “Satisfied”), the filter will display a maximum of 5,000 values.

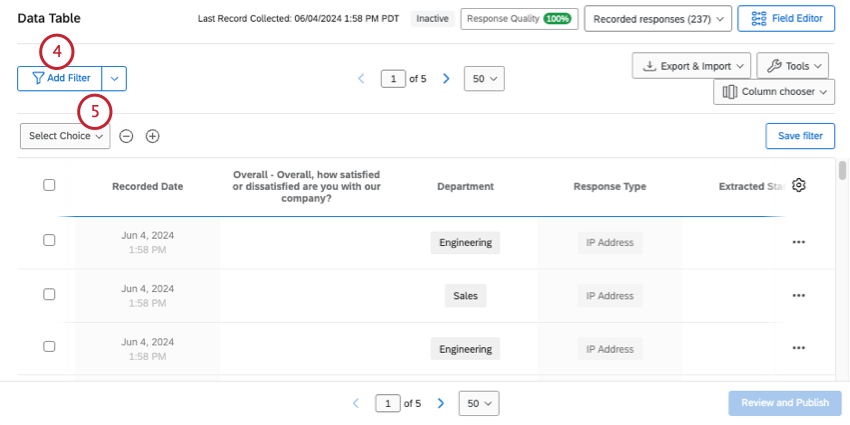
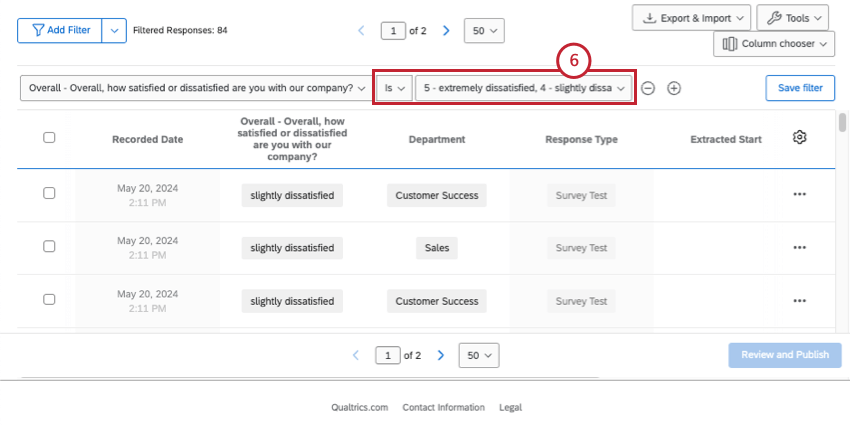
Once you’ve applied your filter(s), your response viewer will automatically update to show you the responses that match your criteria. You can see the total number of these responses right next to your filter.
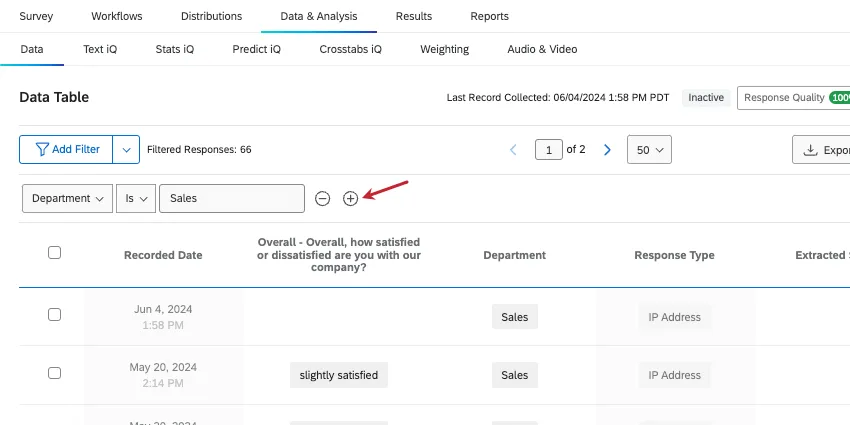
If you want to add more conditions, click the plus sign ( + ). This will take you to the saved filter creator.
Saving Filters
Saving the filters you create allows you to access them later without having to build them again. This is particularly useful for filters that have multiple conditions.
There are a few ways to open the filter creation window so you can save your filters for later:
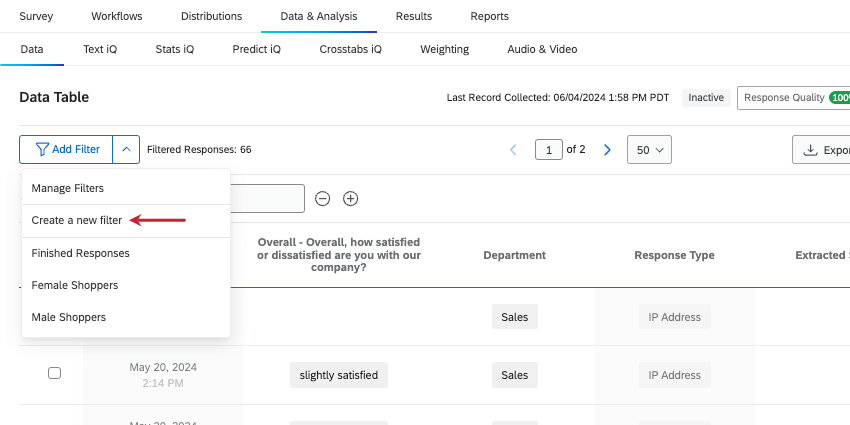
- Click the arrow next to Add Filter, then select Create a new filter.
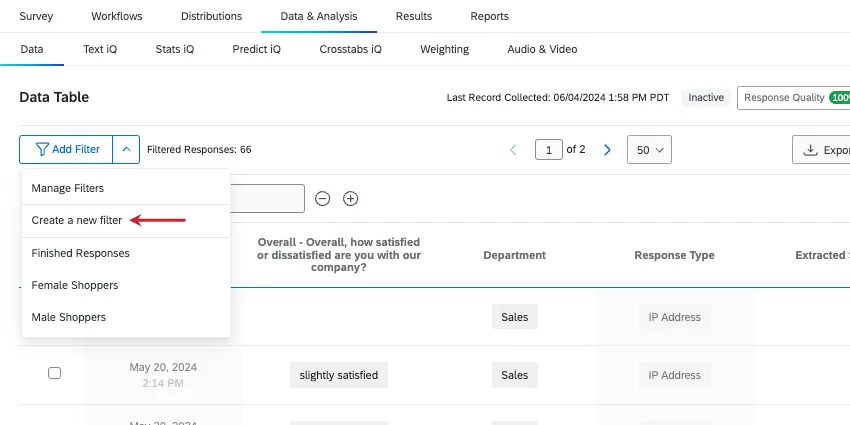
- Build a basic condition, then click the plus sign ( + ) to add another.

Saving New Filters
Qtip: Learn more about basic condition building.
Qtip: For more details, see New Conditions and Condition Sets.
Editing Saved Filters
If you edit your filter, you’ll need to save these changes.

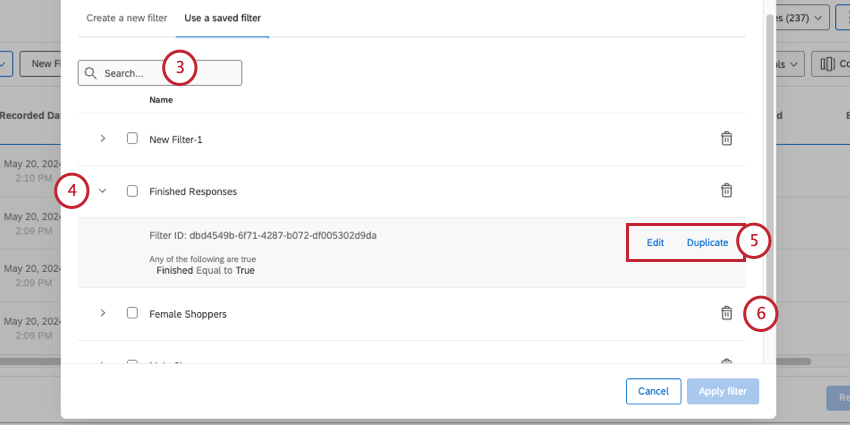
- Edit: Edit the filter’s name and / or conditions.
- Duplicate: Create a copy of the filter to edit.
Loading Saved Filters
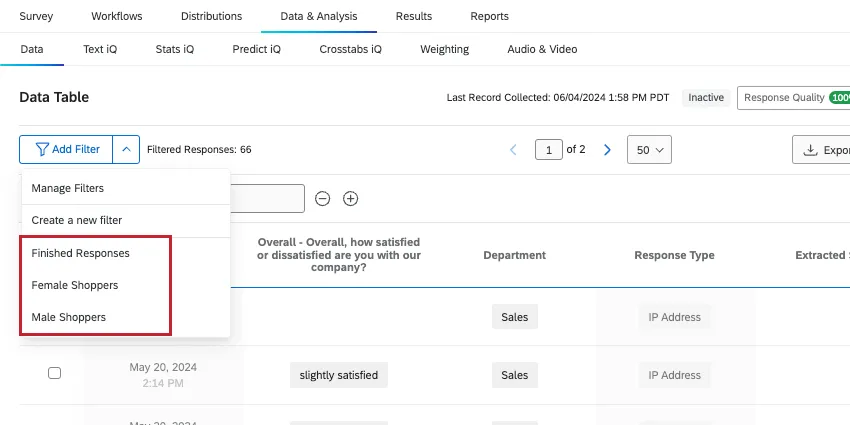
To use a filter you’ve saved, click the arrow next to Add Filter, and select the desired filter.
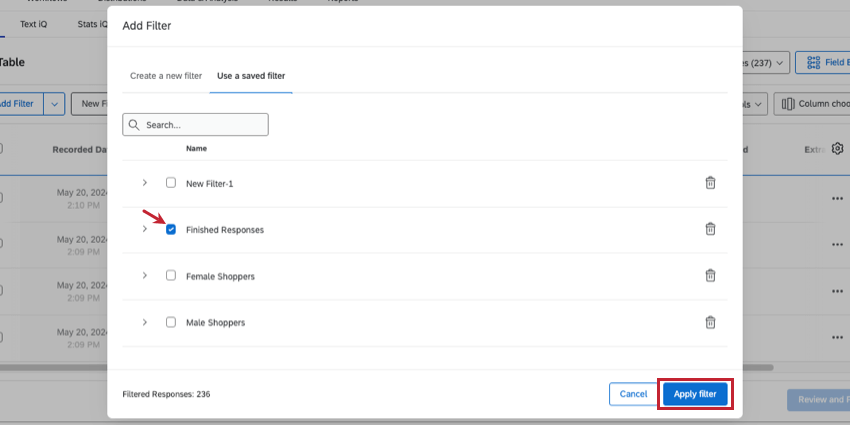
Qtip: You can also access saved filters by selecting Manage Filters, selecting the desired filter, and clicking Apply filter.
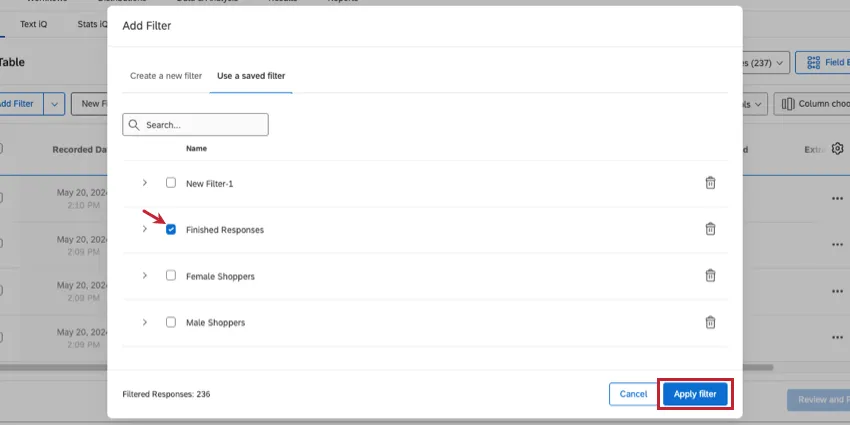
Although it look like you can check the box next to multiple filters, you can only select 1 at a time.
Downloading Filtered Content
Once you have a filter applied at the top, you can export only the filtered data. No special steps are necessary!
See the linked support page for more instructions on exporting your data.
Fields You Can Filter By
The fields you filter by are the columns of data you’re using to narrow down your results. Types of fields can include survey questions, survey metadata, contact information, and embedded data.
Question Answers
There are many different question types in Qualtrics, and different question types have different filtering options. Some question types have only 1 filter option (i.e., only 1 way to represent the data), but for other question types you will have additional options. Possible options include the following:
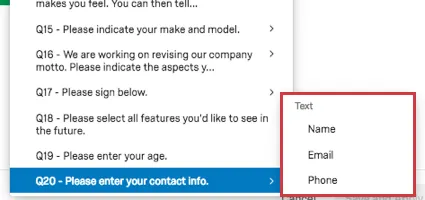
- Form fields: For questions with multiple text entry fields, you can choose which field you want to display.
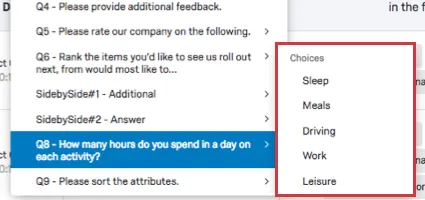
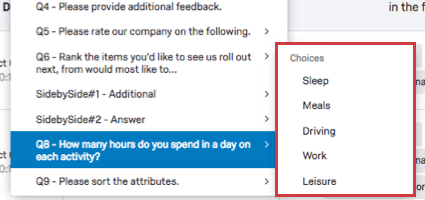
- Multiple fields in one: For questions with multiple statements or components (such as a matrix table), you can choose which statement to filter by.
- NPS®: For NPS® questions, you can view the NPS® groups (Detractor, Passive, and Promoter, all calculated for you) or you can view the actual numeric values (0–10) the question displays to respondents.

Survey Metadata
Survey metadata is information automatically collected when a respondent takes a survey. Survey metadata fields include the following:
- Start Date: The date and time the survey was started.
- End Date: The date and time the survey was completed. Qtip: This time correlates to the last time the respondent interacted with the survey. Note that End Date and Recorded Date could be different times if a response was later closed as an incomplete response.

- Response Type: The type of response collected (survey preview, IP address, offline app, etc.). Qtip: A response type of “IP Address” means the response was collected via an anonymous link, personal link, or individual link. To see how a respondent accessed a survey, filter by the Distribution Channel contact field instead.
- IP Address: The IP address collected from the respondent’s browser.
- Duration: The number of seconds it took the respondent to complete the survey.
- Finished: The status of the respondent’s survey (true = completed, false = incomplete).
- Recorded Date: The date and time the survey was recorded in the dataset.
Qtip: Learn more about metadata fields not listed here on Understanding Your Dataset.
Qtip: Filters in the Data & Analysis tab also have a response ID survey metadata field. Response ID is a unique identification code assigned to each completed response. This code is assigned when a response is closed, so only completed responses have one.
Contact Fields
Contact field information will only be available if you uploaded a contact list and your respondent used an individual link. The following fields are available here:
- Recipient Last Name: The contact’s last name added in the LastName field when creating your contact list.
- Recipient First Name: The contact’s first name added in the FirstName field when creating your contact list.
- Recipient Email: The contact’s email address added in the Email field when creating your contact list.
- External Reference: Extra information about the contact added in the ExternalDataReference field when creating your contact list.
- Distribution Channel: The Qualtrics method that you used to distribute your survey.
Qtip: If you are looking for an embedded data field, you can find it in the Embedded Data section of the dropdown instead.
Embedded Data
Embedded data is any extra information you’ve recorded in addition to your question responses. These include:
- Embedded data fields set in the survey flow
- Manual fields
- Formulas
- Bucketed fields
- Combined fields
- Translated comments
- Text iQ topics
- Text iQ sentiment analysis
- Other Text iQ enrichments
- Q_DataPolicyViolations
Basics of Building Conditions
Creating a filter condition is a matter of defining when a respondent’s data should be included in your report.
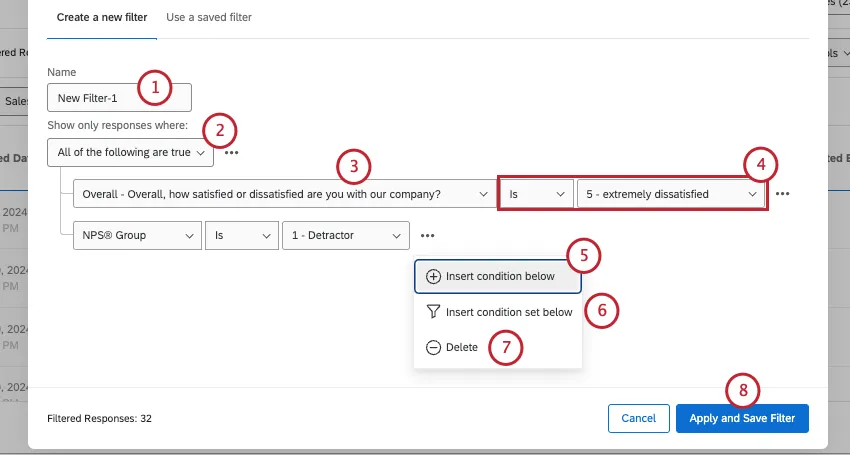
Conditions have 3 parts: the field, the operator, and the operand.
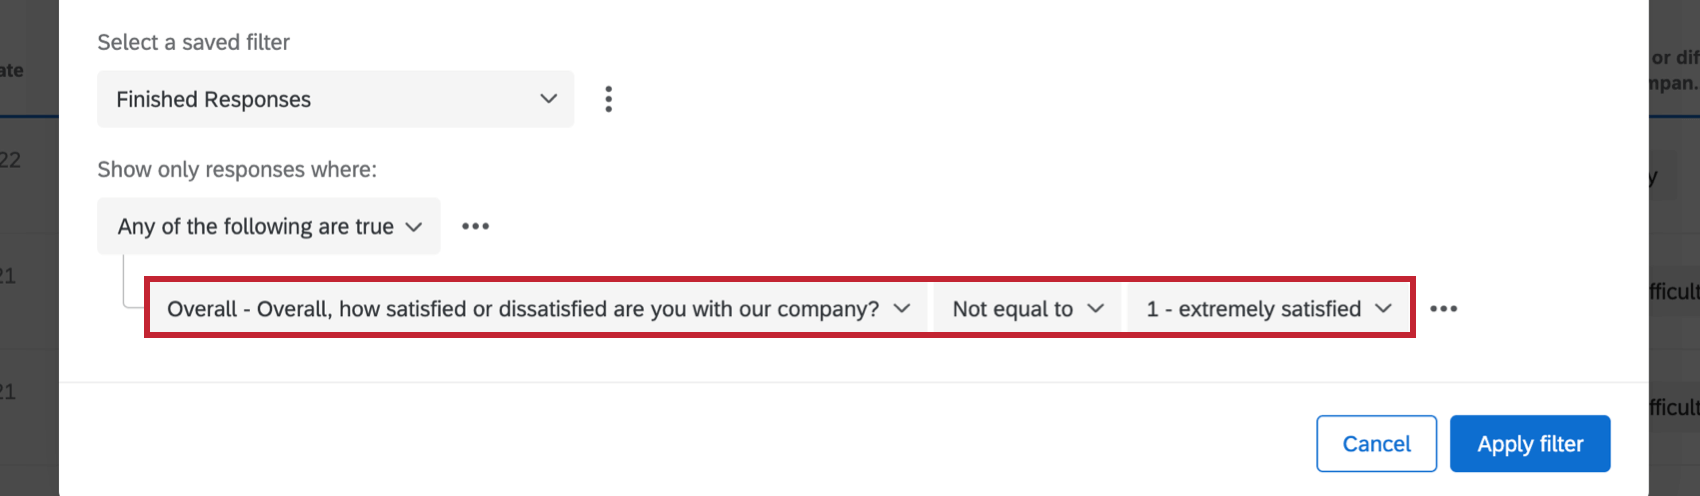
Example: Maybe you’re only interested in looking at feedback from customers who were not extremely satisfied. Your filter field would be your satisfaction question, your operator would be “Not equal to,” and your operand would be “extremely satisfied.”
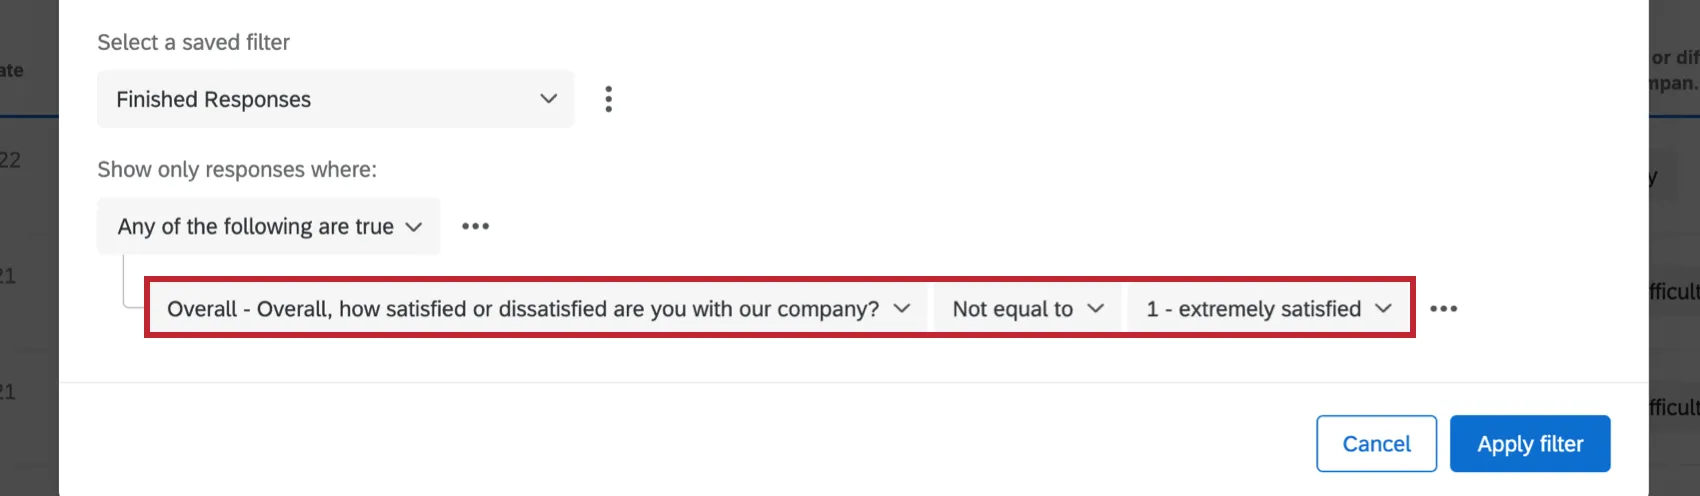
Field
The first dropdown menu in a condition determines the filter field (survey metadata, questions, or Embedded Data). Depending on the type of field you select, the remaining dropdown selection options will vary.
Operator
The second dropdown menu is the operator. Operators determine how the field relates to the final segment of the condition. The operators available depend on the field you just set.
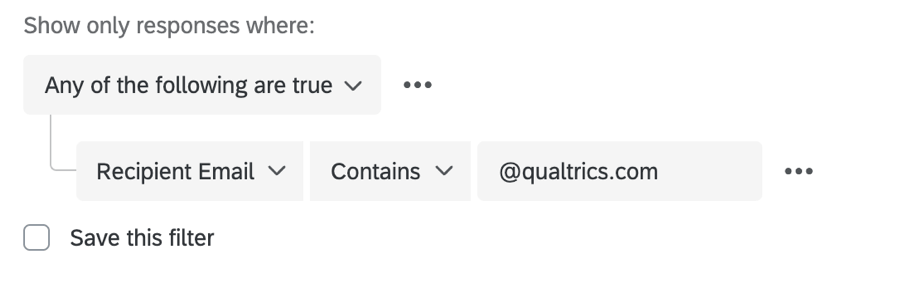
Example: For Text Entry questions, the operators can be “Is,” “Is not,” “Contains,” and “Does not contain.” A potential condition might be, “Only show responses where the Recipient Email contains @qualtrics.com.”
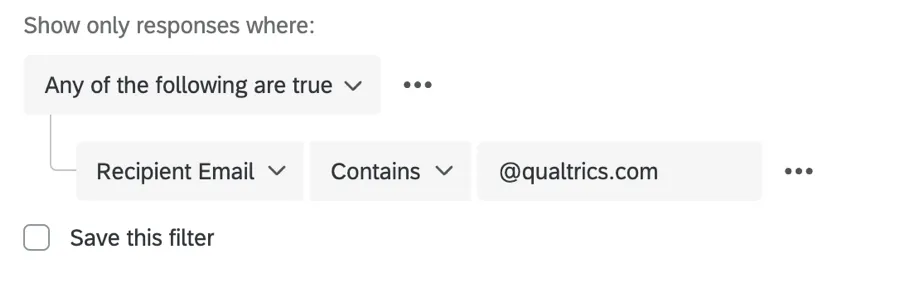
“Recipient Email” is the field and “contains” is the operator.
Qtip: See our List of Operators for more details.
Operand
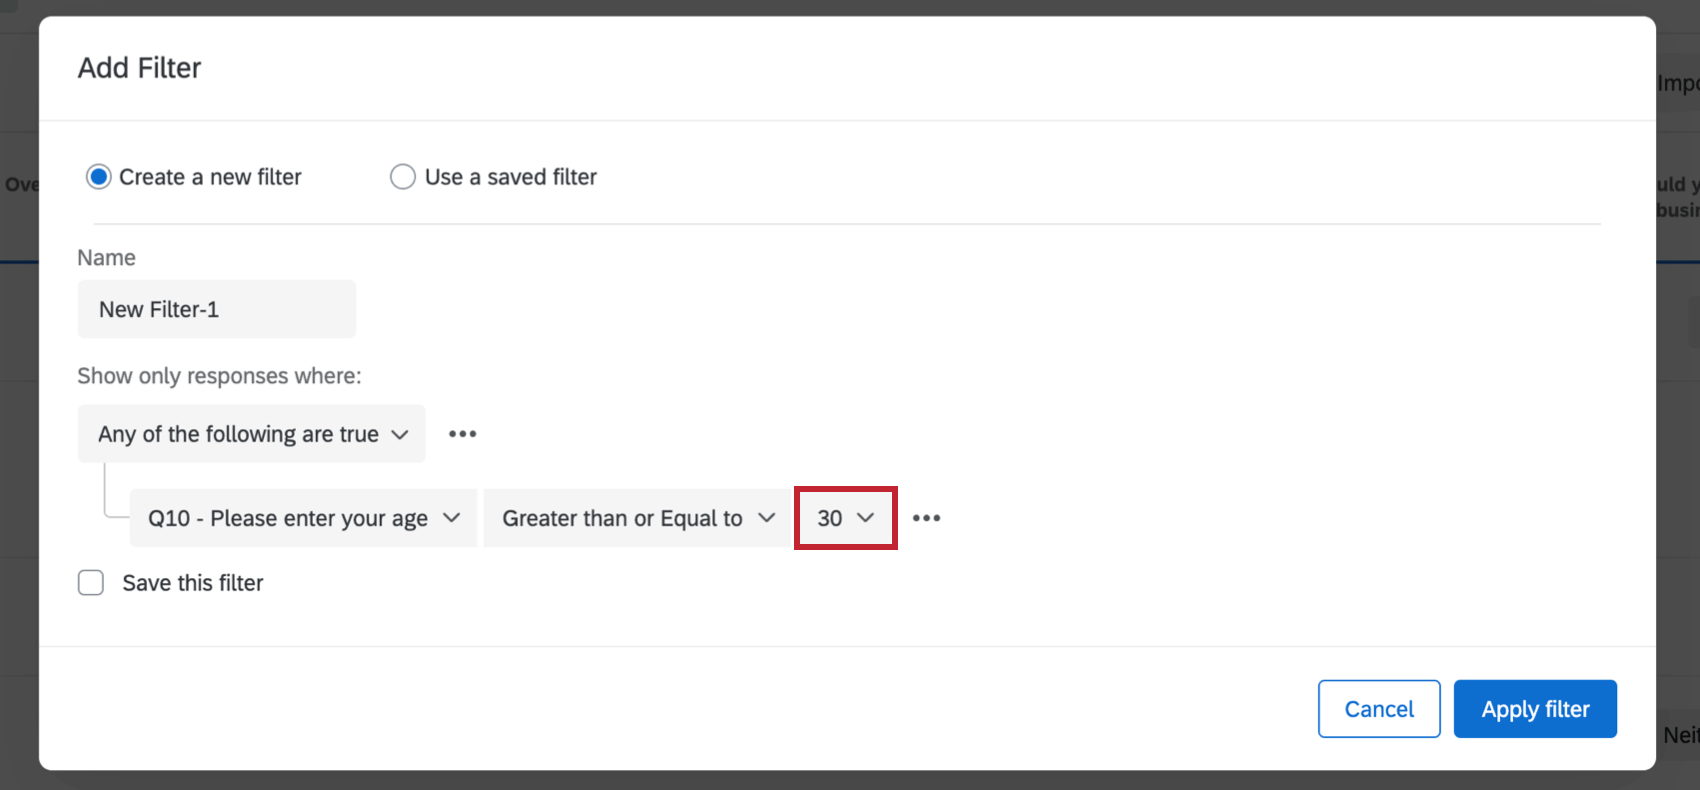
The final dropdown menu is the filter operand. An operand is the value you want to isolate. Let’s say you want to filter by age of your respondent. The field is age, and then the values would be 25, 32, 47, etc.
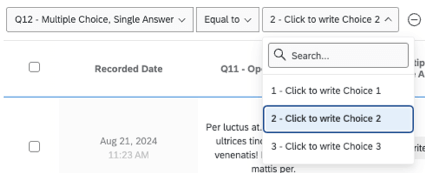
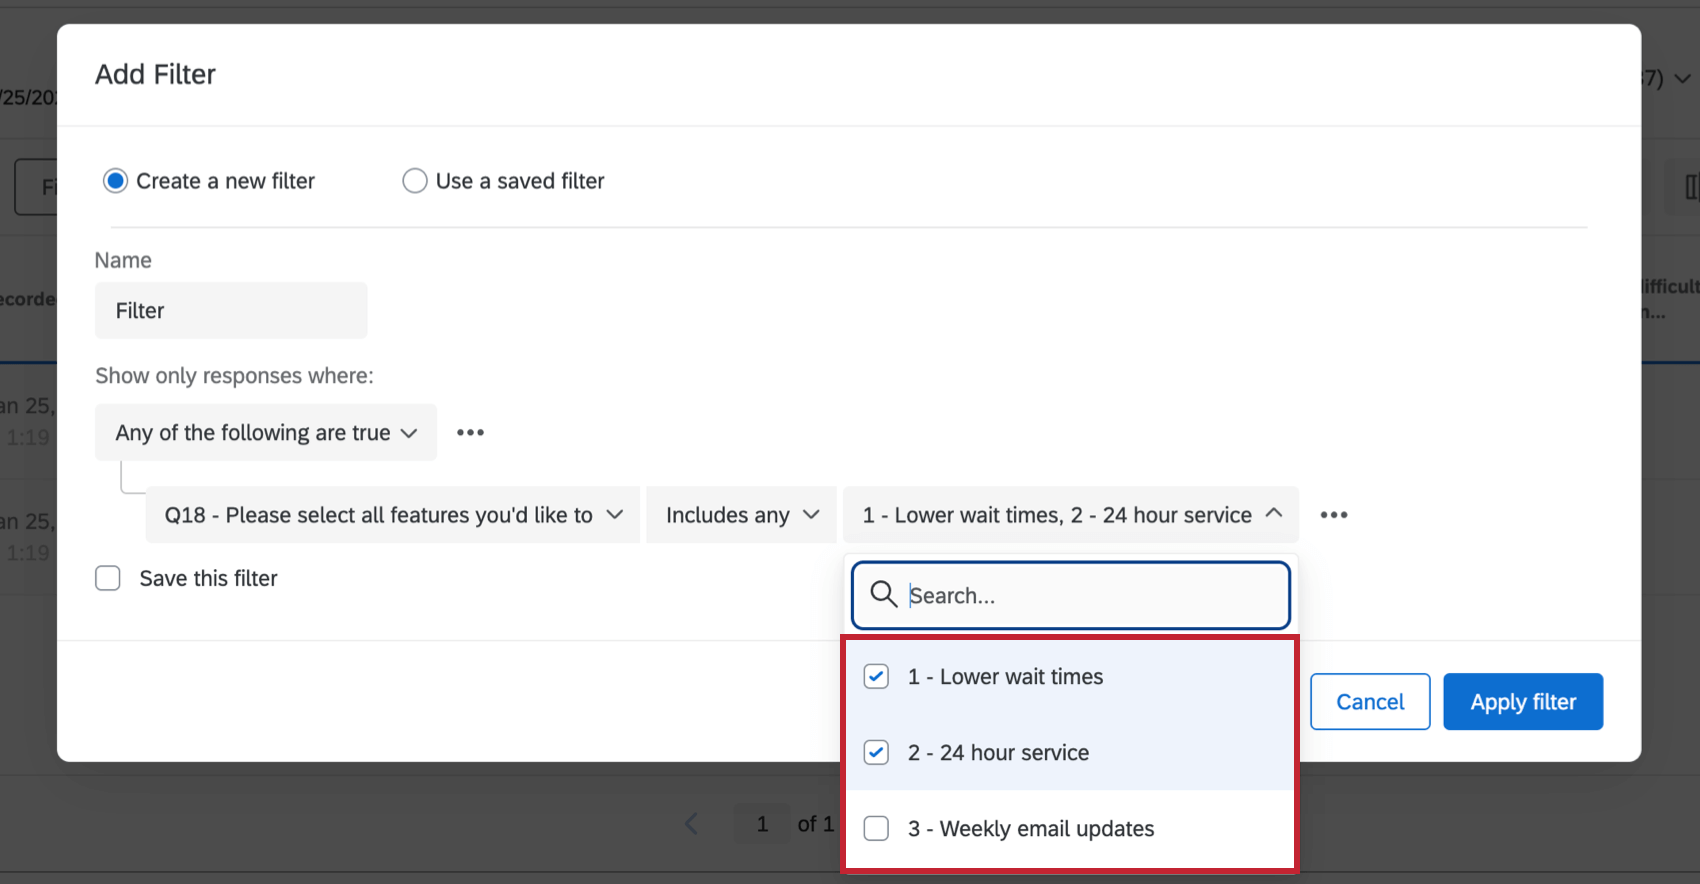
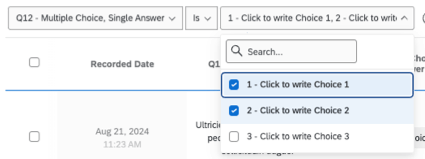
When the field is a question or data input that has discrete potential values (e.g., a Multiple Choice with a limited number of possible values), the operand will be an actual dropdown that lists all the possible options. In these instances, you can pick 1 operand or multiple.

Qtip: When these choices are selected, a respondent only has to match 1 of the selected options to be included in the filtered data. In the image above, respondents could have selected Lower wait times, OR 24 hour service.
When the field is a question or data input that has an unlimited number of potential values (e.g., any type of Text Entry question), the operand will be a text entry box.

Conditions and Condition Sets
It’s best to think of your condition as a statement. Think of the condition you want the respondent to meet, and build a statement that describes that condition.
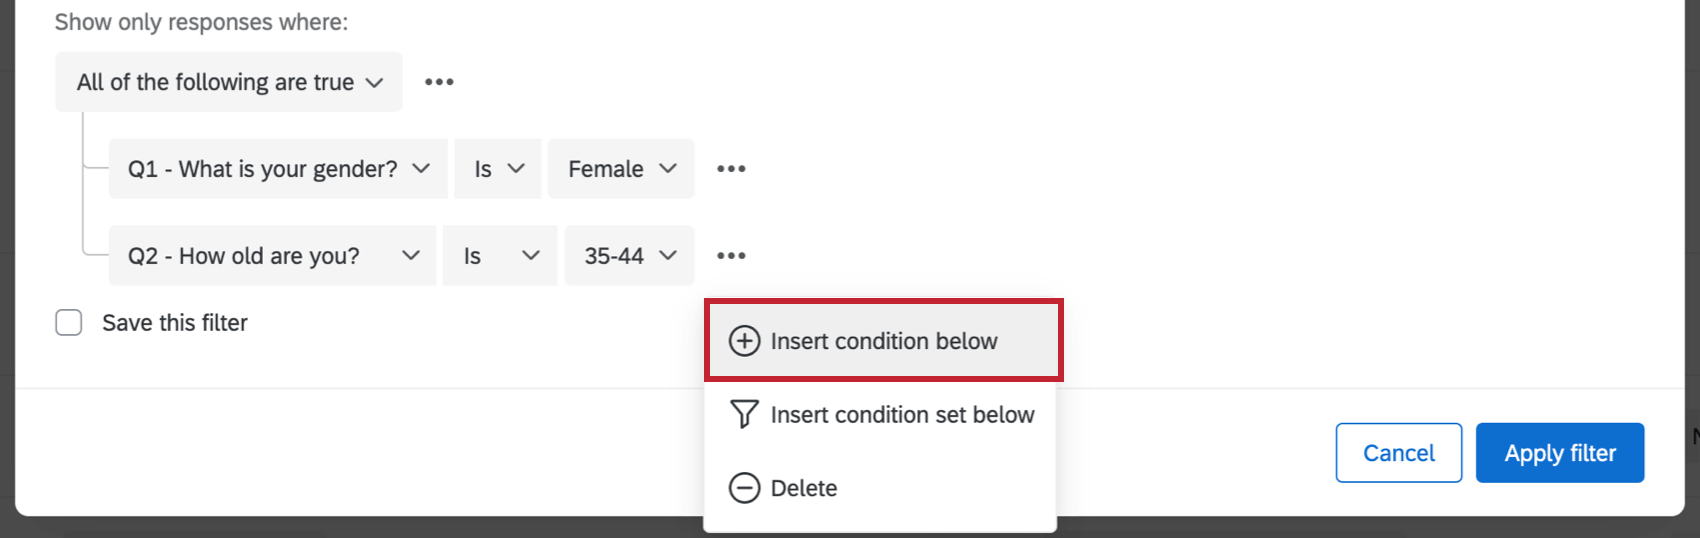
You can add new conditions by clicking the 3 dots to the right of any condition and selecting Insert condition below. This will insert a new condition right below it.

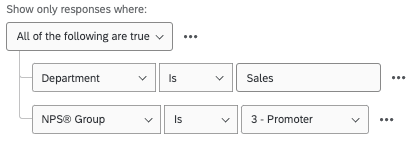
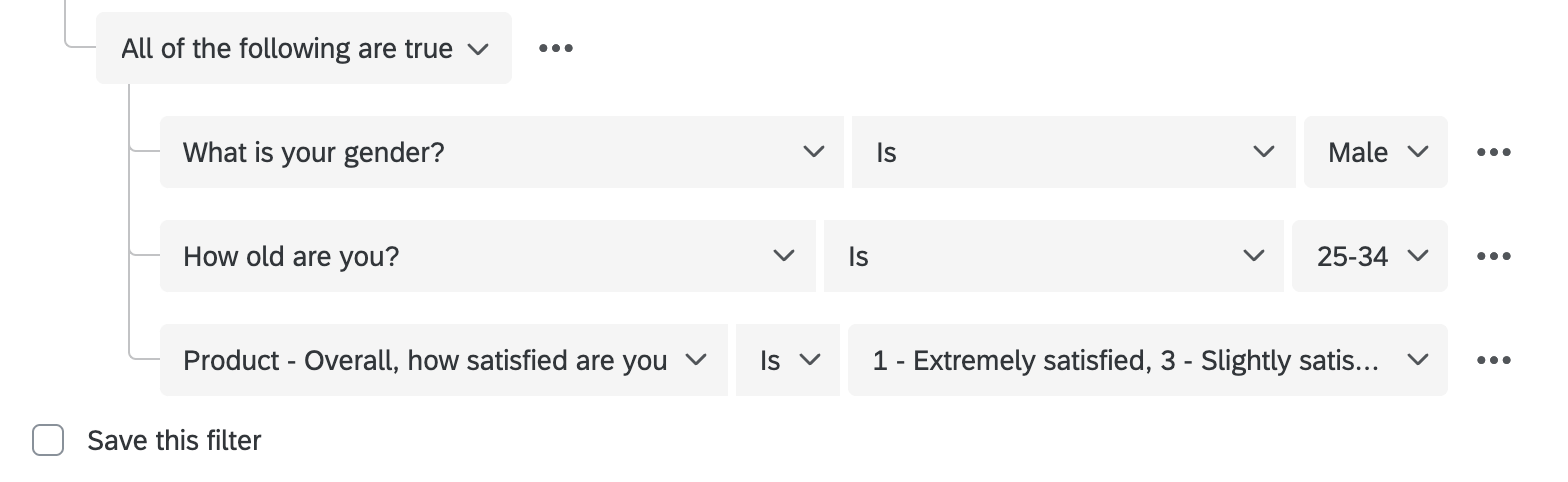
Let’s start with an example. We only want to see responses from the Sales department. We know we saved the department as embedded data, so this condition is as simple as saying “Department Is Sales.”

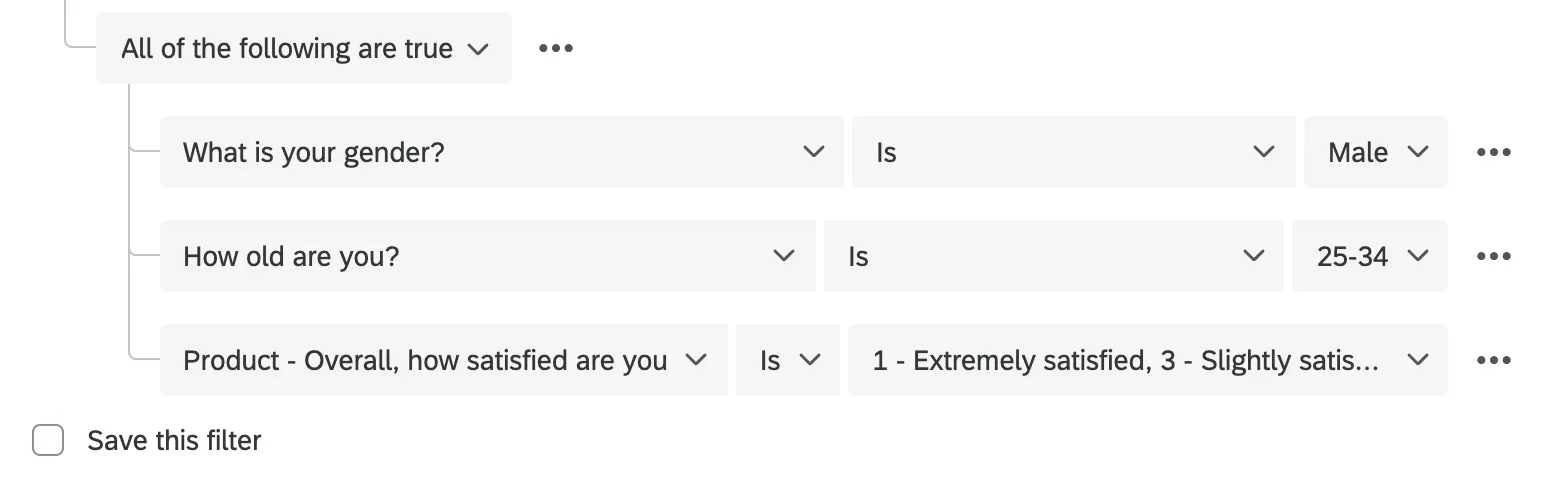
But sometimes the filters you want to create require more conditions. Let’s say we want to see all Sales responses with high NPS scores.
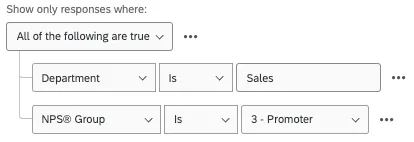
Each statement acts as its own condition. Because the conditions shown above are joined by the same any/all, they’re part of the same condition set.
Condition Sets
You can tell which conditions are in the same set by looking at how indented the conditions are. Conditions within the same set are all indented the same amount and are beneath the same All/Any header.
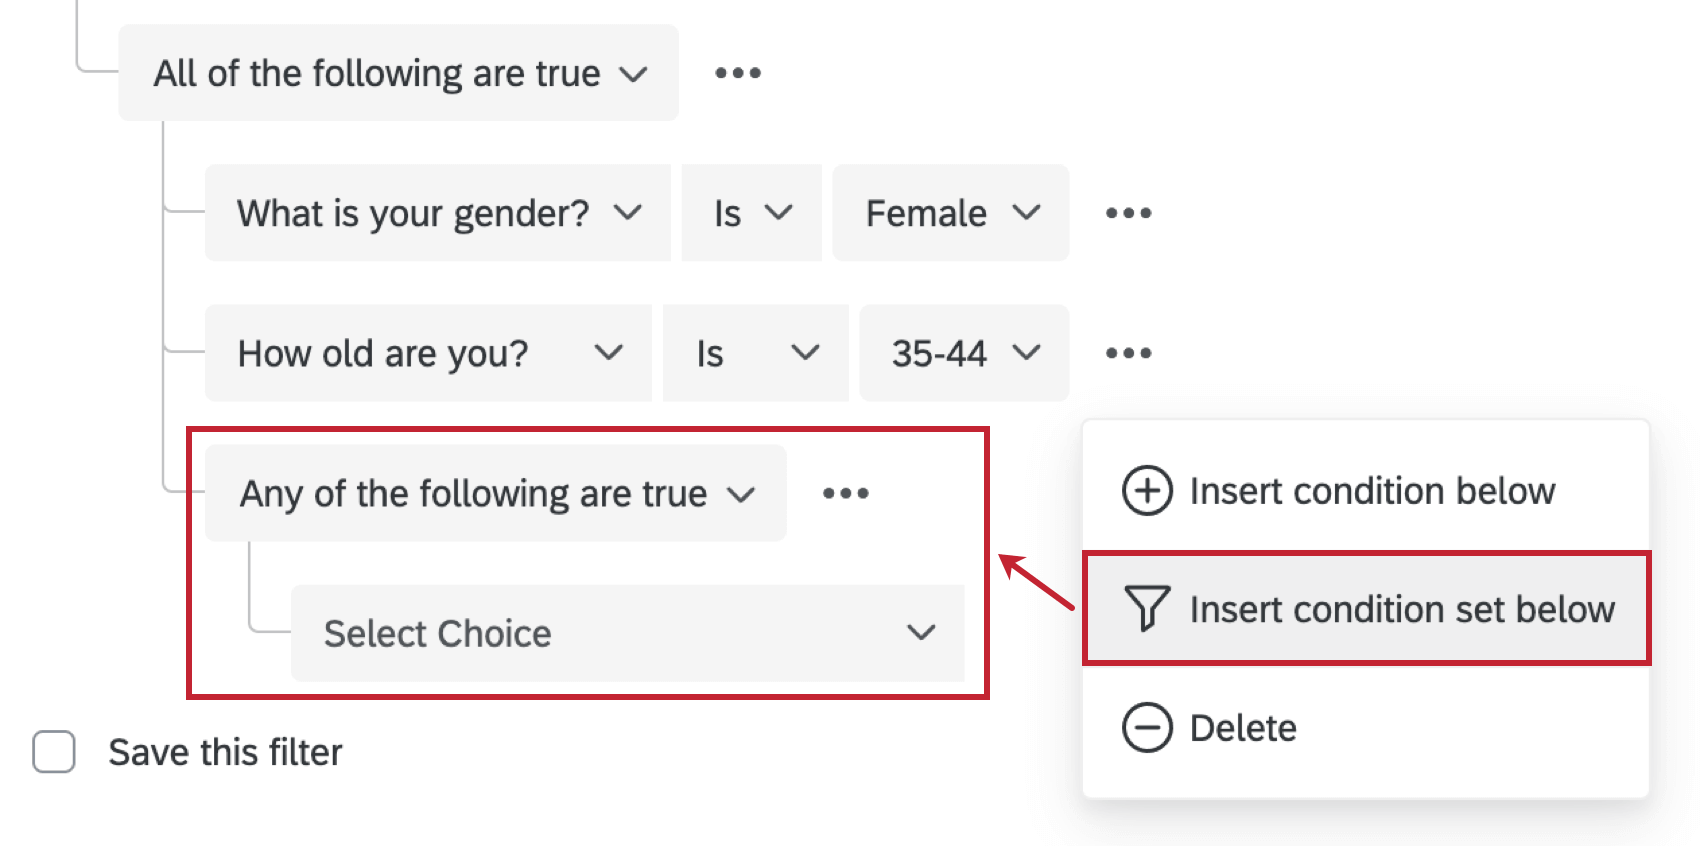
You can create new condition sets by clicking the 3 horizontal dots next to any condition and then Insert condition set below. This will add and nest a new set at the bottom of the set you’re currently in.
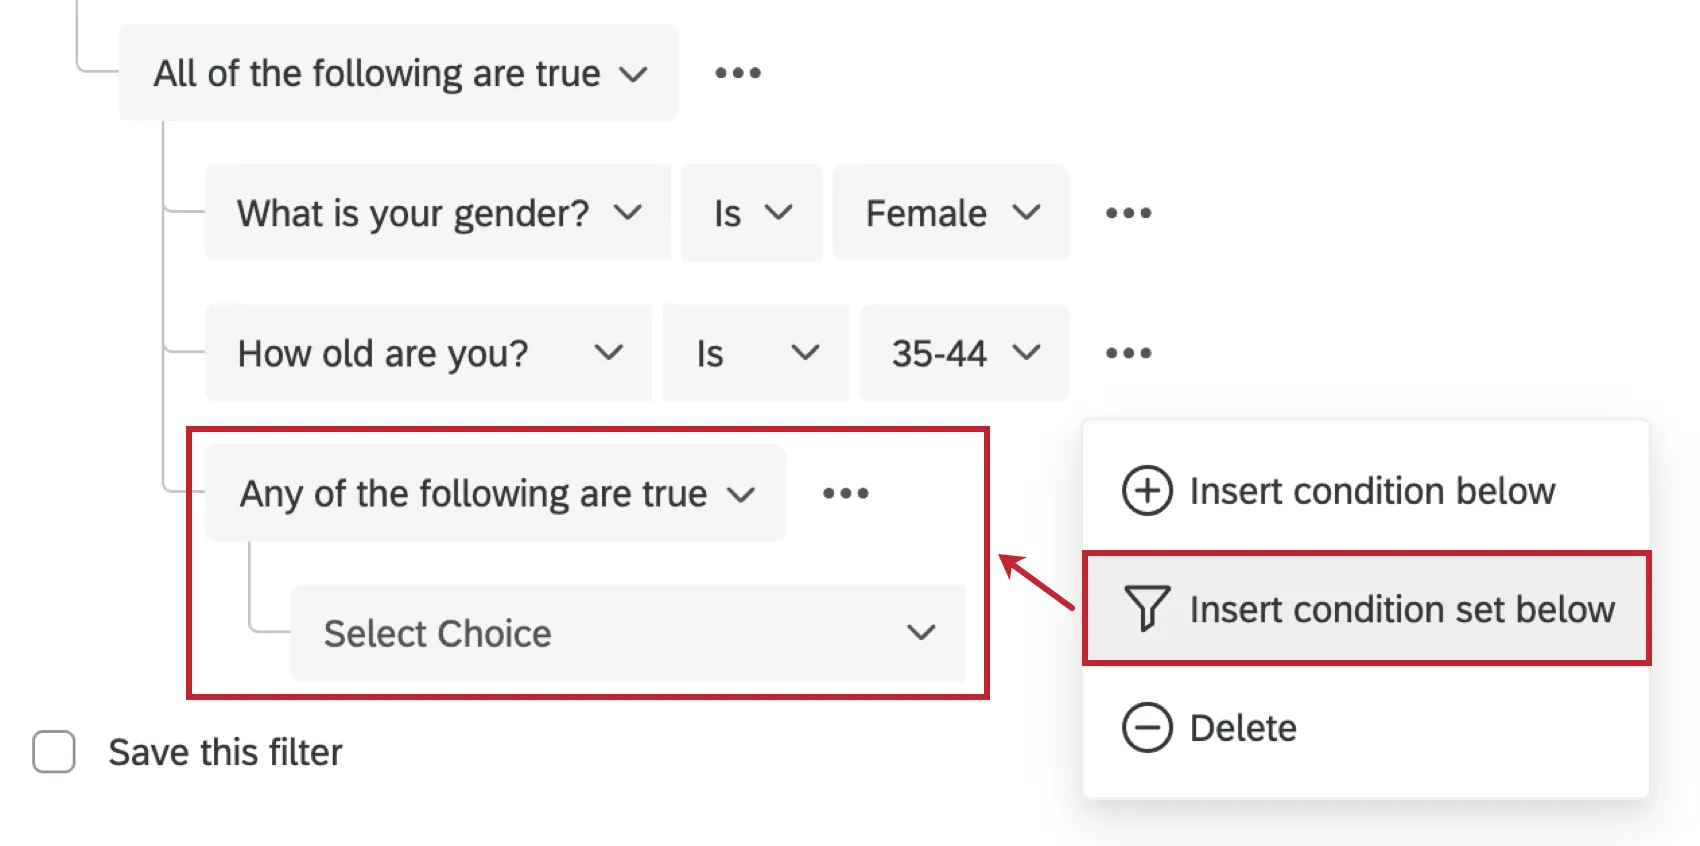
Qtip: Generally, you create a new condition set whenever you want to switch between Any and All.
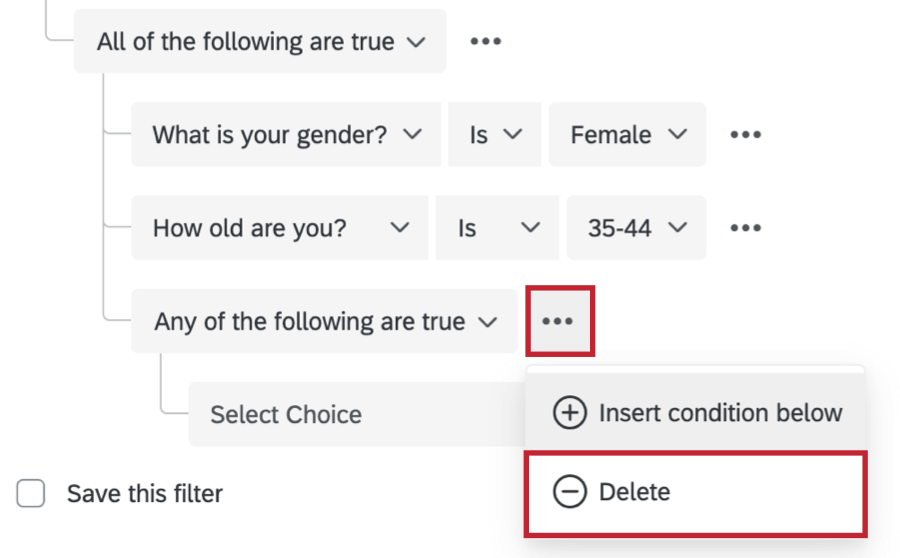
You can de-nest a set of conditions by clicking the 3 dots to the right of the set header and clicking Delete. This will delete the set.

All vs. Any
Whenever you have more than 1 condition, you need to decide how the conditions are connected to each other. Do all conditions need to be met (e.g., a response must be from a particular month and for a specific manager to be included)? Or does only 1 of the conditions need to be true (e.g., data may be included in the report if it was collected either in the Northeast or the Southeast)?
Conditions linked by an and conjunction are called All condition sets (i.e., “only show data where ALL of these conditions are true”). Conditions linked by an or conjunction are called Any condition sets (i.e., “only show data where ANY of these conditions are true”).
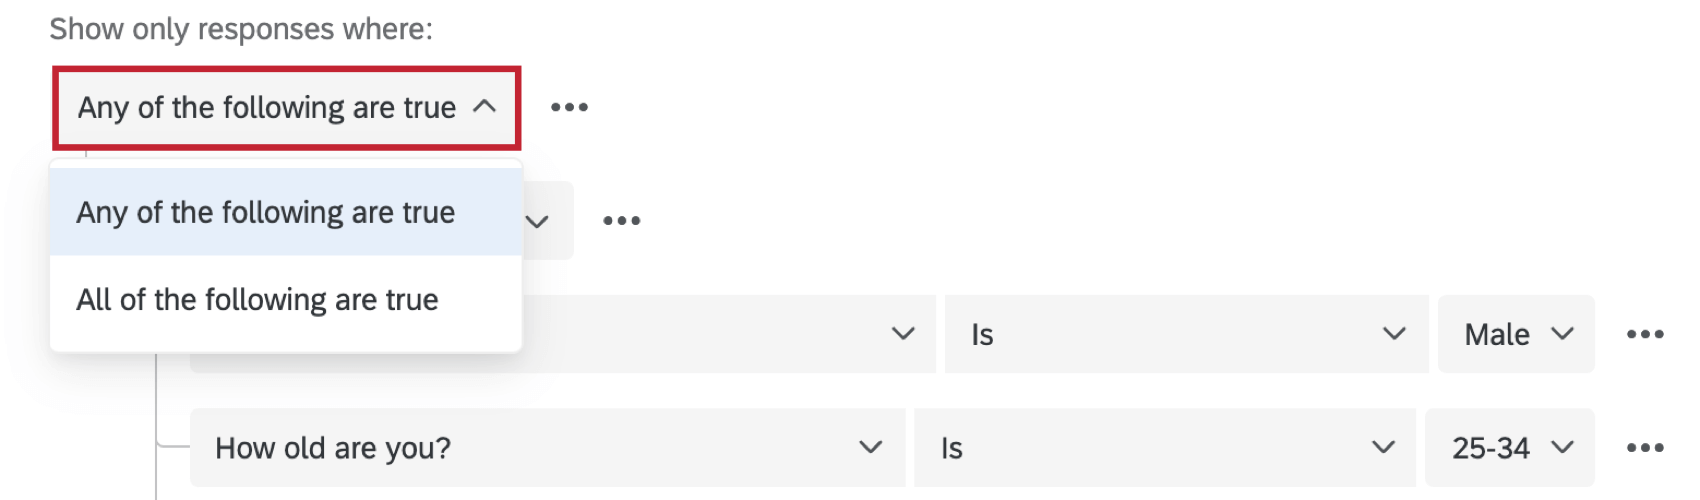
By default, your filter window links conditions in an Any set. You can change this by clicking the dropdown and selecting All.

Qtip: Be careful not to set up contradictory conditions! If you’re asking respondents a Yes or No question, no one can answer both Yes and No at the same time, so an ALL set would always yield zero respondents. But if you switch the filter to say ANY, the number of respondents will increase to those who said Yes and those who said No.
Nesting Logic
Nesting condition sets allows you to create more advanced criteria to filter your data by.
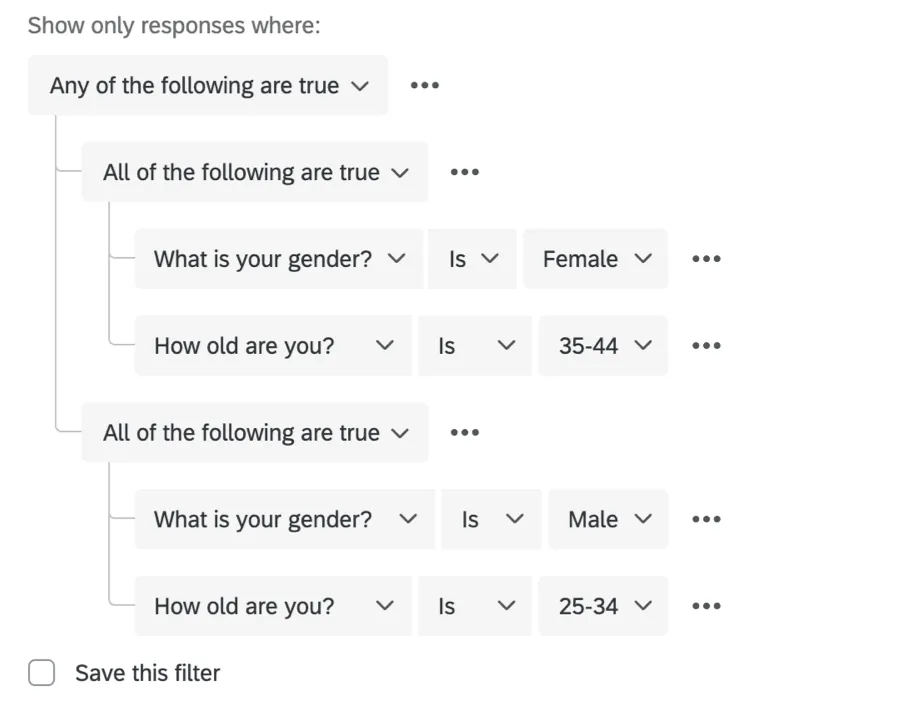
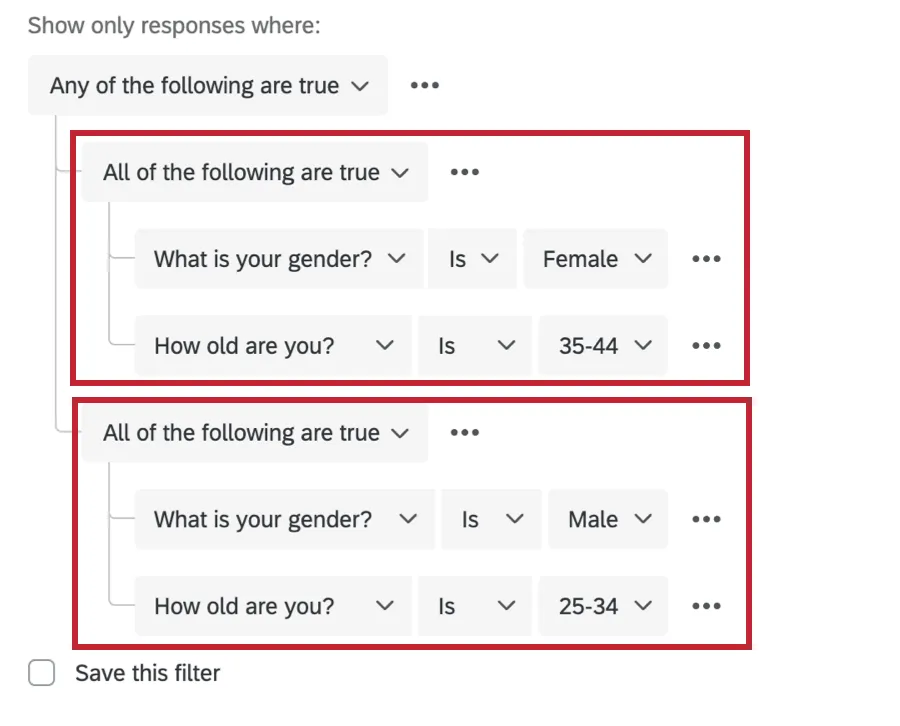
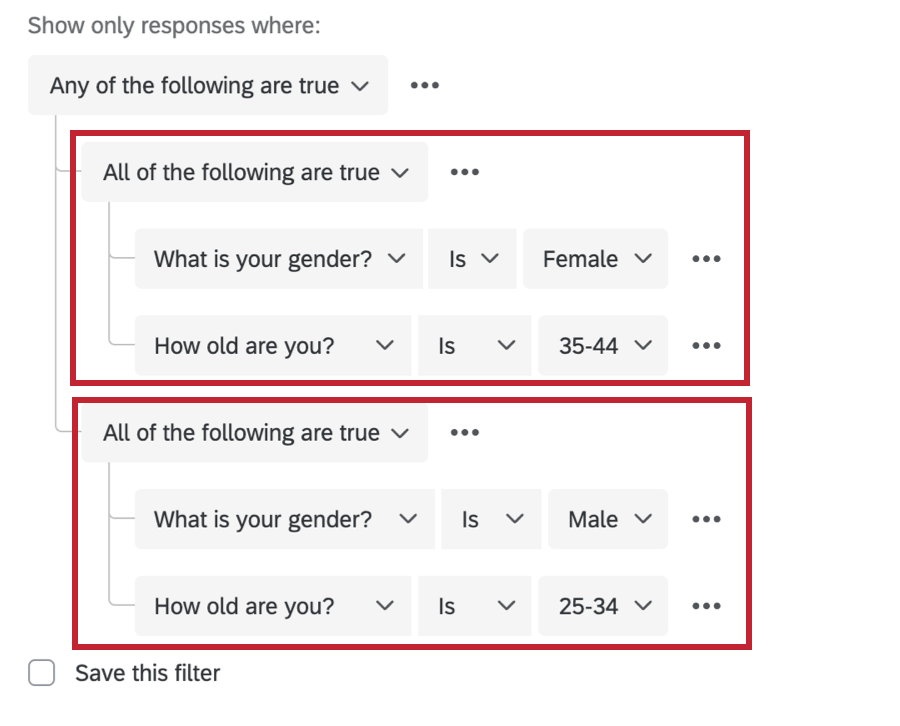
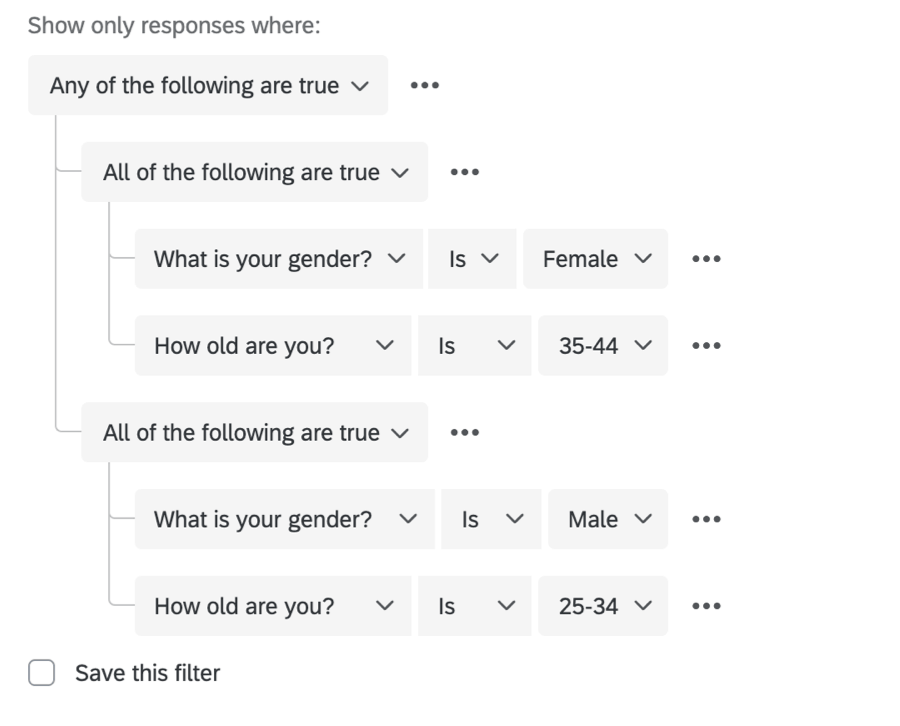
In the above example, the very outermost set is an Any set. People are either one thing or they’re another. Nested within that set are 2 All sets:
- People who are male and 25–34
- People who are female and 35–44.
This report will only include responses from people who are male and 25–34 years old or who are female and 35–44 years old.
When nesting condition sets, it is important to consider whether your outermost conditions are joined by Any or All before you start adding conditions and nesting.
Qtip: At the highest level, are you looking for responses that meet all necessary conditions (All set) or are you looking for responses that meet 1 or more possible conditions (Any set).
Basics Nesting Rules
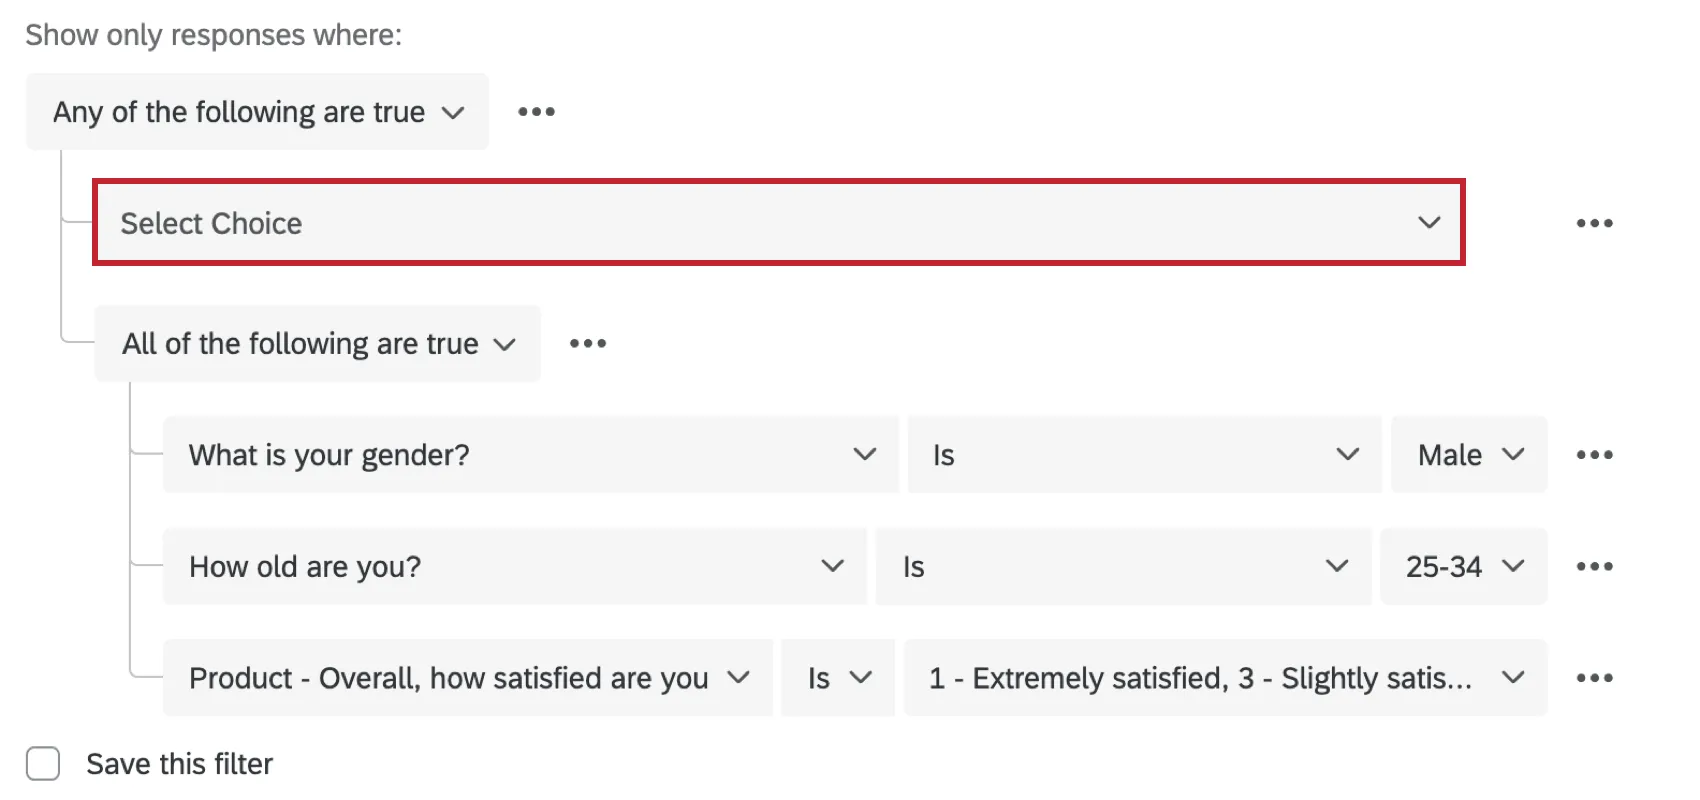
- Clicking Insert condition set below will nest a new set under the set you’re working on.
- Clicking Insert condition below will add a new condition on the same level.
- Click the 3 dots next to a condition and select Delete to delete it.
- To nest Any/All headers directly above each other, like in the examples above, delete the condition just below the header.
- You cannot add items a level above. You cannot reorder items.

List of Operators
You can collect many different types of data. For example, you can give respondents a set number of choices, or you can let them write out their thoughts. You can ask respondents to enter a number, or make them choose on a finite scale from 1 to 5. There are many ways to format your data, and as these data formats vary, the way you use them in filters also varies.
Thus, the type of operator you can use will vary based on the fields you’re filtering by. Below, we’ll list the different operators, when they appear, and how they work.
- Is empty / Is not empty: Base logic on whether or not the respondent left the question blank.
- Is Greater / Less Than / Equal To: Base logic on answers greater than, less than, or equal to a specific number. These operators not only appear with solely numeric data, like sliders, but with multiple choice questions that have been recoded.
- Equal to / Not equal to
- Greater than
- Greater than or equal to
- Less than
- Less than or equal to
Exact Matches
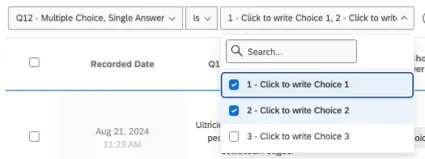
- Is / Is not: This can be used as an exact match, requiring the response to contain (or exclude) an exact phrase or word. This operator is available for open-ended text and multiple choice options. You can select multiple values. Example: Ending the condition “Department is” by selecting both Sales and Marketing will return everyone in either the department “Sales” or “Marketing.”
 Qtip: For open-ended text, you can only type exact matches. You cannot comma-separate multiple responses or search partial answers.
 - Equal to / Not equal to: Base logic on an exact number the answer is or is not equal to. For text entry, this can be used as an exact match, requiring the response to contain (or exclude) an exact phrase or word. You can only select 1 value. Example: “Ages not equal to 19” excludes all 19 year old participants, while returning everyone else.Example: “Department equal to Sales” will return everyone in the department “Sales.” However, similarly named departments that don’t match exactly, like “Tech Sales” or “Sales Management,” will not be returned.
Qtip: “Equal to” conditions only let you select one value at a time, while you can select multiple values for “is” conditions.
Contains
- Contains / Does not contain: Base logic on whether certain content is in the response. Example: If you search for “pie,” you’d get responses that had values “I want pie,” “pie,” “piepizza,” and “I want piepizza,” but you wouldn’t get a response with the value “pizzapie.”Qtip: When filtering survey responses, using the “contains” operator in a filter will only match whole words or the prefix of a word. What constitutes a “word” is determined by separators like spaces, or special characters such as @, –, , ,or /. It is not possible to search for the special characters themselves.
- Contains any: Enter multiple values the results can match. Write values comma-separated. This operator matches whole words, partial phrases, and prefixes. This operator is only available for open-ended text fields, like text entry. Qtip: When filtering survey responses, using the “contains” operator in a filter will only match whole words or the prefix of a word. What constitutes a “word” is determined by separators like spaces, or special characters such as @, –, , ,or /. It is not possible to search for the special characters themselves.Example: Search for responses that contain any “bread, pie,” and you’ll also return results with “bread pudding,” “pizza pie,” or “pie pizza.” You won’t find results for “pizzapie,” because “pie” is at the end of the word, rather than a prefix or a separate word.
Includes / Excludes
- Includes: Type multiple, comma-separated values a response can match. This operator only matches exact text, not partial text. This operator only appears in very few cases, such as when you have an embedded data set to “Text” format. (This is the default embedded data format.) Example: If you filter for “includes pizza, bread pudding,” results can only contain “pizza” or “bread pudding.” Responses like “pizzapie,” “I love pizza,” and “pudding” will not be included.
- Includes any: Select multiple values the results can match. This operator is only available for fields that allow multiple values, such as a multi-answer multiple choice. Example: Meal options include “pizza,” “chicken,” and “bread pudding.” You can filter “includes any pizza, bread pudding,” and you’d see all results with either pizza or bread pudding selected.
- Excludes all: Select multiple values the results should not This operator is only available for fields that allow multiple values, such as a multi-answer multiple choice. Example: Meal options include “pizza,” “chicken,” and “bread pudding.” You can filter “excludes all pizza, bread pudding,” and you’ll only see results where neither pizza or bread pudding are selected.
Date operators
Date fields, like survey response dates and custom date fields made manually, have different operators that allow you to filter for specific dates and timeframes.
You can select from a series of premade, relative timeframes, such as:
- Today
- Yesterday
- Last 14 days
- Last 30 days
- Last 60 days
- Last 120 days
- Last 365 days
- This month
You can also set a custom timeframe. For example, maybe there’s a specific date you’re interested in. These operators include:
- Before
- Between
- After
Other Operators
- Is In List: Enter a comma-separated list of values. This operator will return “True” if there is an exact match with one of the values in the list.
Filtering Responses in Different Project Types
Depending on your license, you might have access to a few different types of projects. The steps and options described on this page apply to the following project types:
There are a few other types of projects where you can filter response data. However, there are important differences to keep in mind:
- For 360 projects, see Managing Response Data (360).
- For all other Employee Experience projects, see Managing Response Data (EX).
Qtip: While other areas of the platform, like reports and directories, may also allow you to filter data, this support page is solely focused on how to filter survey response data in Data & Analysis. For steps on filtering across the XM platform, try narrowing your support site search.
FAQs
What responses actually count toward my license?
What responses actually count toward my license?
Licensed responses are any completed responses that are not Survey Previews or Survey Tests. Completed responses can include imported responses, finished surveys, and partial surveys that were moved out of responses in progress and recorded. If you ever want to know the exact number of interactions you’ve used, reach out to your Brand Admin. You can also view your response usage by going to Account Settings to view the legacy Account Usage report.
Contact Account Services or your Account Executive prior to importing historical responses, as this may require an update to your license.
I have a lot of questions in my survey and I would rather not export data for the entire survey. Is there a quick way I can see the entire response for an individual?
I have a lot of questions in my survey and I would rather not export data for the entire survey. Is there a quick way I can see the entire response for an individual?
I only see a couple columns of information displayed in the Data & Analysis tab. Can I choose different columns of data?
I only see a couple columns of information displayed in the Data & Analysis tab. Can I choose different columns of data?
How do I delete responses I do not want?
How do I delete responses I do not want?
For more information regarding deleting responses, see Deleting Responses.
That's great! Thank you for your feedback!
Thank you for your feedback!