Creating an Anonymized Raffle
About Creating an Anonymized Raffle
We often want to reward our respondents for helping us with our research. But most researchers also need to keep their data anonymous, so they can stay unbiased in their data analysis. Anonymizing data can also help keep us unbiased if we can only choose a few winners.
To create an anonymized raffle, you will need two surveys:
- Survey One: Your main study. Totally anonymous. Asks consent before sending respondents to the raffle.
- Survey Two: Raffle sign-up form.
Survey One: Main Study
This is the main survey you are sending out to your respondents, which contains your primary study or feedback form.
Anonymizing Data
You can ensure your data collection is anonymous by distributing the survey through the anonymous link. If you are emailing the survey through Qualtrics, you can make sure your link type is anonymous.
However, the anonymous link still collects IP Address data. Select Anonymize responses under Security survey options to remove all personal data, including IP address.
Linking to the Raffle
You want to set the main study up so that once respondents get to the end, they can enter the raffle or opt out and get a standard thank you message.
- At the end of your main study survey, add a multiple choice question asking if the respondent would like to enter a raffle.
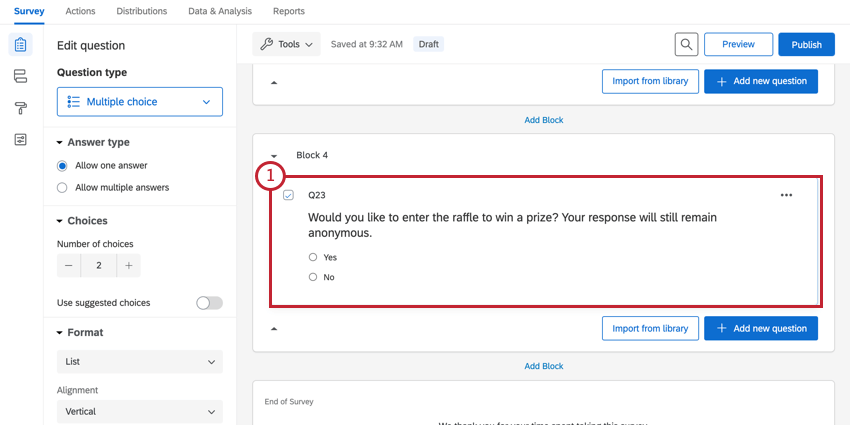
- Create your second survey, which will house the raffle.
- Go to your second survey’s Distributions tab.
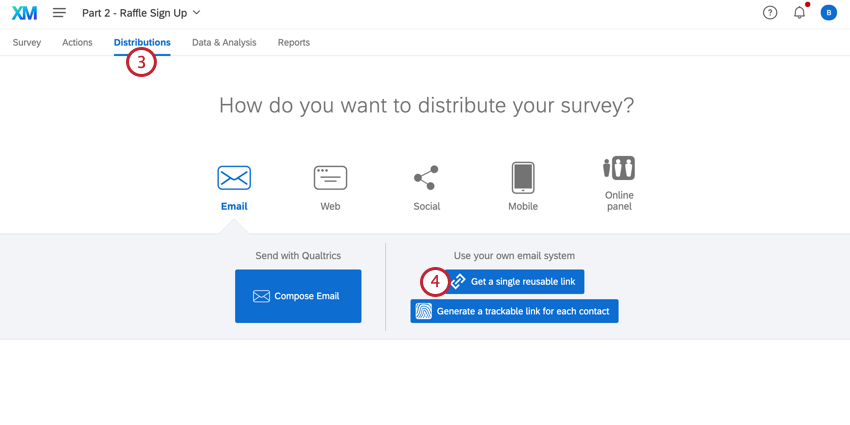
- Select Get a single reusable link.
- Copy the link.
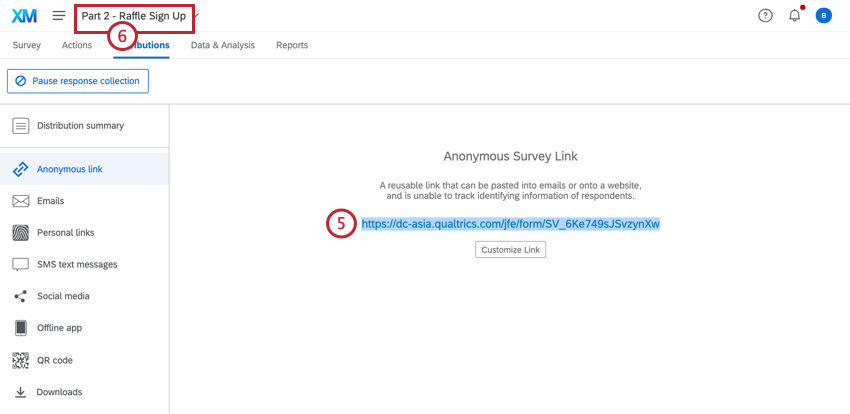
- Go back to your first survey using the dropdown in the navigation bar. Your first survey is the main survey where you will conduct your study.
- Navigate to Survey flow.
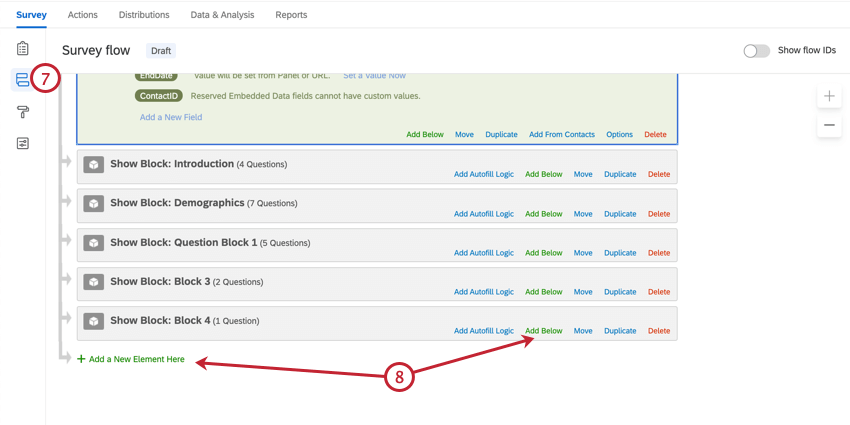
- Click Add a New Element Here or Add Below.
- Select Branch.
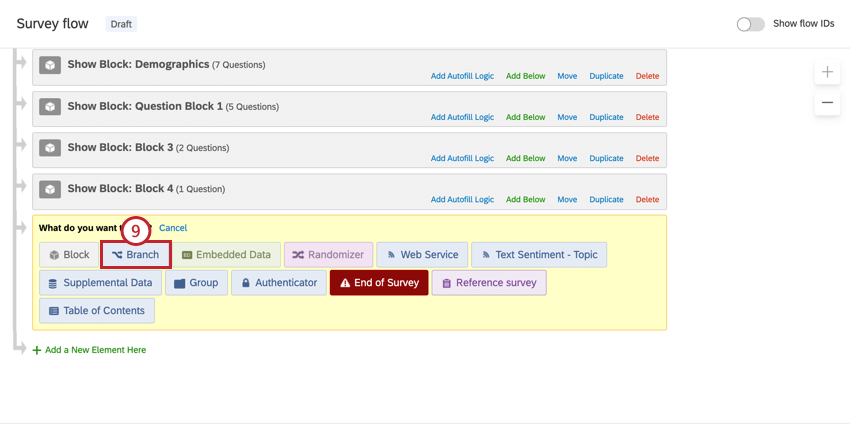
- Click Add a condition.
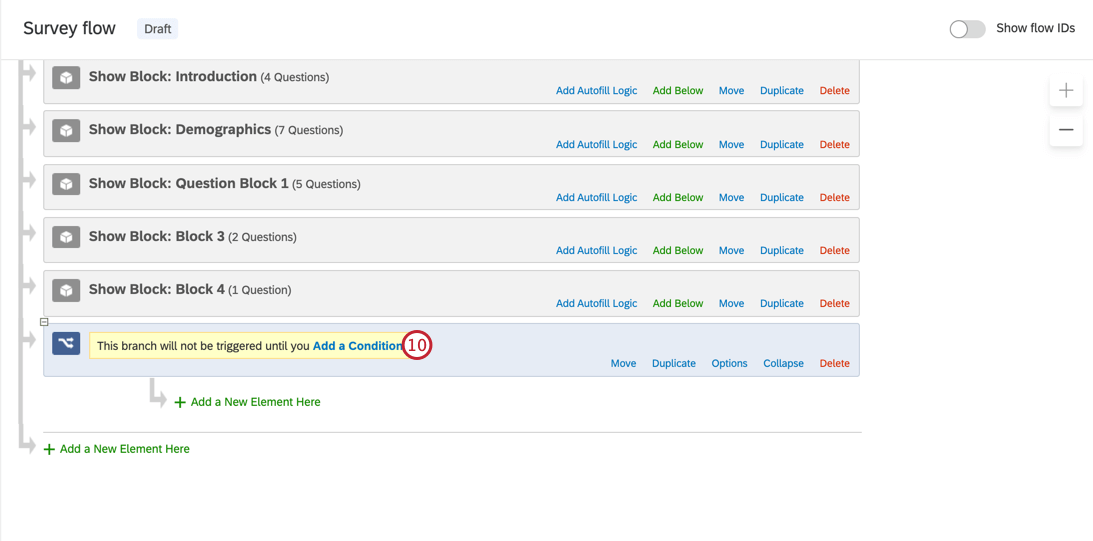
- Select Question in the first field.
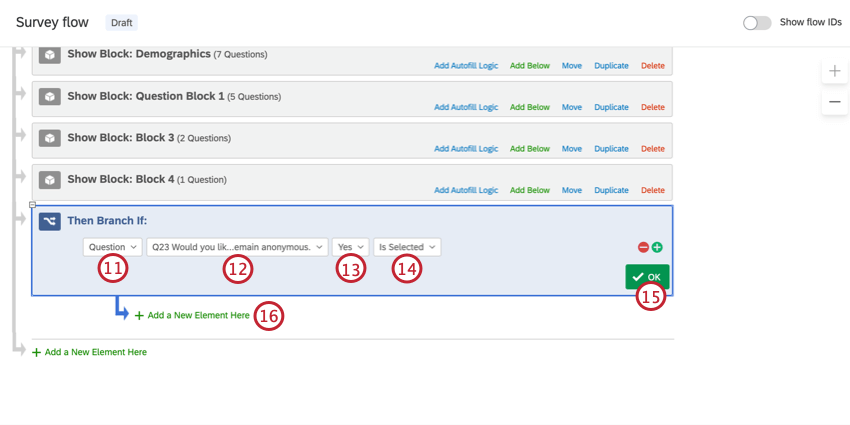
- Select the question you created in Step 1.
- Select Yes, or whatever you have named your choice that indicates consent.
- Select Is Selected.
- Click OK.
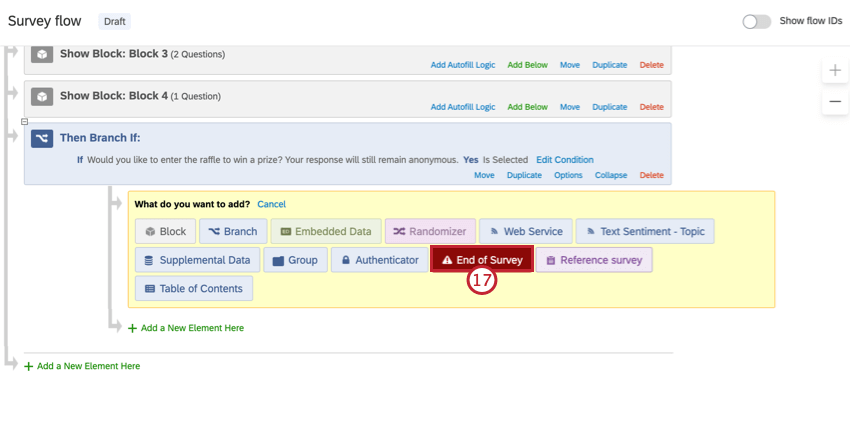
- Click the Add a New Element Here that is indented under the branch.
Qtip: If you do not add a new element in the correct place, this set up will not work!
- Select End of Survey.
- Click Customize.
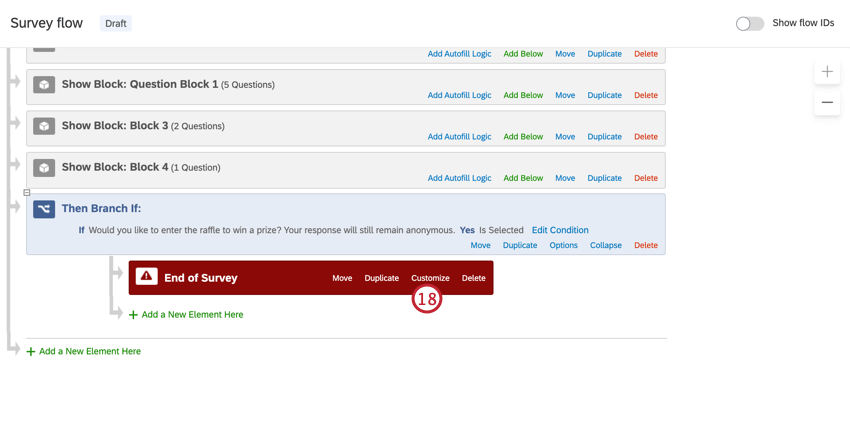
- Select Override Survey Options.
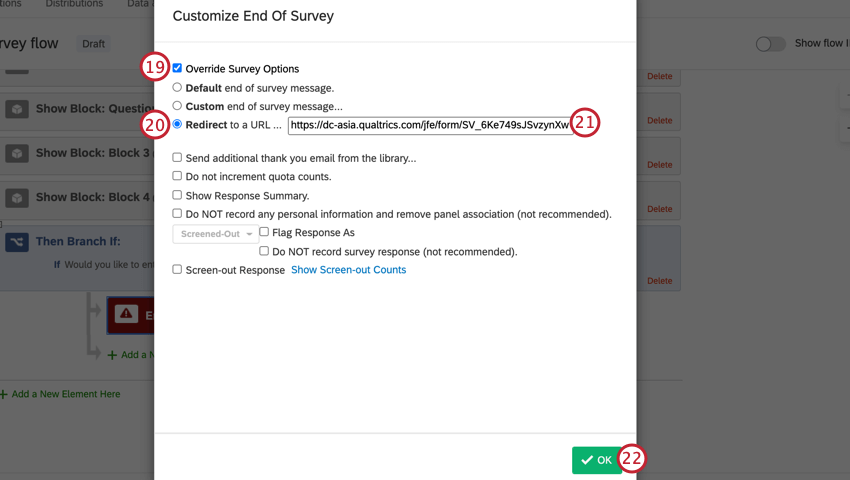
- Select Redirect to a URL.
Qtip: This feature is not available for free accounts.
- Paste the anonymous link you copied from the second survey into the field.
- Click OK.
- Click Add a New Element Here at the bottom of your survey flow.
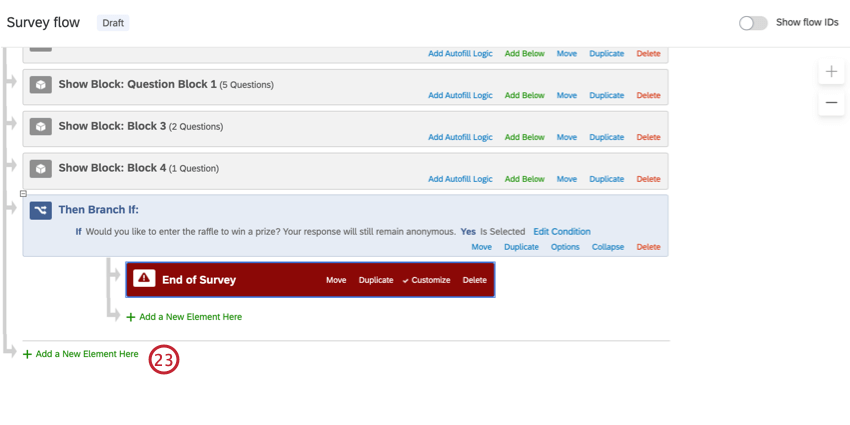 Qtip: Make sure you are adding the new branch at the end of the survey flow, and not indenting it under the first branch!
 - Select Branch.
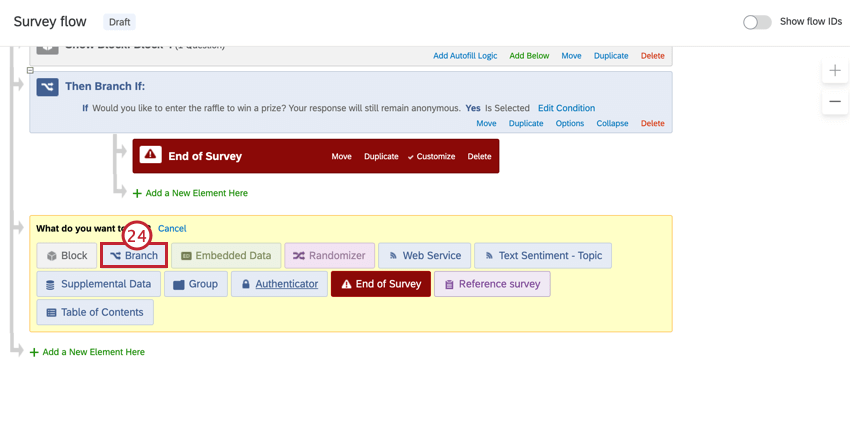
- Add a condition to your branch based on the question you created in Step 1.
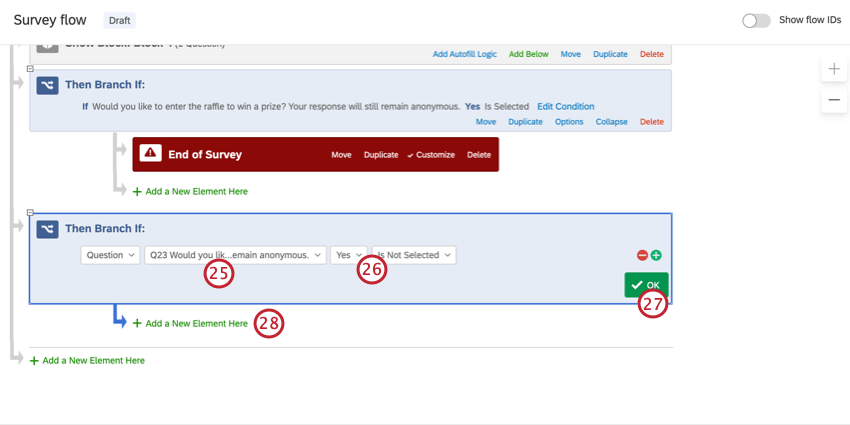
- Set as Yes Is Not Selected.
Qtip: Saying “Yes” “is not selected” specifies that if someone doesn’t answer the question, they will also get the non-raffle ending.
- Click OK.
- Indented under the branch, click Add a New Element Here.
- Select End of Survey. You can customize this element however you like.
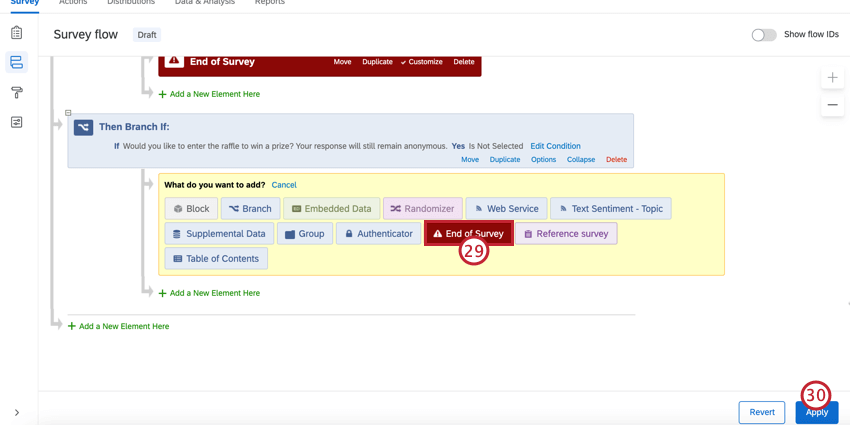
- When finished, click Apply.
Survey Two: Manual Raffle
- Go to your first survey, where the main study is.
- Click the Distributions tab.
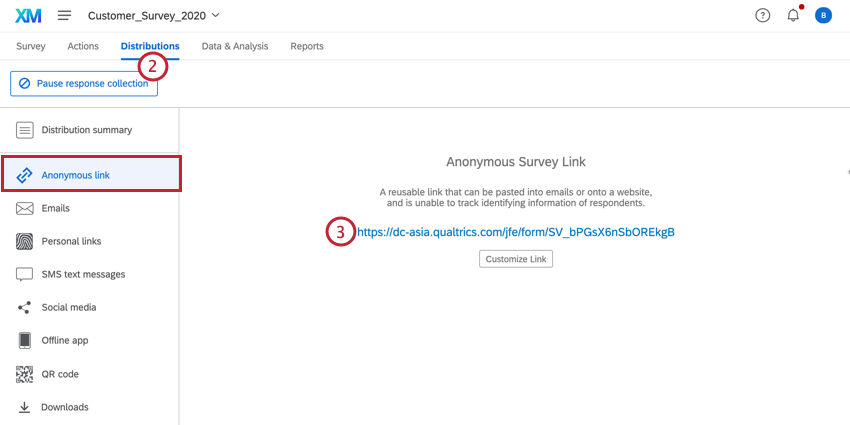
- Copy the anonymous link.
- Go to your second survey using the navigation menu.
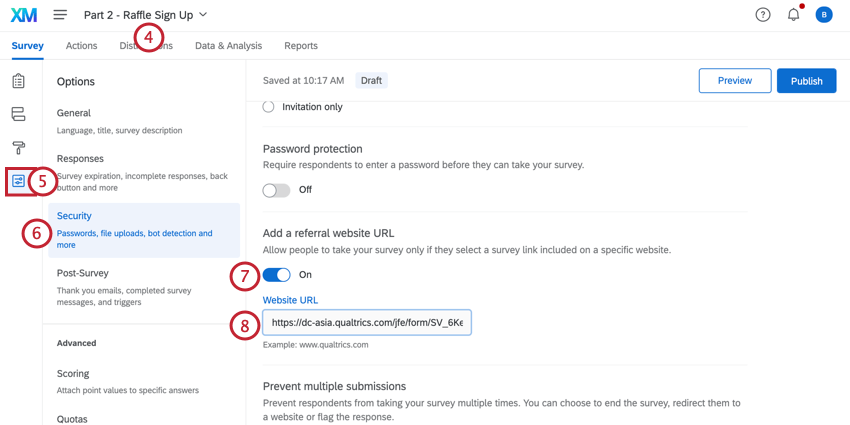
- In the Survey tab, click Survey options.
- Go to Security.
- Set Add a referral website URL to On.
Qtip: This step ensures your raffle contestants can’t give the survey link to just anyone! Only people who came from your previous survey can come here. However, please be aware that software is available for spoofing HTTP referers. To improve your survey’s security, you should combine this feature with other fraud detection measures.
- Paste the anonymous link you copied in Step 3 into the field.
- Navigate to the survey builder.
- Click Add new question.
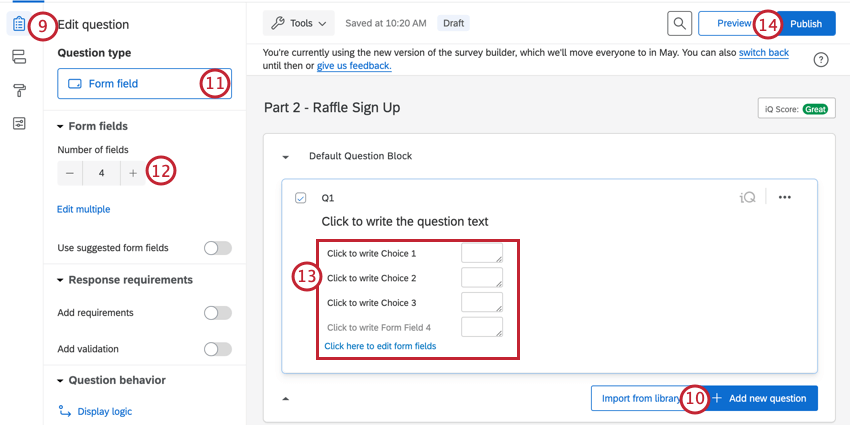
- Change the question type to Form field.
- Adjust the number of form fields.
- Name your form fields and change the question text to capture your respondent’s contact information. Make sure you have an email field.
Qtip: You can add an additional question if you want! These steps just go over the essentials.
- Click Publish in the upper-right of your survey to save these changes.
Qtip: If you do not have a Publish button, disregard this step.
- Once you’ve collected your data, you can download a list of the participants by exporting the data.
Once you have your list of raffle winners, you will have to randomly select a winner and reach out to them with the incentive yourself.
Survey Two: Raffle Automated by Qualtrics
In this version, Qualtrics will automate the rewarding of a raffle for you.
- Go to your first survey, where the main study is.
- Click the Distributions tab.

- Copy the Anonymous Link.
- Go to your second survey.

- In the Survey tab, click Survey options.
- Go to Security.
- Set the Add a referral website URL option to On.
Qtip: This step ensures your raffle contestants can’t give the survey link to just anyone! Only people who came from your previous survey can come here. However, please be aware that software is available for spoofing HTTP referers. To improve your survey’s security, you should combine this feature with other fraud detection measures.
- Paste the anonymous link you copied in Step 3 into the field.
- Navigate to the survey builder.
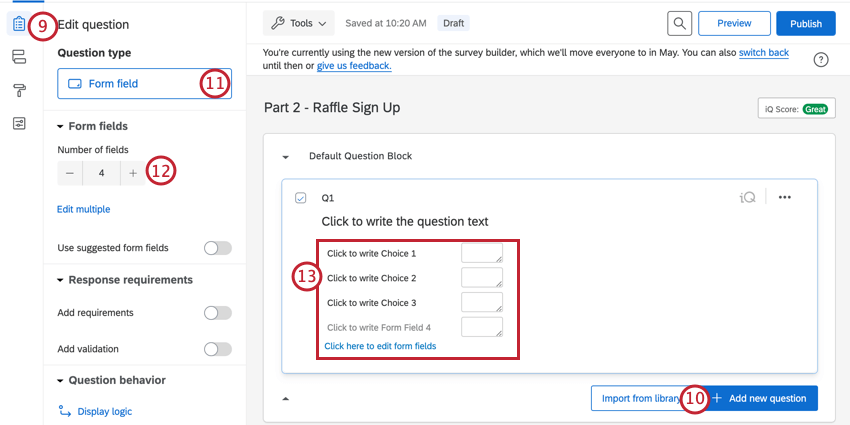
- Click Add new question.
- Change the question type to Form field.
- Adjust the number of form fields.
- Name your form fields and change the question text to capture your respondent’s contact information. Make sure you have an email field.
Qtip: You can add an additional question if you want! These steps just go over the essentials.
- Go to Survey options.
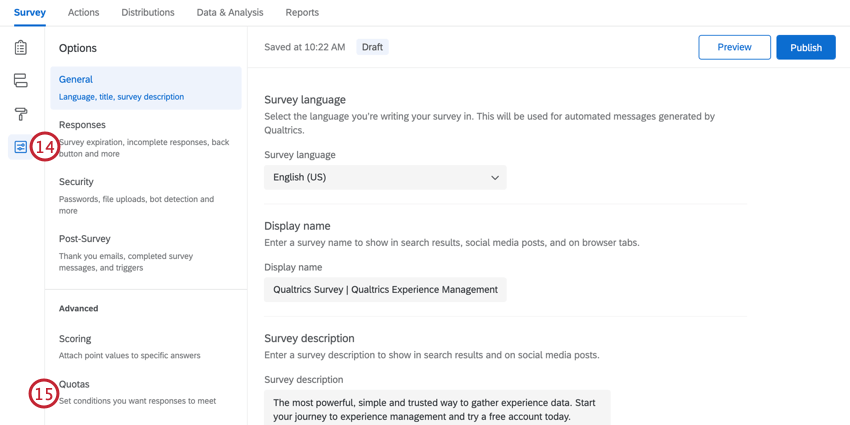
- Select Quotas.
- Click Add Quota.
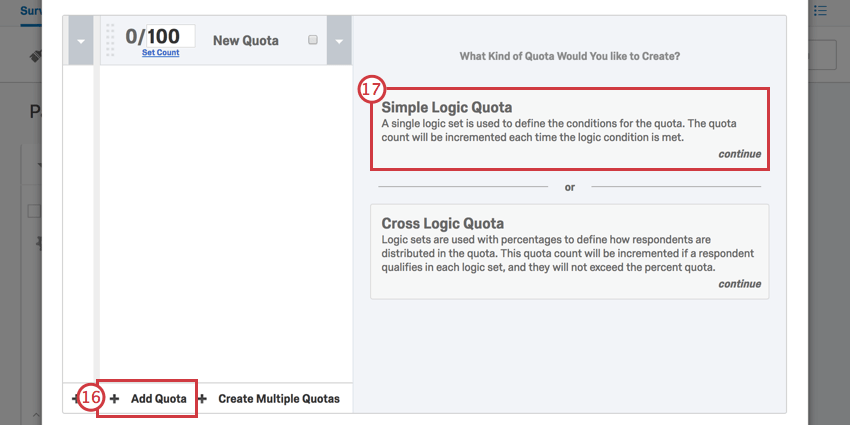
- If given the choice, select Simple Logic Quota.
- Change the first field to Embedded Data.
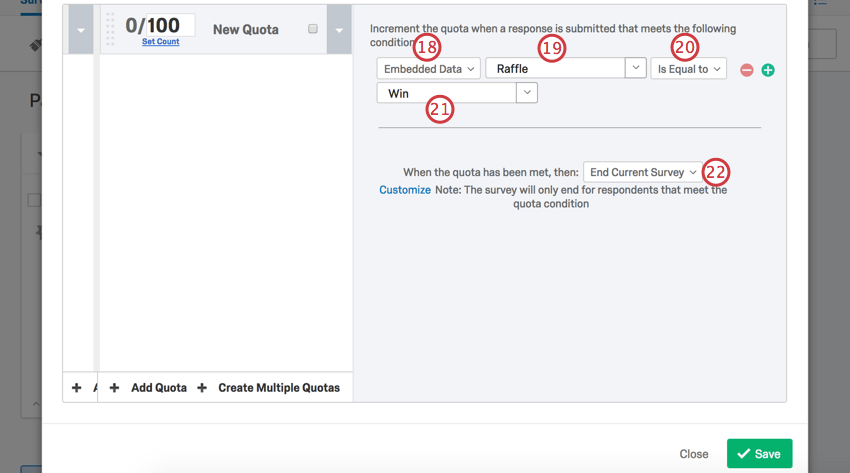
- Type Raffle.
- Select Is Equal to
- Type Win.
- From the dropdown, select None.
- Change the maximum count to 1.
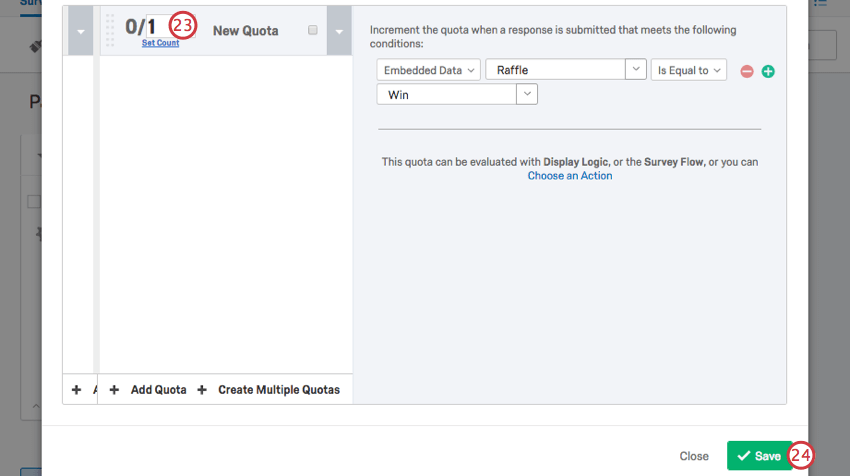 Qtip: This specifies that there can be only one winner of the raffle.
 - Click Save.
- Go to the Survey flow.
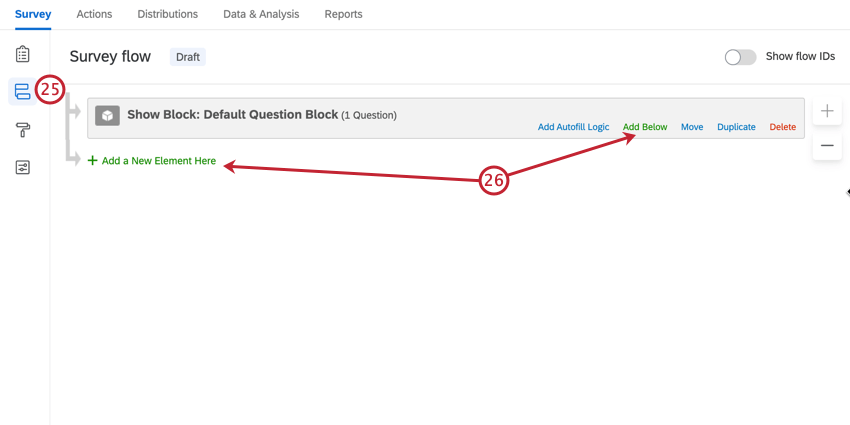
- Click Add a New Element Here or Add Below.
- Select Randomizer.
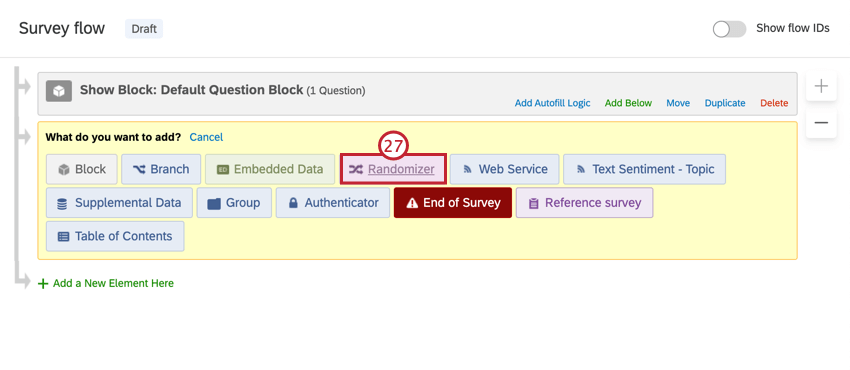
- Click Add a New Element Here below the randomizer.
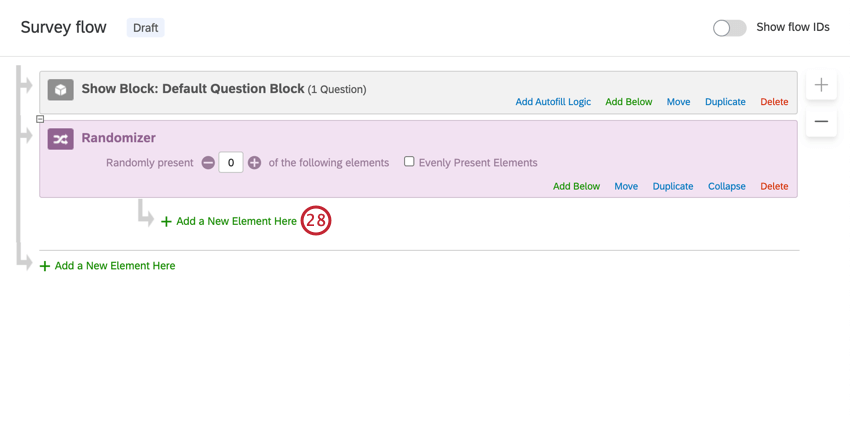 Qtip: Make sure this element is indented under the randomizer!
 - Select Embedded Data.
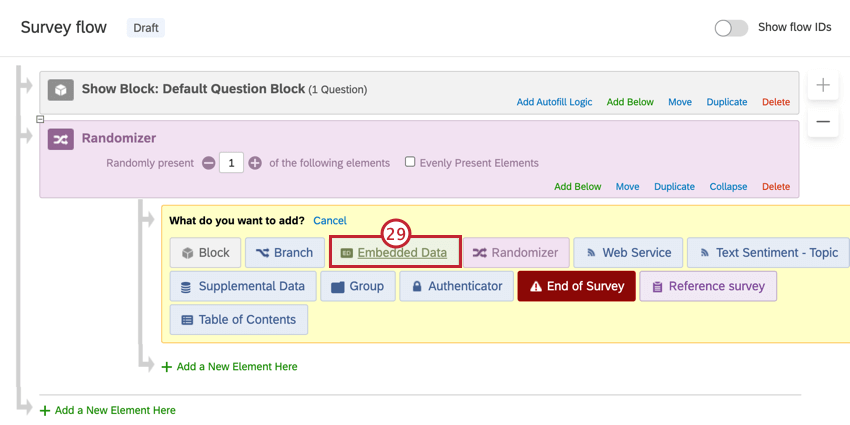
- Name the embedded data element Raffle.
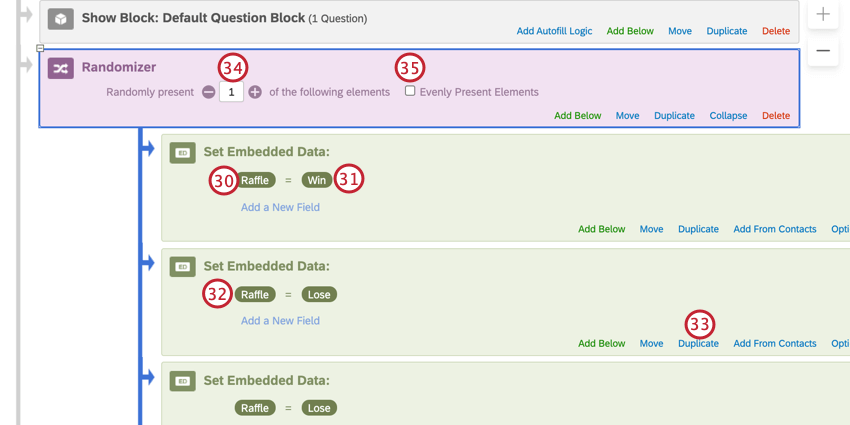
- Set the value as Win.
- Add another embedded data element. Name this one Raffle, too, but make sure it is equal to Lose instead.
- Click Duplicate on the embedded data to decrease the chances any one person coming into the survey will win.
Qtip: For example, if you have 10 embedded data total (including both win and lose), this is a 10% chance each new respondent who enters the survey will win. (Until someone wins. Changes we make in the following steps will ensure that once the prize is won, no one else can get it.) In contrast, if you have just one Win and one Lose, this increases the chance of winning to 50% for every new respondent.
- Change the Randomly Present number to 1.
- Select Evenly Present Elements.
Qtip: This will still randomize the order of elements.
- At the bottom of the survey flow, click Add a New Element Here.
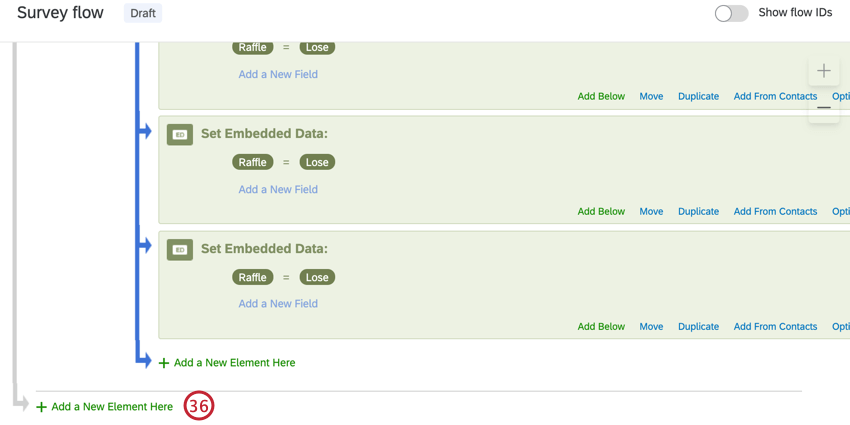 Qtip: Make sure this is not indented under the randomizer!
 - Select Branch.
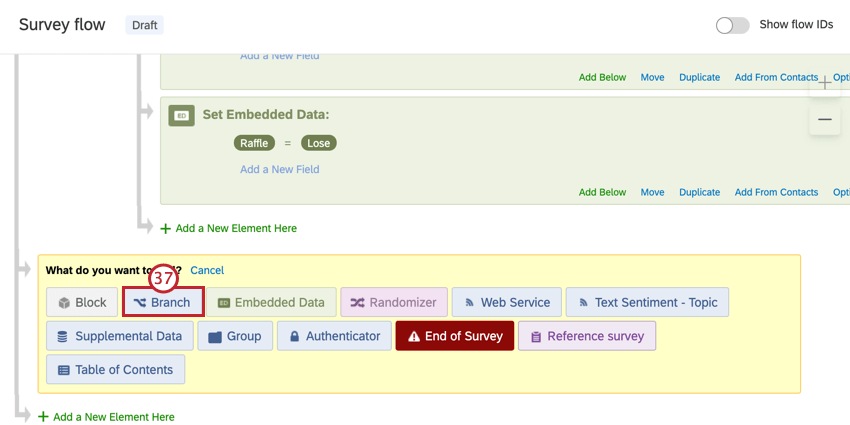
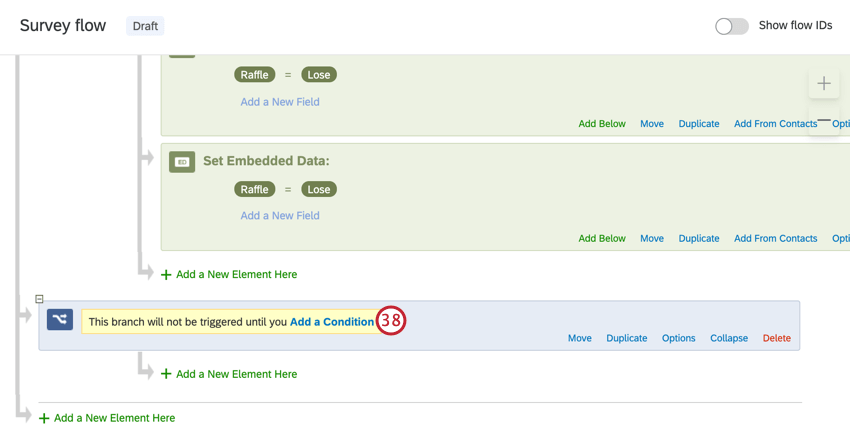
- Click Add a Condition.
- Set the first field to Quota.
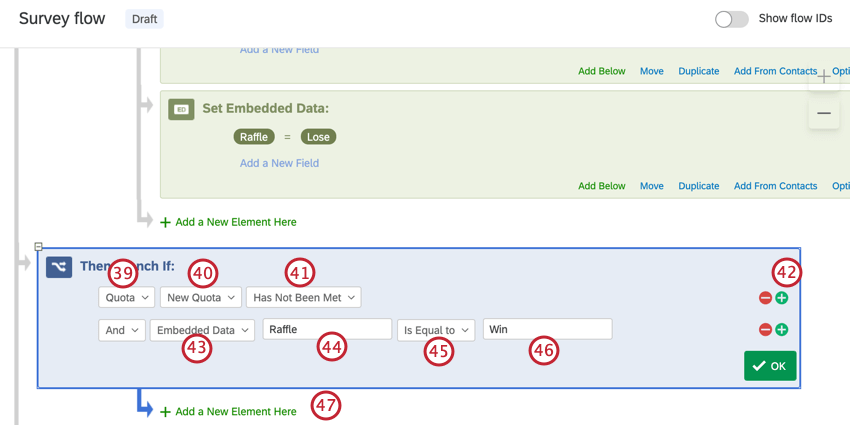
- Select the quota you made earlier.
- Select Has Not Been Met.
- Click the plus sign ( + ) to add another condition.
Qtip: Do NOT change the “And” field.
- Change the first field of the new condition to Embedded Data.
- Type Raffle.
- Select Is Equal to.
- Type Win.
- Click Add a New Element Here underneath the branch.
- Add an embedded data element. Name it Tango and set it equal to True.
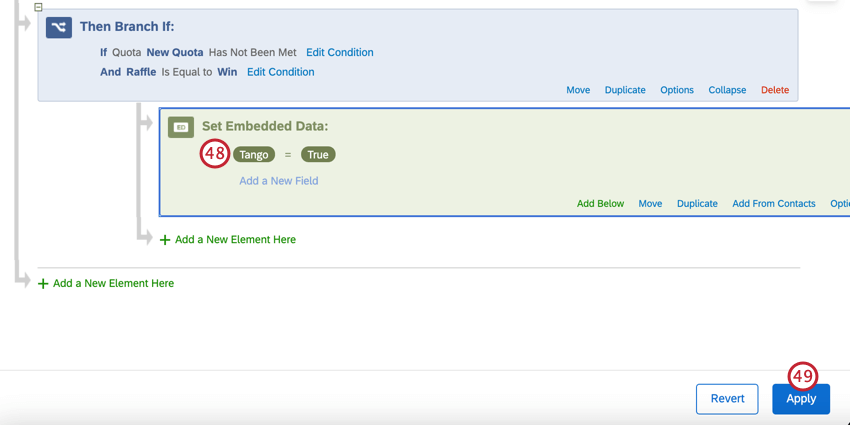
- Click Apply.
- Go to the Workflows tab.
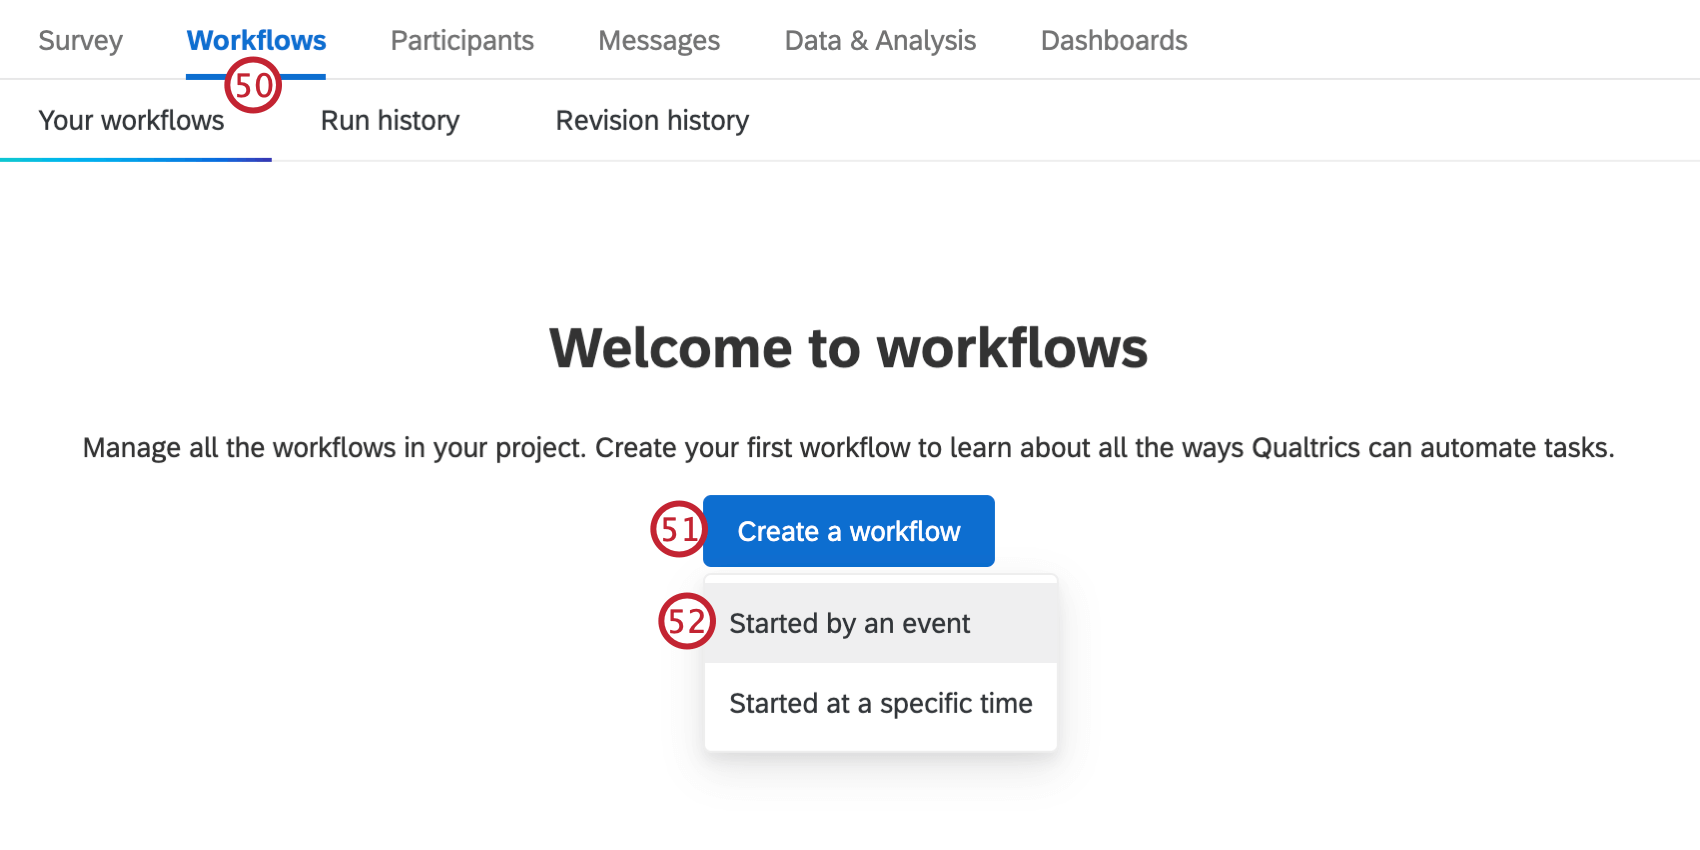
- Click Create a workflow.
- Select Started by an event.
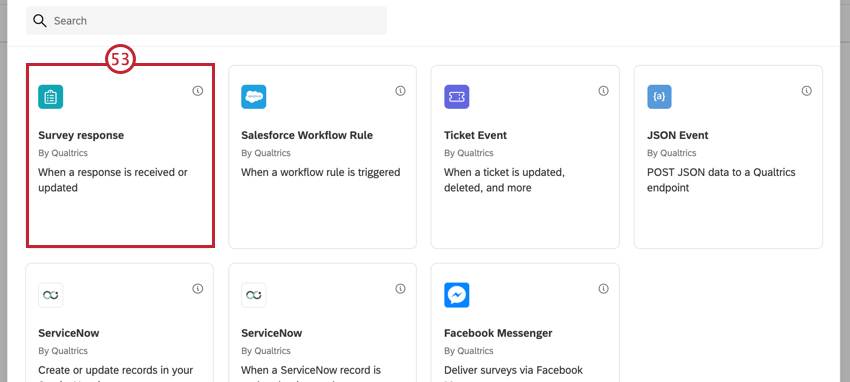
- Select the Survey response event. More information about this event can be found on this support page.
- Select Newly created responses.
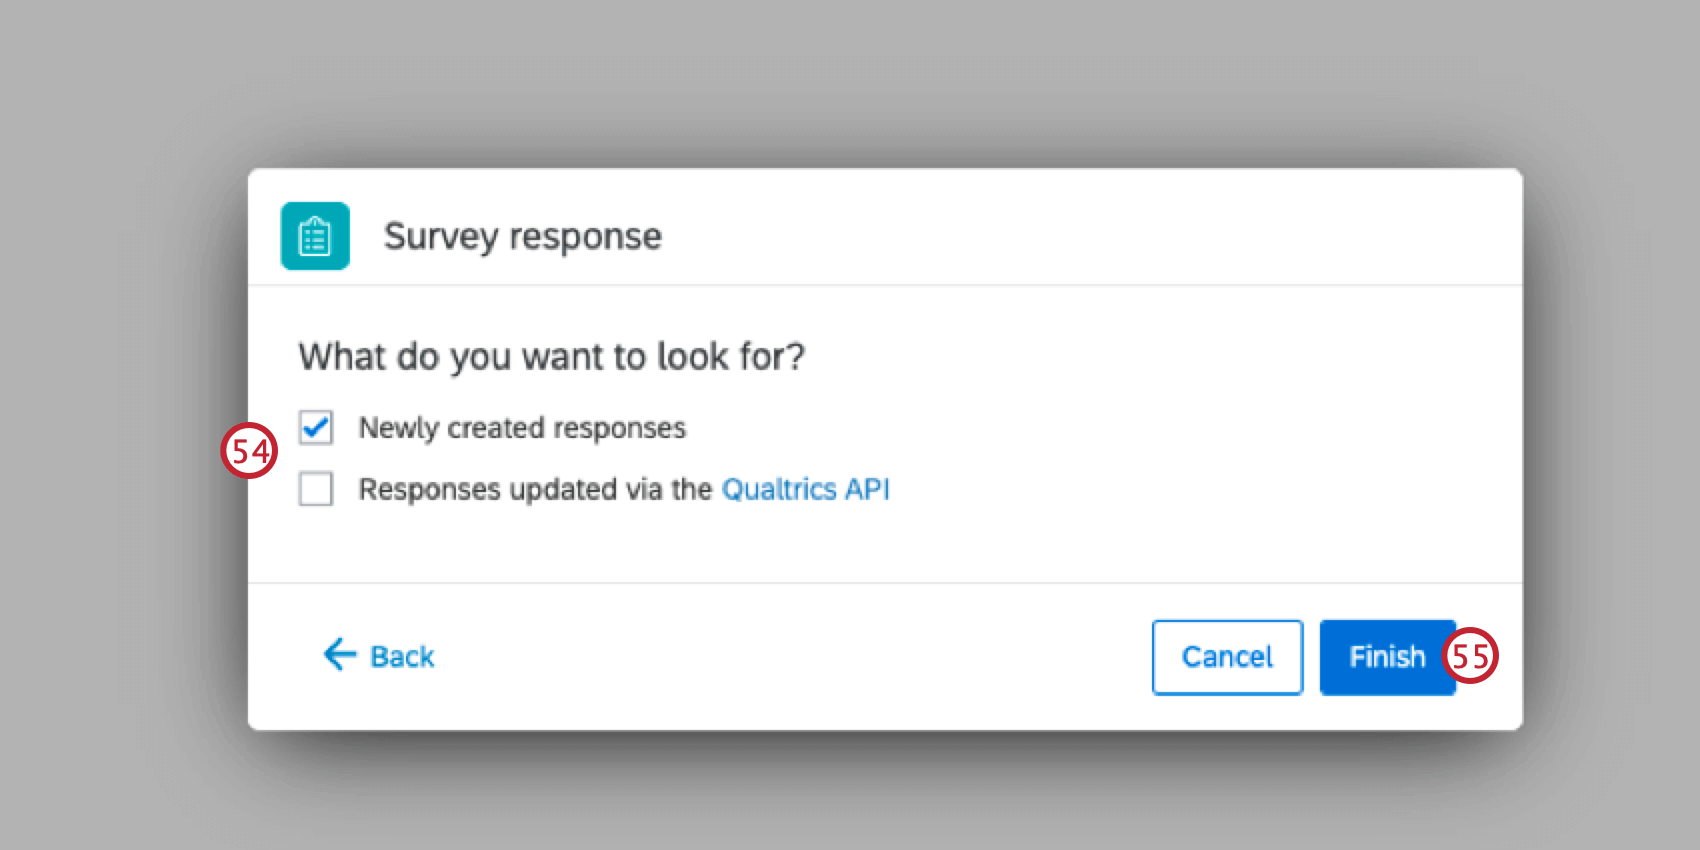
- Click Finish.
- Click the plus sign (+) and then Conditions.

- Select Embedded Data.
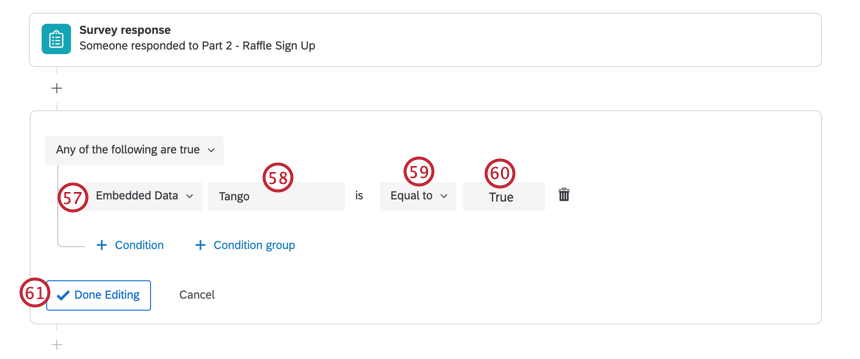
- Name the field Tango.
- Select Equal to.
- Type True as the value.
- Click Done Editing.
- Click the plus sign (+) and then Task.
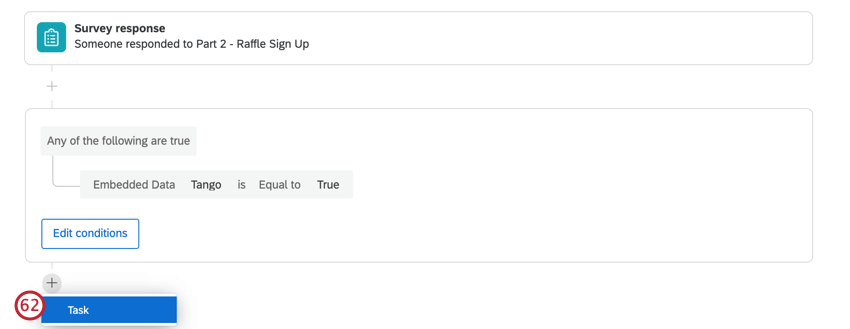
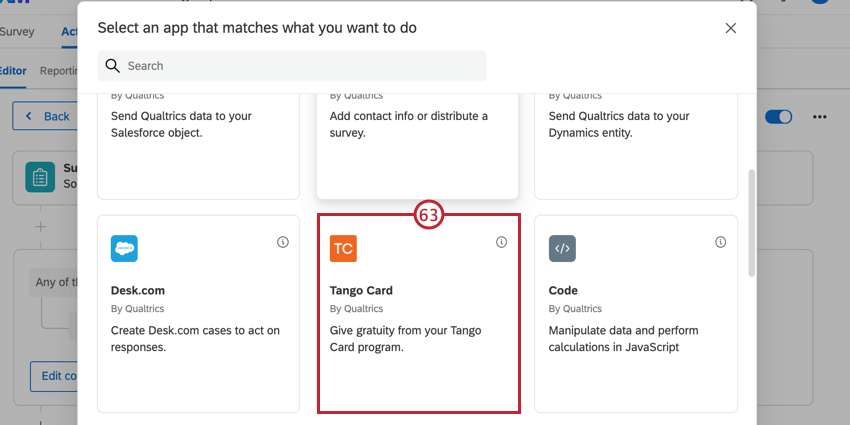
- Choose Tango Card.
- Select Respondent emails will be captured via a survey question.
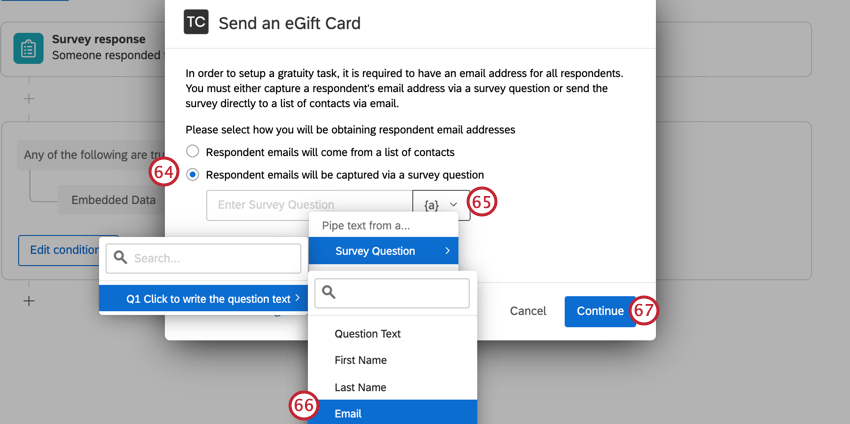
- Click the piped text button, {a}.
- Select Survey Question, then the form field you made above, and then select the Email field.
Qtip: This ensures the email address a respondent enters is the same one that will receive the Tango incentive!
- Click Continue and finish setting up the Tango Card task by following the linked instructions.
- Back in the Survey tab, click Publish to preserve your changes.
If you test this survey, test in a copy. Otherwise, you will have to make changes to your Randomizer counts and your Quota counts.