
Vaccination Status Manager
What's on this page
About the Vaccination Status Manager
The Vaccination Status Manager makes it easy for your employees to upload their vaccination status and documentation. This solution includes an employee roster with real-time, comprehensive updates to each employee’s status.
The Vaccination Status Manager is made up of the following projects, all pulled together under one program:
- Vaccination Attestation Project: A survey where participants state their vaccination status (e.g., fully vaccinated, partially vaccinated, not vaccinated) and provide details regarding their vaccinations.
- Employee Status Project: Contains your full employee roster with the current status of all employees, including those that may not have responded yet.
- Vaccination Status Dashboard: Allows for aggregate reporting on vaccination status, plus the ability to share role-based dashboards with relevant leaders in your organization.
Attention: For maximum success, this project should be created by a user who is a Brand Administrator. This user will have access to all employee data collected by this program.
Creating a Vaccination Status Manager
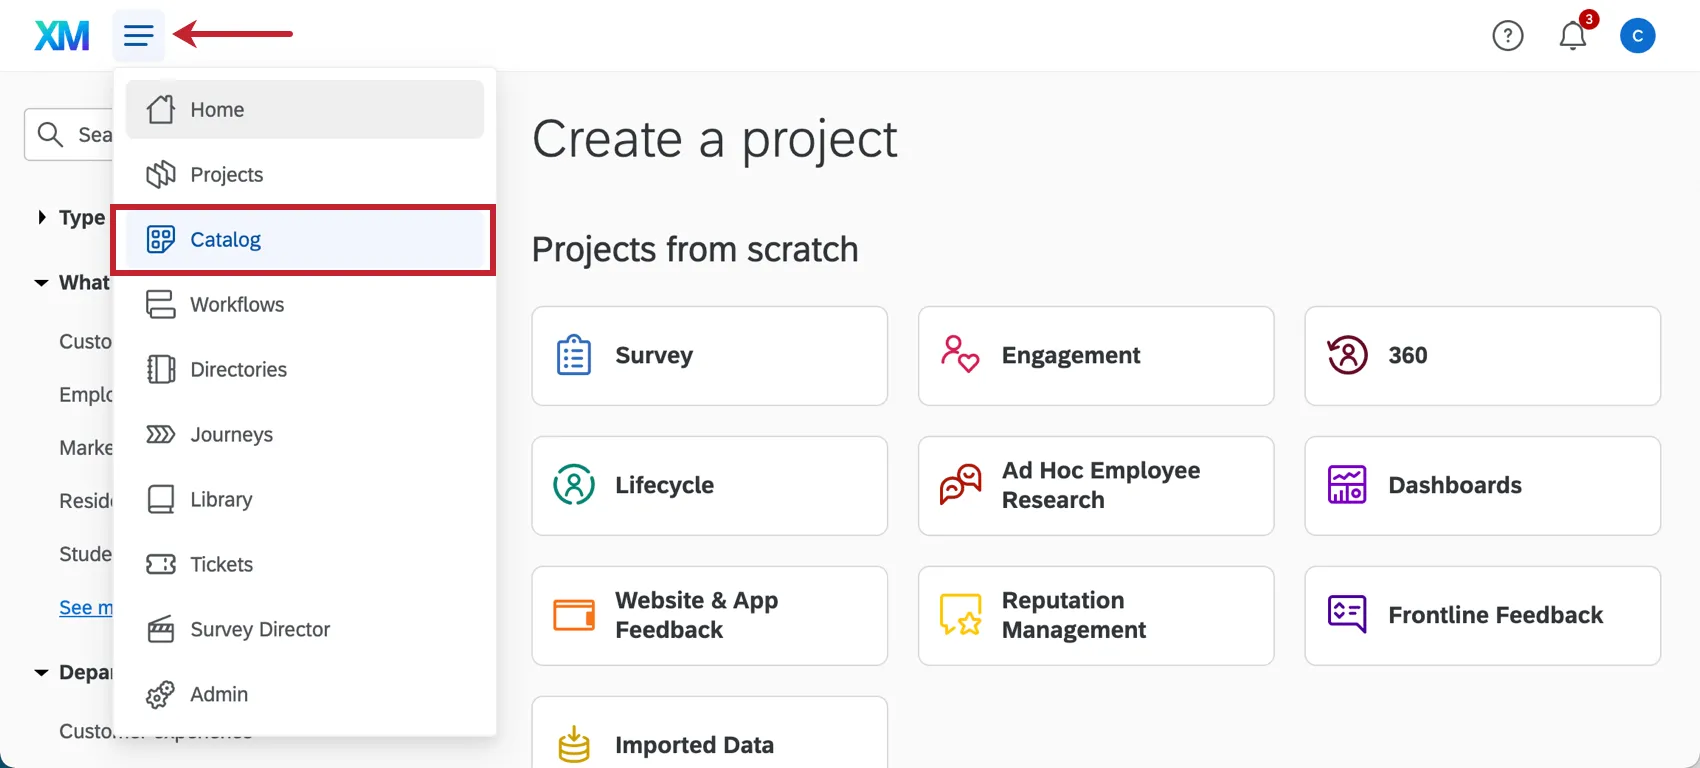
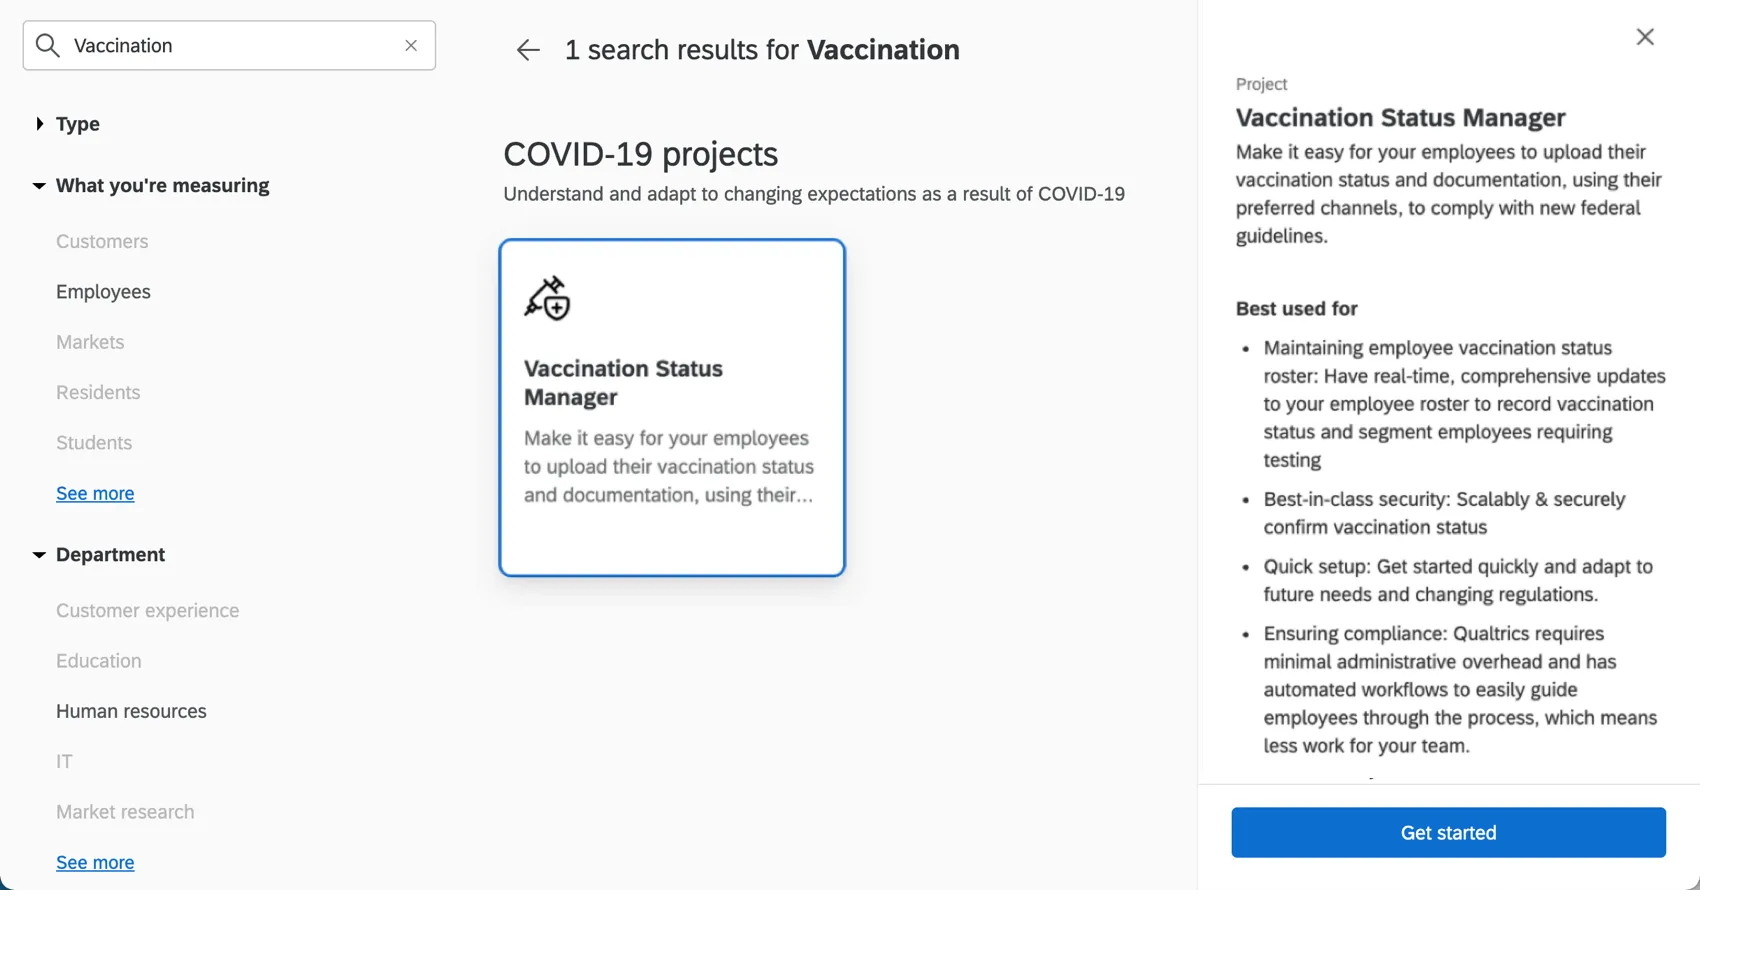
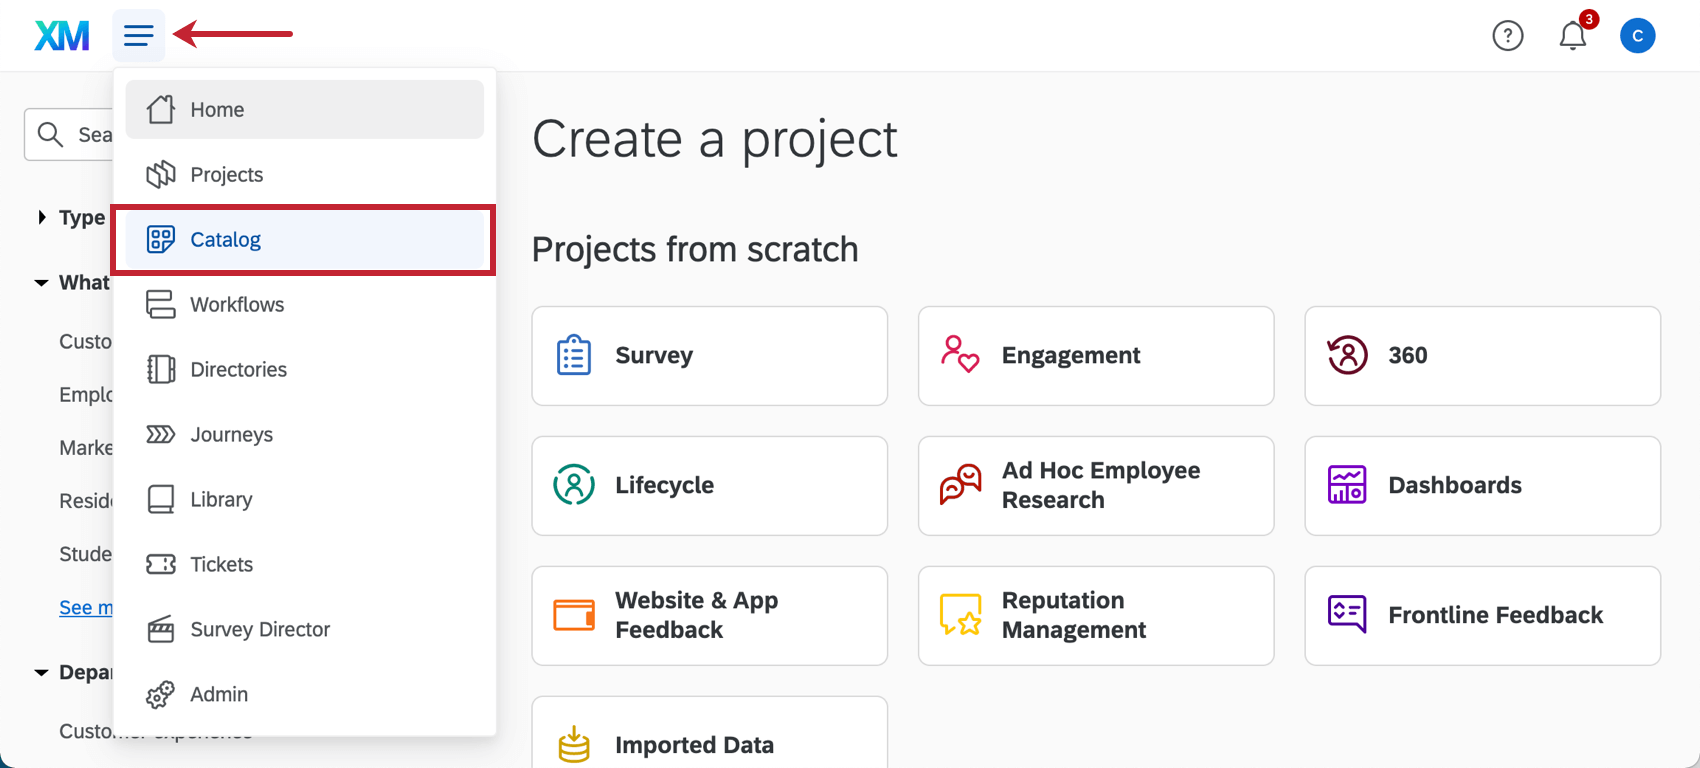
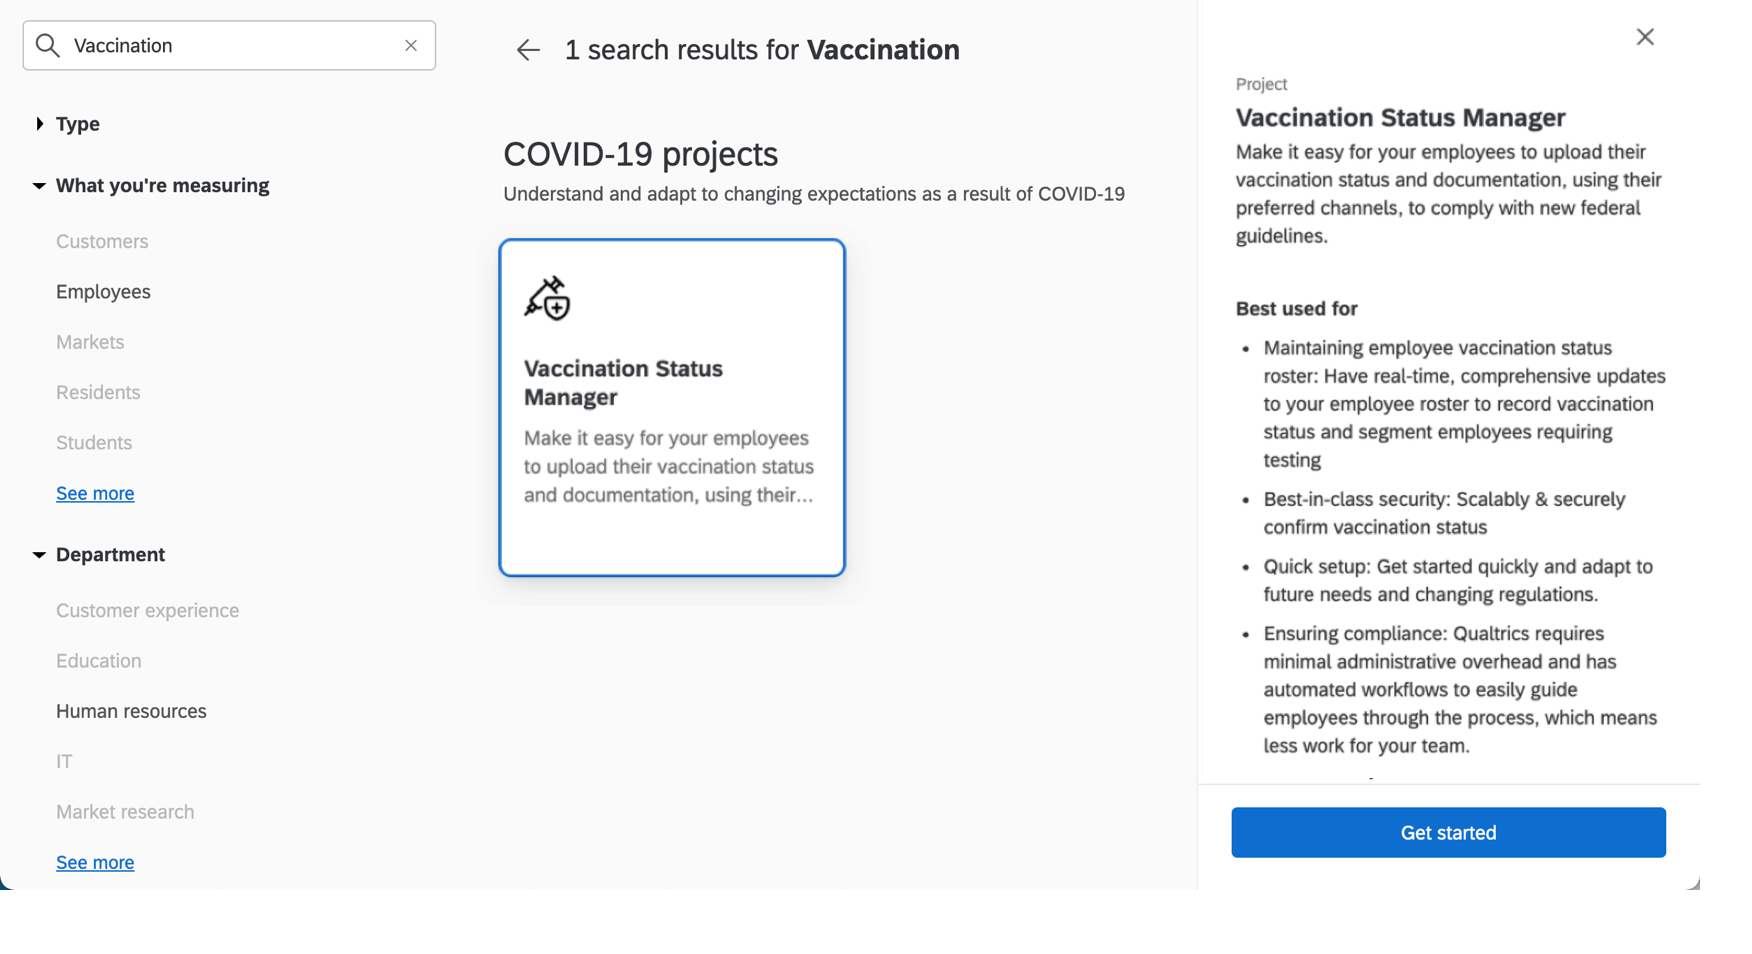
You can create a Vaccination Status Manager by going to the catalog and either searching it by name, or looking under COVID-19 Projects.
You will be asked to name your project. Then once you click Start customizing, the guided setup will begin.
In order to prepare your program and enable the appropriate automated workflows, you must perform the steps described in the following sections in their entirety:
The setup assistant will include links to key pages you need to complete tasks on, which will automatically open in a new tab. We recommend completing these tasks in a separate window or tab of your browser so that you do not lose your place in the setup assistant.
Attention: Once you’re finished with your initial setup and ready to launch, do not forget to complete crucial launch steps.
Enable Your Workflows
To make sure the automated workflows in this solution run smoothly, you need to do two things: get your API token and use it to set up account-wide credentials for a web service and a mailing list to survey synchronizer. Completing these steps ensures that the employee roster will update with every response submitted, which will allow the dashboard to display vaccination status results in a timely manner.
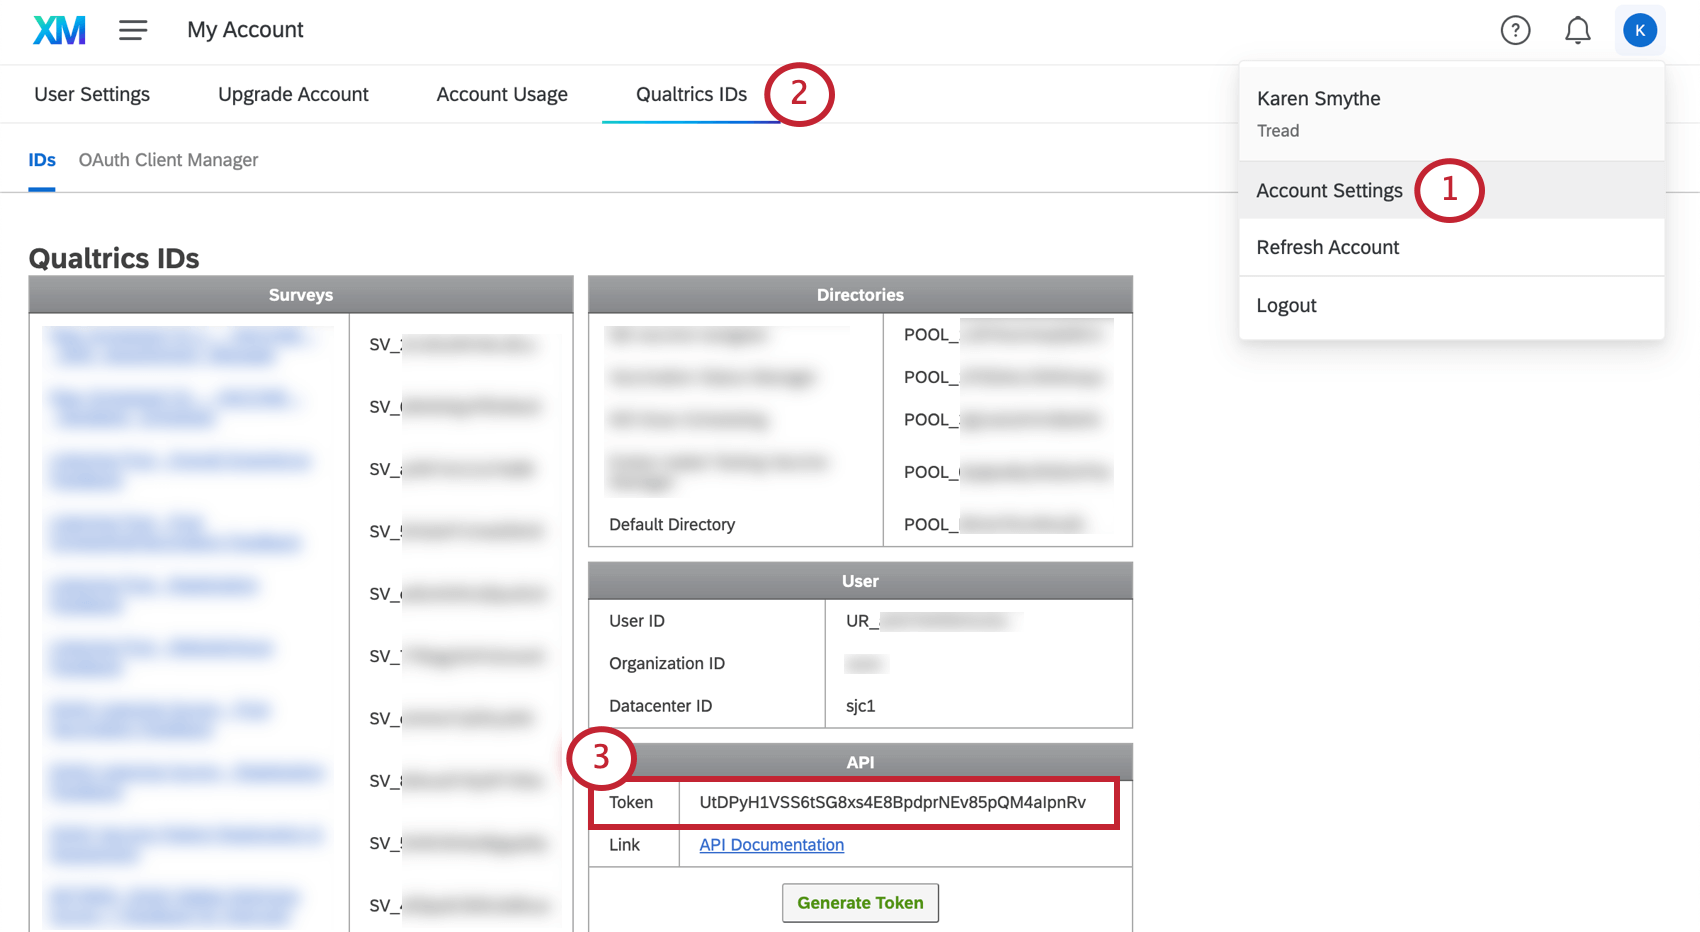
Getting an API Token

If you do not have an API token yet, generate a token, then copy it. Do not regenerate the API token if you already have one.
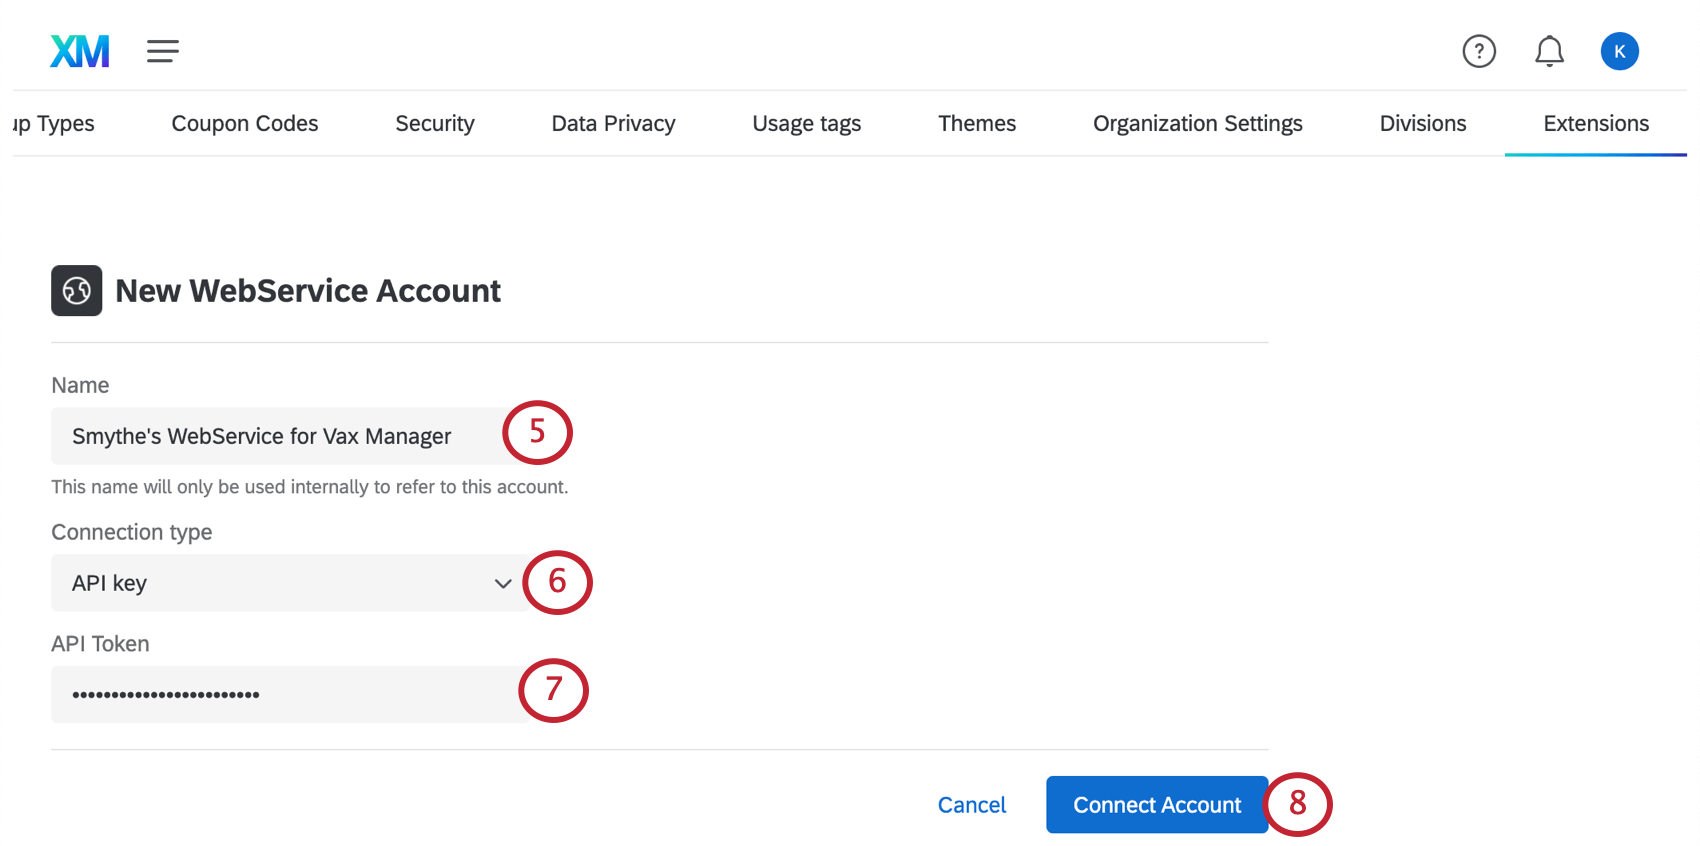
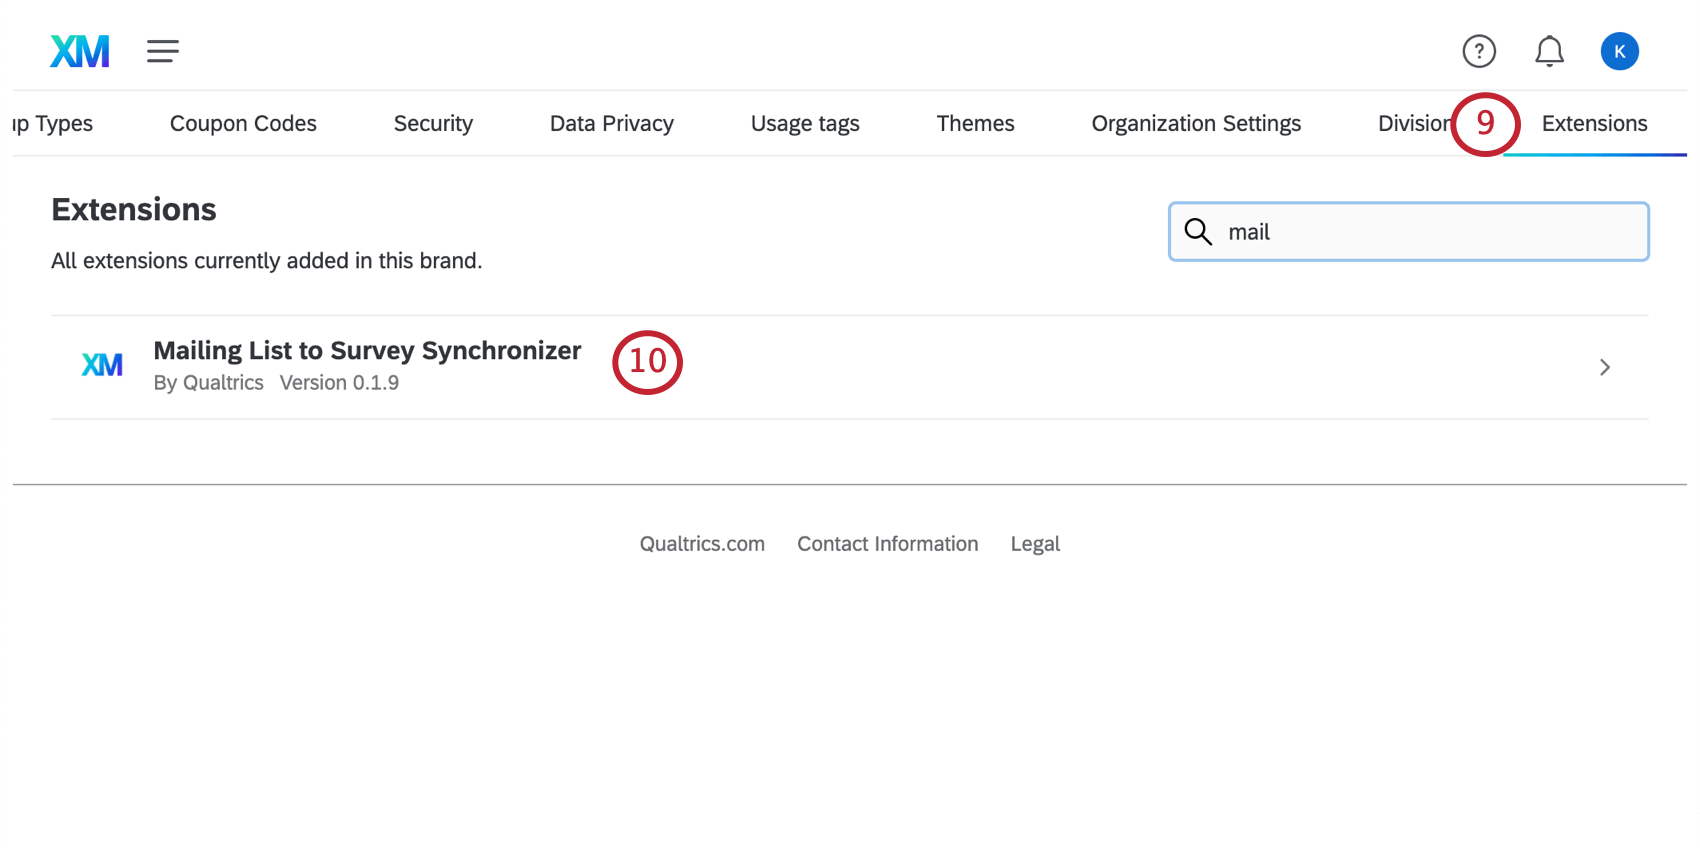
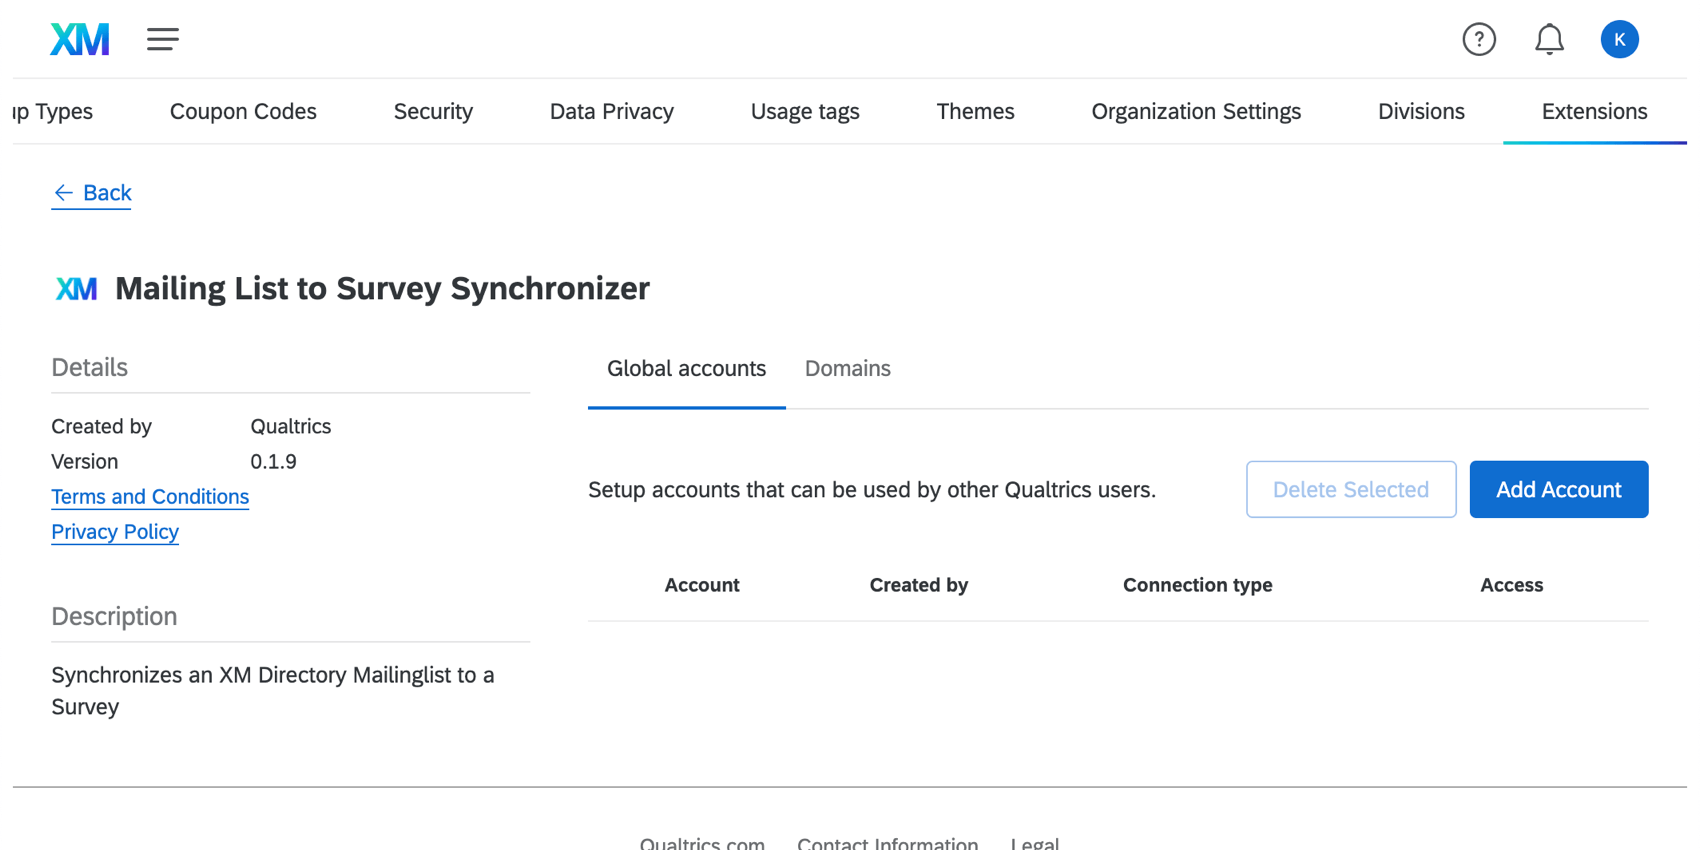
Creating credentials
Your API token will enable two major workflows in your program: a web service that will update your employee roster, and a mailing list survey synchronizer, which makes sure your employee roster has status for both those who responded to the attestation survey and those who did not. In this section, we’ll show you how to enable both of these workflows by creating credentials for each of them.

Warning: If you do not complete all of these steps correctly, your dashboard will not show the correct data!
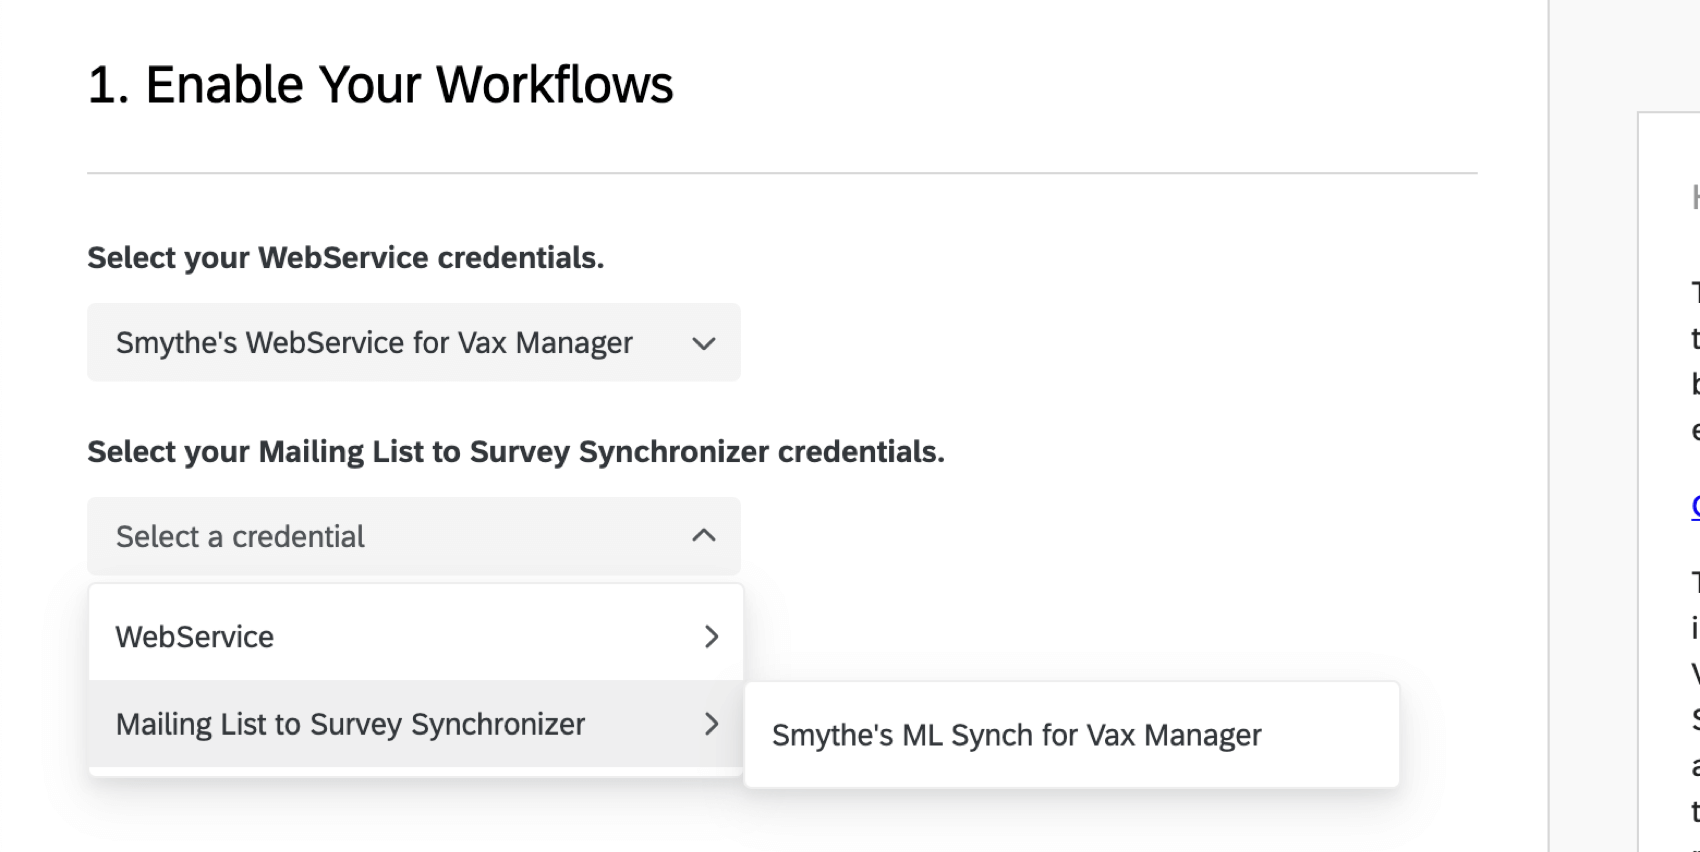
Adding credentials to the setup assistant
Once you’ve completed the steps above, the setup assistant will ask you to select the credentials you created for the web service and for the mailing list to survey synchronizer.

Qtip: If nothing appears in these dropdowns, go back and make sure you completed the previous steps correctly. You may need to go back a page in the setup assistant and re-submit.


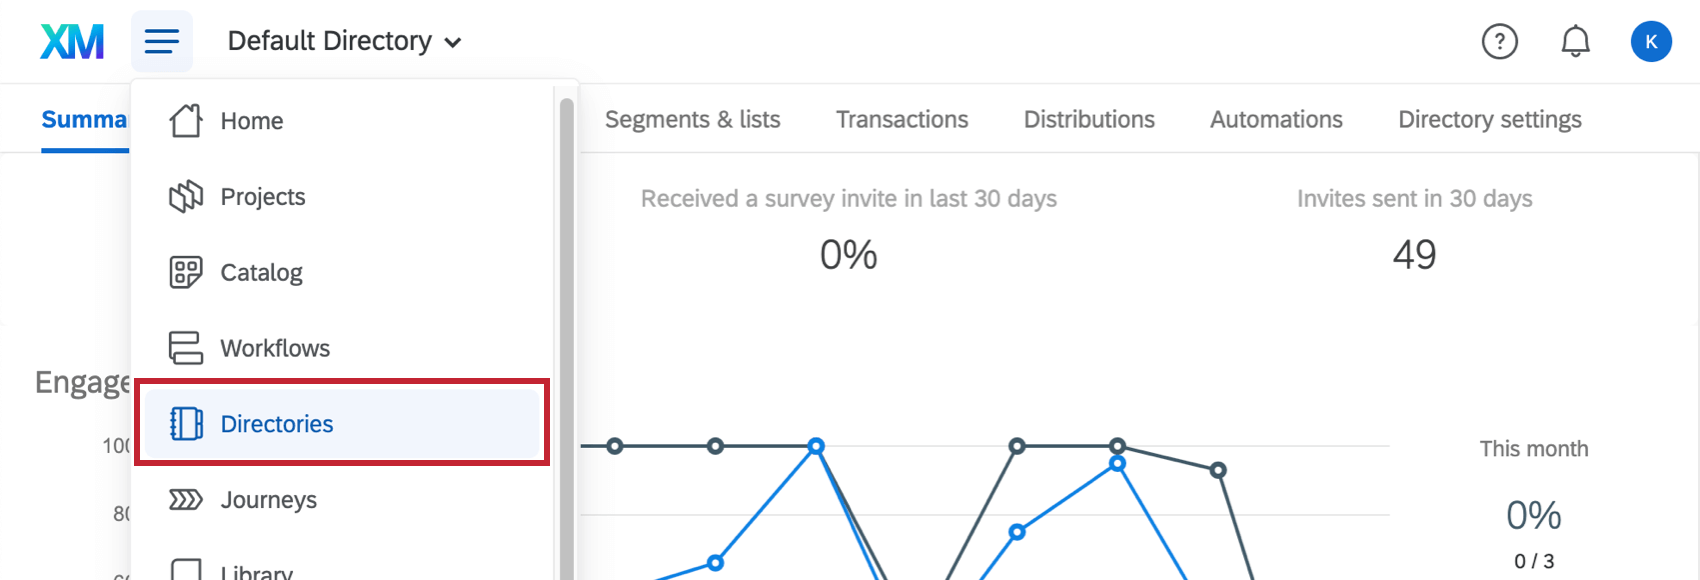
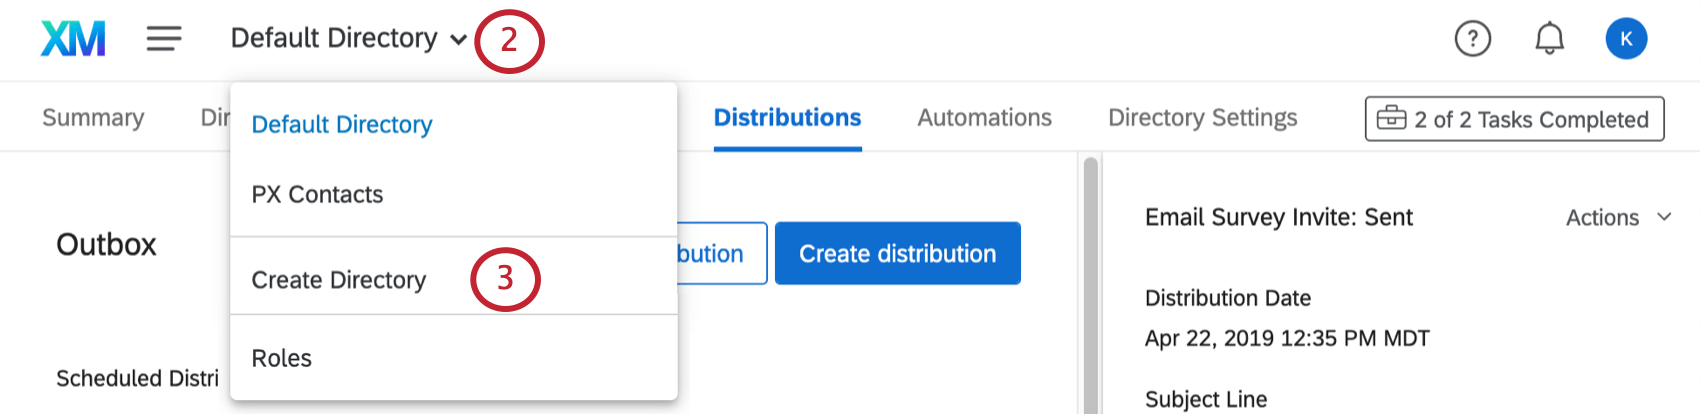
Create a New Directory
The employee roster used in this solution contains medical information, and is thus subject to certain protections. To make sure your employee roster is separated from other contact or employee data in your brand, you must create a new directory.
Qtip: If you are given a choice between Employee Directory and Contacts Directory, choose Contacts Directory.
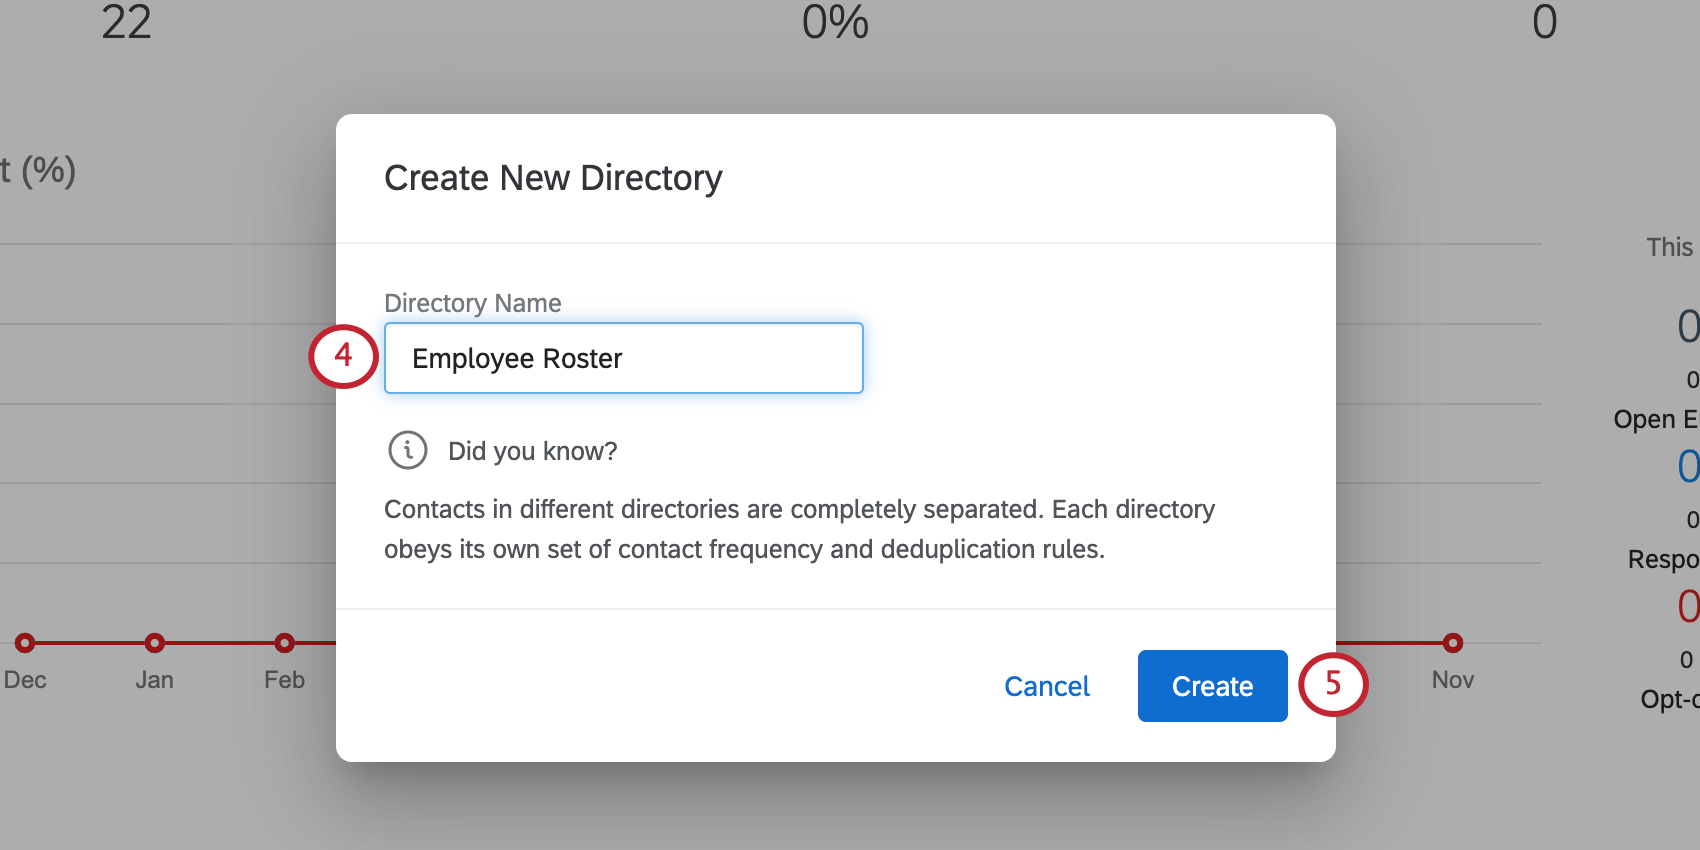
Qtip: We recommend putting “Employee Roster” somewhere in the name.
You will now be able to limit who has access to these employee records by assigning roles. See XM Directory Roles for more information on this topic.
Qtip: If you cannot create a new directory, you may have reached the maximum number allowed for your account. If this happens, contact Account Services to get another directory added to your license.
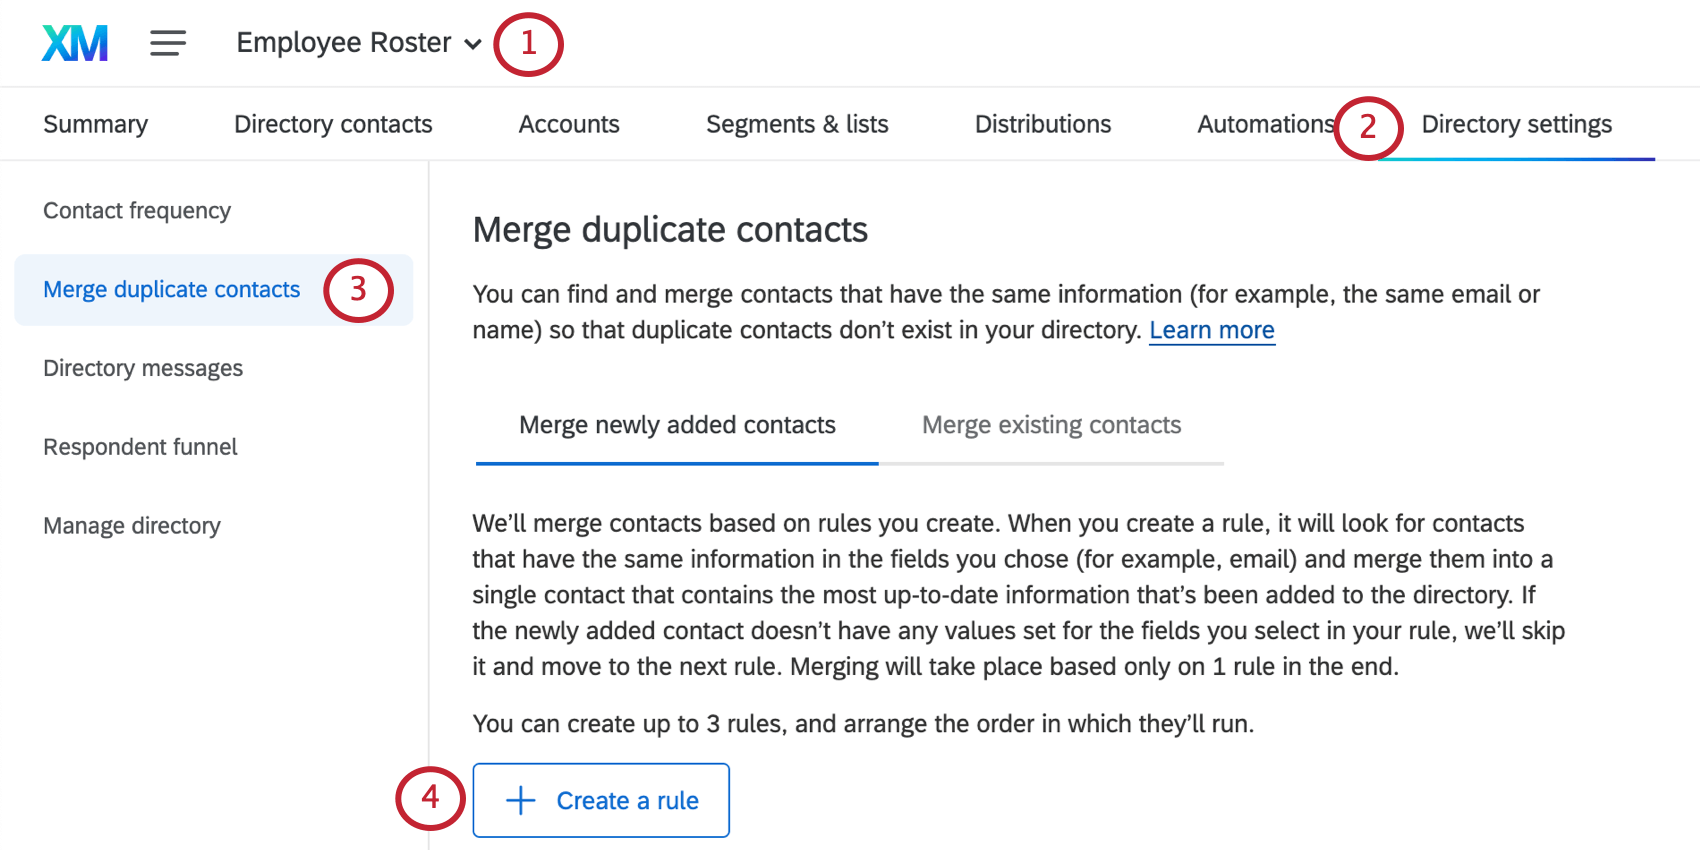
Prevent Duplicate Employee Records
In order to make sure each employee is being updated with the correct status, make sure the directory you created to house your employee roster knows how to identify and merge duplicate contacts.
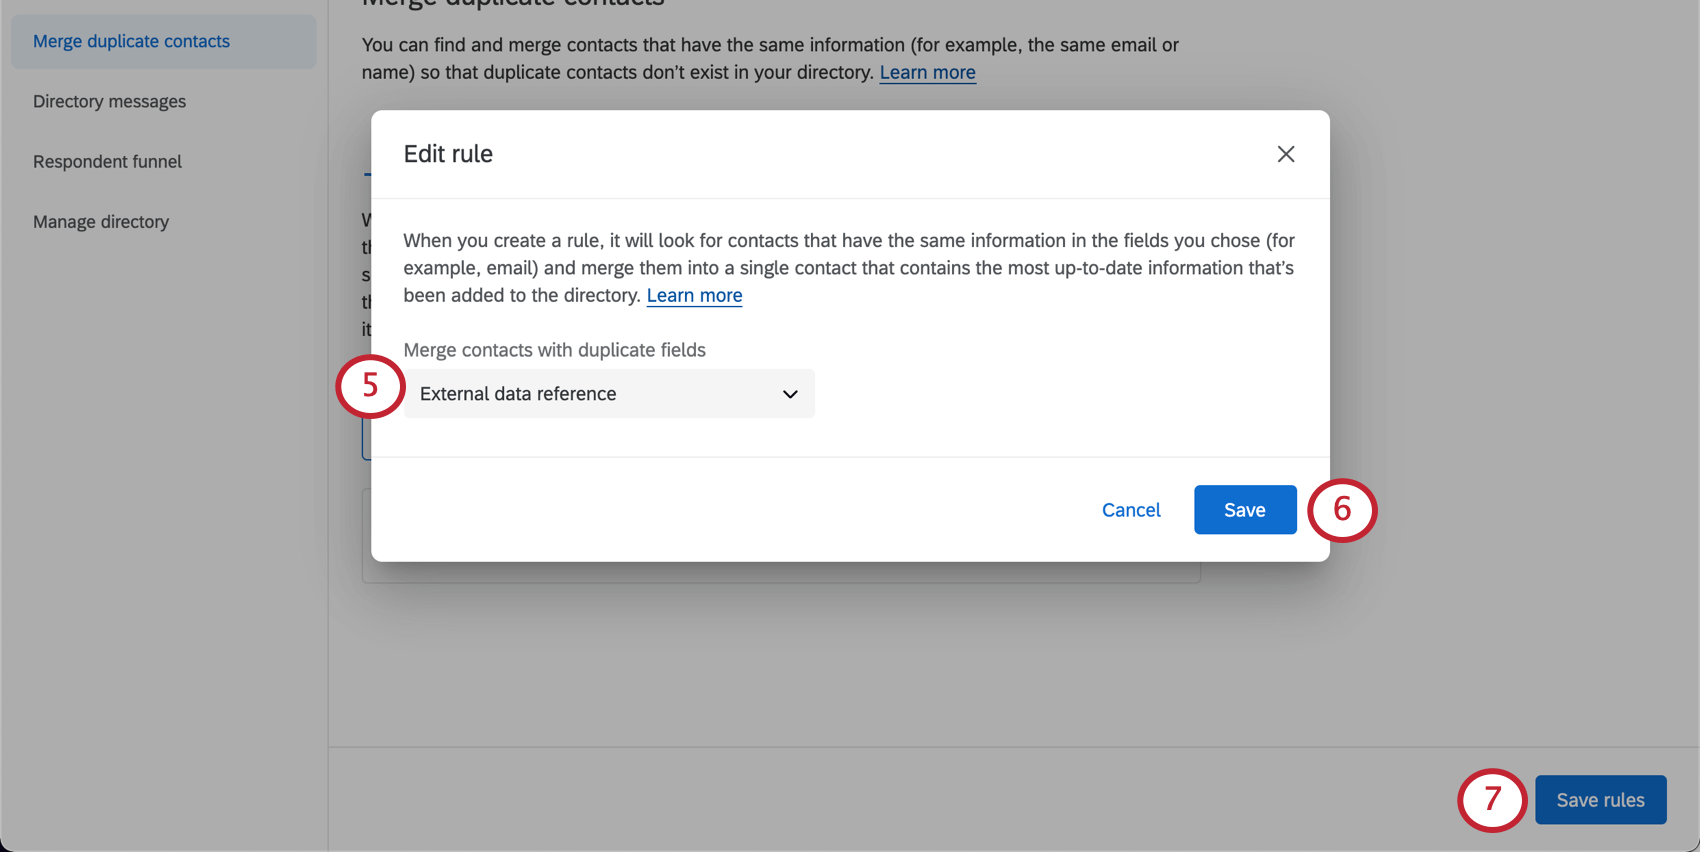
Warning: If you do not click Save rules, your employee roster will not update correctly. Instead, every time someone responds to the survey, duplicate employee records will be added.
Prepare Your Employee Roster File
Now it’s time to create a list of your employees. For this solution to work as intended, there are some required fields that are unique to this program. You may add more data fields to the file, but do not delete any headers.
Download this file to get started.
Required information
Much of the following information can often be found in your organization’s HRIS system.
- ExternalDataReference: Should contain every person’s employee ID.
- FirstName: Employee’s first name.
- LastName: Employee’s last name.
- Email: Employee’s email. This field is not required, but it will impact the solution setup. Learn more about changes you will need to make to the solution if email is not available for all employees.
- WorkPlace: A physical location (e.g., fixed, mobile) where the employer’s work or operations are performed. This does not include an employee’s residence. Qtip: This field is included so employers can easily present the number of fully vaccinated employees and the total number of employees at that workplace, if asked.

- VaccinationStatus: This field must state “Not Vaccinated (Has not responded)” for all employee records, unless a status is already known and maintained in another system of record. If so, use one of the following values to set an employee status. Do not deviate from this list.
- Fully Vaccinated
- Partially Vaccinated (received final dose)
- Partially Vaccinated
- Not Vaccinated
- TestingRequired: This field must state “Yes” for all employee records, unless you are pre-populating a VaccinationStatus of “Fully Vaccinated,” in which case those employee records should state “No” for TestingRequired.
- contactId: This field is case-sensitive, meaning it must be capitalized exactly as it’s shown here for it to be recognized properly.
Attention: Always be careful with the spelling and punctuation you use for these fields. If something is misspelled or punctuated differently (e.g., adding a space between words, forgetting parentheses), the directory will recognize it as a separate data point, which may affect your ability to report on this data.
The file is also required to have the following headers with no values, to be updated as respondents submit their surveys:
- VaccinationUploadLink
- PlanningVaccination
- WorkplaceSituation
- SeekingAccommodation
- GrantedAccommodation
- AccommodationReason
In addition to the above, we also recommend including appropriate demographic data for each employee (e.g., department, function) as additional columns in your file. You can name these columns whatever you’d like; just remember to keep header names consistent if you upload multiple files.
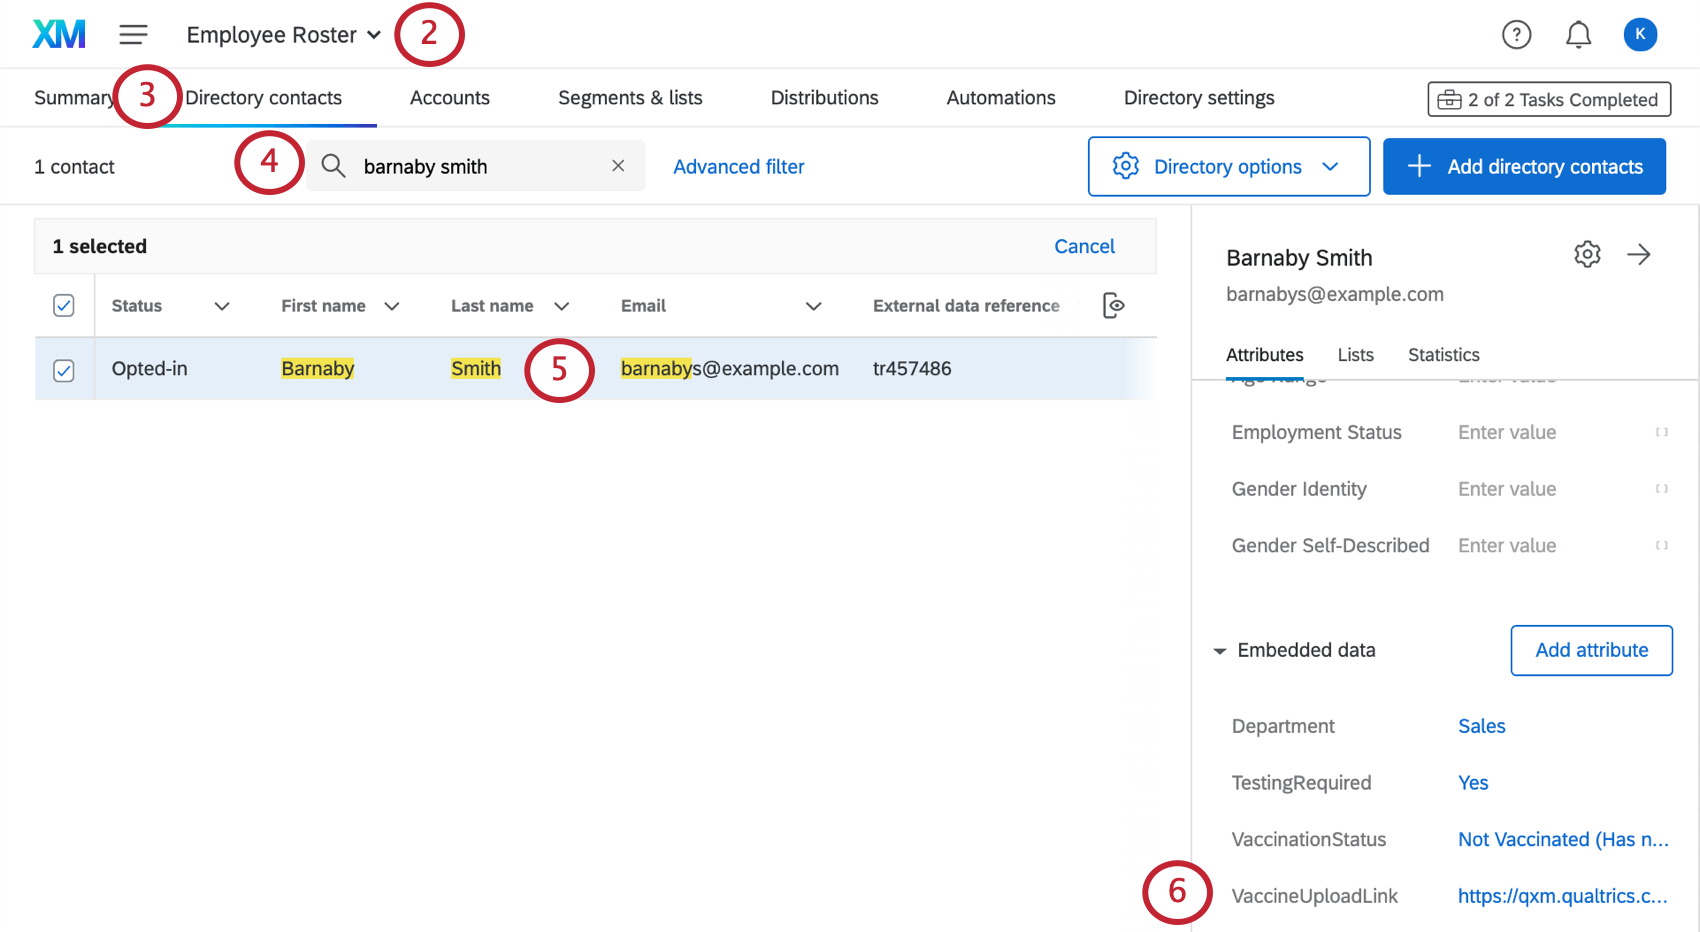
Example: In the image below, the required fields filled out for our employee; we also added a department column because we’d like that data to be handy in reporting, although it is not required for the solution to work. Additional required fields are left blank for the solution to fill. (You may need to click the image to expand it.)


File type requirements
Your file can be saved to your computer as either a CSV with UTF-8 encoding or as a TSV. No other file types are compatible with XM Directory.
For additional help troubleshooting file setup, see CSV/TSV Upload Issues.
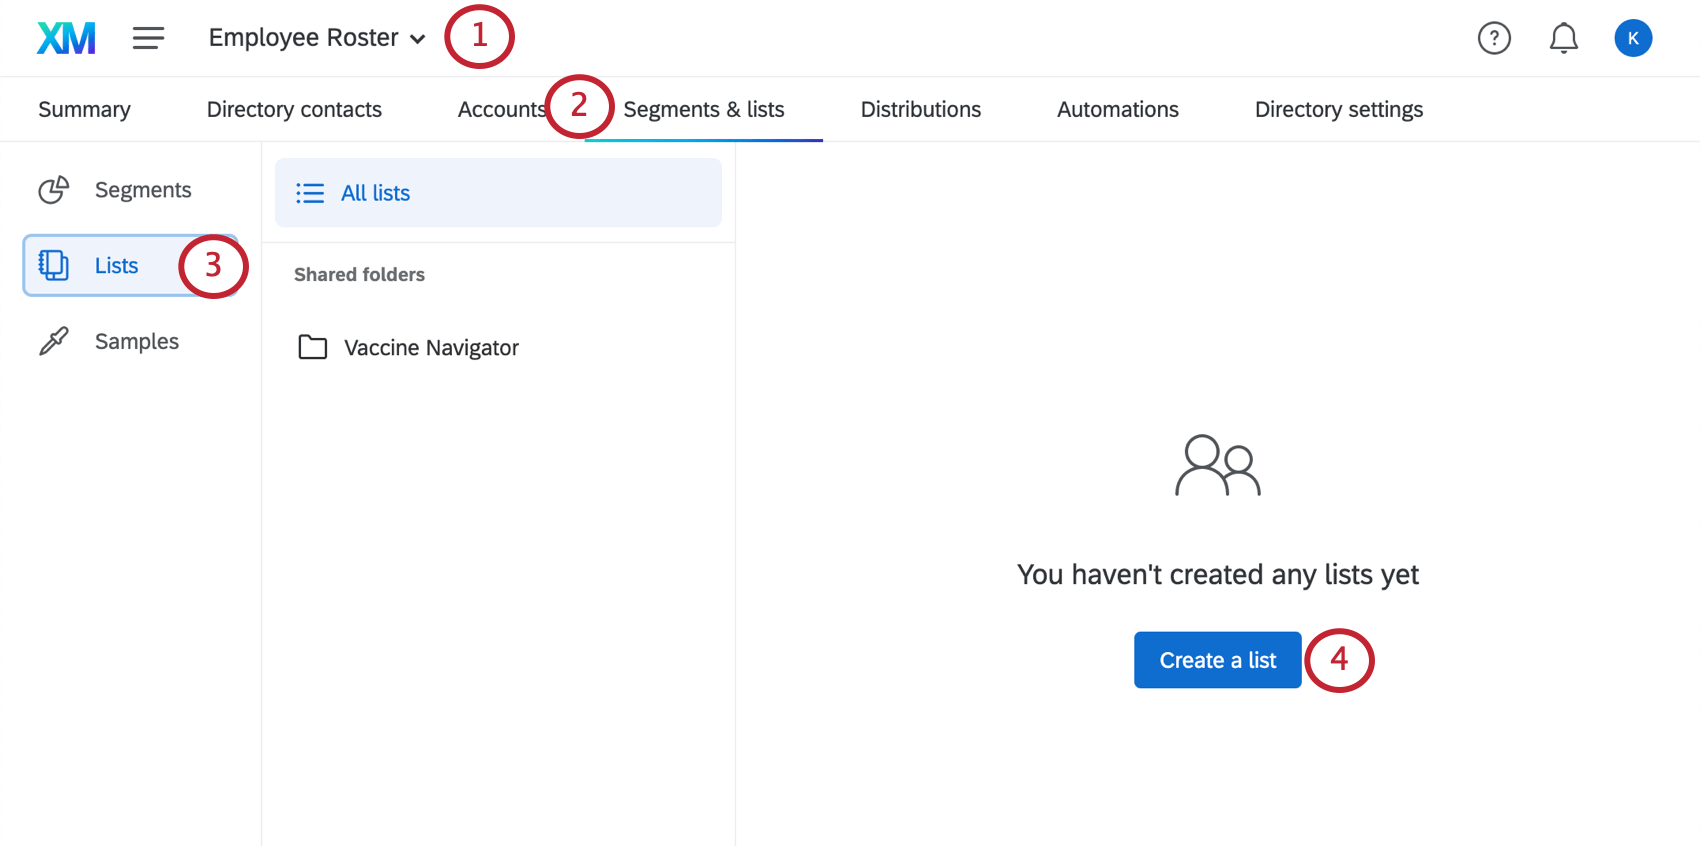
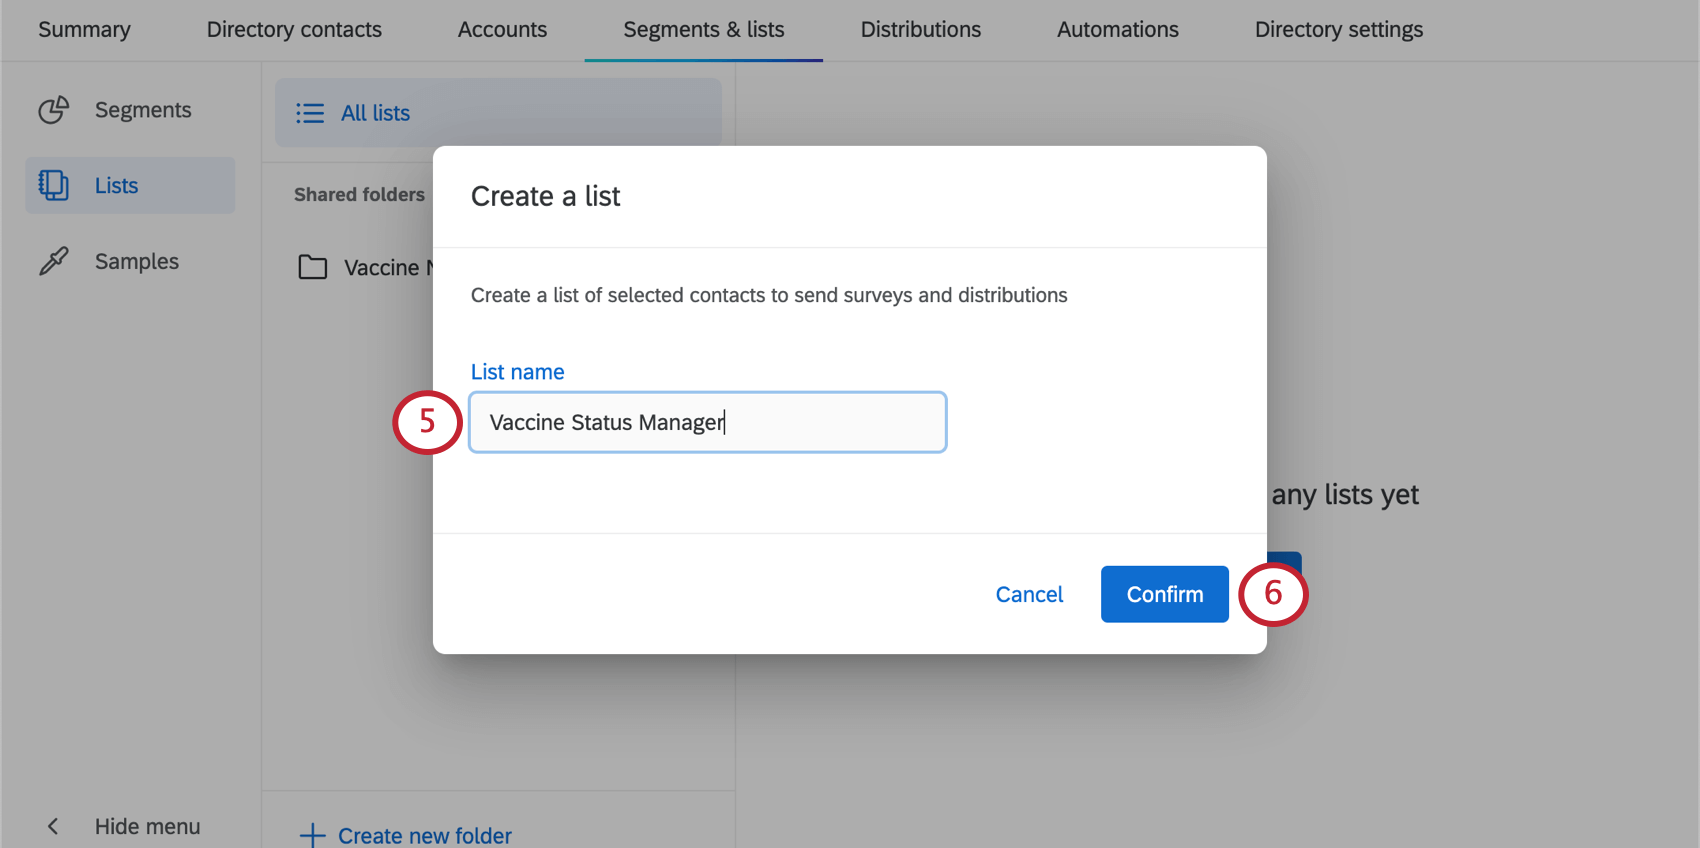
Upload Employee Data
To complete your employee roster, make a mailing list in your newly created directory, and upload the file you made to it.
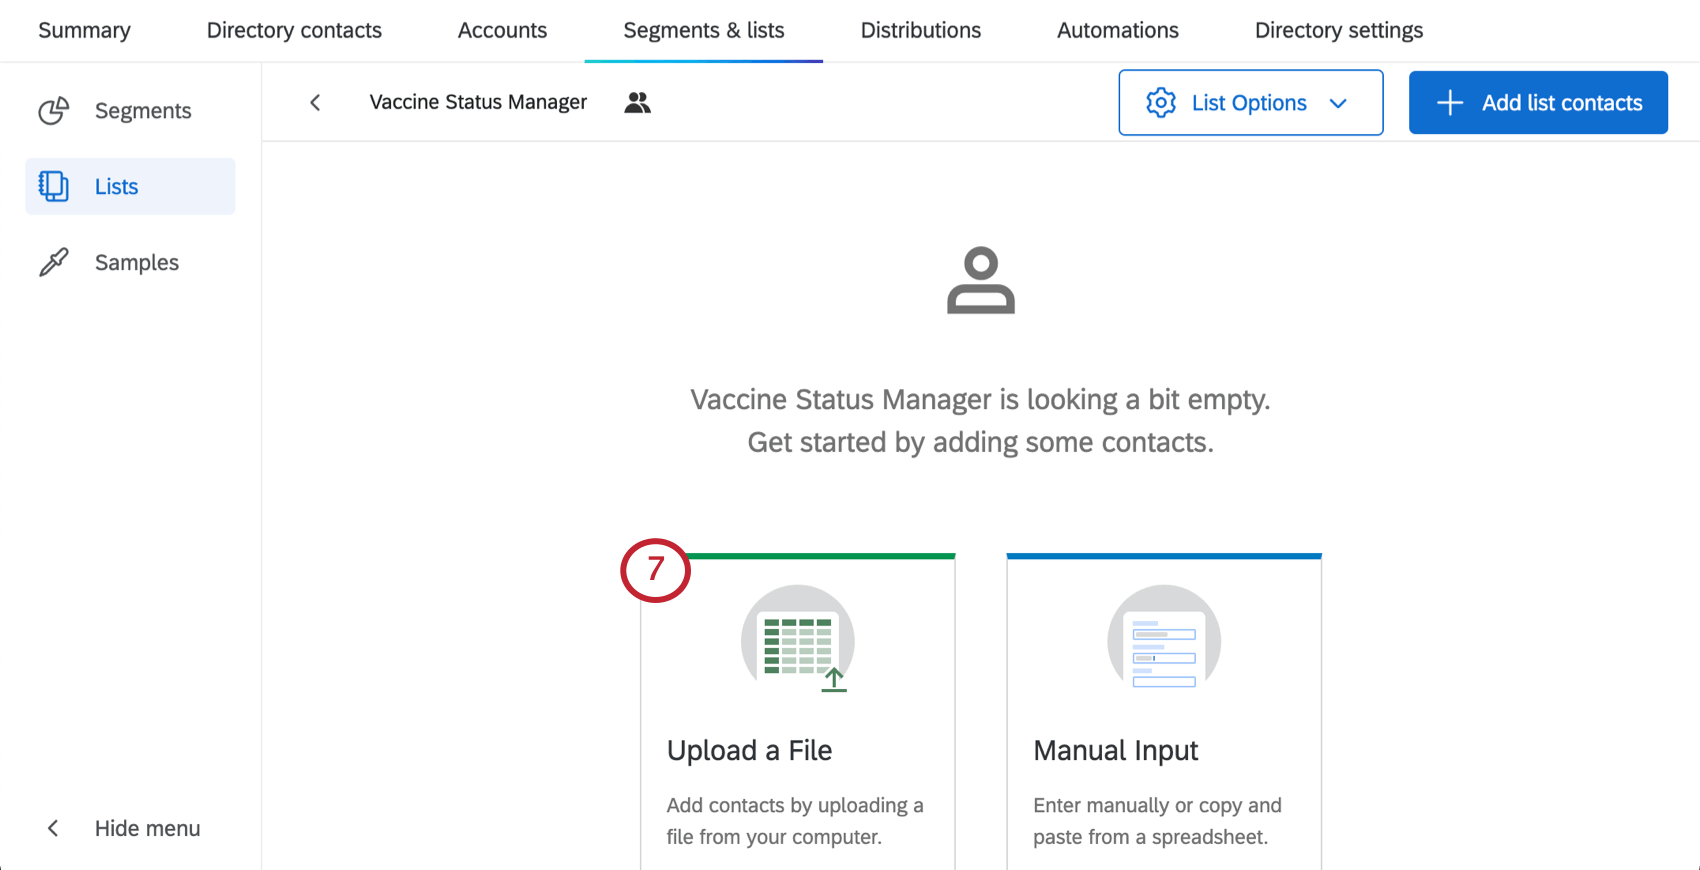


For troubleshooting file upload, see the Creating XM Directory Mailing Lists and CSV / TSV Upload Issues support pages.
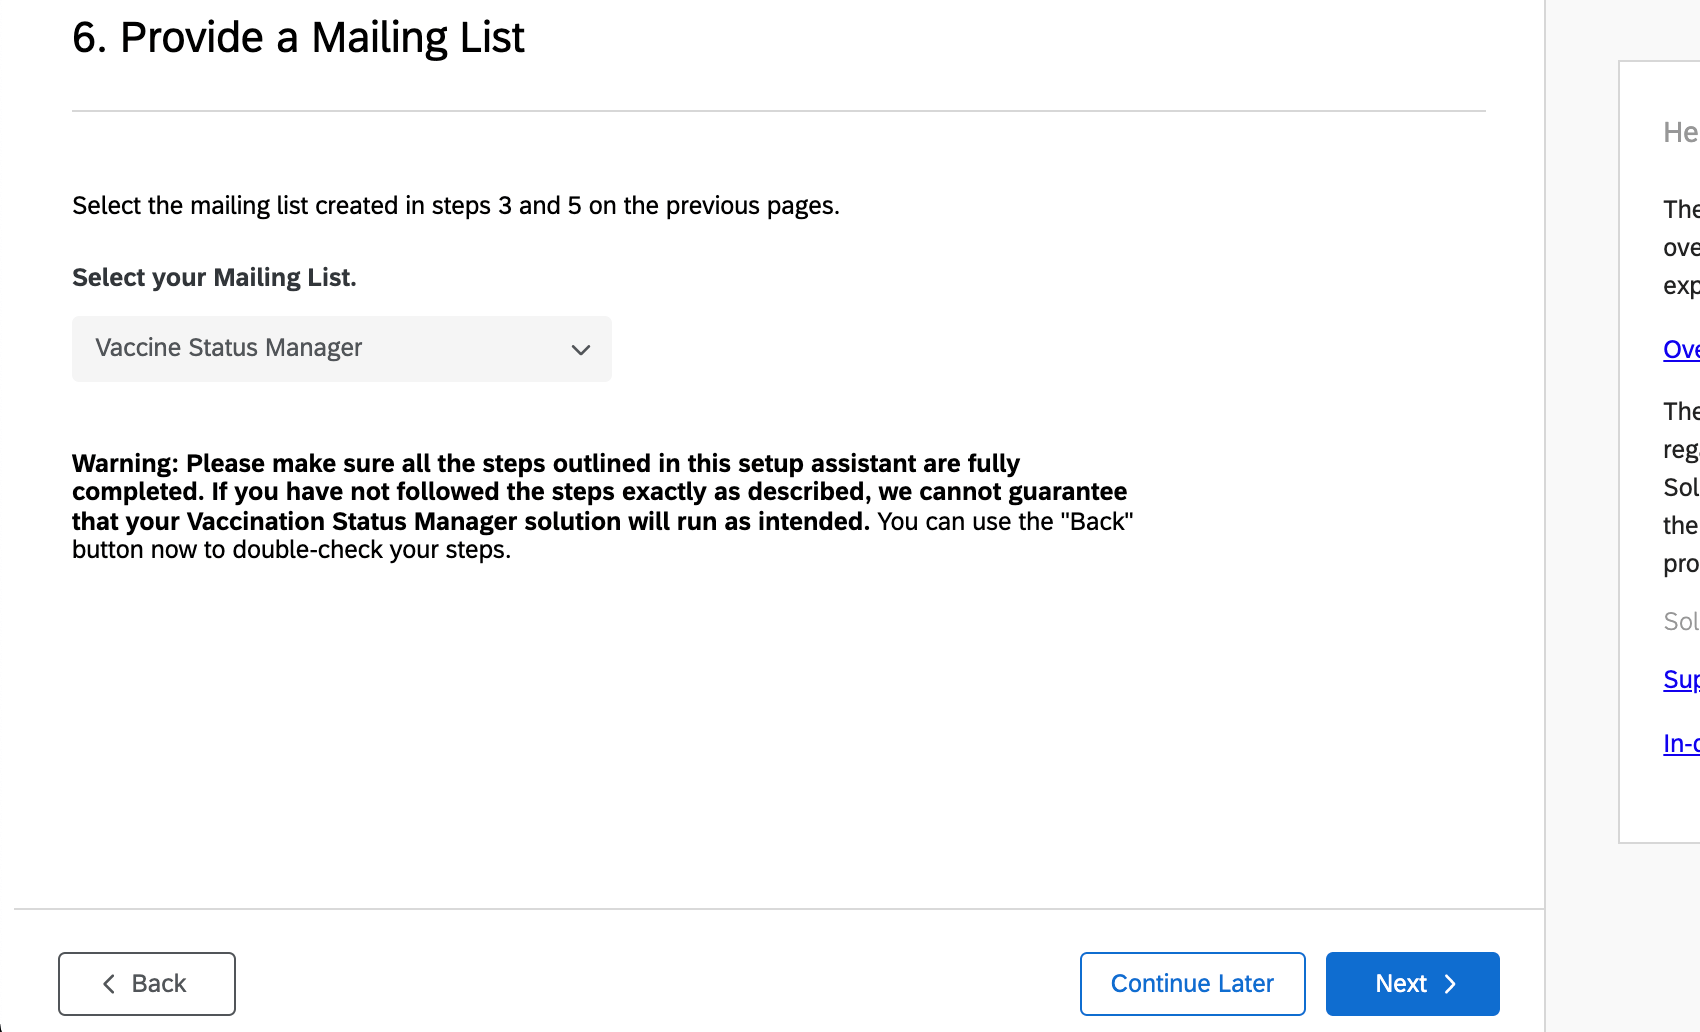
Provide a Mailing List
In the solution setup assistant, get to the page that says Select your Mailing List and add the list you created in the previous steps.

Qtip: If nothing appears in this dropdown, go back and make sure you completed the previous steps correctly. You may need to go back a page in the setup assistant and re-submit.

Provide Details for Optional Configurations and Complete Setup
At the end of the setup assistant, you’ll be presented with a few optional features.
Attention: If you do not include this link, we recommend finding Q1 in your survey and editing it to remove the hyperlink.
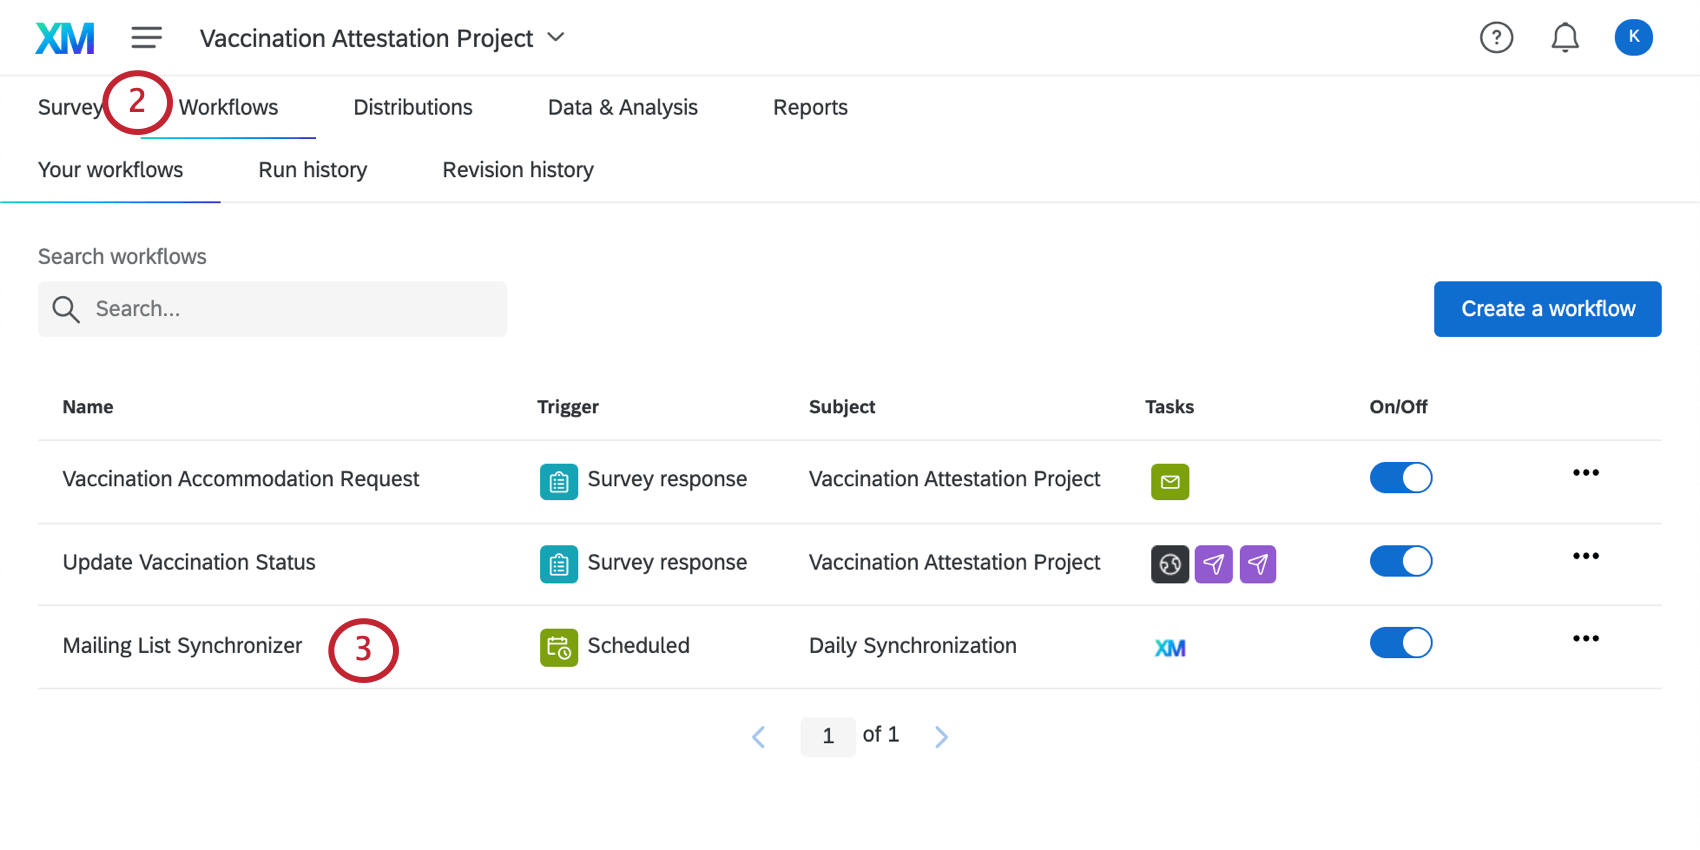
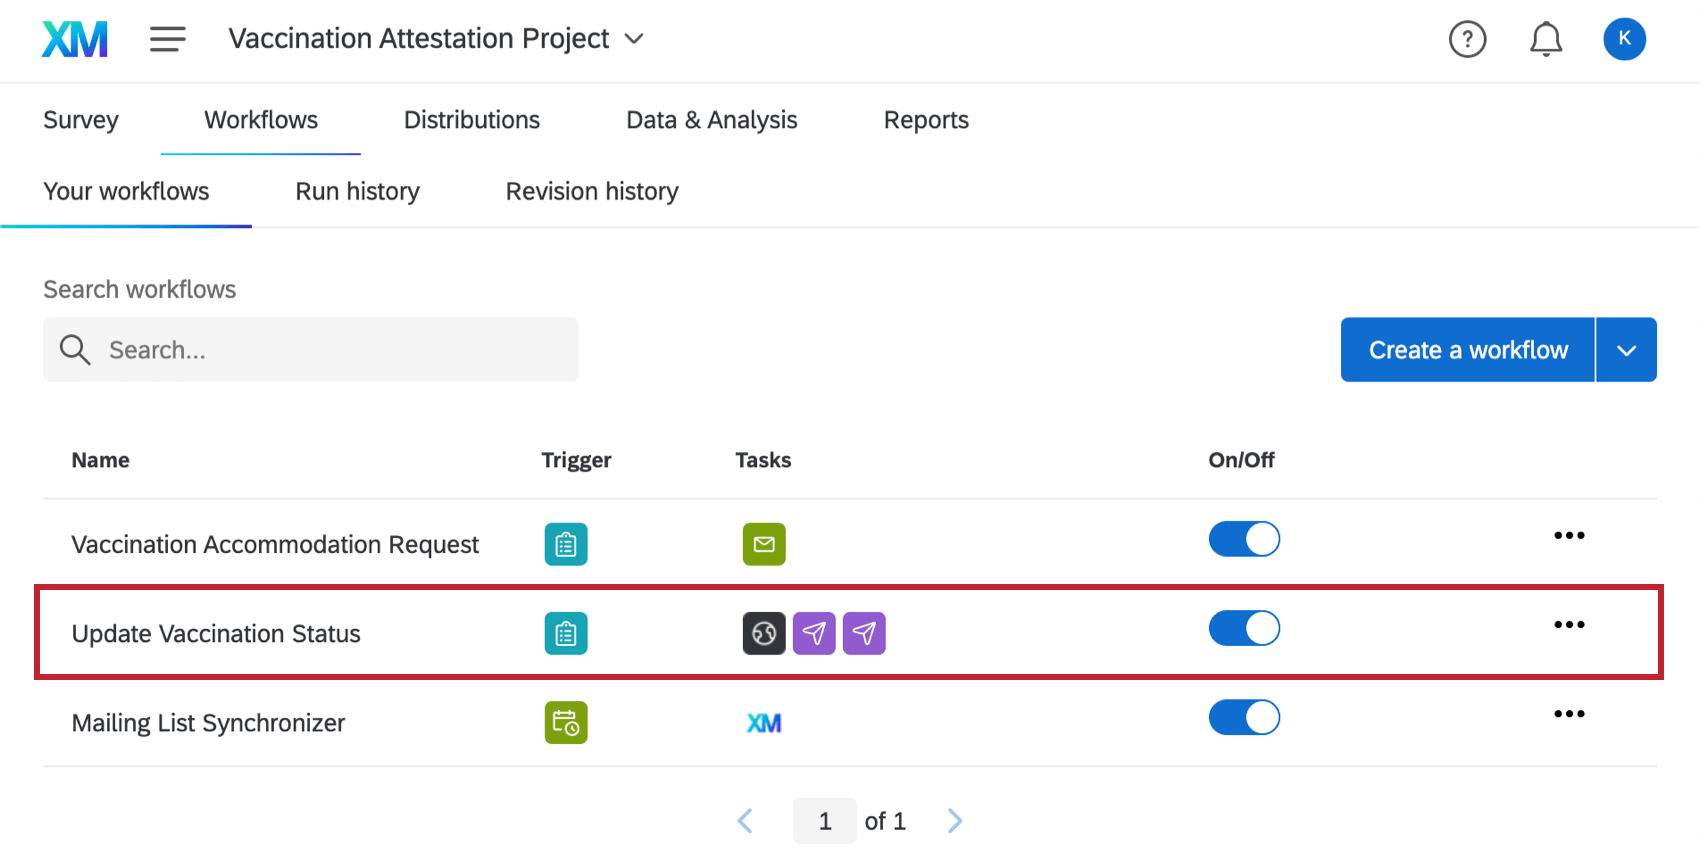
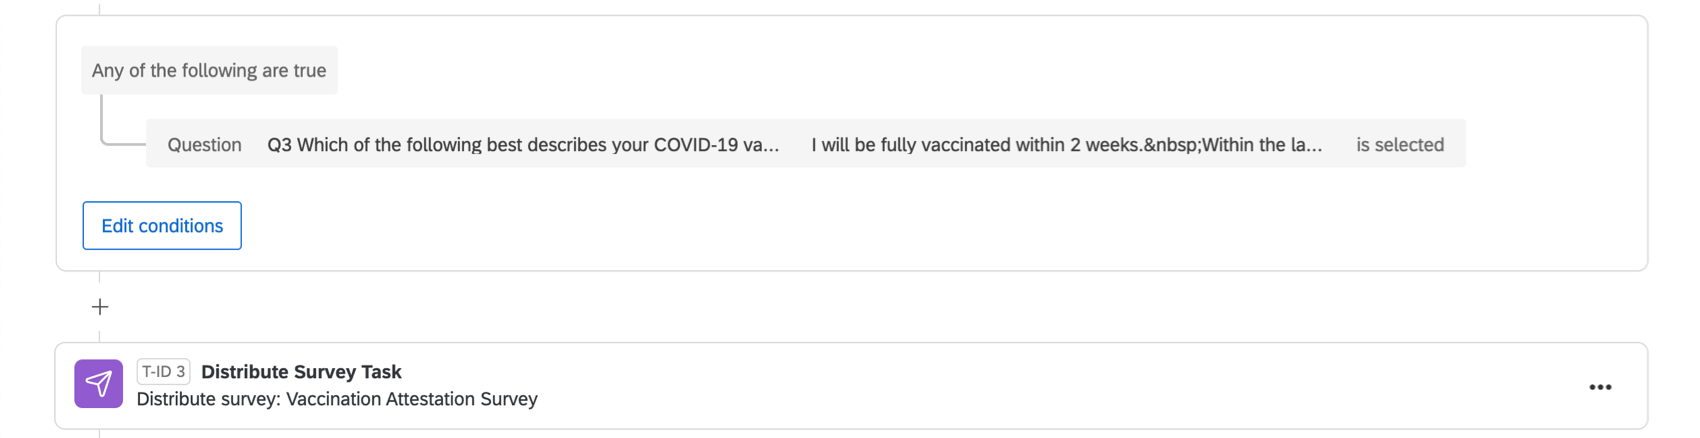
There is also a distribution that will be sent to employees who indicate that they are only partially vaccinated at the time of completing the survey, but will be fully vaccinated within 2 weeks. 14 days after their initial response, employees will be sent an email requesting that they complete the Vaccination Attestation survey again to confirm their vaccination status. This email setup can be found in the Workflows tab of the Vaccination Attestation survey, under “Update Vaccination Status.”
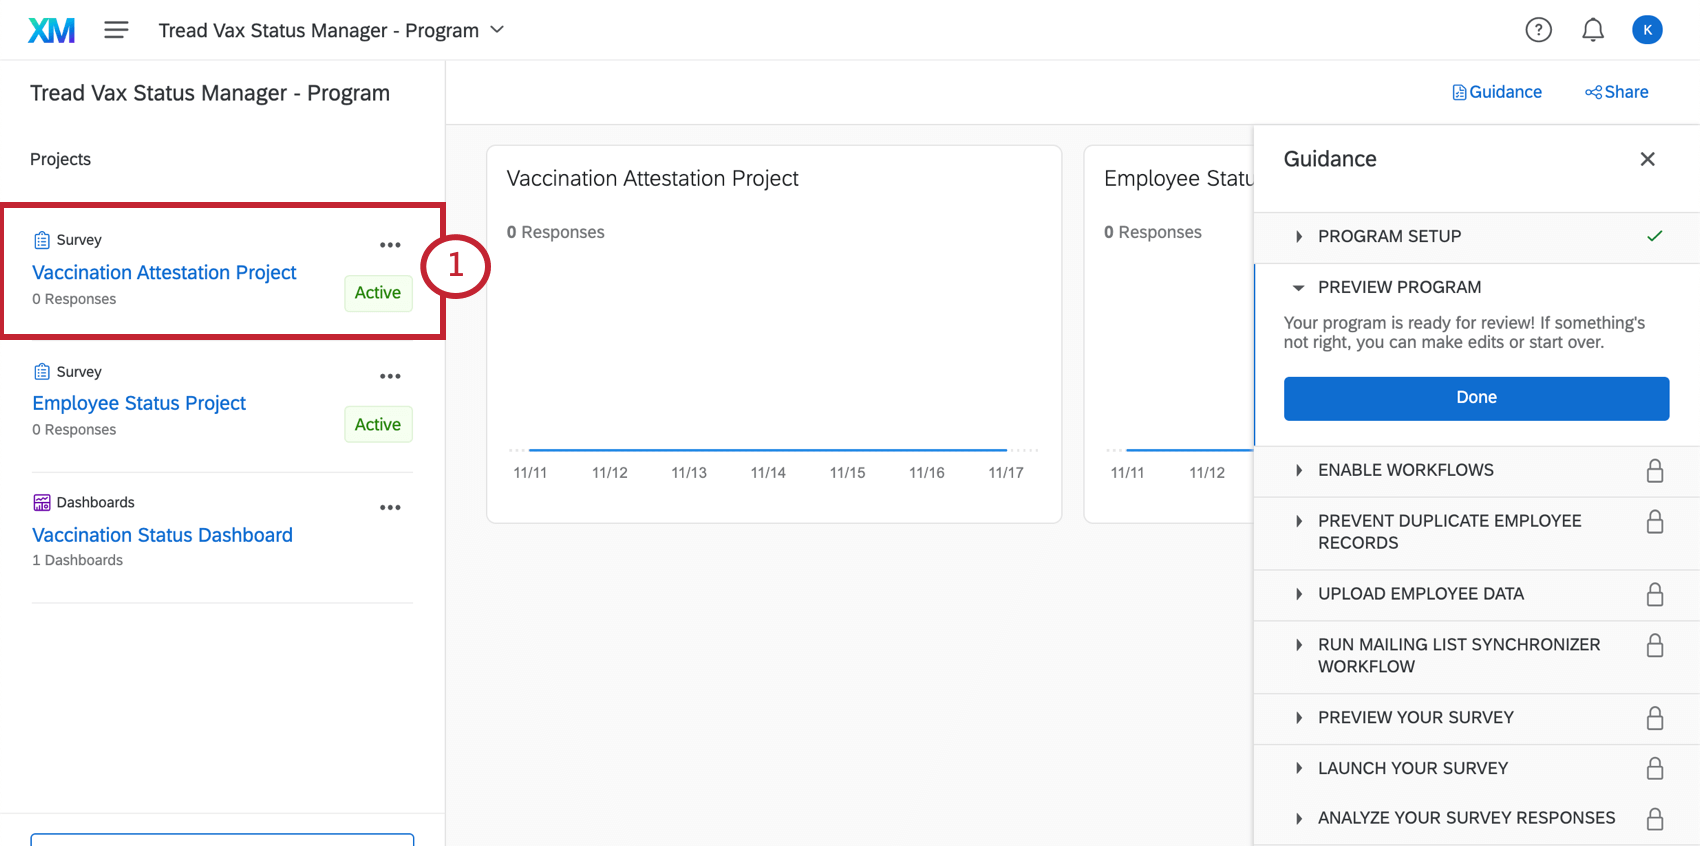
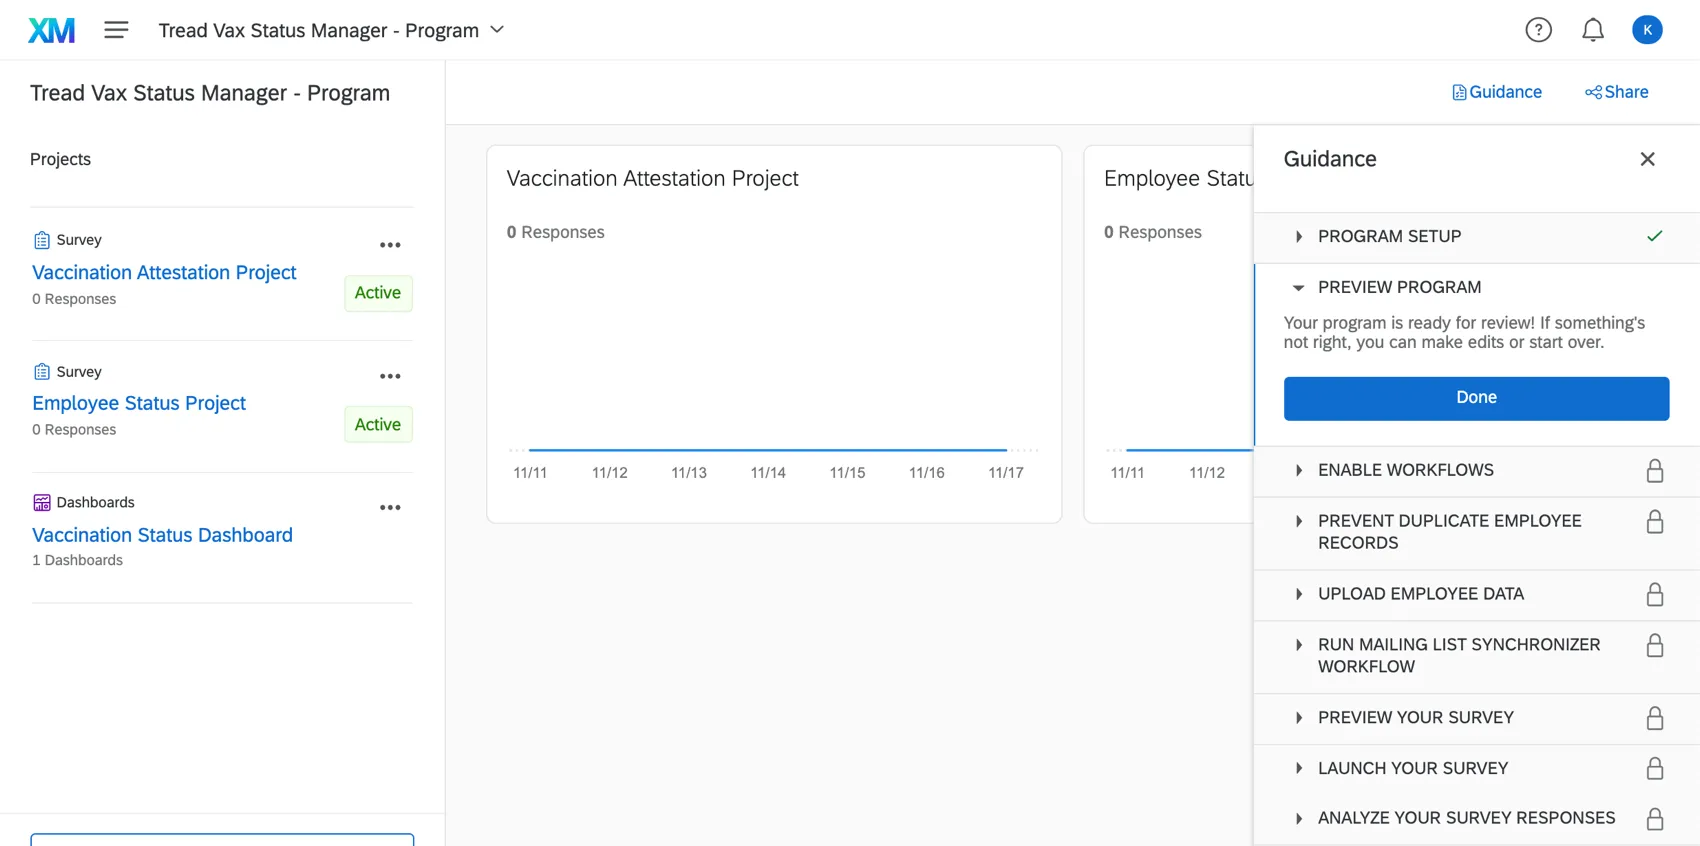
Once you’ve finished your setup, you’ll be taken to a program that holds your Vaccination Attestation Project, Employee Status Project, and Vaccination Status Dashboard in one place. The guidance sidebar will provide instructions on the next steps, which will be to launch your project.

Launching the Vaccination Status Manager
Now that you’ve completed the initial setup, there are three steps you must complete to successfully launch your solution:
Attention: It is critical that you synchronize your employee roster before distributing your solution.
Synchronize Your Employee Roster
Attention: Due to the time it takes for the synchronization to run, we recommend doing this at least six hours before you begin collecting vaccination documentation.
The first thing you’ll need to do when launching your solution is make sure that your employee roster has been loaded into the Employee Status survey.
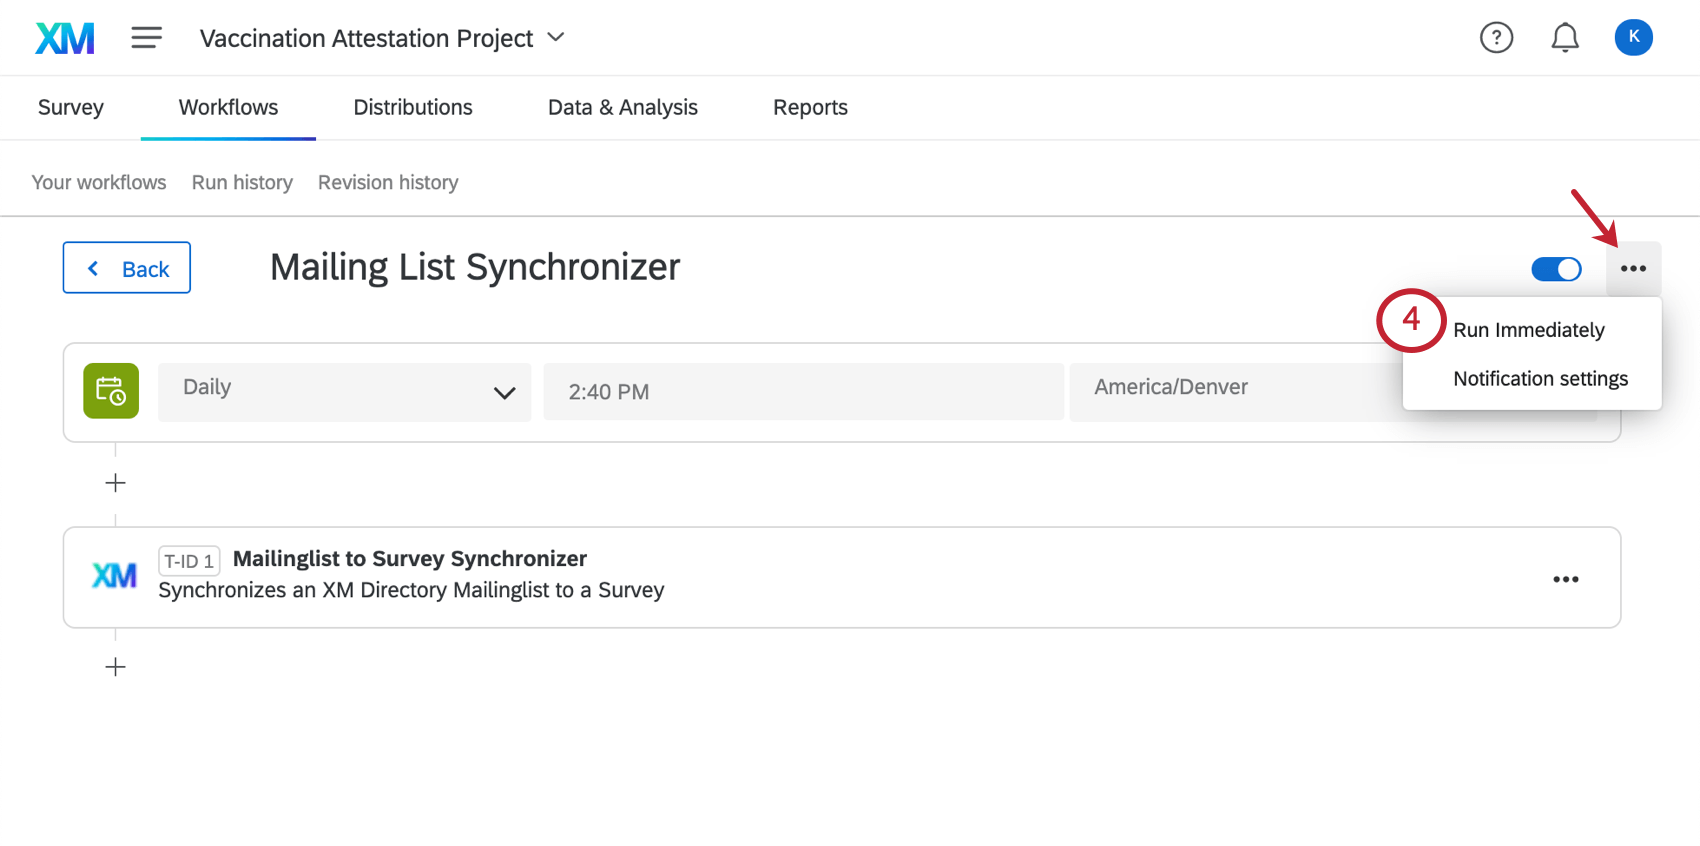
This will begin the initial synchronization of your employee roster for reporting. This process can take several hours, depending on the number of employees in your organization. When the synchronization is done, you will see the entire list of your employees in the Employee Status Project’s Data & Analysis tab.
Customize Your Email Messages
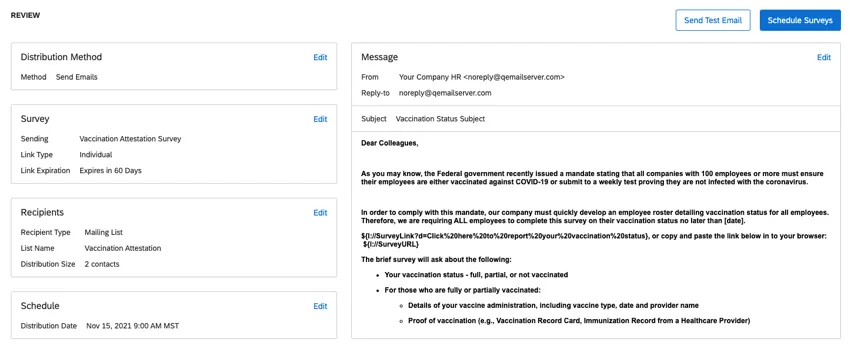
By default, the Vaccination Status Manager is built to collect vaccination documentation via emailed surveys. In preparation for sending surveys to your employees, we recommend that you create a message in your account’s library.
Qtip: You should create two messages: one should have the type Invite Emails, and the other should have the type Reminder Emails.
Below is an example of an invitation message. Remember to fill out the information [CAPITALIZED IN BRACKETS]. There is also a Microsoft Word-compatible version of this template available for download here.
SUBJECT: ACTION REQUIRED : VACCINATION STATUS SURVEY - COMPLETE BY [DATE]
Dear Colleagues,
As you may know, all [ORGANIZATION] employees must be either vaccinated against COVID-19 or submit to a weekly test proving they are not infected with the coronavirus to [COMPANY POLICY: e.g., “work from our offices”].
We are requiring ALL employees to provide details on their vaccination status. You must complete this survey on your vaccination status no later than [DATE].
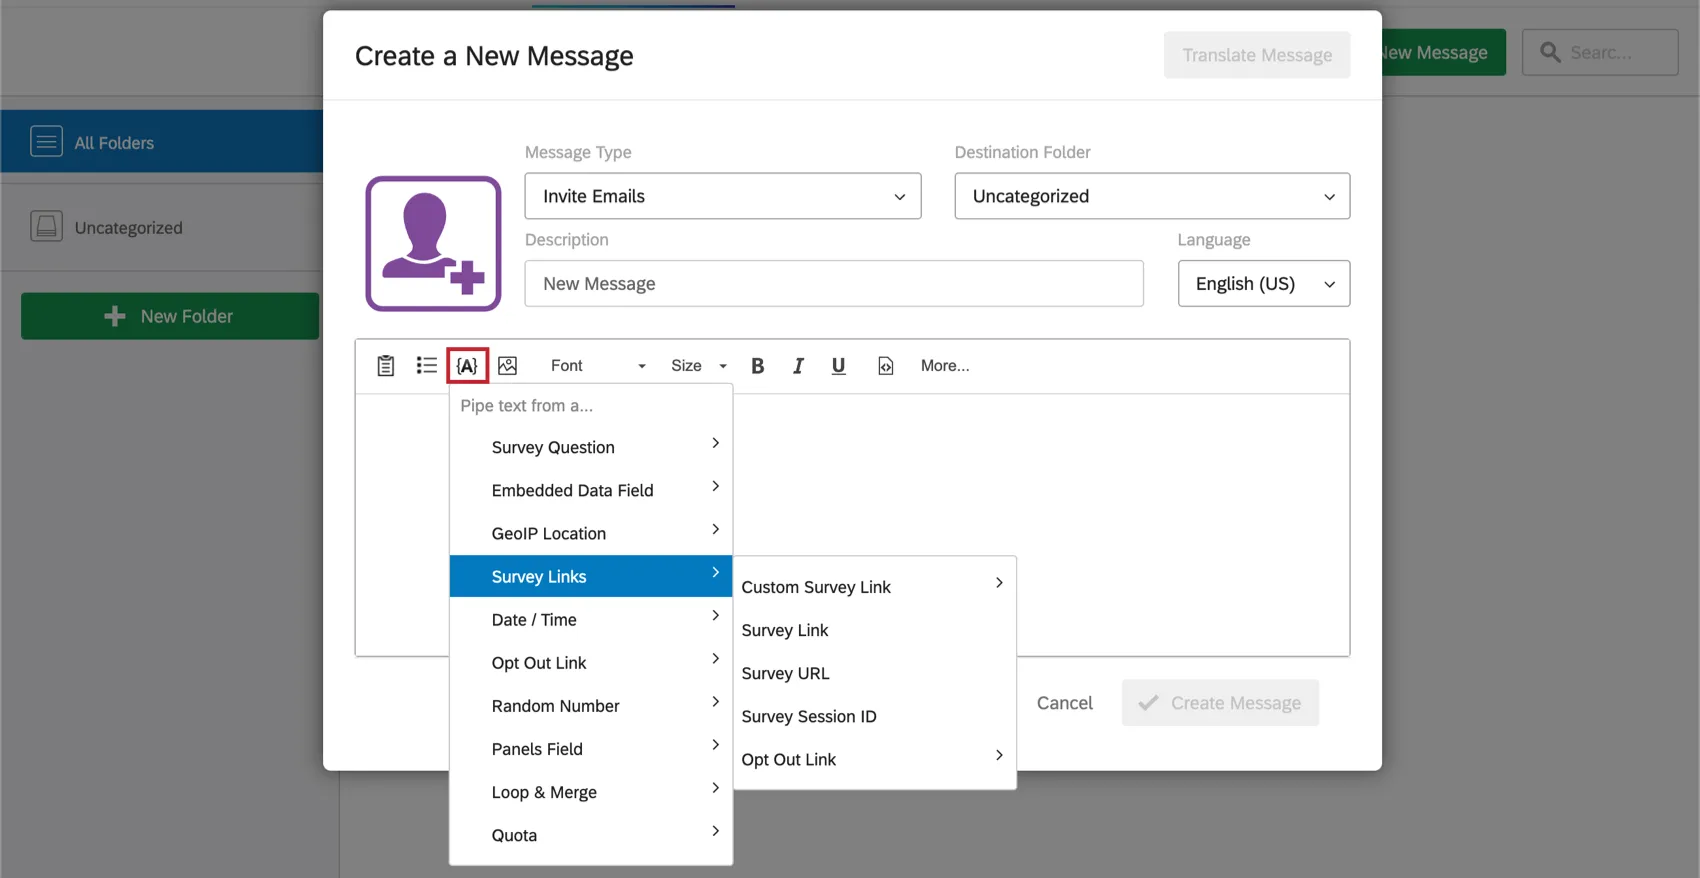
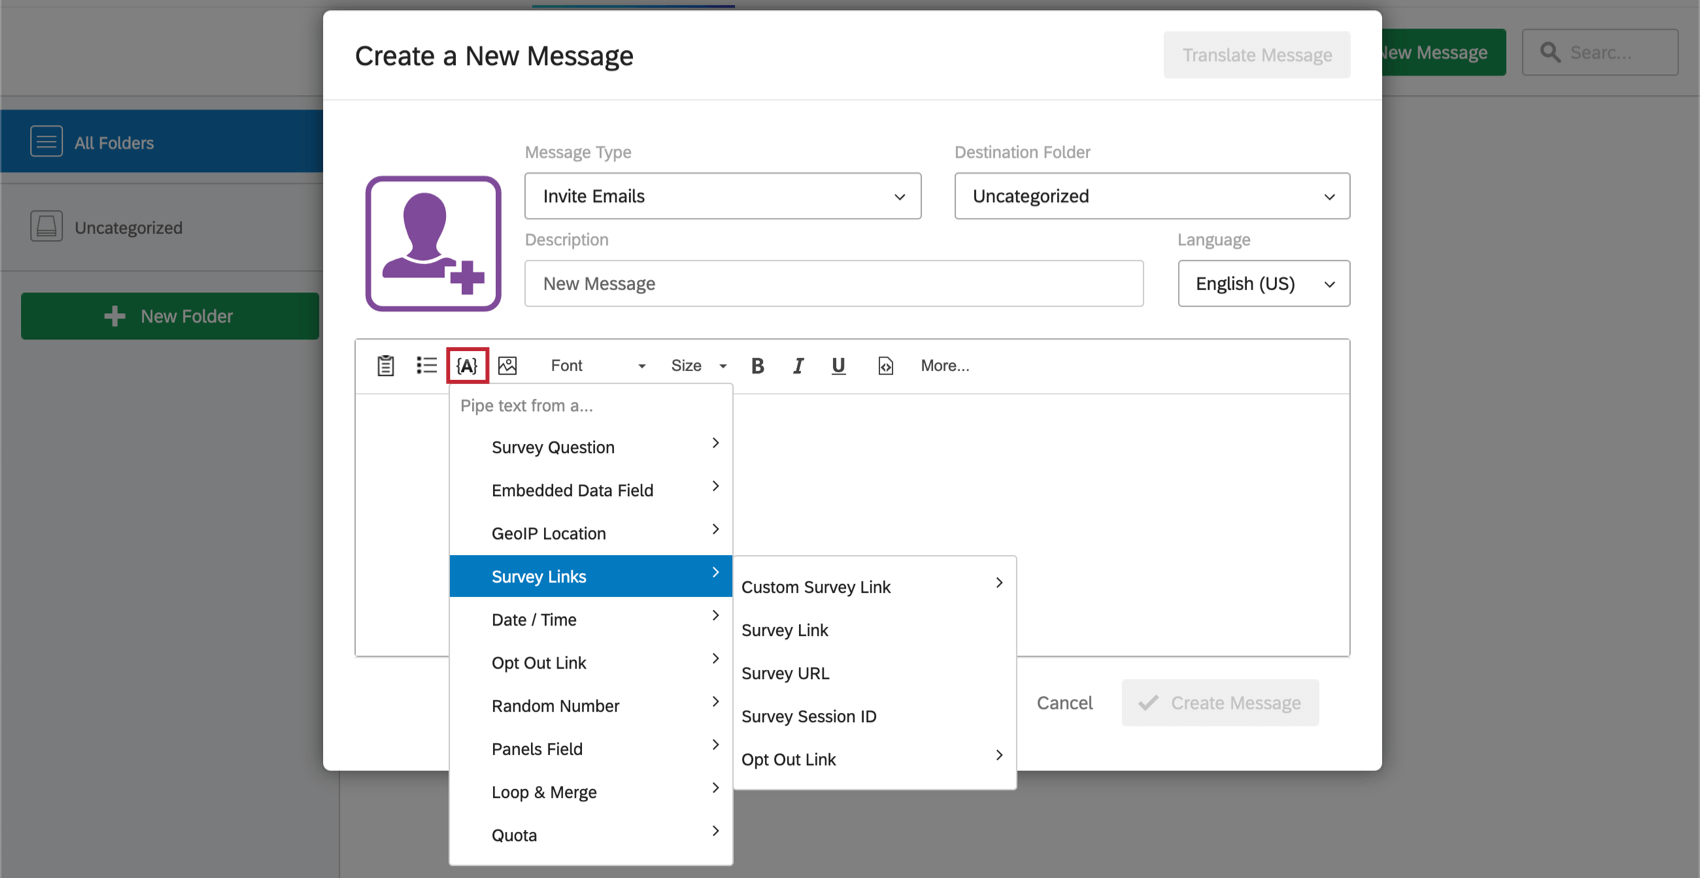
${l://SurveyLink?d=Click%20here%20to%20report%20your%20vaccination%20status}, or copy and paste the link below into your browser:
${l://SurveyURL}
The brief survey will ask about the following:
1. Your vaccination status - full, partial, or not vaccinated
2. For those who are fully or partially vaccinated:
-Details of your vaccine administration, including vaccine type, date and provider name
-Proof of vaccination (e.g., Vaccination Record Card, Immunization Record from a Healthcare Provider)
-If you do not have proof of vaccination, you will be required to attest to your vaccination status
3. For those not fully vaccinated:
-If you are planning to become fully vaccinated
-If you have received or will be seeking a medical or religious accommodation
-If you work in a location (i.e., home, outdoors, in a place where you have no contact with customers or colleagues)
Here is information [LINK] to our company policy.
Once again, this survey must be completed by ALL employees no later than [DATE].
Thank you for helping us keep all of our employees and their families safe and healthy.
Sincerely,
[INSERT SIGNATURE] Qtip: Be careful copying and pasting piped text (e.g., ${l://SurveyURL} ). Text formatting can be carried over that may invalidate the piped text, so it doesn’t work as intended. We recommend generating piped text right inside the rich content editor in the library’s message editor.
Schedule Your Distribution
Attention: Make sure you synchronize your employee roster at least six hours before you begin collecting vaccination documentation.
Once you have synchronized your employee list and configured your email messages, you can send the Vaccination Attestation Project to your employees. We recommend distributing this survey through email. If you choose a different distribution method, there are changes you’ll have to make to the setup, which we’ll explain in detail.
You can send an email from the Distributions tab of the survey or from the Directory itself. Either way, make sure you are distributing to the employee email list you created earlier.
When you’re done, go back to the Distributions tab to schedule a reminder (in the survey, in the directory). Make sure the reminder will be sent after the initial invite.
Qtip: Reminders only go to respondents who haven’t finished the survey, so you don’t have to do anything extra to make sure it’ll only go to employees who have not filled out the attestation.
SMS (Text)
You may want to send the Vaccination Attestation survey to your employees via SMS rather than email. In order to distribute the survey via SMS, you will need to ensure that you have purchased SMS credits through Account Services.
If you have SMS credits available, you can begin preparing for your SMS distribution. First, make sure that all of your employee records in XM Directory have a mobile phone number in the Phone field. The mobile phone number must include a country code. See Importing Phone Numbers for the exact formats you should use.
Your file only needs an ExternalDataReference column with employee IDs and a Phone column for phone numbers. Then you can then upload the changes to the mailing list.
Qtip: The “Consolidate duplicates” directory setting will make sure the contacts are updated instead of replaced.
Once your phone numbers are uploaded, you can send a 1-way SMS distribution to your employees. A link will be texted to each employee, who will open the survey on their phone’s mobile browser.
Qtip: The Vaccination Attestation survey is not compatible with 2-way SMS distributions.
QR codes and anonymous links
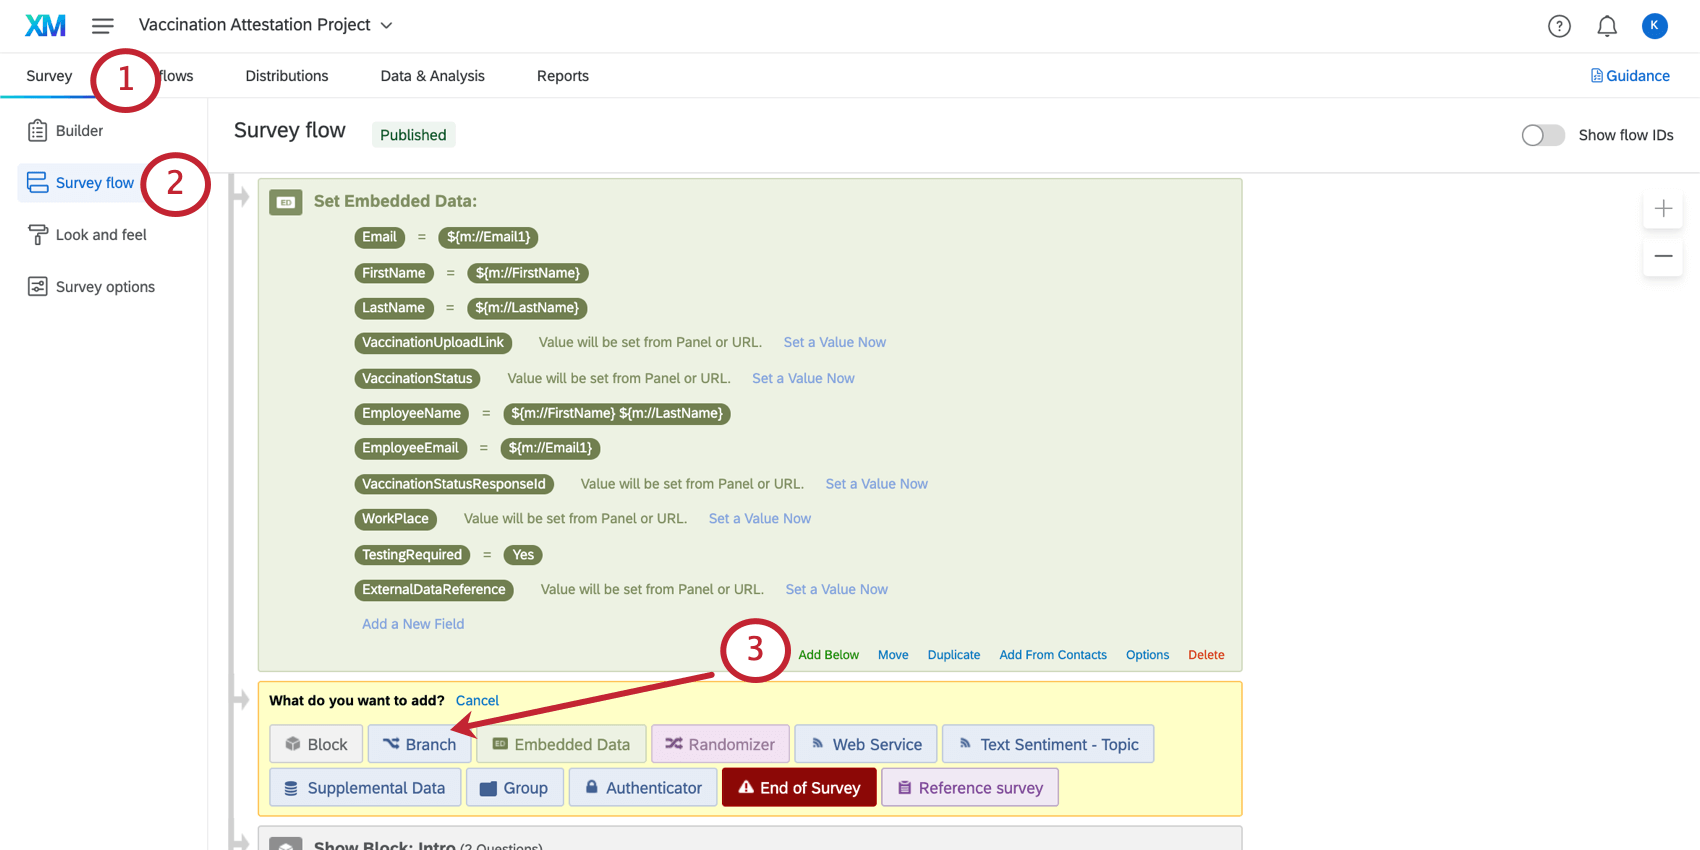
If you would like employees to access the Vaccination Attestation survey via a QR code® or a static link posted on your company intranet, you need to add an authenticator to the Vaccination Attestation survey first.
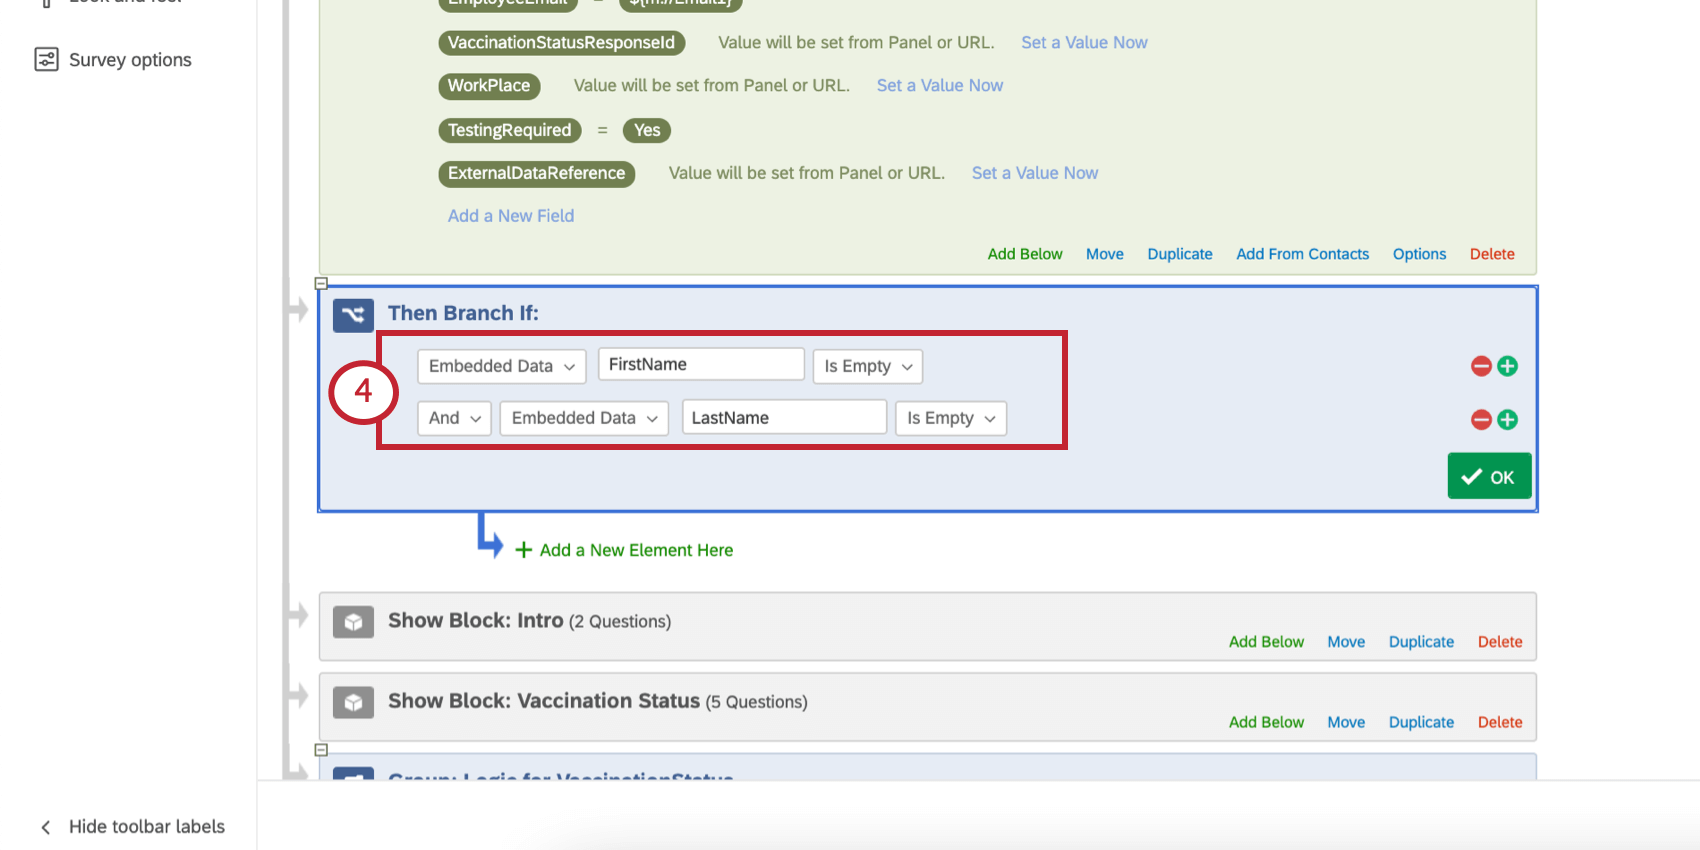
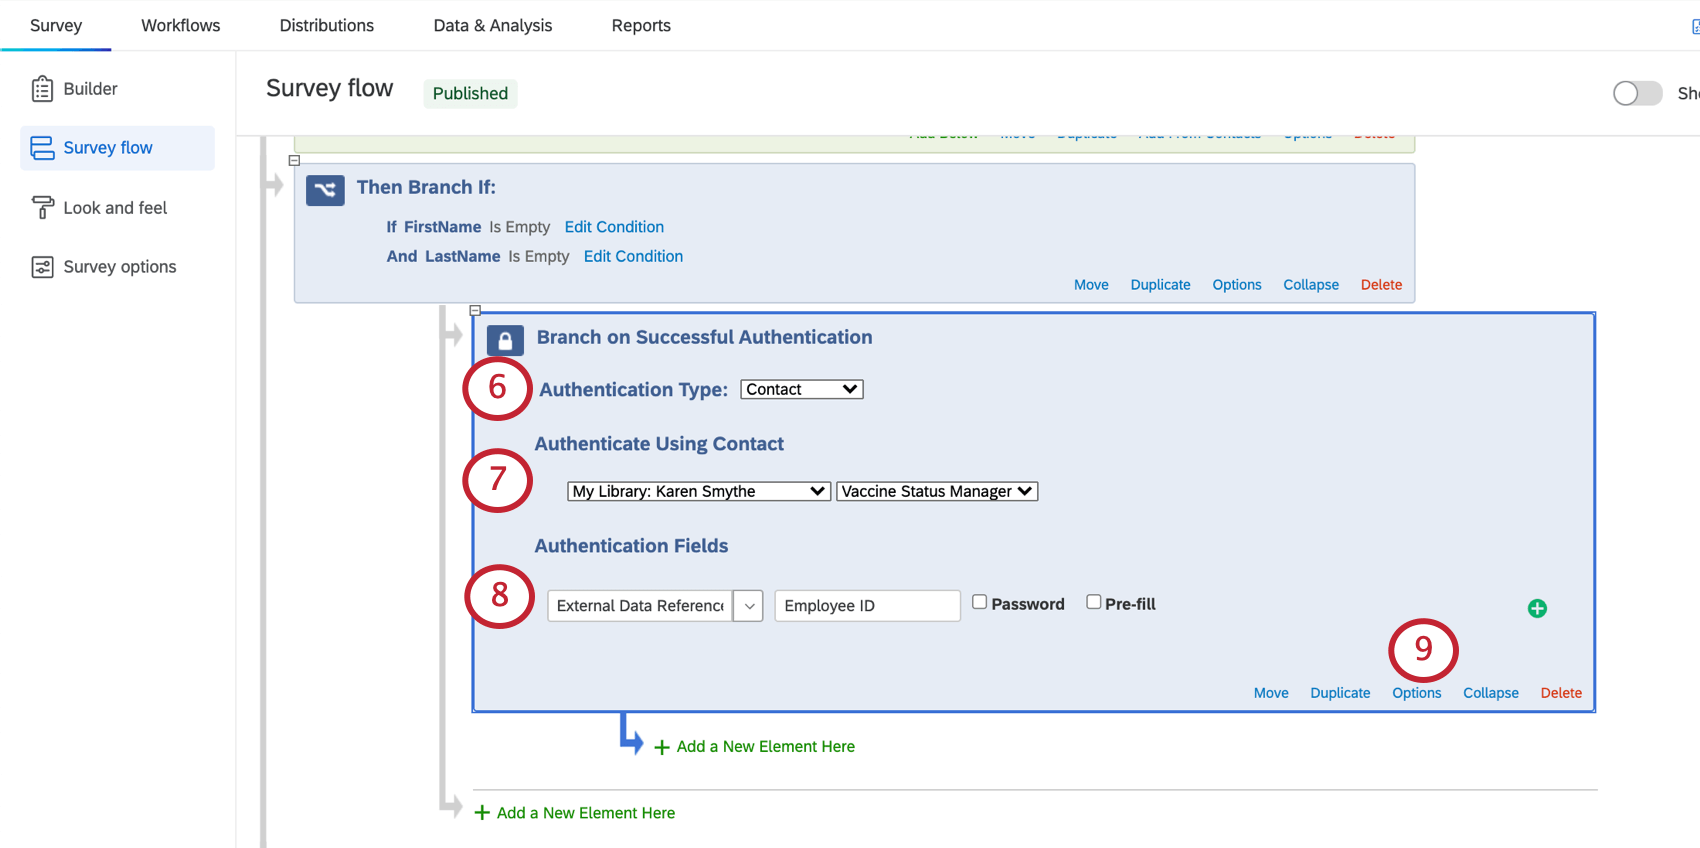
Qtip: Use the optional label field to tell the employee which ID to enter. Here, we wrote “Employee ID” because that’s the information we saved as the External Data Reference.

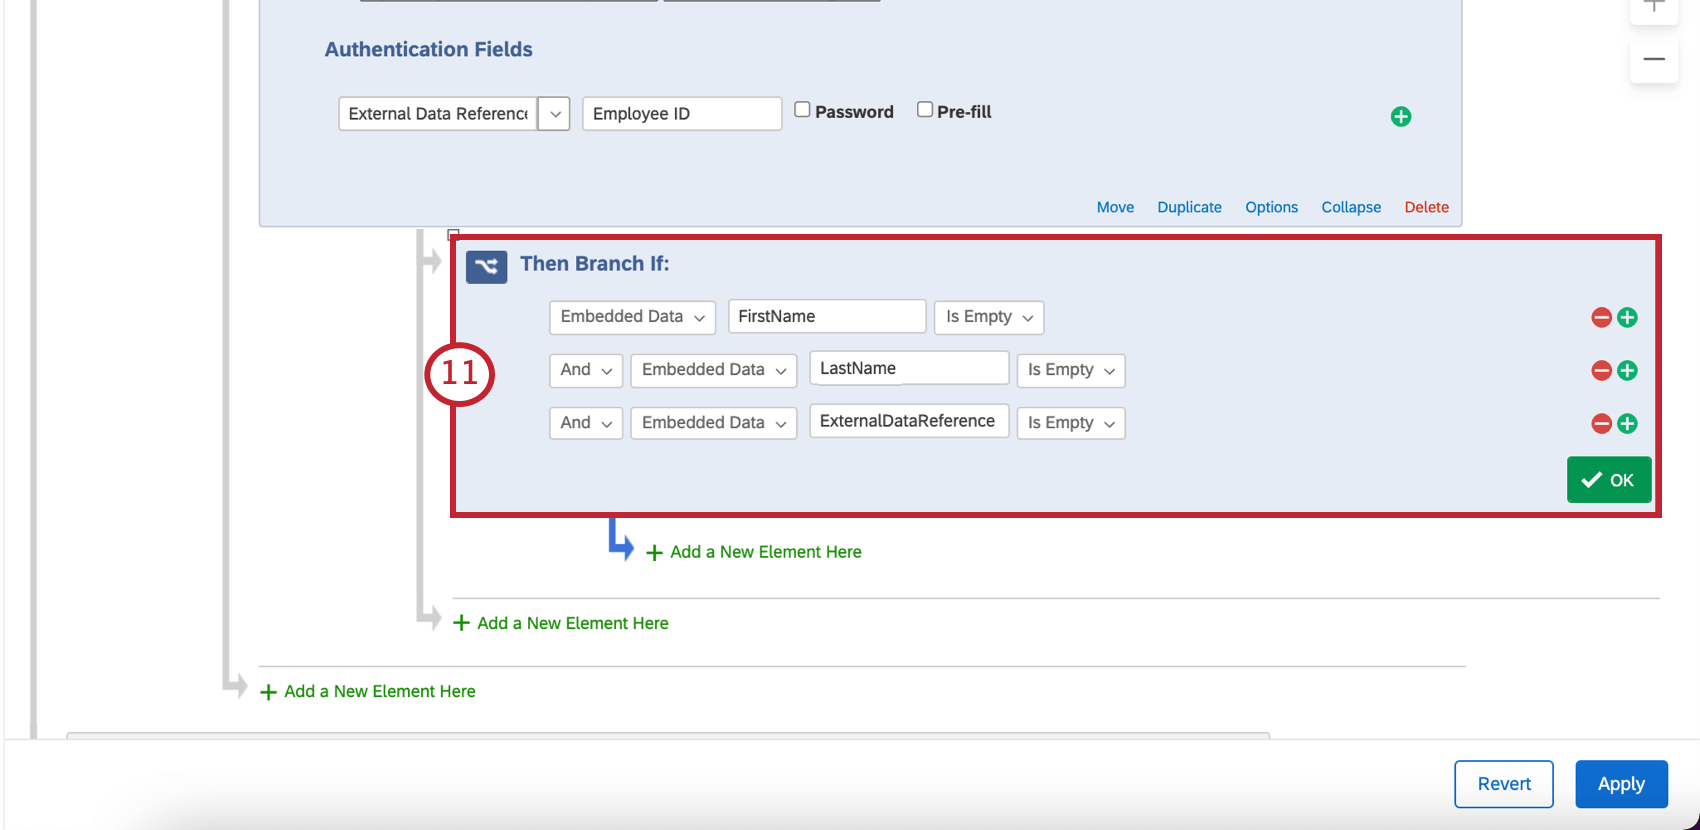
Qtip: Make sure to join all conditions with “AND.”
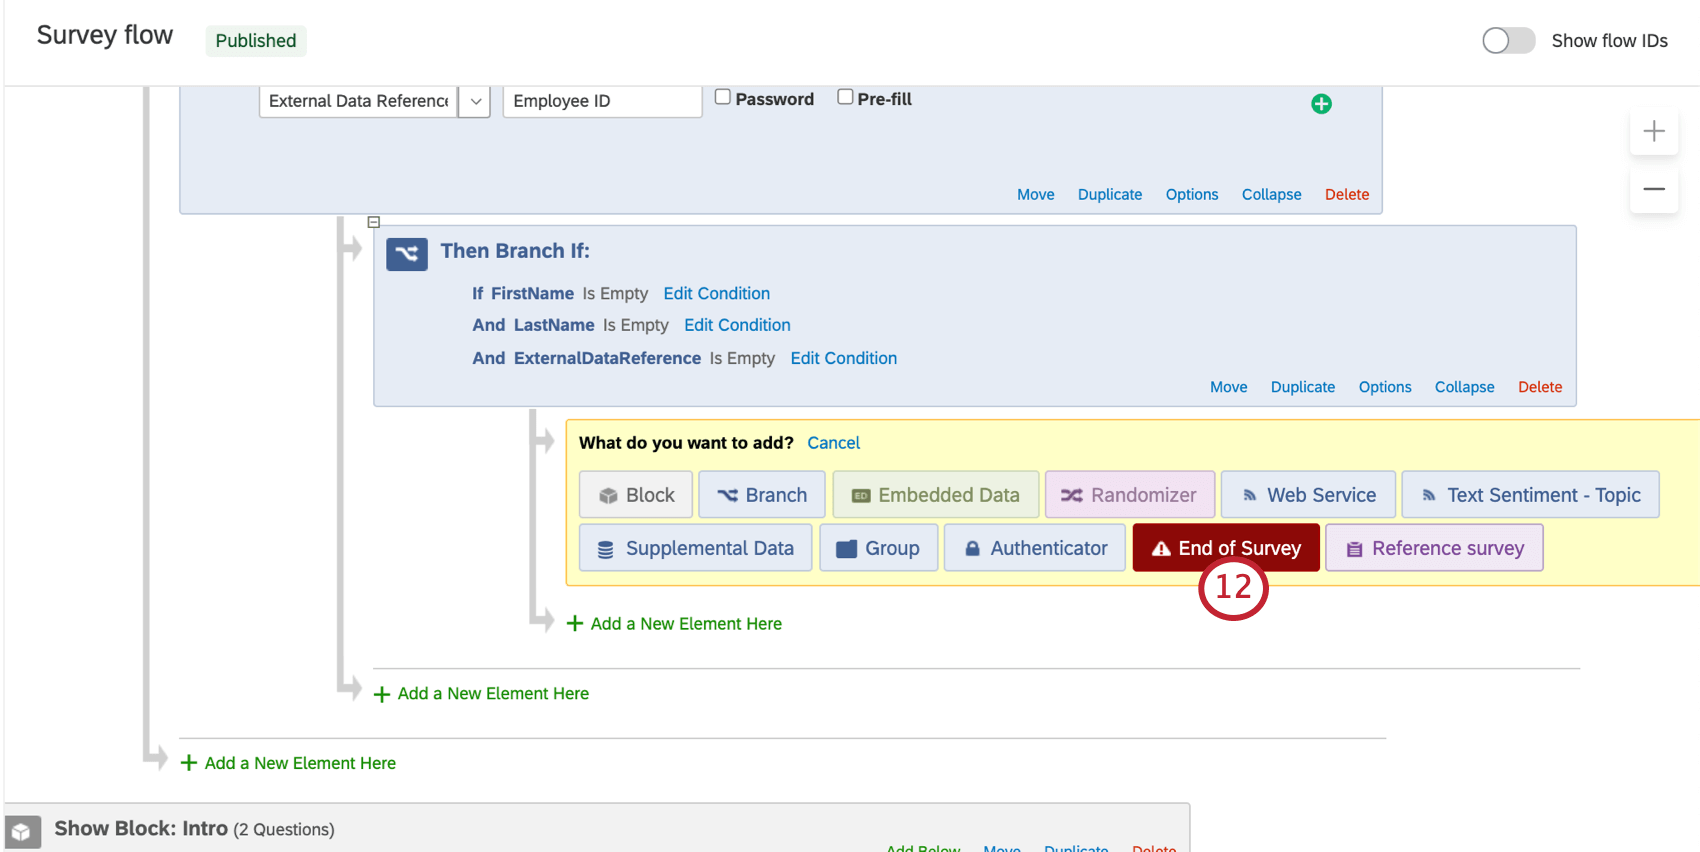
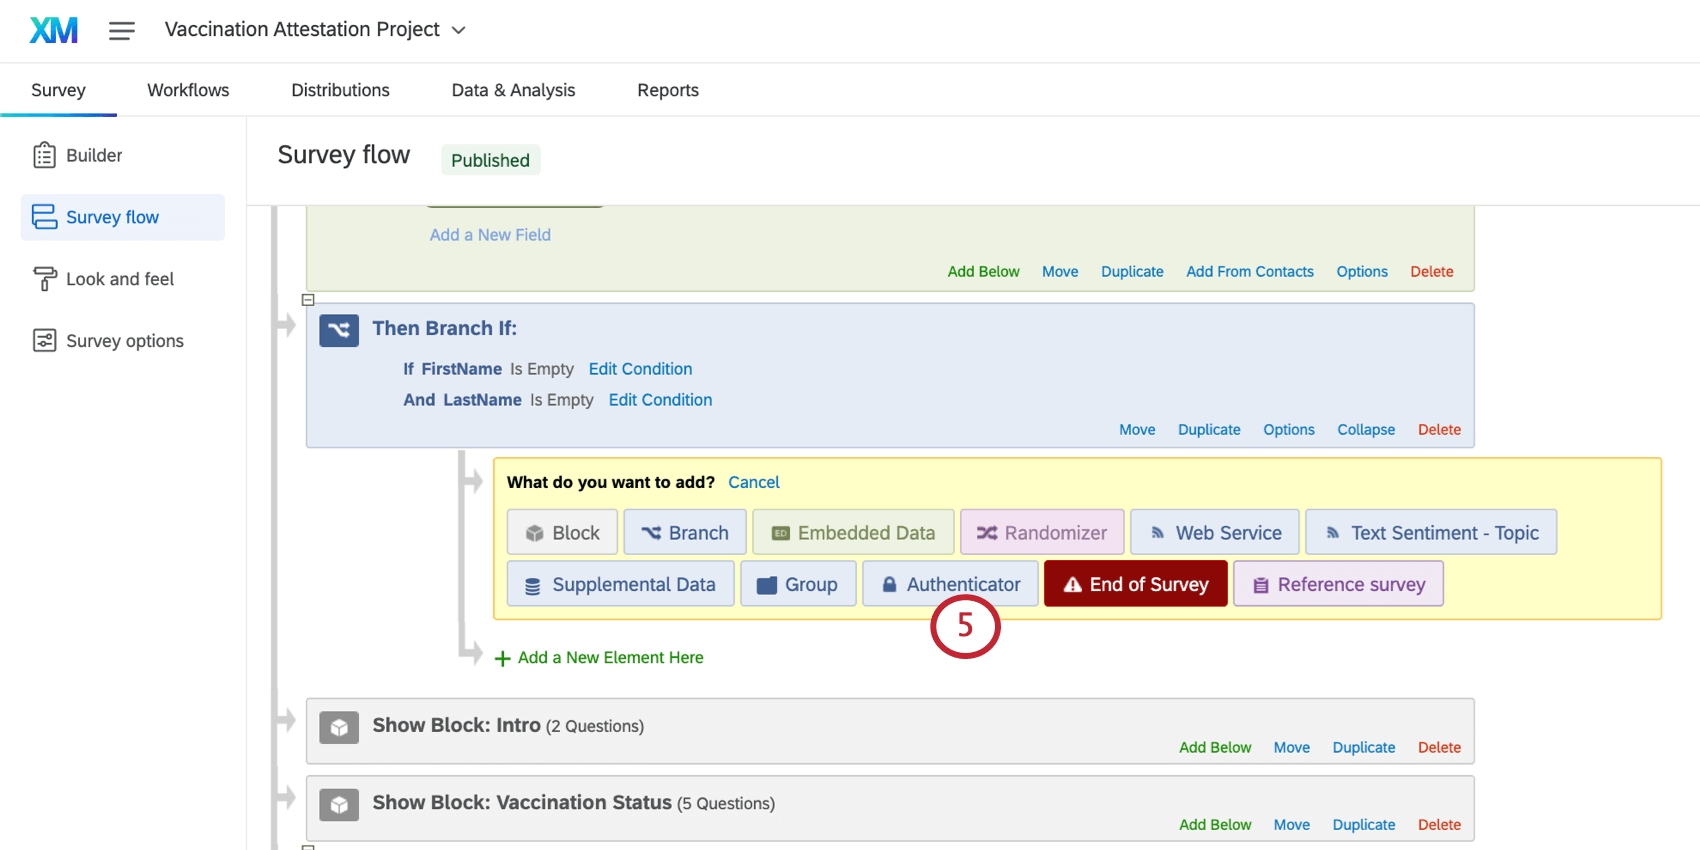
Qtip: This means employees who go through this branch will not get to fill out the survey because they did not provide the correct information. They will need to try again and provide an Employee ID.
Once you’ve completed these steps, go to the Vaccination Attestation survey to get the QR Code or the anonymous link.
Download Vaccination Documents
In order to download a single employee’s vaccination record,
You can also download all of the vaccination documents your employees provided in bulk. Please note that these files, while labelled by Response ID, will not necessarily be labelled by respondent.
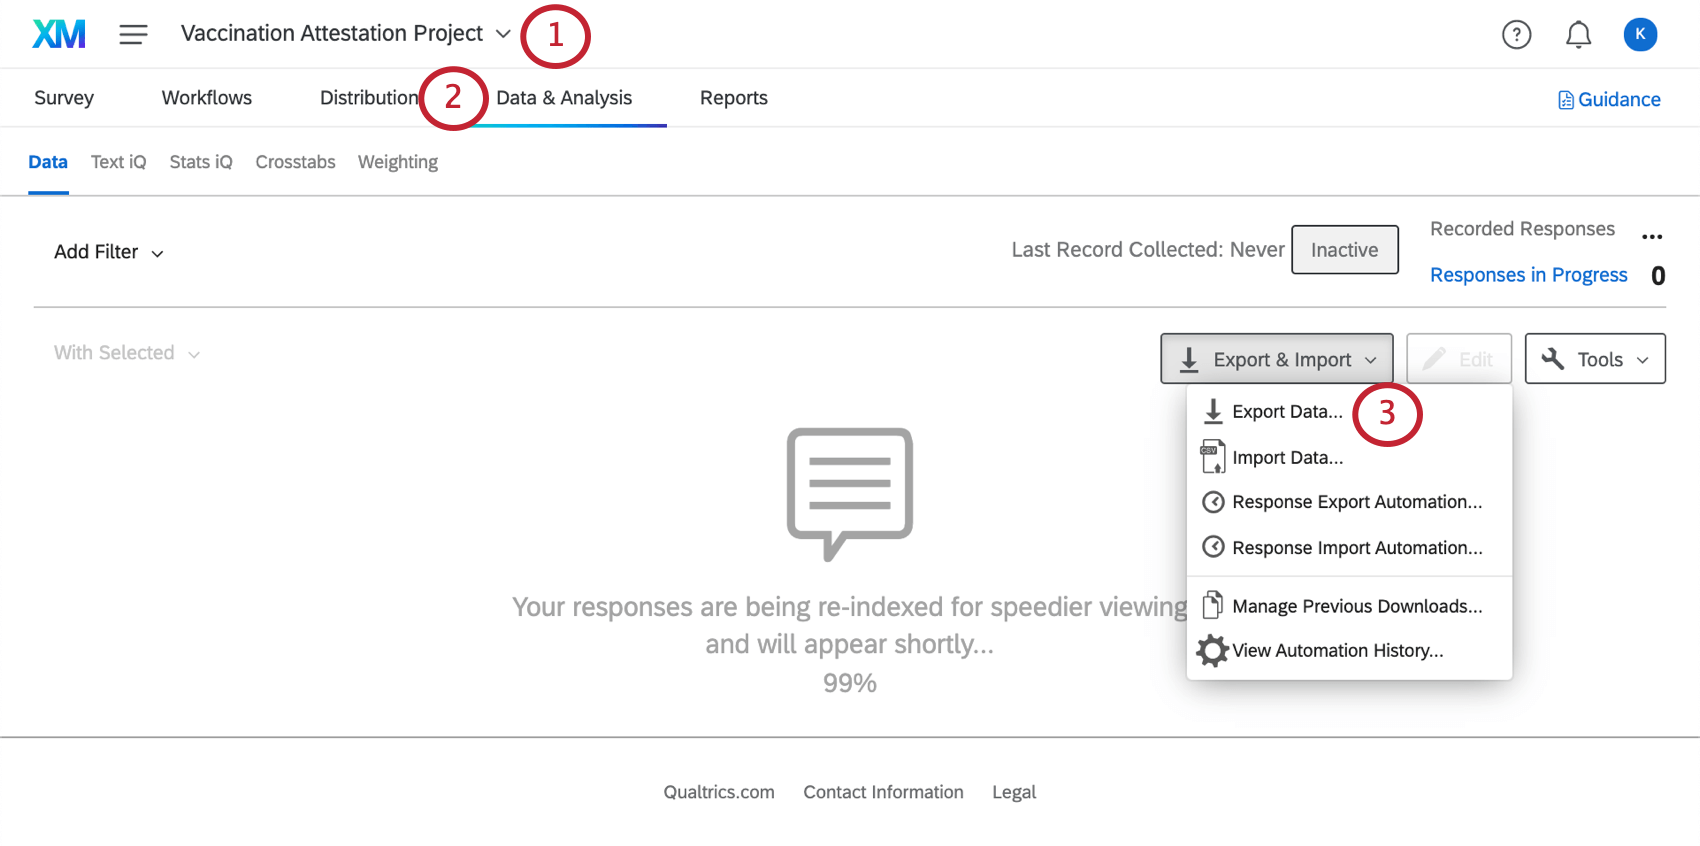
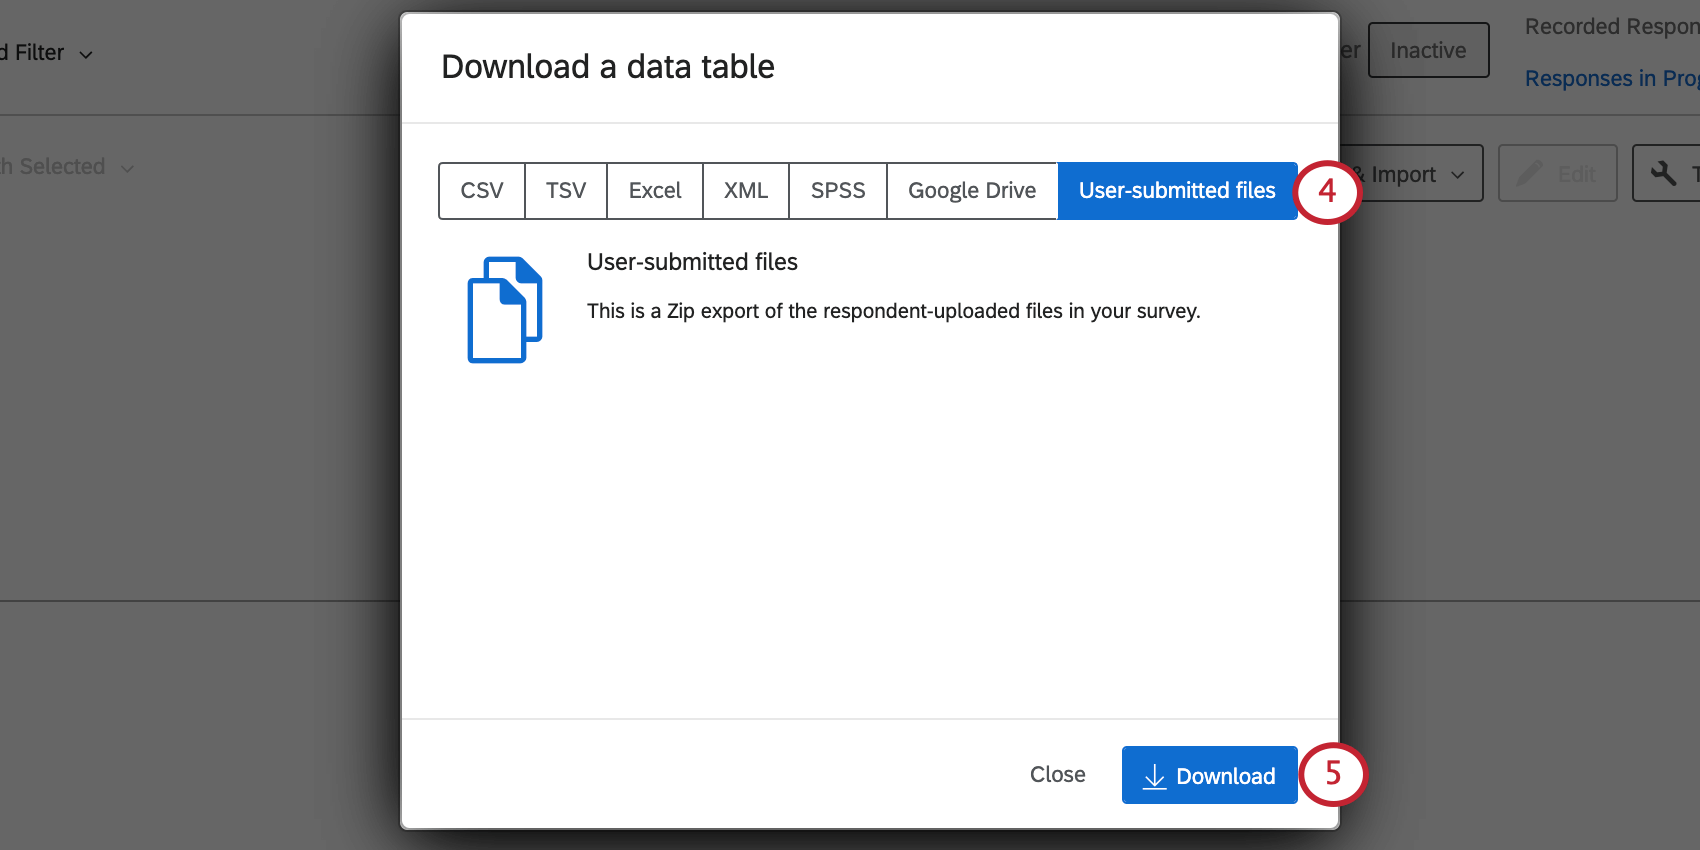
See the Exporting Response Data page for more detailed steps.
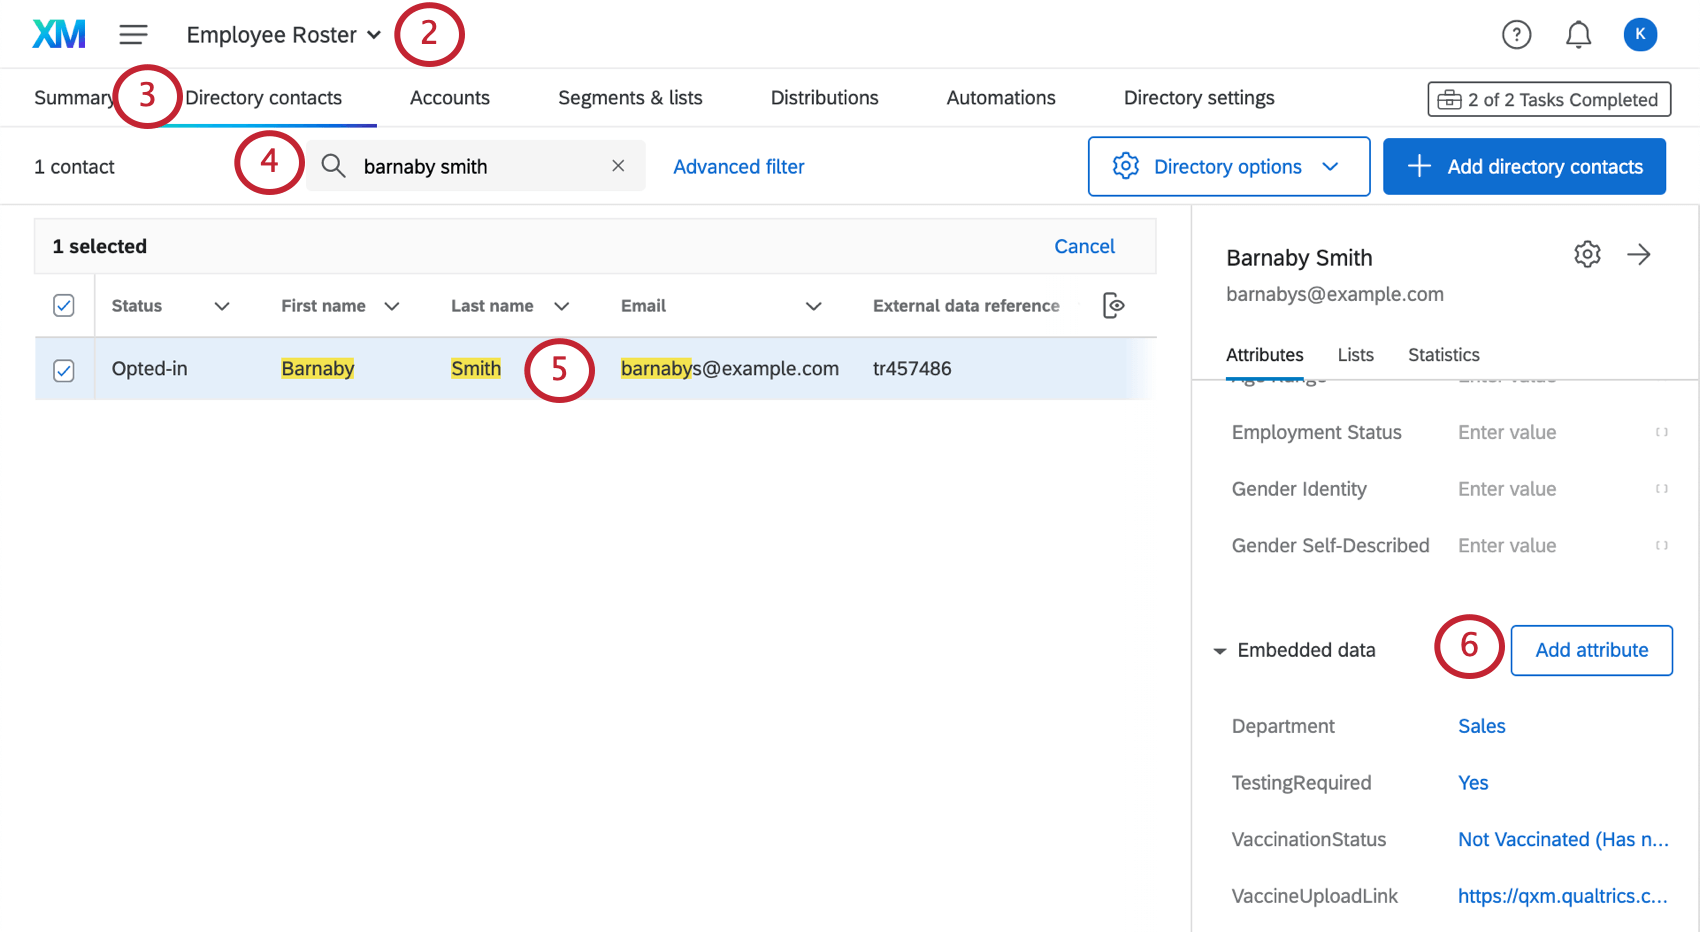
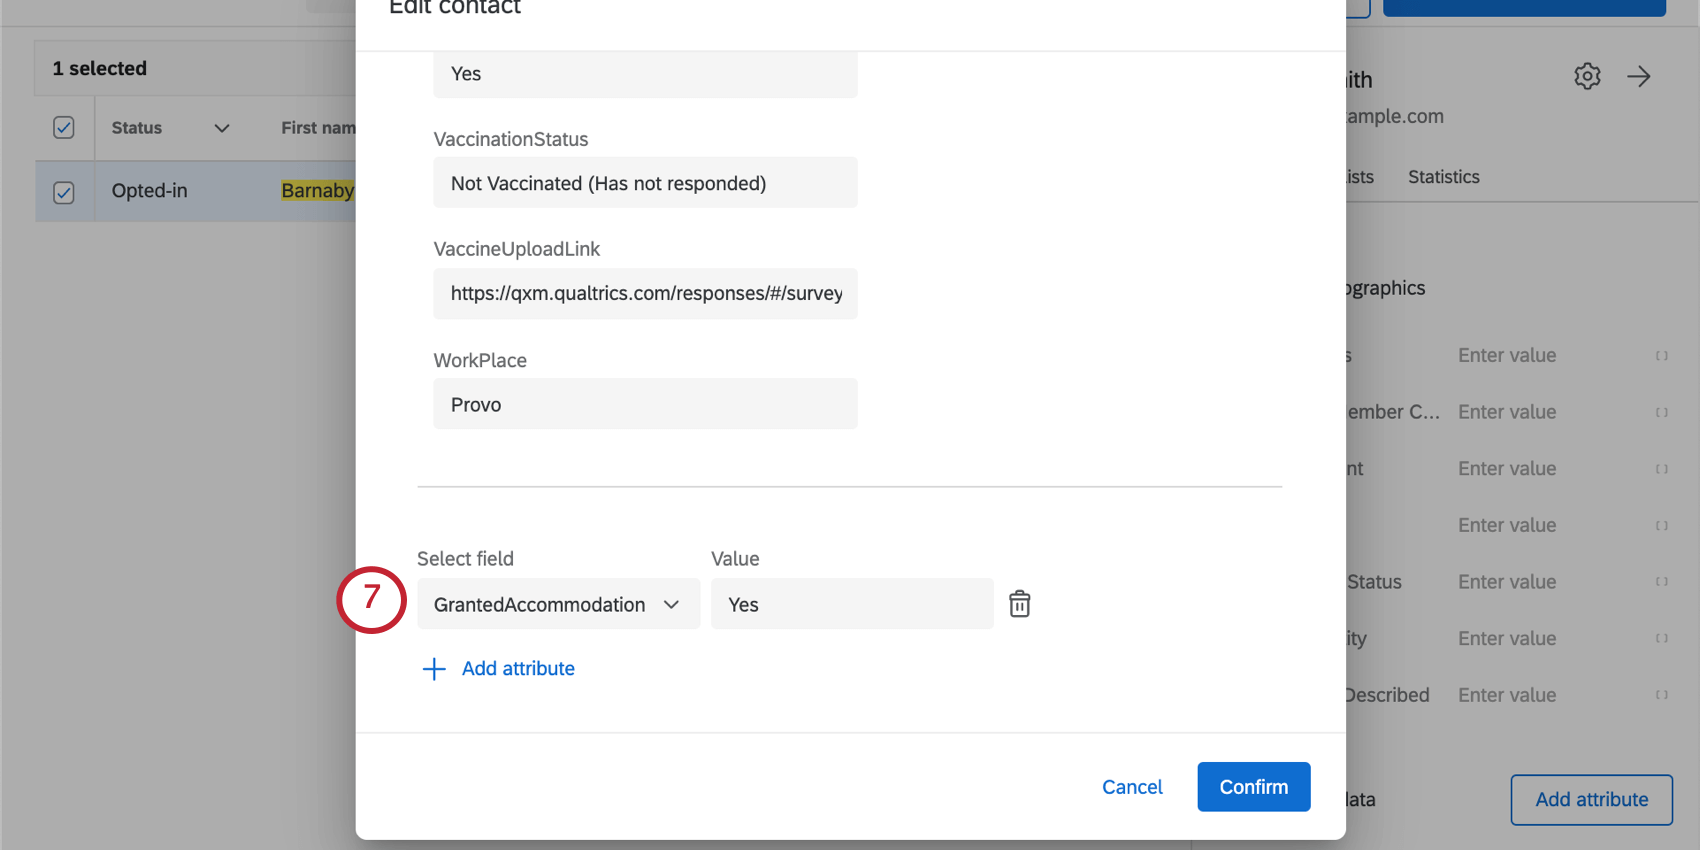
Granting Accommodations
When an employee requests an accommodation, a team of your choice that you specified during setup (e.g., Human Resources) will be notified over email. If that individual’s accommodation has been approved, the team can update that employee’s record in XM Directory to reflect that approval. To do this,
Setting your Employee Roster to Automatically Update
Depending on how your employee data is stored, you can set a workflow so that Qualtrics automatically updates your employee rosters to account for new hires and other changing employee data.
First, you will need an import source. Once you have determined how the employee roster will be transferred to Qualtrics, you can configure a workflow to import your data to Qualtrics.
Vaccination Status Dashboard
The Vaccination Status Dashboard can be found on the Projects page or inside your program by searching its name, “Vaccination Status Dashboard.”
In this project is a premade dashboard designed by our top subject-matter experts. It includes the following pages:
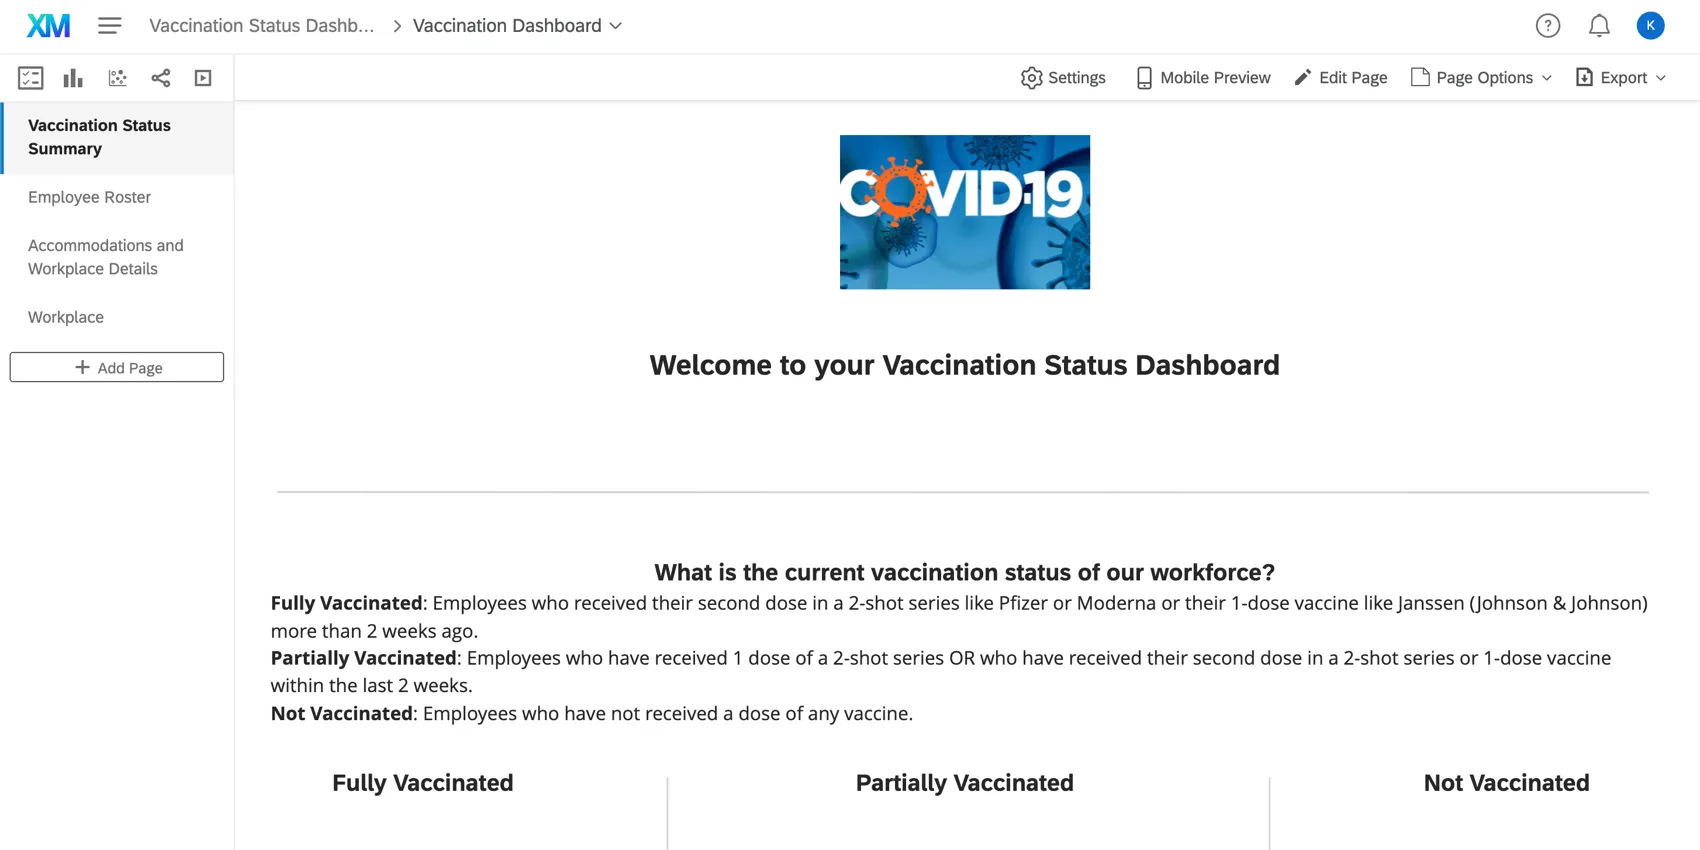
- Vaccination Status Summary: See how many employees fit each vaccination status, how many have been granted special workplace situations, and how many people are either seeking or have been granted an accommodation.
- Employee Roster: A roster of all current employees and their vaccination statuses.
- Accommodations and Workplace Details: This page breaks down details on employees who state they have either:
- Requested or been granted a reasonable accommodation under civil rights laws; or
- Work from home, outdoors, or in a workplace where no other individuals such as coworkers or customers are present.
- Workplace: This page gives information similar to the Vaccination Status Summary, but broken out by workplaces.
You are welcome to add more pages or make edits as needed. If you delete premade dashboard content, it will not be retrievable, and you will have to rebuild it by scratch.
Dashboard Editing
Check out these introductory pages to get started.
- Getting Started with CX Dashboards
- Step 1: Creating Your Project & Adding a Dashboard
- Step 2: Mapping a Dashboard Data Source
- Step 3: Planning Your Dashboard Design
- Step 4: Building Your Dashboard
- Step 5: Additional Dashboard Customization
- Step 6: Sharing & Administering Users
Qtip: Once you’ve uploaded all your dashboard users, you can easily send everyone their login credentials.
Managing Your Program
Once you’ve created your Vaccination Status Manager, a new program will be created. It contains various resources we have developed to help you run your program, including the Vaccination Attestation Project, the Employee Status Project, and the Vaccination Status Dashboard.
Qtip: You can add and remove projects from this program.
In the center is a watchlist. This is a helpful place to keep track of response rates without looking into individual surveys.
To learn more about generally navigating a program and adjusting the watchlist reports, see the Programs support page.
Qtip: You can share this program with other users in your Qualtrics license.
Permissions Required for the Vaccination Status Manager
The following is a list of permissions required to create this solution.
- General
- Access API
- Create Surveys
- Manage Workflows Across Projects
- Use CX Dashboards
- File Upload
- Signature
- XM Directory
- Manage Directories
- Multiple Directories
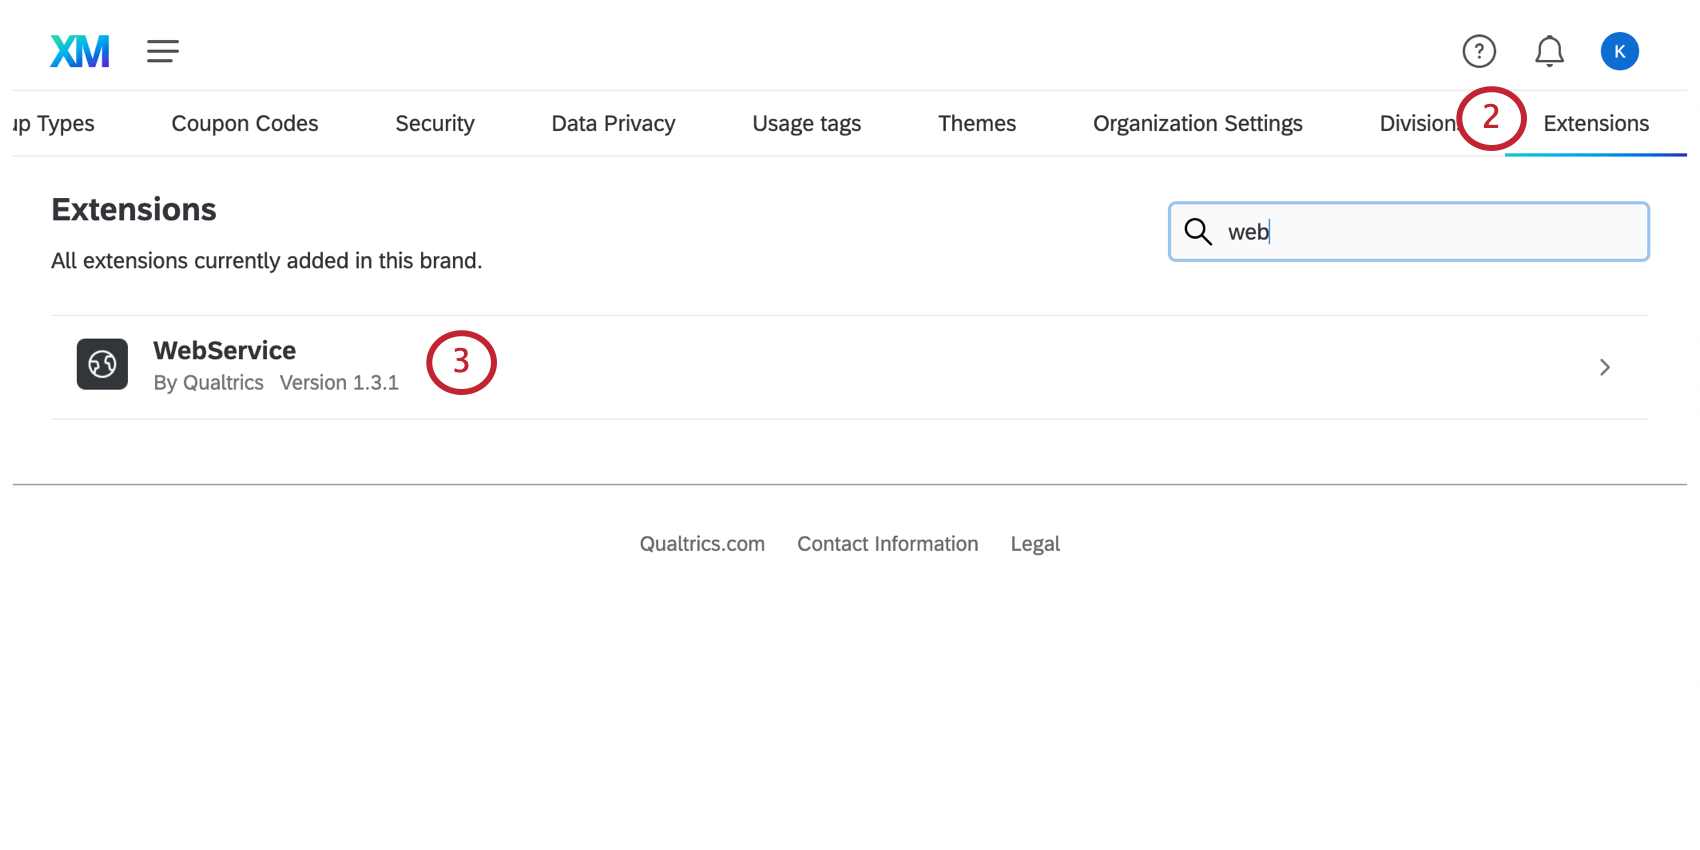
- Extensions
- WebService
- Mailing List to Survey Synchronizer
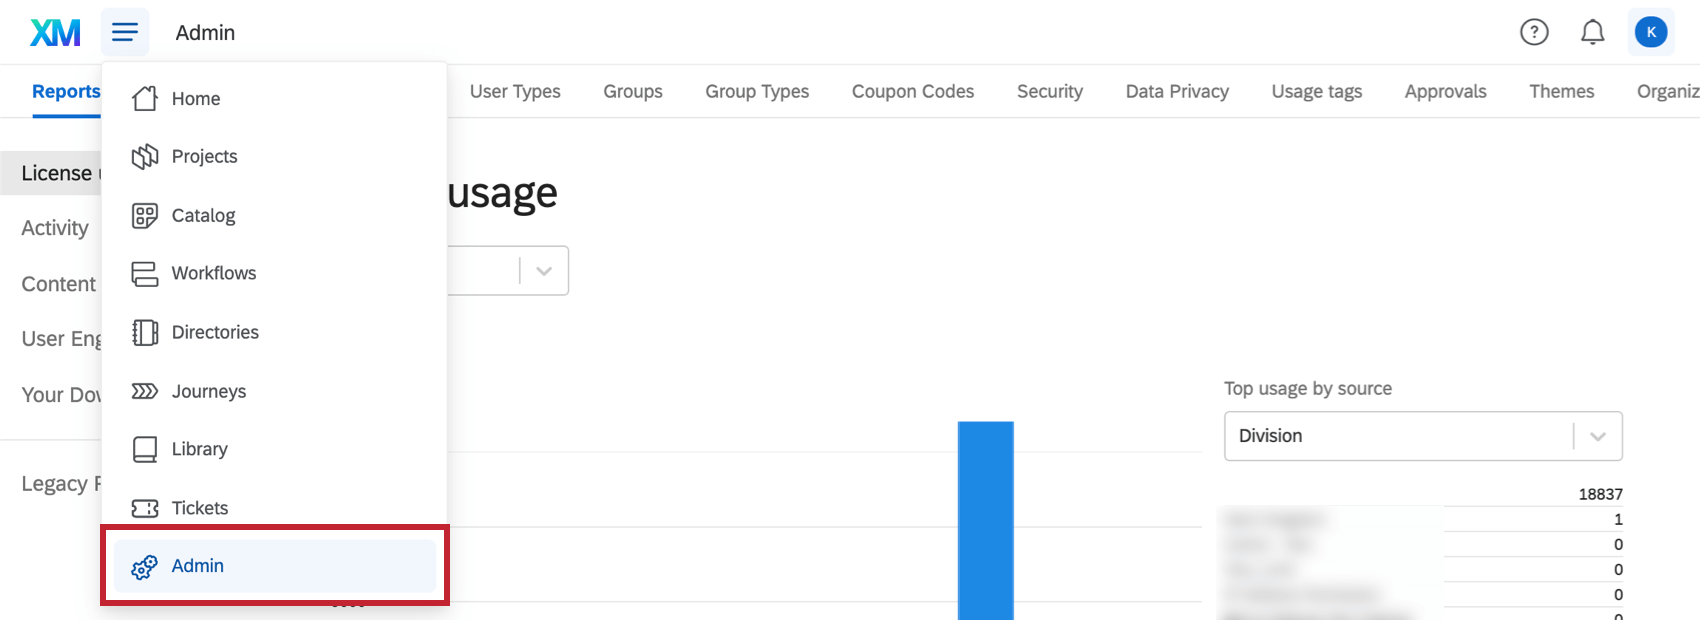
We recommend a Brand Administrator create the Vaccination Solution Manager, since they often have most of the permissions required, in addition to access to the Extensions tab.
“Update Vaccination Status” Web Service
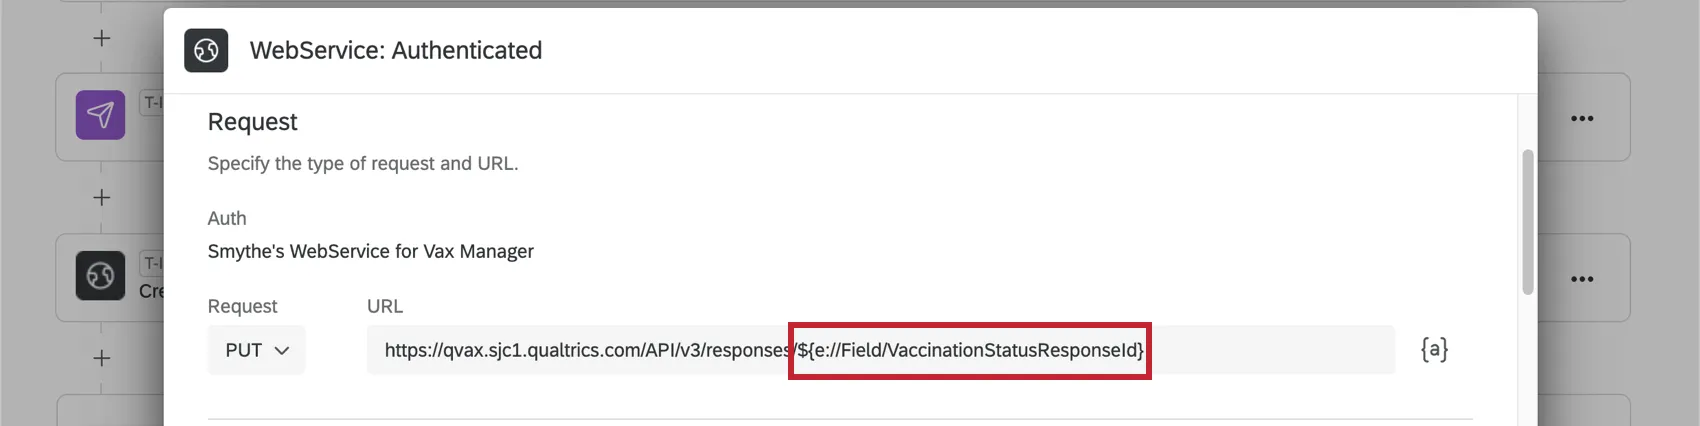
The Vaccination Status Manager contains several automations, which can be found in the Workflows tab of the Vaccination Attestation Project. One of these workflows contains a web service.

Whenever an employee submits an update on their vaccination status, the web service updates the employee’s response in the roster so this status can be reported using the corresponding dashboards. To break this down further,

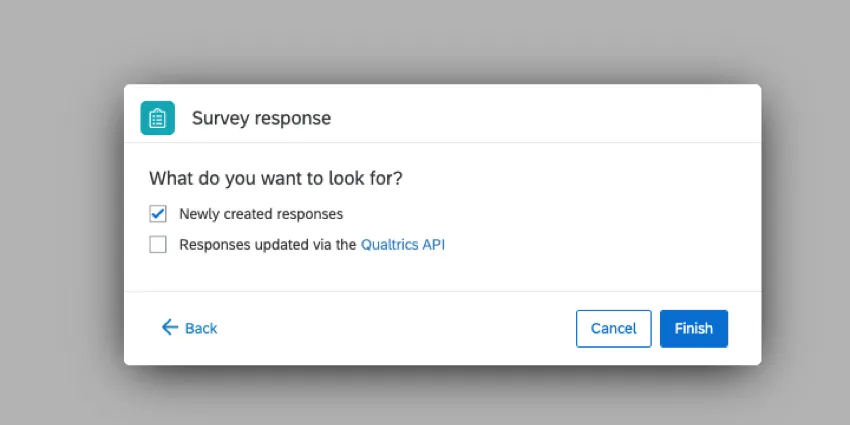
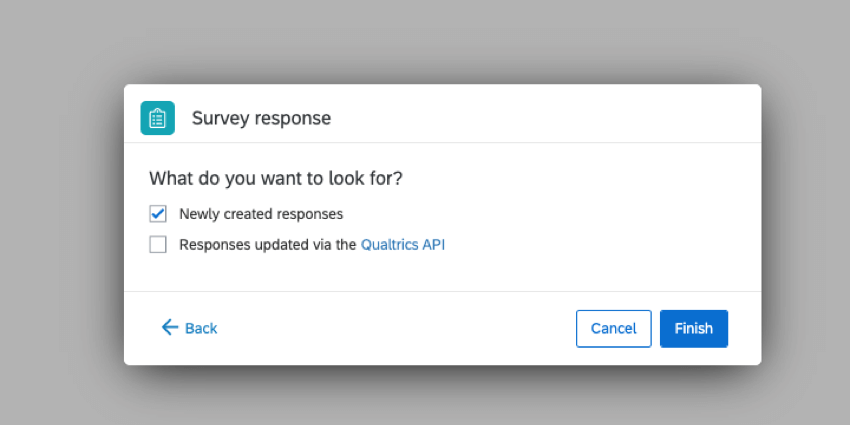
Qtip: This event should only be triggered for Newly created survey responses, not ones updated by API.


Qtip: Response IDs are internal Qualtrics IDs linked to individual survey responses. The field that stores this ID for the sake of this web service is one created by the mailing list to survey synchronizer. This field is usually called something like “VaccinationStatusResponseId”. It is used to identify the correct employee’s response in the Employee Status Project and update it accordingly.

Qtip: This email is mentioned at the end of the solution setup.
Additional Troubleshooting Resources
In addition to the steps described on this page, there are other resources that can help you troubleshoot the Vaccination Status Manager.
- Troubleshooting the Qualtrics Vaccination & Testing Manager Solution: A page describing how to troubleshoot a similar solution.
- Using a Mailing List to Survey Synchronizer in COVID-19 Response Solutions: A page that explains how to use the mailing list to survey synchronizer in the Vaccination Status Manager.
- Testing/Editing an Active Survey: A helpful guide to which edits are safe and which edits are not safe to make to a survey after you’ve started collecting data.
Attention: When editing the survey, keep in mind that changes you make to questions could also affect workflows and dashboards built into the solution. Best practice is to avoid deleting content and to perform survey edits before you start collecting data.
QR Code is a registered trademark of DENSO WAVE INCORPORATED.
FAQs
Who is the Brand Administrator of my account and what types of tasks can they perform?
Who is the Brand Administrator of my account and what types of tasks can they perform?
What will happen if I redo the setup assistant on my XM Solution?
What will happen if I redo the setup assistant on my XM Solution?
If you want to start the setup assistant over, do the following: Please note that if you want to start over from scratch, you can also create a new XM Solution instead.
Is this solution HIPAA compliant?
Is this solution HIPAA compliant?
If you have specific questions or concerns, we encourage you to seek your own legal advice about what additional steps, if any, you need to take to comply with applicable privacy laws or company policies. We have included suggested consent statements in these materials but you will need to confirm whether these statements are adequate or need to be modified to meet your specific needs.
How can I tell if I’m a Brand Administrator?
How can I tell if I’m a Brand Administrator?
You can easily find out who your organization’s Brand Administrators are by logging into the Customer Success Hub.
That's great! Thank you for your feedback!
Thank you for your feedback!