Trustpilot Inbound Connector
About the Trustpilot Inbound Connector
You can use the Trustpilot inbound connector to import ratings and reviews from Trustpilot into XM Discover. This enables you to aggregate and study feedback from customers using XM Discover’s analytics and reporting features.
Qtip: You’ll need your Trustpilot API token to set up the connection.
Setting Up a Trustpilot Inbound Job
Qtip: The “Manage Jobs” permission is required to use this feature.
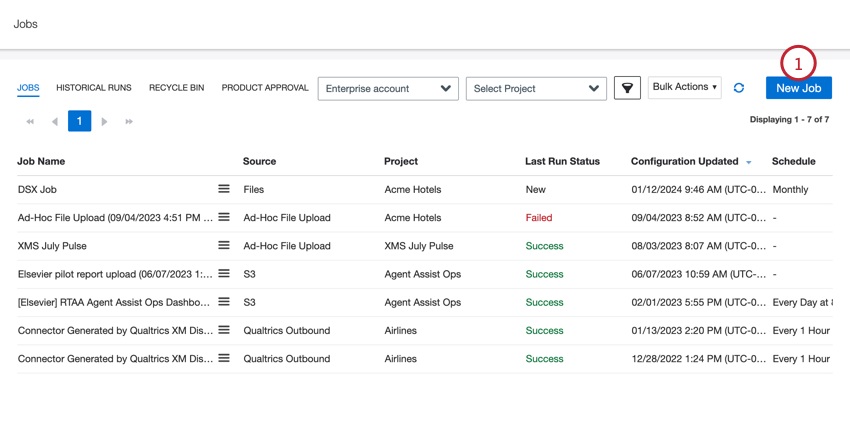
- On the Jobs page, click New Job.
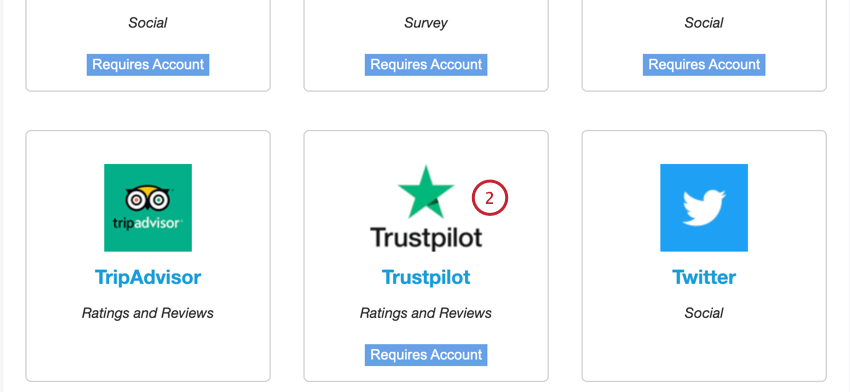
- Select Trustpilot.
- Choose the project to load data into.
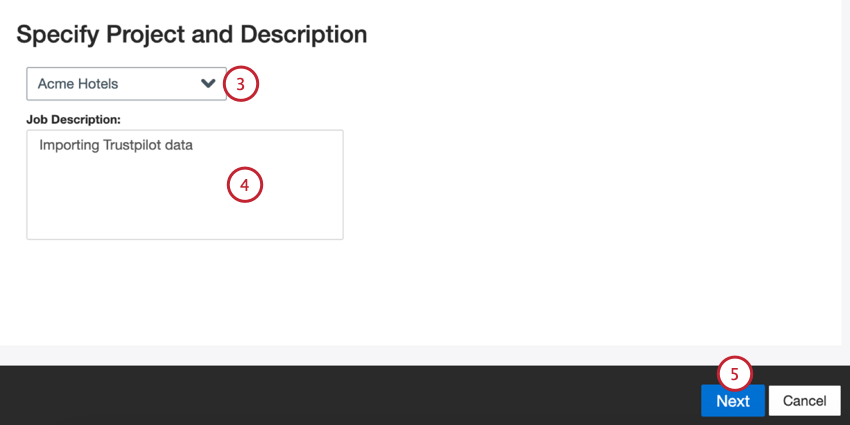
- Give your job a description so you know its purpose.
- Click Next.
- Choose a Trustpilot account to use, or select Add New to add a new one.
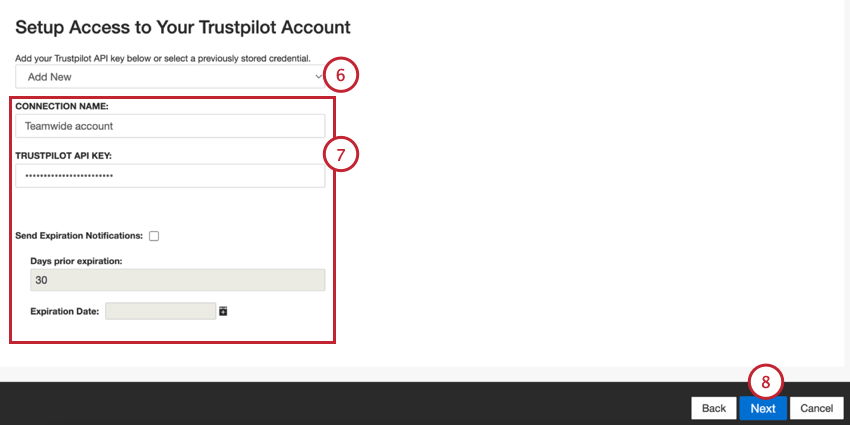
- If adding a new account, enter the following:
- Connection name: Give the connection a name so you can identify it.
- Trustpilot API Key: Your Trustpilot API key.
- Send Expiration Notifications: If you’d like your account credentials to expire after a certain amount of time, select this option.
- Days Prior Expiration: If enabling expiration notifications, enter how many days you’d like to be notified before the expiration. You may enter a value between 1 to 100 days.
- Expiration Date: Set the date when the credentials will expire. Click on the box to open a calendar to pick the date.
- Click Next.
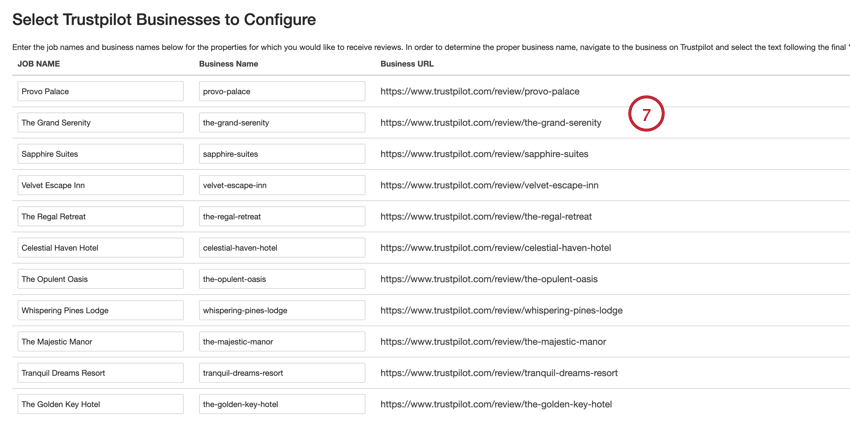
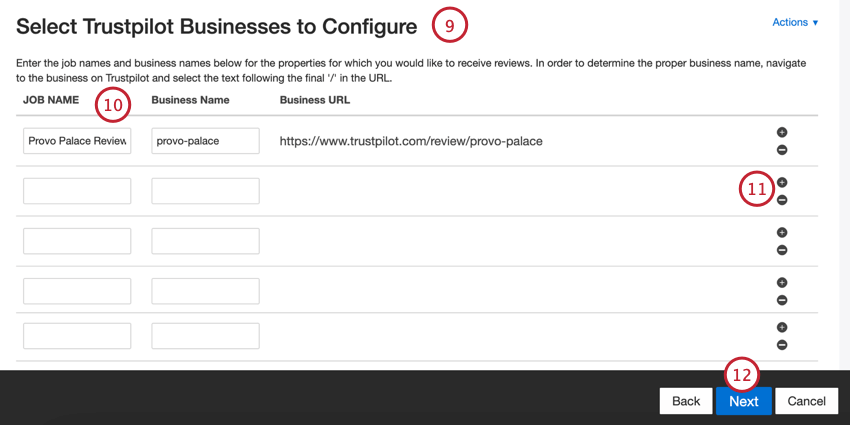
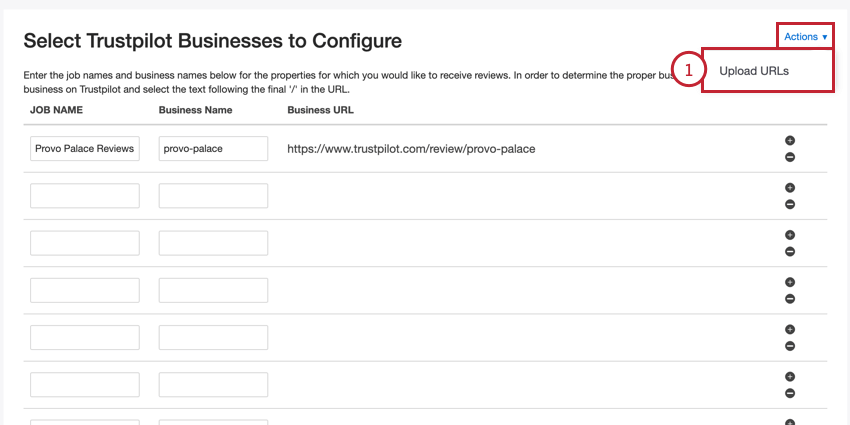
- Provide one or more property names of a hotel, restaurant, or attraction for which you wish to pull data. You can do this either manually or via a file.
 Qtip: These steps cover adding properties manually. See Uploading Properties via a File for steps on how to upload a file.
 - If adding properties manually, enter the following information:
- Job Name: A name for the property and for the data job. This is the name that will appear for the job in XM Discover
- Business Name: The end part of the property’s URL from Trustpilot.
Qtip: To find the right business name, navigate to the business on Trustpilot and select the text following the final ‘/’ in the URL.Example: If the property URL is “https://www.trustpilot.com/review/provo-palace, then you would enter “provo-palace.”Qtip: The Business URL field will automatically update based on the business name. You can double check this URL matches the URL from Trustpilot.
- You can add additional properties by clicking the plus sign ( + ) or remove properties by clicking the minus sign ( – ).
- Click Next.
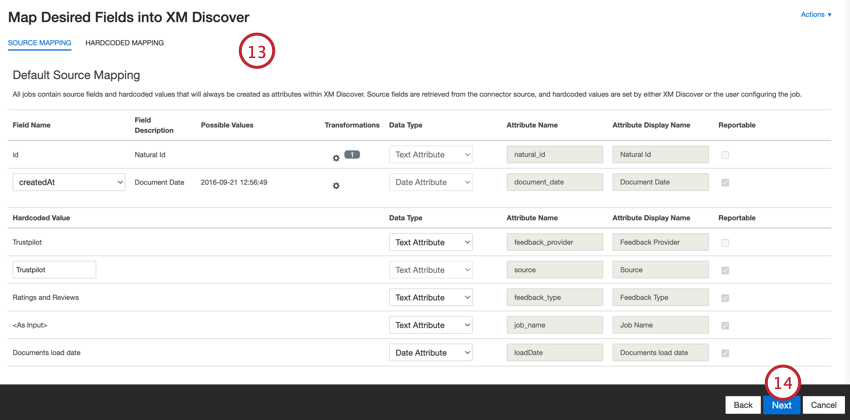
- If needed, adjust your data mappings. See the Data Mapping support page for detailed information on mapping fields in XM Discover. The Default Data Mapping section has information on the fields specific to this connector.
- Click Next.
- If desired, you can add a connector filter to filter the incoming data to limit what data is imported.
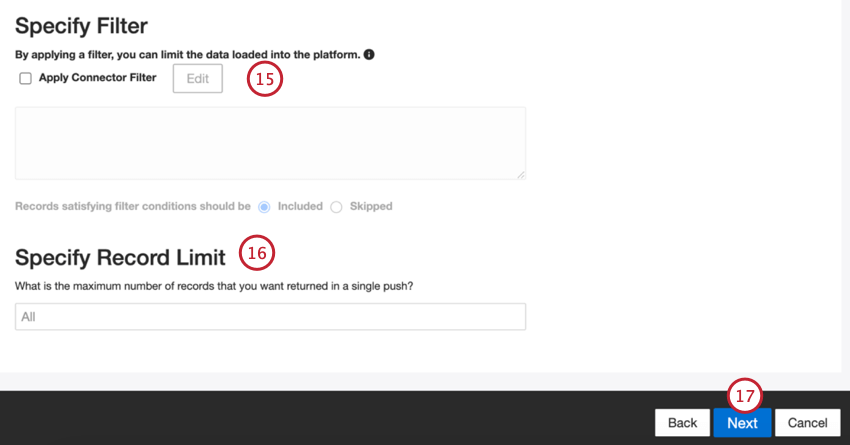
- You can also limit the number of records imported in a single job by entering a number in the Specify Record Limit box. Enter “All” if you would like to import all records.
- Click Next.
- Choose when you’d like to be notified. See Job Notifications for more information.
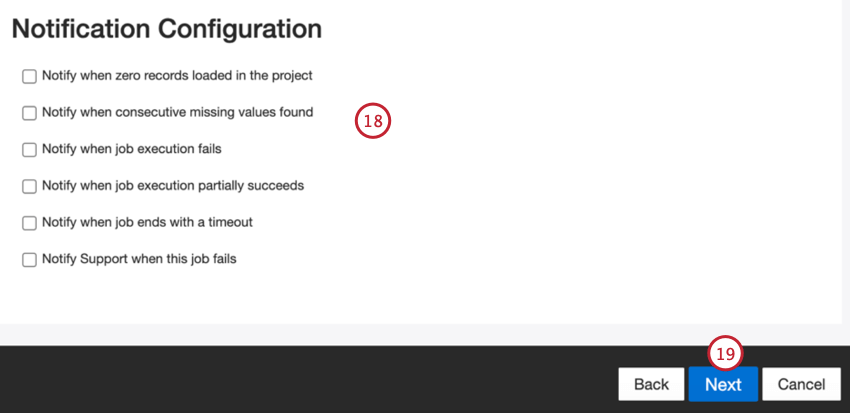
- Click Next.
- Choose how duplicate documents are handled. See Duplicate Handling for more information.
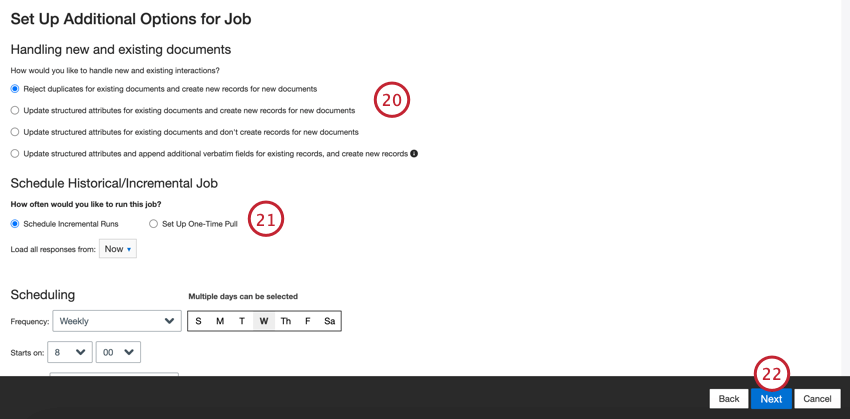
- Choose Schedule Incremental Runs if you’d like your job to run periodically on a schedule, or Set Up One-Time Pull if you’d like the job to run just once. See Job Scheduling for more information.
- Click Next.
- Review your setup. If you need to change a specific setting, click the Edit button to be brought to that step in the connector setup.
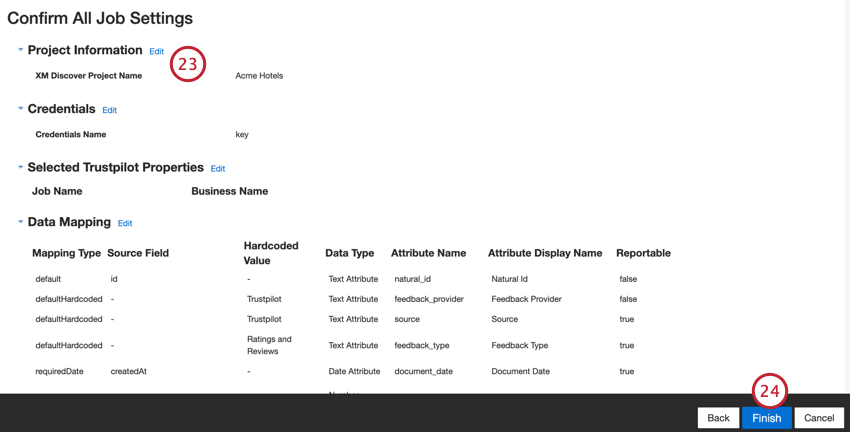
- Click Finish to save the job.
Default Data Mapping
This section contains information on the default fields for Trustpilot inbound jobs.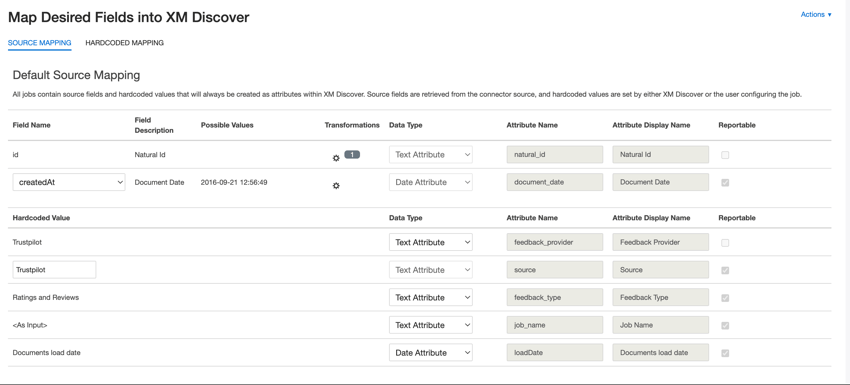
- natural_id: A unique identifier of a document. It is highly recommended to have a unique ID for each document to process duplicates correctly. For Natural ID, you can select any text or numeric field from your data. Alternatively, you can automatically generate IDs by adding a custom field. For Natural ID, XM Discover uses source IDs prefixed by the connector’s name via a custom transformation: Natural ID = Connector-name;Source-ID.
- document_date: The primary date field associated with a document. This date is used in XM Discover reports, trends, alerts, and so on. You can use 1 of the following:
- createdAt (default): The date the review was published.
- updatedAt: The date the review was updated.
- createdAt: The date the company replied to a review, if available.
- If your source data contains other date fields, you can select it for the document date.
- You can also set a specific date by adding a custom field.
- feedback_provider: Identifies data obtained from a specific provider. For Trustpilot uploads, this attribute’s value is set to “Trustpilot” and cannot be changed.
- source_value: Identifies data obtained from a specific source. This can be anything that describes the origin of data, such as the name of a survey or a mobile marketing campaign. By default, this attribute’s value is set to “Trustpilot.” Use custom transformations to set a custom value, define an expression, or map it to another field.
- feedback_type: Identifies data based on its type. This is useful for reporting when your project contains different types of data (for example, surveys and social media feedback). By default, this attribute’s value is set to “Rating and Reviews” and cannot be changed.
- job_name: Identifies data based on the name of the job used to upload it. You can modify this attribute’s value when adding properties while setting up the job.
- loadDate: Indicates when a document was uploaded into XM Discover. This field is set automatically and cannot be changed.
Uploading Properties via a File
This section covers how to upload properties via an Excel file instead of entering them into XM Discover manually.
- When adding property information, click Actions and then Upload URLs.
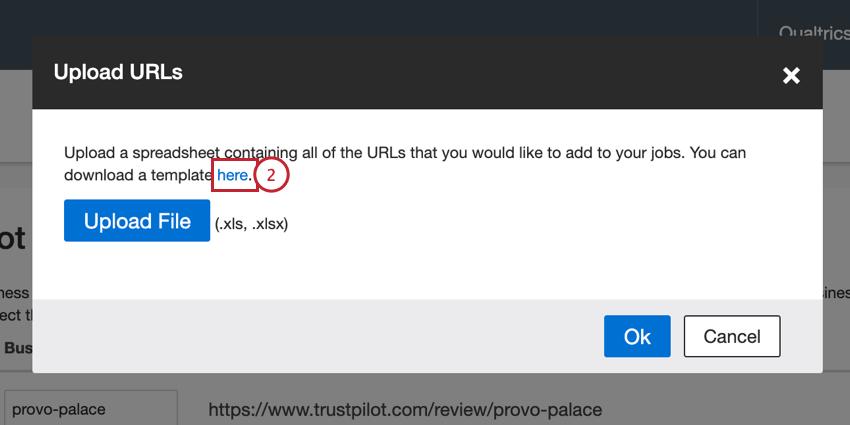
- Click the hyperlinked “here” to download a template XLSX file. Open this file in Excel or another spreadsheet editor on your computer.
- Add your property information in the first 2 columns:
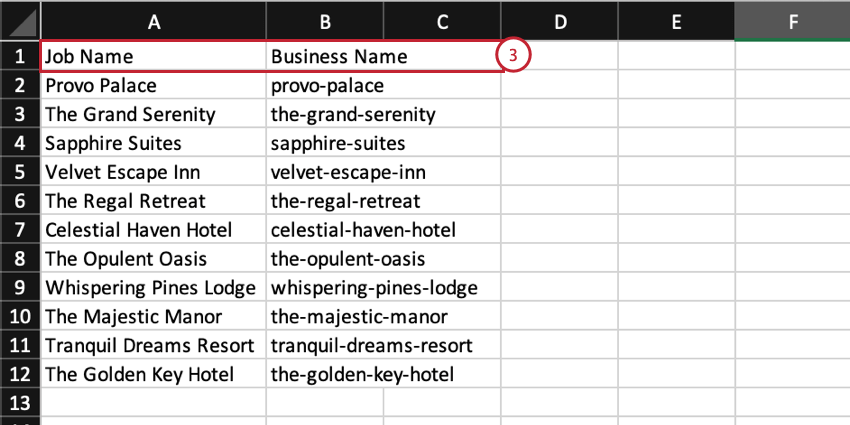
- Job Name: A name for the property and for the data job. This is the name that will appear for the job in XM Discover
- Business Name: The end part of the property’s URL from Trustpilot.
- Save your file as an XLS or XLSX file.
- In XM Discover, click Upload File and choose the file saved on your computer.
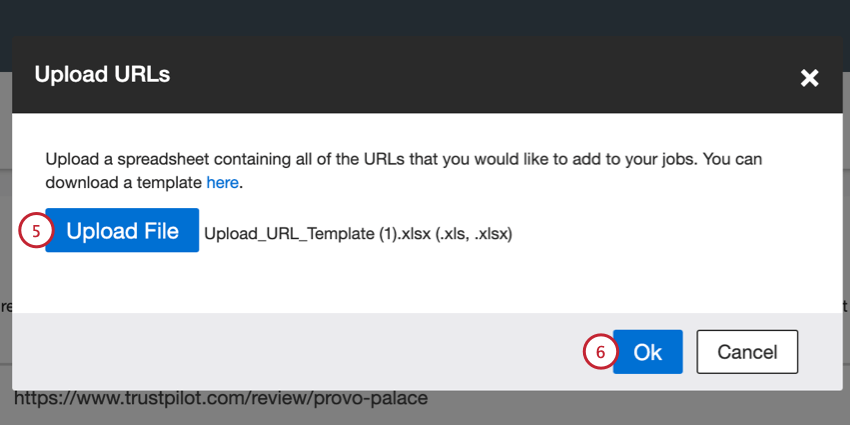
- Click Ok.
- Double check your properties for any errors. You can manually fix any job names and business names, or upload an updated file.
