SMS Distributions
About SMS Distributions
Qualtrics SMS distributions help you reach your audience through mobile devices and collect on-the-go feedback. This page outlines how to set up an SMS survey distribution and provides best practices for conducting SMS surveys.
You can distribute surveys in 2 different ways through SMS: as a “2-way,” interactive survey where respondents text their replies to each question, or as a link to the survey sent to the respondent’s phone that can be opened in a mobile browser.
For information on SMS credit consumption and opting-out of an SMS distribution, see the SMS Credits & Opt-Outs page.
Steps Required Before Sending SMS Distributions
Before you can distribute your survey using SMS, you will need to complete some preliminary setup steps. First, you need to decide if you are using the self-service model or the sub-account model. Pricing for these models may differ, so make sure you talk to Account Services.
- Sub-account model: In this model, you can leverage Qualtrics’ existing relationship with the cloud communication platform Twilio. Benefits of this model include assistance onboarding, maintaining, and troubleshooting the integration with help from Account Services. You will need to purchase SMS credits to send SMS surveys through Qualtrics. For information about SMS credits pricing, reach out to Account Services. Credit use depends on the recipient’s country/region, and the price of credits is subject to change. See Credit Consumption for more information.
Qtip: If you are a government customer, you can only use the sub-account model through AWS End User Messaging, which is a FedRAMP authorized provider.
- Self-service model: In this model, you handle SMS message distribution cost directly with your SMS provider. You can check how much it costs to send and receive SMS messages on the support site of your SMS provider. This is recommended if your company has an existing relationship with Twilio and a dedicated support team that can handle issues directly with Twilio. This model affords your own control over onboarding, maintaining, and troubleshooting SMS distributions.
Next, you must complete SMS onboarding before you can send SMS distributions. SMS regulations require Qualtrics to review each use case separately and comply with local regulations and registration processes. This process may take between a couple days to a couple months. To learn more about the onboarding process or to initiate it, reach out Account Services.
SMS Opt-In Compliance Guidelines
To comply with legal and carrier requirements, SMS distributions should have an opt-in message. Opt-in messages confirm a respondent’s enrollment in your program or survey. In your message, be sure to include the following:
- A brand name or product description
- Customer care contact information
- Opt-out instructions
- The phrase “message and data rates may apply”
It’s a good practice to draft an opt-in template within your organization to ensure consistency and conformity. In addition to the information above, ensure that your messaging meets the following criteria:
- Sender identification. When sending an SMS distribution, survey respondents must be able to identify the sender of the program in addition to understanding the program name and/or product descriptions.
- Display clear calls-to-action. Respondents must be made aware of what exactly they are signing up to receive.
- Give a time estimate: Let respondents know how long it will take to complete the survey. This could be either a time estimate for SMS invitations, or an exact number of messages for 2-way SMS surveys.
- Offer clear opt-in mechanisms. Respondents must consent to opt into all recurring SMS distributions.
- Send opt-in confirmation messages. A confirmation message must always be sent to the respondent. The opt-in message is a single SMS message that states which program the respondent is participating in and provides clear opt-out instructions. For 2-way SMS distributions, there must be an opt-in confirmation as a first question of the survey. You should send your confirmation message as soon as the respondent opts-in.
Tips for creating opt-in compliant templates
- Get feedback from your teammates or coworkers to ensure the template you’ve written is clear and free of errors.
- For 2-way interactions, think about the template message as a conversation starter with the goal to begin the conversation by having the user reply.
- Make sure your respondents understand why they received your message – you can remind them of the reason why they originally gave you permission to send them messages.
Example: Hi {{1}}, thanks for your order {{2}} placed on {{3}}. Your order has shipped. You can get a tracking update anytime by replying TRACK.Example: Hi {{1}}, we value the employee experience at {{2}}. Please take 10 minutes to share about your engagement at our company this past year <Survey URL>. You may opt-out at any time by replying STOP.
- Avoid using the word survey. Instead, you may ask the respondent for their feedback.
Example Opt-In Templates
Customer Feedback Template
Hi <Recipient first name>!
We want to hear from you! Please click on <Survey URL> and take 5 minutes to share your experience with us so that we can improve our services. You can opt out at any time by visiting<Opt-out link> or replying STOP.
We look forward to hearing from you!
<Brand name> Customer Experience Team
*Message and Data Rates May Apply.
Employee Feedback Template
Hi <Recipient first name>!
We want to hear from you! Please click on <Survey URL> and take 5 minutes to share your experience as an employee at our company. You can opt out at any time by visiting<Opt-out link> or replying STOP.
We look forward to hearing from you!
<Brand name> Employee Experience Team
*Message and Data Rates May Apply.
Market Research Template
Hi <Recipient first name>!
We are conducting market research on behalf of <industry>! Please click on <Survey URL> and take 5 minutes to share your opinions. You can opt out at any time by visiting<Opt-out link> or replying STOP.
We look forward to hearing from you!
<Brand name> Market Research Team
*Message and Data Rates May Apply.
Legal Requirements
Though SMS Surveys open up new communication possibilities, they also carry a set of legal requirements regarding who, when, and under what conditions you are allowed to message. Many laws and regulations that apply to the telecommunications industry as a whole also apply to SMS text messaging.
The Telephone Consumer Protection Act (TCPA) regulates any means “to communicate with or try to get into communication with a person by telephone.” This act is United States-specific.
TCPA includes strict opt-in requirements for telephone marketing. Consent for SMS must meet the following conditions:
- Be in writing
- Come from the owner of the device
- Identify the advertiser and all companies that will have access to the customer’s phone number
- Make clear the type of text messages the consumer is signing up for (consenting to event updates is not the same as consenting to ads)
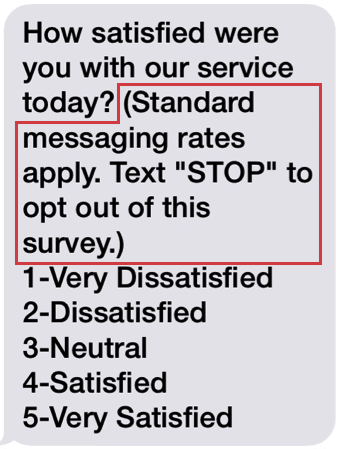
- State that standard messaging fees may apply
- Include how the subscriber can opt out of the survey session at any time (see our list of Stop Words).
We recommend addressing the final 2 requirements by including a phrase such as the following as part of the first survey question:
To learn more, see the TCPA Rules Document. More information is also available in our SMS Terms of Service.
Country-Specific Requirements
This section contains specific legal requirements when sending to recipients located in that country.
- New Zealand: You must update your SMS invitation to include the name of your organization and the message that “responses carry a 20c charge.”
Example: “Please take this 2-minute customer experience survey for [Organization Name]. SURVEY URL: text STOP to opt-out of this survey. [Responses carry a 20c charge].”
Importing Phone Numbers
Phone numbers for an SMS survey distribution are uploaded the same way email addresses are uploaded for an email distribution—in a contact list.
Contact lists should contain a field for phone numbers. This column should be called “Phone”. Make sure your column title perfectly matches that name in capitalization and spacing.
Format for US Numbers
For phone numbers based in the United States, you are allowed to use spaces, dashes, and parentheses, provided that you remember to use the country code. The following are valid formats:
- 1(XXX)-XXX-XXXX
- 1-XXX-XXX-XXXX
- 1-(XXX)-XXX-XXXX
- 1XXXXXXXXXX
- 1-XXXXXXXXXX
- 1 (XXX) XXX-XXXX
- 1-(XXX) XXX-XXXX
- 1(XXX) XXX-XXXX
Format for UK Numbers
Numbers based in the United Kingdom must not contain spaces, dashes, or parentheses. Remove the leading 0 after the country code (44) if there is one. The following are valid formats:
- 44XXXXXXXXXX
Format for Other Countries
Write the country code, then the number. Be sure to remove any 0’s after the country code. Do not include spaces, dashes, or parentheses.
Survey Design
Surveys sent through SMS are built the same way you would build a traditional survey—using the Survey tab.
Question Formatting
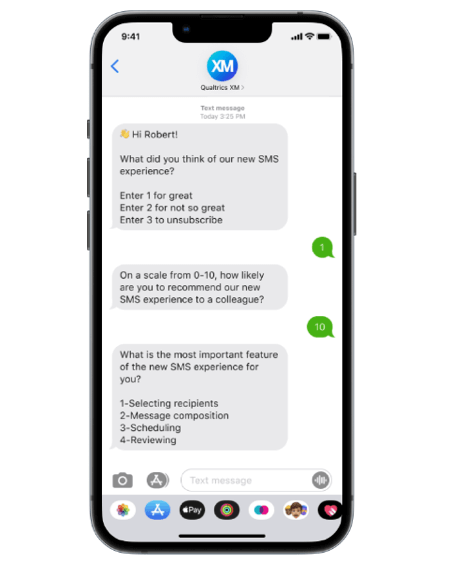
On multiple choice questions, choices will be modified to each include a code. Participants text in this code to select that choice.
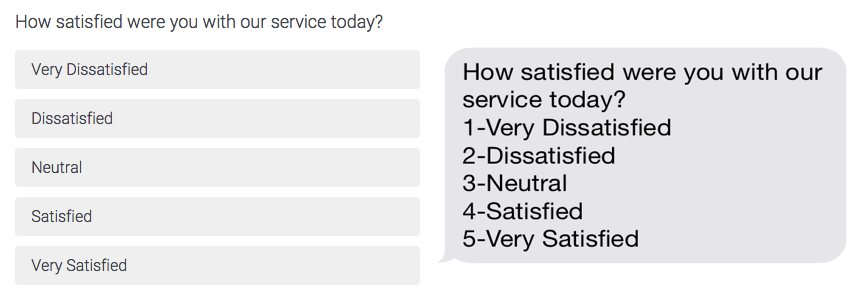
Choices in the Survey tab (left) display options participants can select. When sent via SMS (right), these choices include a number instead.
On NPS© questions, only the question text itself will be sent to participants. Respondents need to answer with a number on the NPS© scale (i.e 0-10) to answer the question. We recommend including the NPS© scale in your question text so your participants know how to respond.
Unchanged:
Character Limits
When writing your questions, it’s important to keep in mind how your content may be broken up into multiple messages.
For most characters (GSM-7), each character takes up 7 bits of data. The limit for these characters is 160 characters per message.
For special characters (UCS-2), emojis, and any characters that take up 16 bits of data per character, the limit is 70 characters per message.
Survey Pages
SMS surveys are distributed 1 question at a time. If a participant answers a question, the next question will be sent. Page breaks are ignored when distributing a survey via SMS.
Survey Compatibility
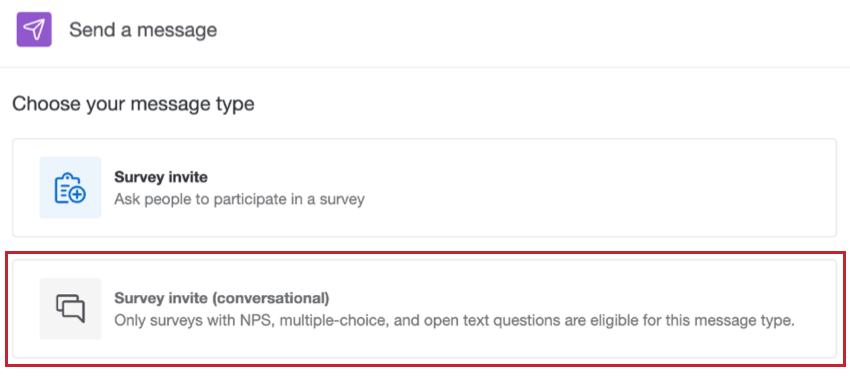
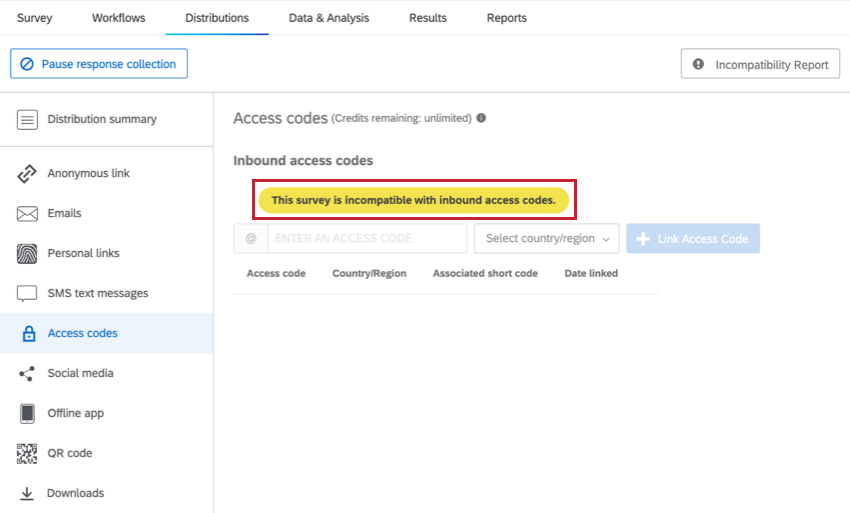
When distributing the survey (done through the SMS section in the Distributions tab), you will not be able to select Survey invite (conversational) if the survey is not compatible with 2-way SMS. See Survey Design for guidance.
When distributing your survey using access codes, an alert will appear if the survey is not compatible.
Distributing an SMS Survey Invite
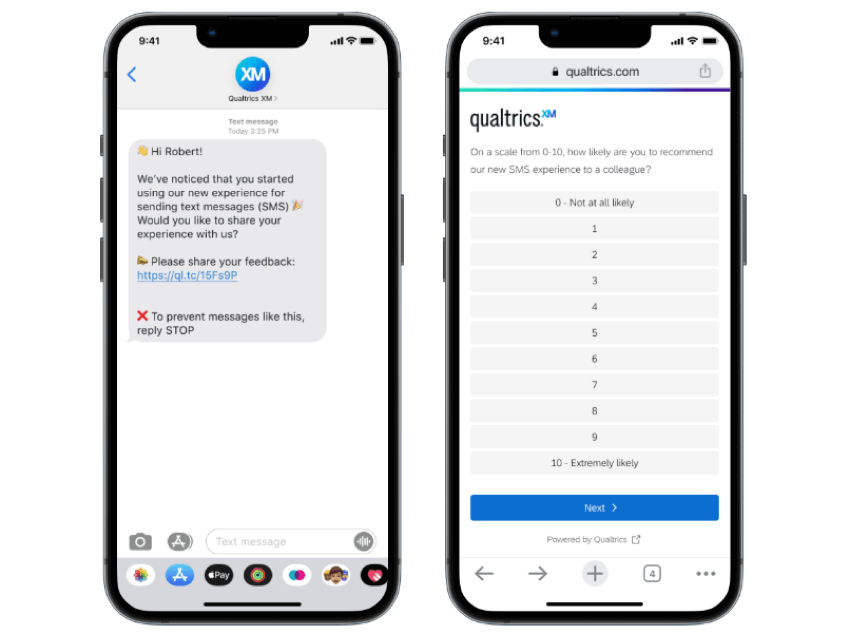
Instead of sending your survey question by question, you can text an individualized link respondents can open in their mobile browser. Because the link is individualized, it will save all the respondent’s contact information and their Embedded Data with their response. This distribution method can be used to send a survey to any phone number globally that accepts SMS messages.
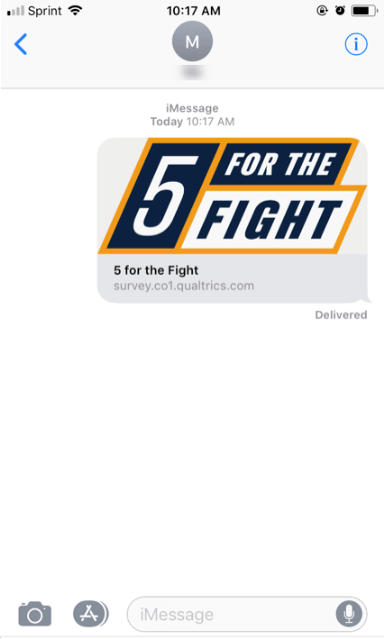
Your respondents will see a shortened survey URL in their invitation. Clicking this URL will take them directly to the survey in their browser.
To send a survey invitation via SMS
- Navigate to the Distributions tab and choose the SMS section.
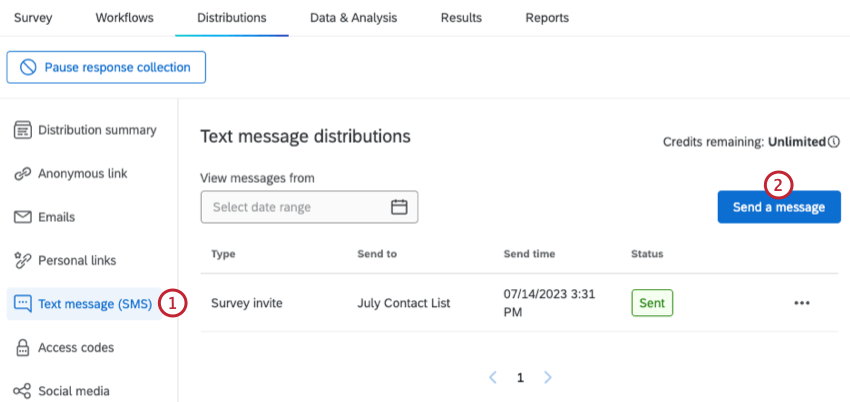
- Click Send a message.
- Select Survey invite as the message type.
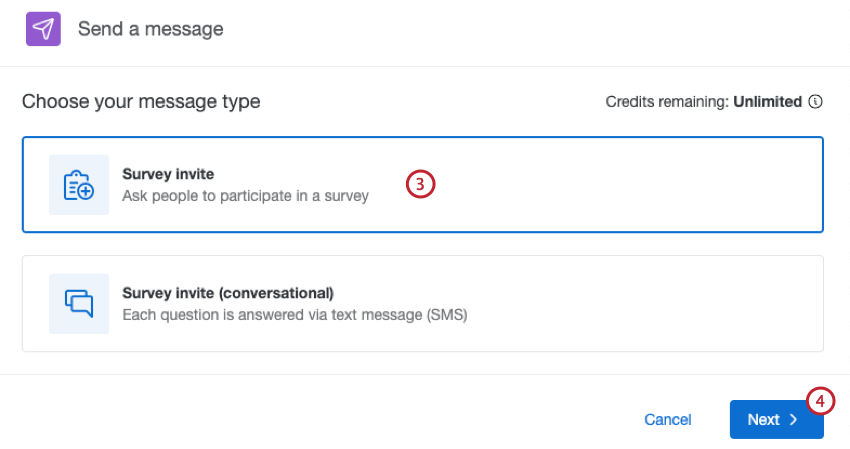
- Click Next.
- Choose the appropriate contact list. You can use the drop-downs at the top to filter by available directories and lists, or type a list name or keyword into the search bar.
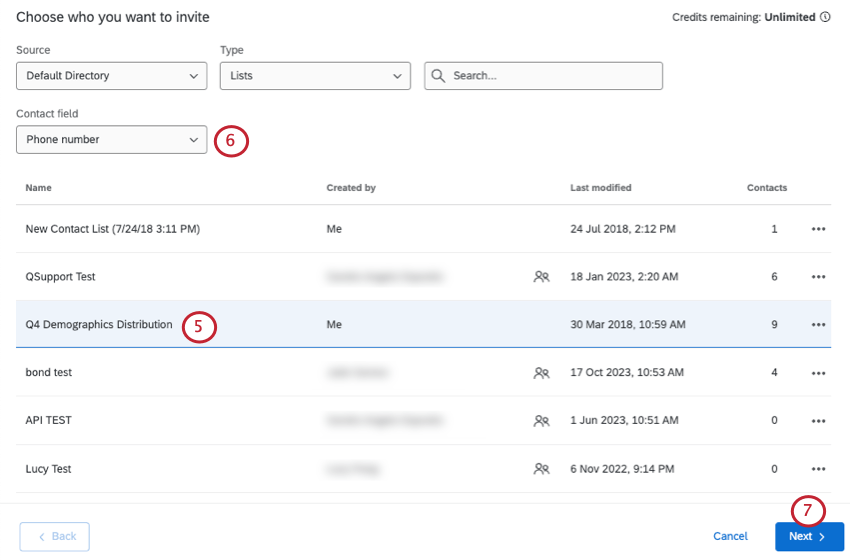 Qtip: To send to an individual contact from a list, select the 3 horizontal dots next to the list and choose Send to individual. You can then select the individual contact that will receive your SMS invite.
 - Choose the contact field where the phone number is stored in your list.
- Click Next.
- Load an existing message, or create a new message in the editor.
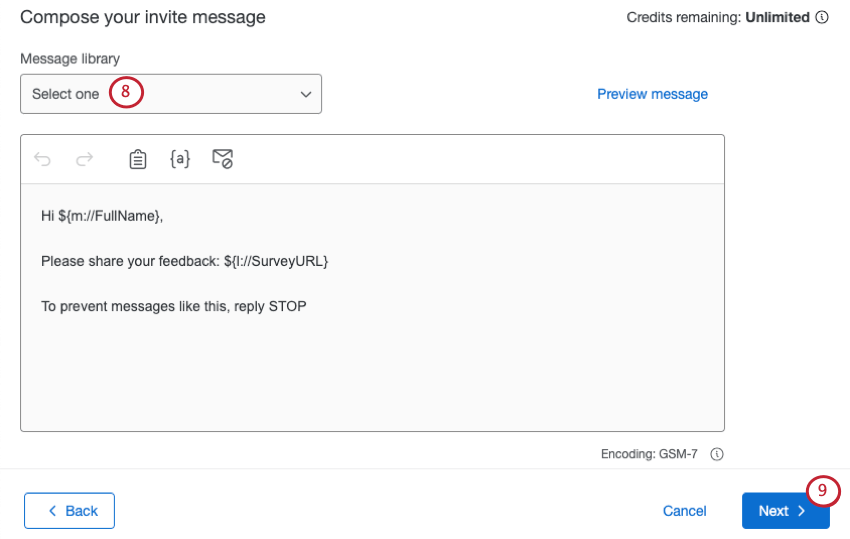 Warning: It is recommended you create your message within this window instead of copying and pasting from a Word document. When you copy and paste, hidden HTML elements can carry over which can cause your SMS to be broken over multiple messages, leading to extra credits being consumed.
 - Click Next.
- Choose when the invite should send.
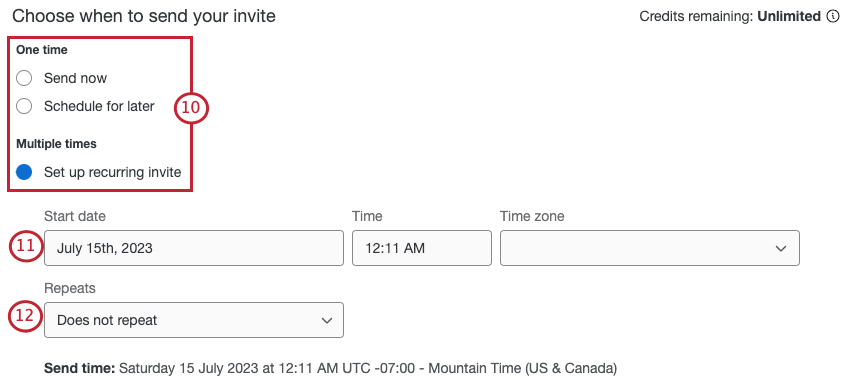
- Send now: Send the SMS immediately.
- Schedule for later: Schedule the SMS for a future date and time.
- Set up recurring invite: Schedule a start date and time for the SMS, and select how often it will repeat.
- If you’re scheduling the invite for later or setting up a recurring invite, select the date and time the SMS should send.
- If you’re setting up a recurring invite, select how often the SMS will repeat.
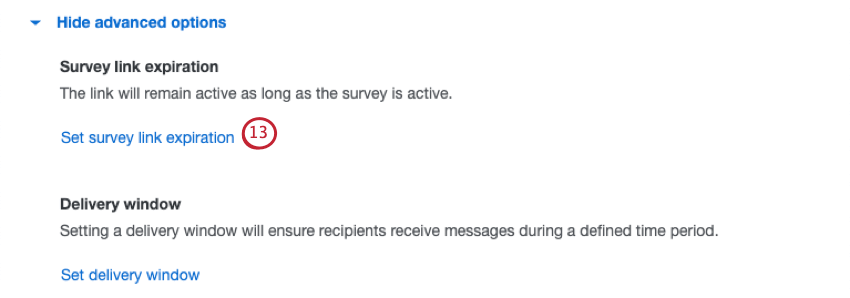
- If desired, click Set survey link expiration to set a custom expiration for your survey link. By default, the link will remain active as long as the survey is active.
- Select Set custom link expiration and choose how many days after your survey is sent the link should expire.
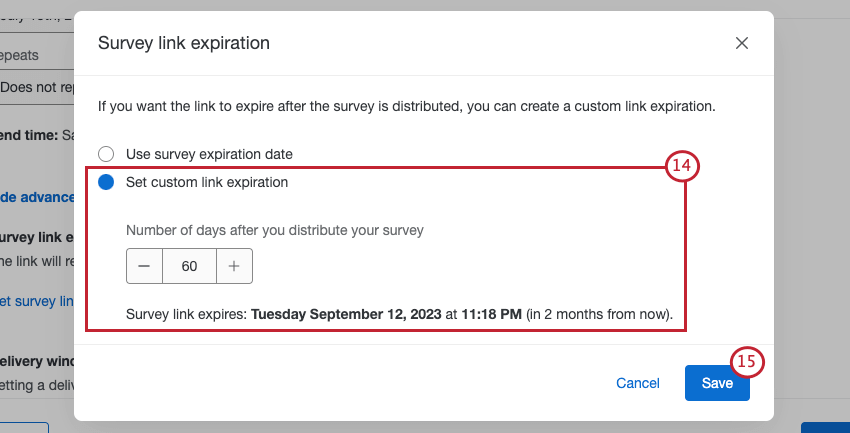
- Click Save.
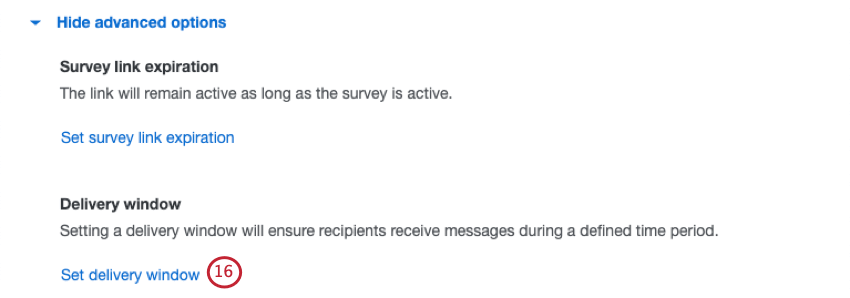
- If desired, click Set delivery window to set a custom delivery window for when your SMS invites will send.
- Select Set custom delivery window and choose a delivery window. A delivery window ensures recipients receive messages during a defined time period. SMS invites will only be sent during this specified window.
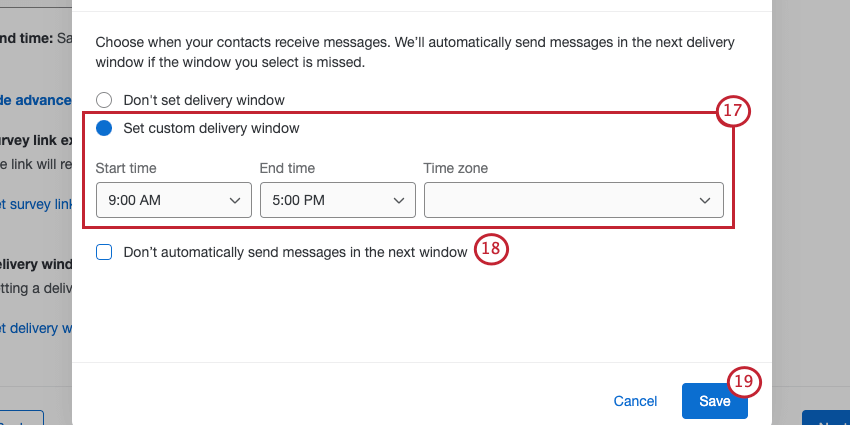
- Choose how you want to handle SMS invites scheduled outside of the delivery window. Check the box if you want SMS invites to not be sent in the next delivery window. If the box is unchecked, distributions that were scheduled to be sent outside of the delivery window will be saved and sent in the next delivery window.
- Click Save.
- Click Next.
- Review your distribution details. Click Edit next to any section to make changes.
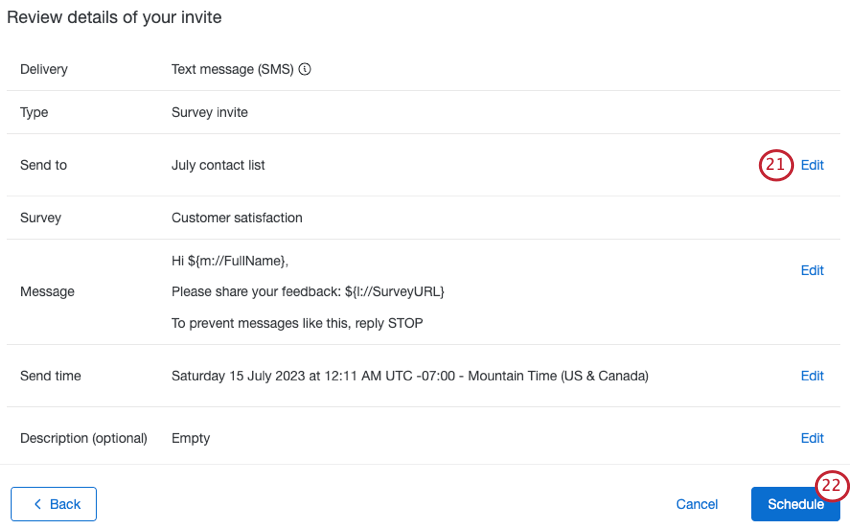 Qtip: Click Edit next to the description field to name your distribution.
 - If everything looks correct, click Schedule. Remember that you will be charged for each message sent and received.
Distributing a 2-Way SMS Survey
2-way SMS, also called interactive SMS, allows you to text survey questions directly to respondents, so they can then text their answers back.
There are 2 ways of distributing a 2-Way SMS survey: through a list of phone numbers or through Access Codes that your respondents text.
To distribute to a list of phone numbers
With a list of phone numbers, you send an SMS message to a specific group of people who then respond to the message and continue through the SMS survey as normal. Since you’re distributing to a list of contacts, the respondent’s contact information and their Embedded Data will be saved with their response.
- Navigate to the Distributions tab and choose the SMS section.

- Click Send a message.
- Select Survey invite (conversational) as the message type.
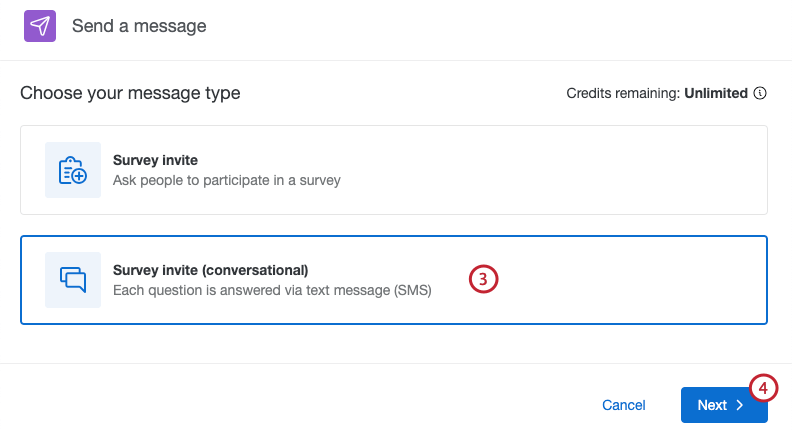
- Click Next.
- Choose the appropriate contact list. You can use the drop-downs at the top to filter by available directories and lists, or type a list name or keyword into the search bar.
 Qtip: To send to an individual contact from a list, select the 3 horizontal dots next to the list and choose Send to individual. You can then select the individual contact that will receive your SMS invite.
 - Choose the contact field where the phone number is stored in your list.
- Click Next.
- Choose when the invite should send.
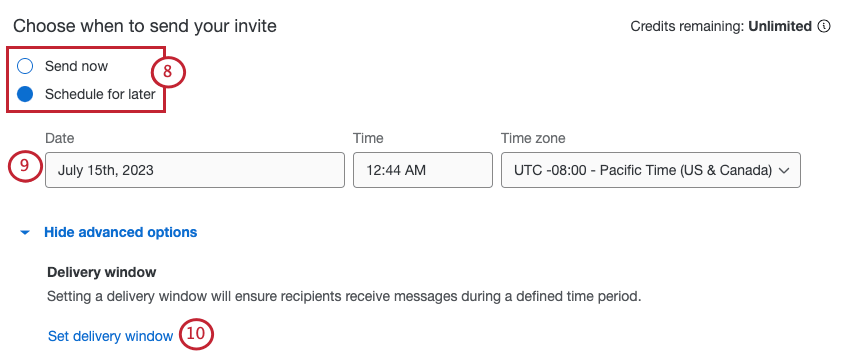
- Send now: Send the SMS immediately.
- Schedule for later: Schedule the SMS for a future date and time.
- If you’re scheduling the invite for later or setting up a recurring invite, select the date and time the SMS should send.
- If desired, click Set delivery window to set a custom delivery window for when your initial survey SMS will send. A delivery window ensures recipients receive messages during a defined time period.
- Select Set custom delivery window and choose a delivery window. SMS invites will only be sent during this specified window.
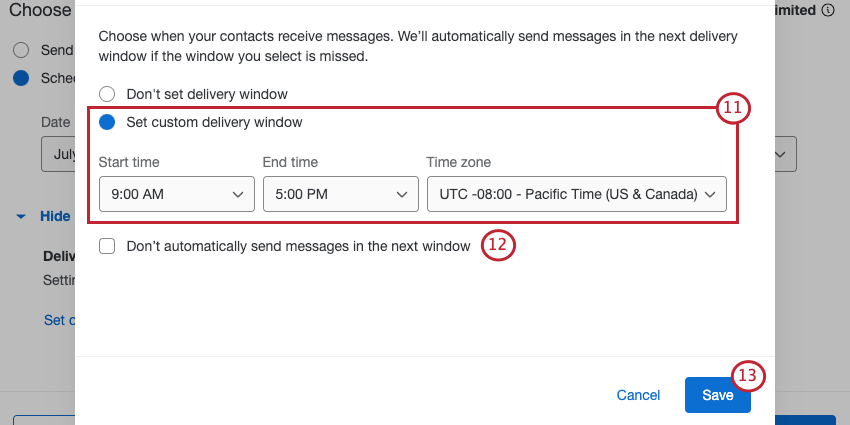
- Choose how you want to handle SMS invites scheduled outside of the delivery window. Check the box if you want SMS invites to not be sent in the next delivery window. If the box is unchecked, distributions that were scheduled to be sent outside of the delivery window will be saved and sent in the next delivery window.
- Click Save.
- Click Next.
- Review your distribution details. Click Edit next to any section to make changes.
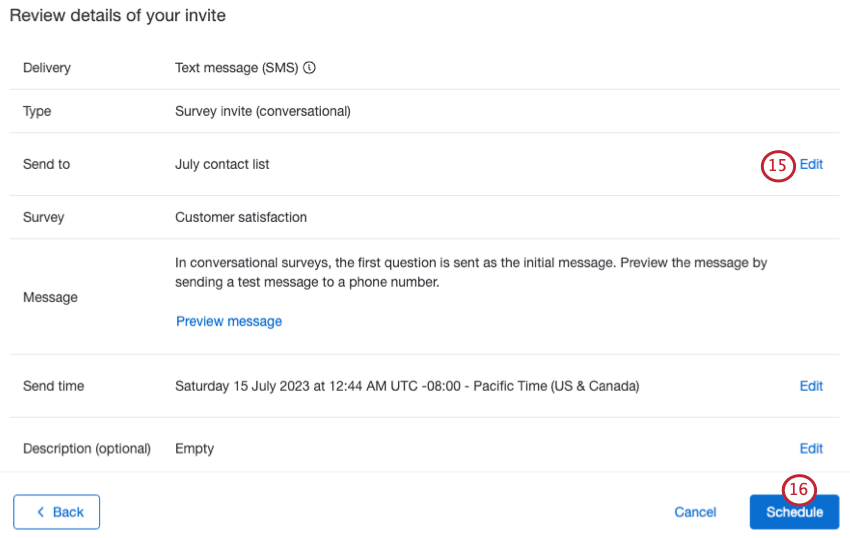
- If everything looks correct, click Schedule. Remember that you will be charged for each message sent and received.
To distribute via an Access Code
With the Access Codes, you are given a unique 10-digit toll-free number and a unique code to distribute to respondents however you would like (sent through an email, posted on a flyer, etc.). Respondents message the number a specific code and then are sent the survey questions via SMS. Since this distribution method isn’t targeted at individual contacts, contact information is not saved with the response automatically.
- Navigate to the Distributions tab and choose the Access codes section.
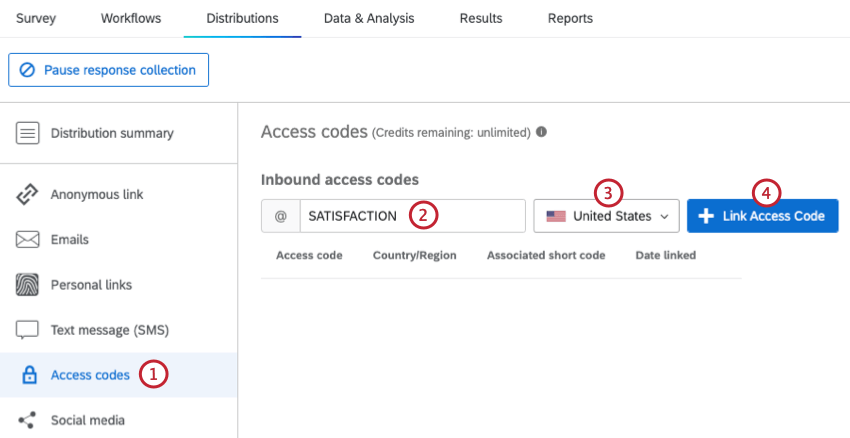
- Type any combination of characters in the Inbound Access Codes text box (note that the @ sign is required at the beginning of all access codes).
- Choose a country of origin for the access code. Only numbers belonging to that country will be able to use that access code.
- Click Link Access Code.
- Distribute the toll-free phone number and the Access Code to your respondents (mass email, web advertisement, movie theatre ads, etc.). Any respondent who texts the Access Code to the toll-free number will receive the survey.
Reminders
You can send reminder texts if you are sending a 1-way SMS survey link. Reminders are not available for 2-way SMS.
Reminder texts only go to respondents who are either halfway through the survey, or have not started it.
- Click the 3 horizontal dots next to the distribution you’d like to remind.
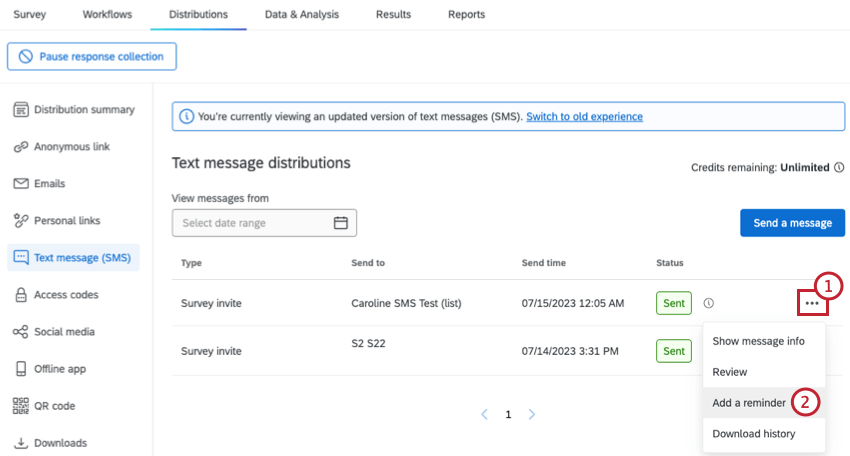
- Select Add a reminder.
- Write a message or select a previously saved one.
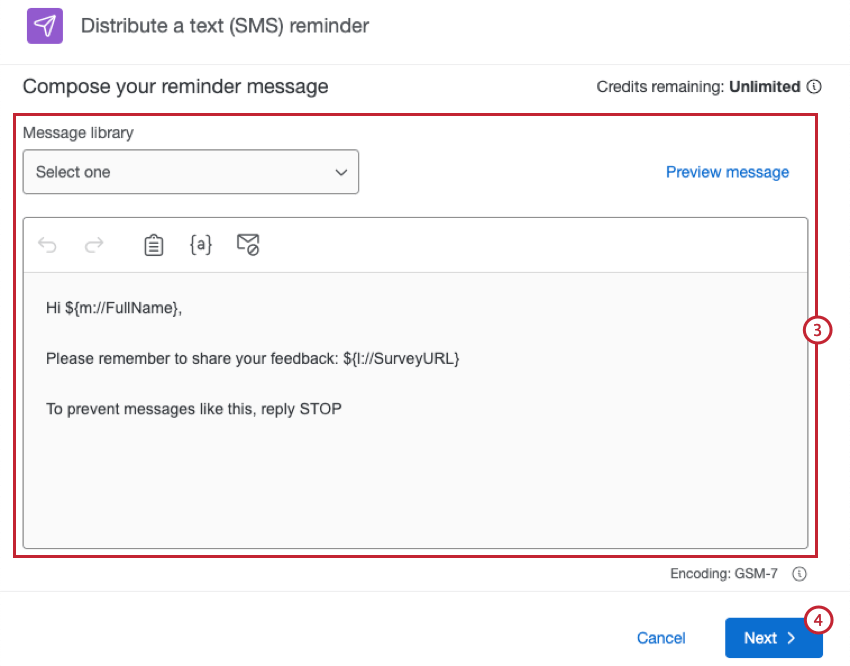 Qtip: Reminder and Thank You Email messages are separate from SMS messages in your library, and cannot be used for each other.
 - Click Next.
- Choose when to send your reminder message.
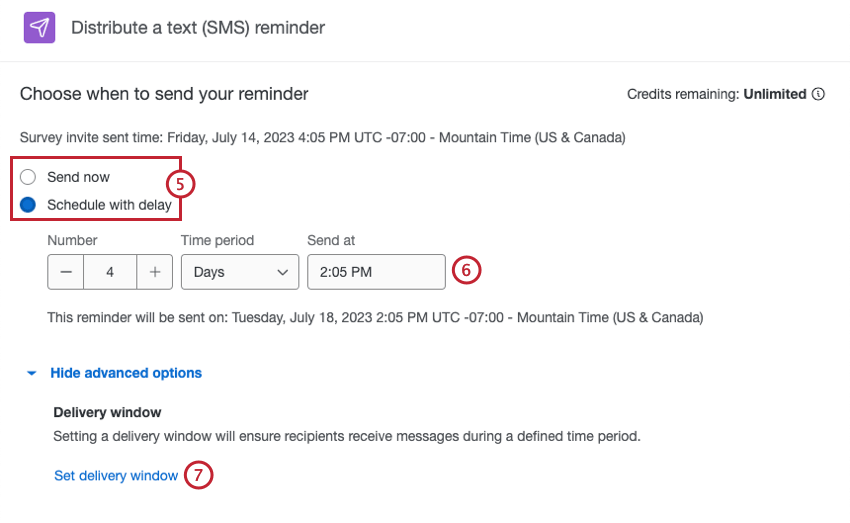
- Send now: Send the reminder immediately.
- Schedule with delay: Schedule the reminder for a specified amount of time after the invite.
- If you’re scheduling the reminder with a delay, select the amount of time after the invite and time of day the SMS should send.
- If desired, click Set delivery window to set a custom delivery window for when your SMS reminders will send.
- Select Set custom delivery window and choose a delivery window. SMS reminders will only be sent during this specified window.
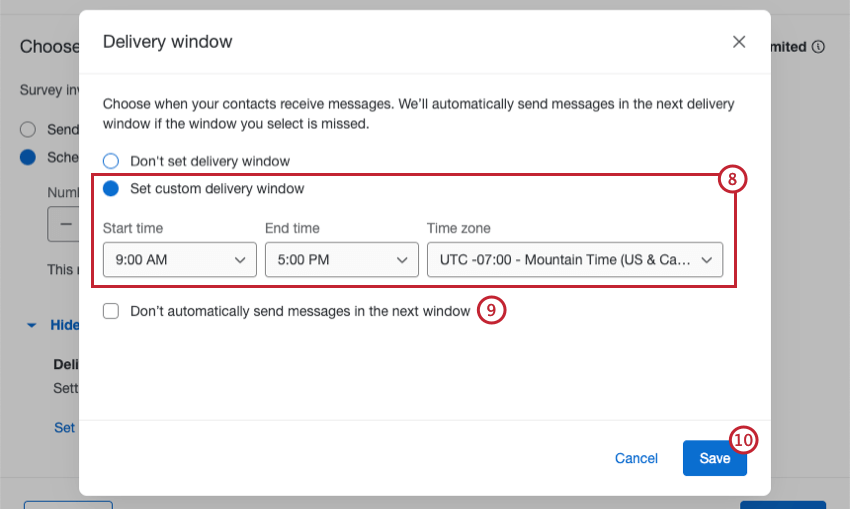
- Choose how you want to handle SMS reminders scheduled outside of the delivery window. Check the box if you want SMS reminders to not be sent in the next delivery window. If the box is unchecked, distributions that were scheduled to be sent outside of the delivery window will be saved and sent in the next delivery window.
- Click Save.
- Click Next.
- Review your distribution details. Click Edit next to any section to make changes.
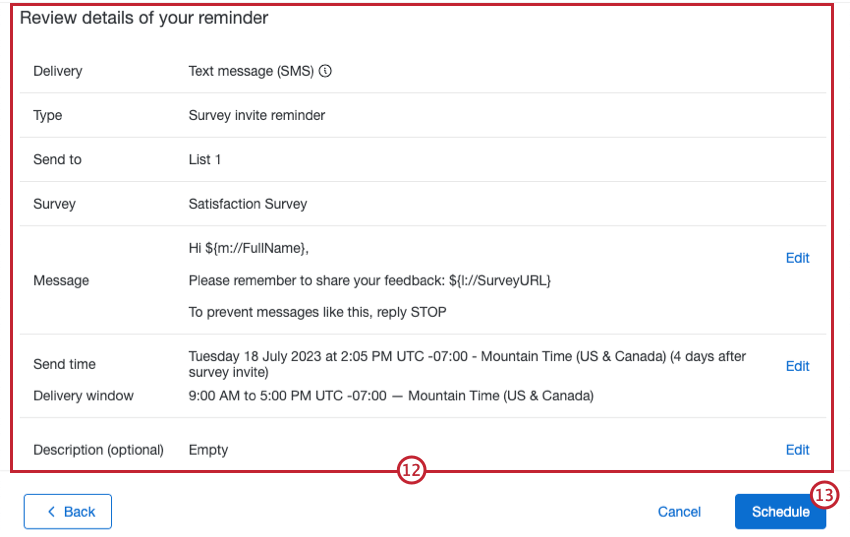
- If everything looks correct, click Schedule. Remember that you will be charged for each message sent and received.
Distribution Management
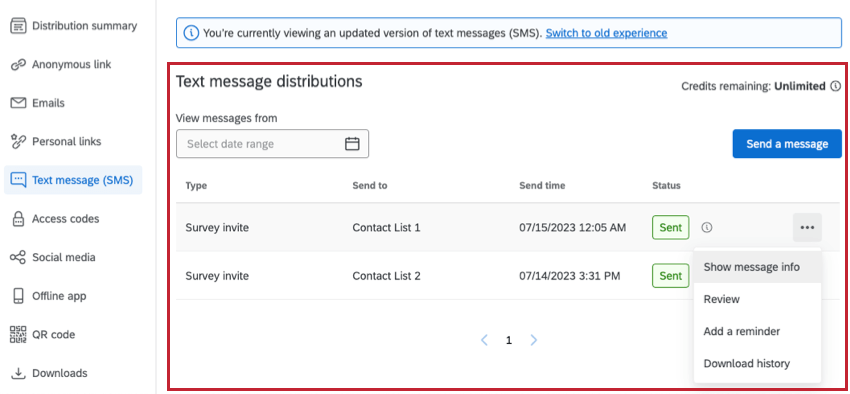
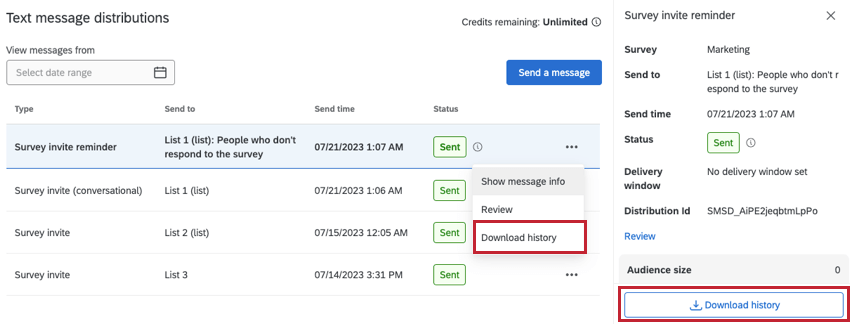
In addition to scheduling new SMS distributions, you can review and download information about your past SMS distributions on the SMS page. See Downloading the Distribution History for a step-by-step guide on downloading distribution histories and for more information about the data contained in the distribution history.
The SMS tab also contains a table with the following information:
- Type: The type of SMS distribution, either a survey invite, survey invite (conversational), or a survey invite reminder.
- Send to: The respondents to whom the distribution was sent.
- Send time: The date and time the distribution was sent or is scheduled to send.
- Status: The status of the distribution.
To view distributions for a specific time frame, click Select date range and select a date range to search within.
SMS Distribution Statuses
Distribution statuses provide helpful information on the success of your distribution. The following distribution statuses are currently available:
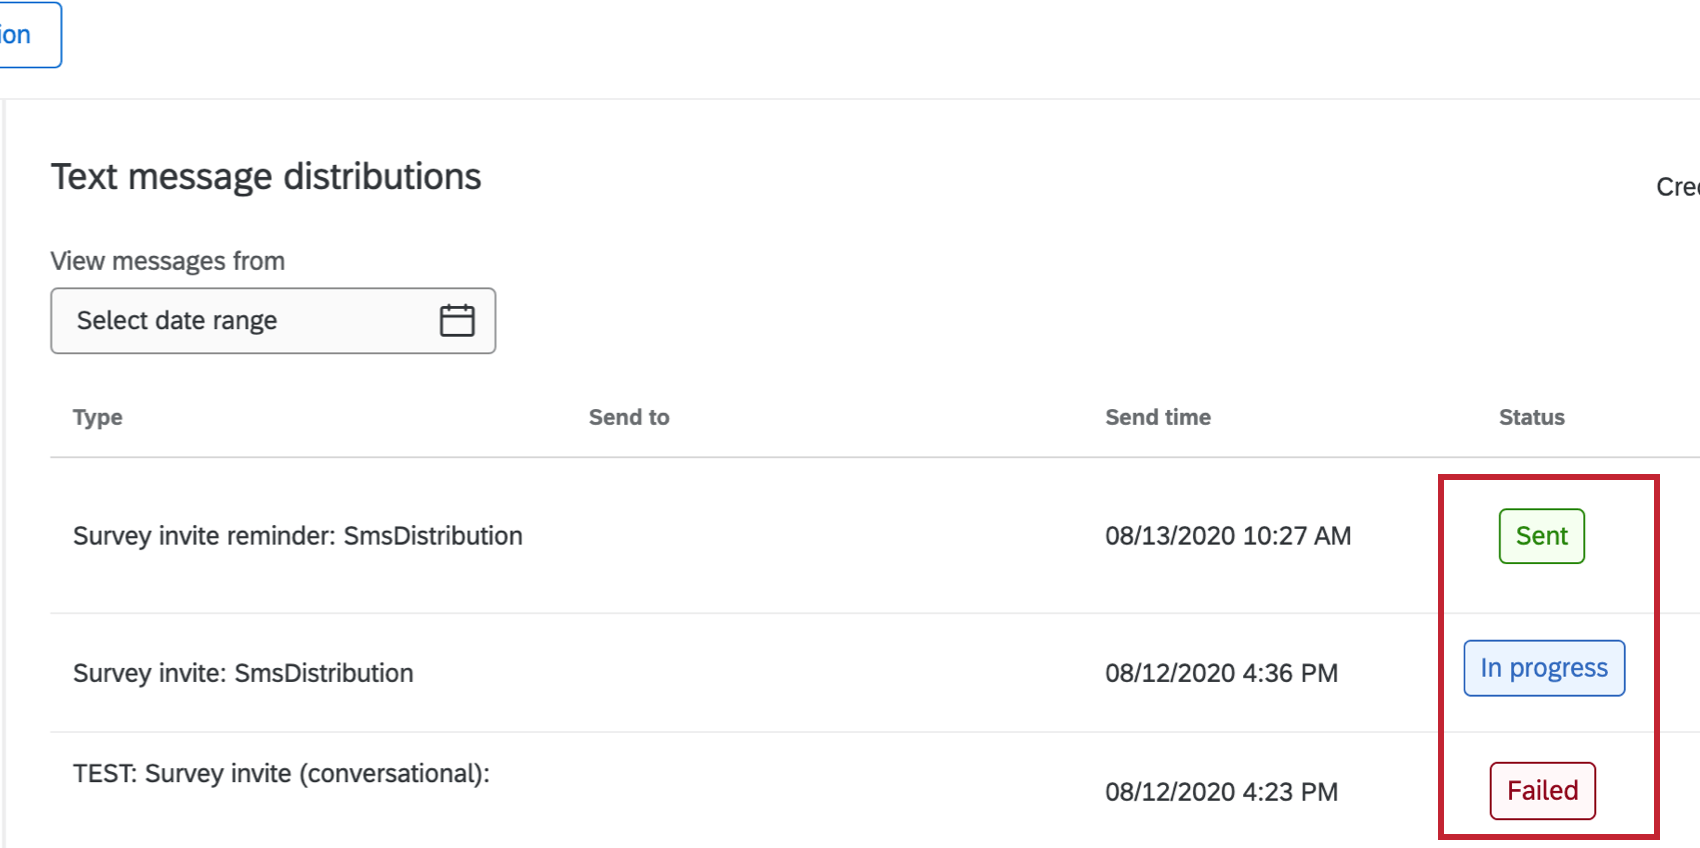
- Scheduled: The distribution is scheduled.
- In progress: The distribution is currently being processed during the scheduled time frame.
Qtip: The status may be in progress for longer than normal if there are distribution delays due to network issues or delivery errors. If the status is in progress for longer than 7 days, reach out to Qualtrics Support.
- Sent: The distribution has been successfully processed and the messages were sent from Qualtrics to the SMS provider for delivery to recipients.
Qtip: If your distribution contains any issues, a tooltip will appear next to your status. See Downloading the Distribution History for more information.
- Failed: The distribution was not sent.
Qtip: A failed distribution is typically the result of the survey not being configured correctly. Check your configuration and try to send the distribution again in a few minutes.
- Interrupted: The distribution was not sent or was sent partially. Review the distribution history for more information.
Viewing Message Info
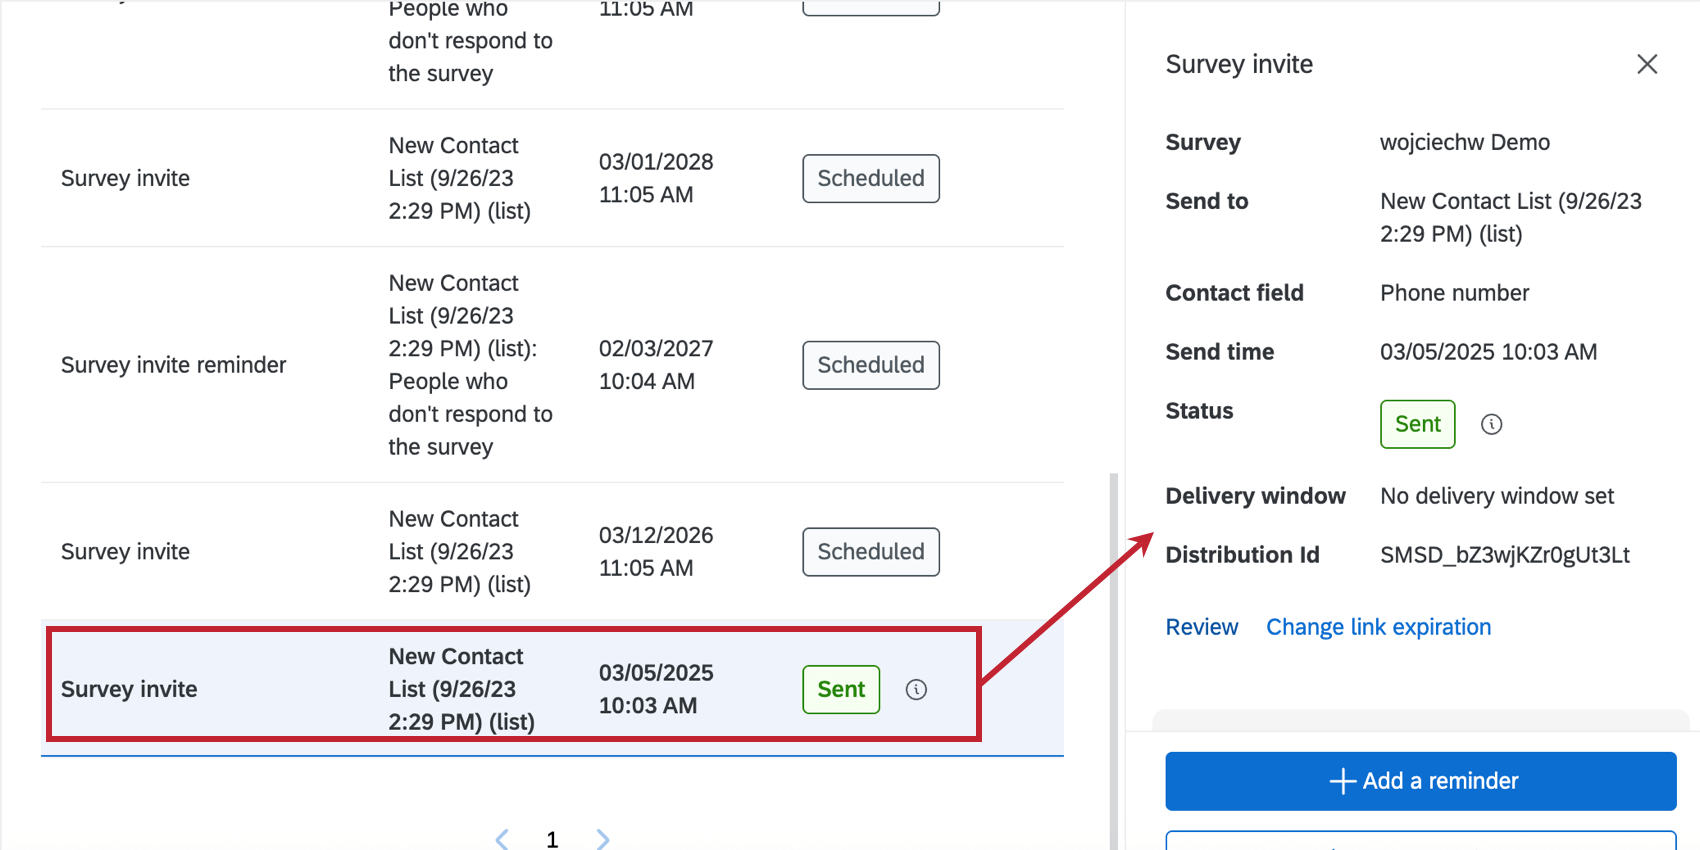
Click a distribution to view more information about it.
The following information is available:
- Survey: The name of the survey sent in the distribution.
- Send to: The name of the contact list or individual who was sent the distribution.
- Contact field: The field that contains the contact information used to contact the recipients (in this case, phone number).
- Send time: The date and time that the distribution was sent.
- Status: The distribution’s status. See “SMS Distribution Statuses” above for more information about each status.
- Delivery window: Choose when your contacts receive messages. We’ll automatically send messages in the next delivery window if the window you select is missed.
- Distribution Id: The ID of the distribution. This is helpful to provide to the Qualtrics Support team if you need help troubleshooting this distribution.
- Review: Click this link to review a sent distribution’s configuration. See “Reviewing Distribution Details” for more information.
- Change link expiration: For distributions that have already been sent, you can change the distribution’s expiration date by clicking this option.
- Edit: For distributions that are scheduled to send, you can click this option to change the distribution’s configuration.
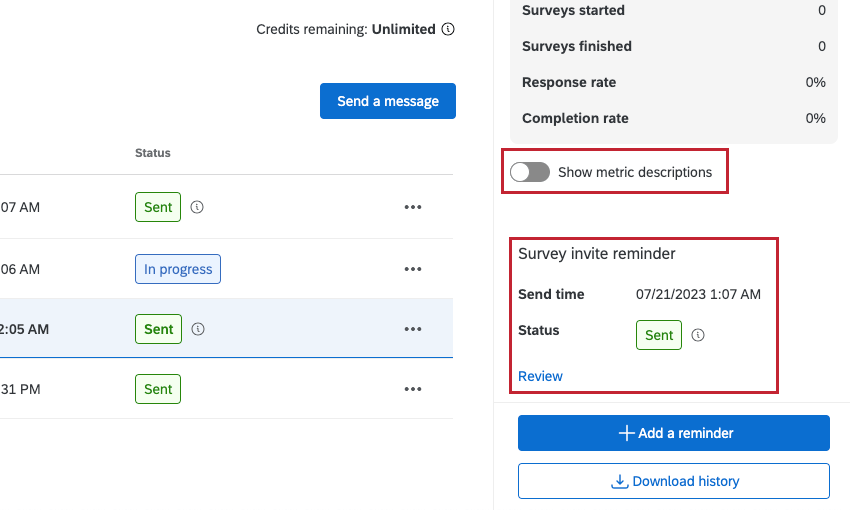
The first section displays details about your distribution, while the second displays metrics like audience size and completion rate. Select Show metric descriptions to view a definition of each metric.
If there is a reminder(s) attached to the distribution, you will see the send time and status beneath the distribution metrics.
From this window you can also review or edit your distribution, change the link expiration, add a reminder, or download the history by clicking on the relevant button.
Distribution Metrics
You can view metrics and statistics about your selected distribution in the Distribution metrics section.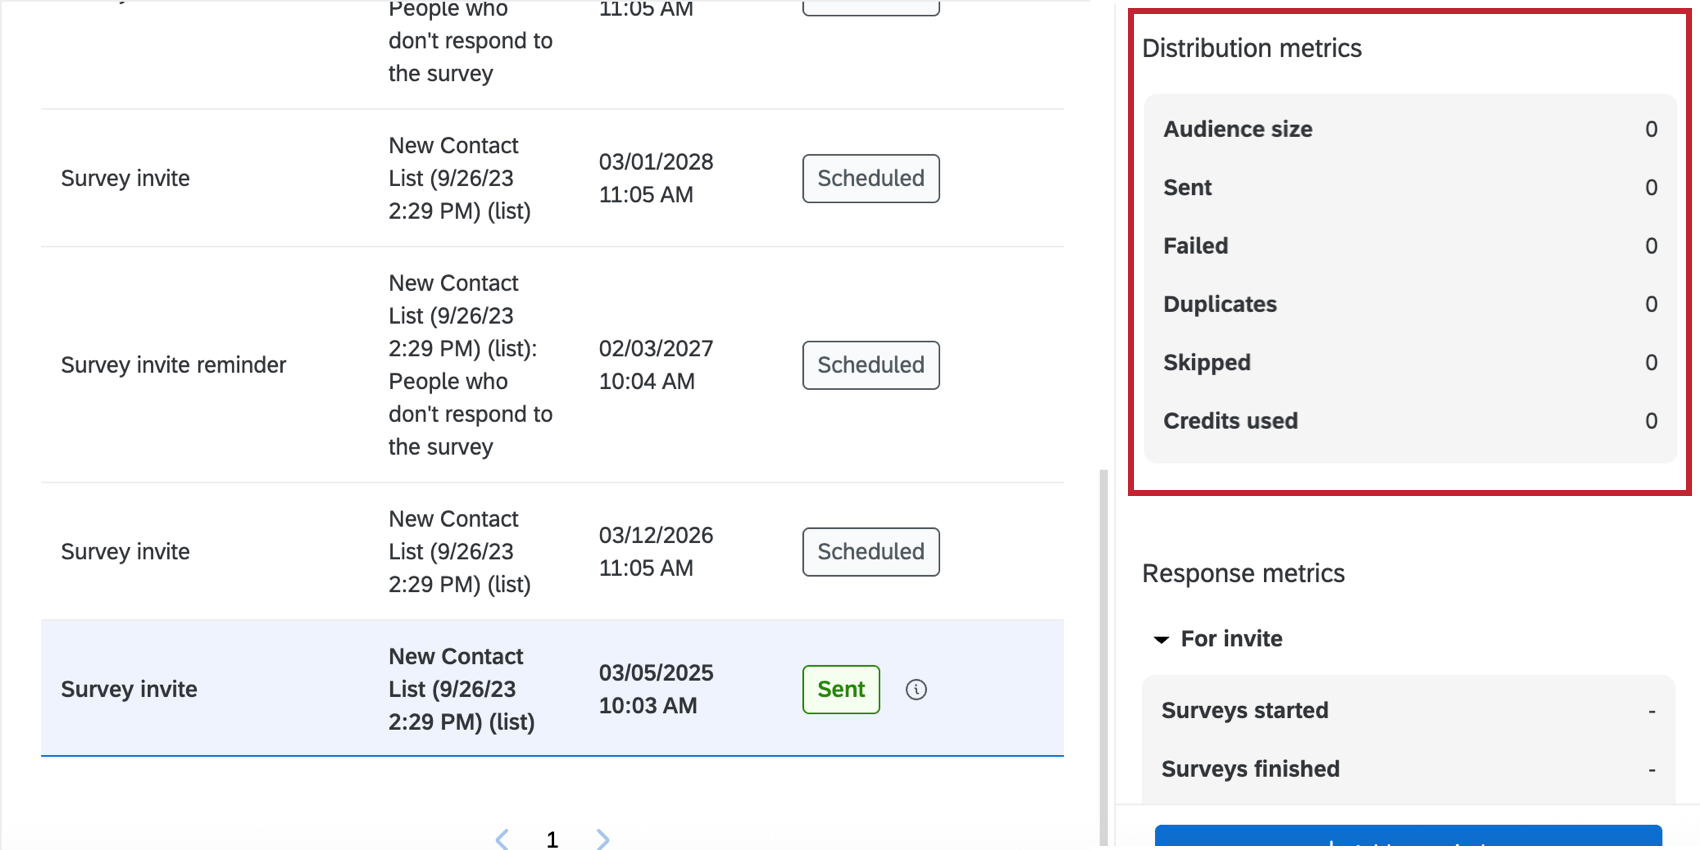
The following metrics are available:
- Audience size: Number of people who are due to receive the distribution.
- Sent: The number of messages sent successfully.
- Failed: The number of messages that failed to send.
- Duplicates: The number of messages avoided being sent twice to the same contact.
- Skipped: The number of messages not sent due to XM Directory contact frequency rules.
- Credits used: The number of SMS credits consumed by the distribution.
Response Metrics
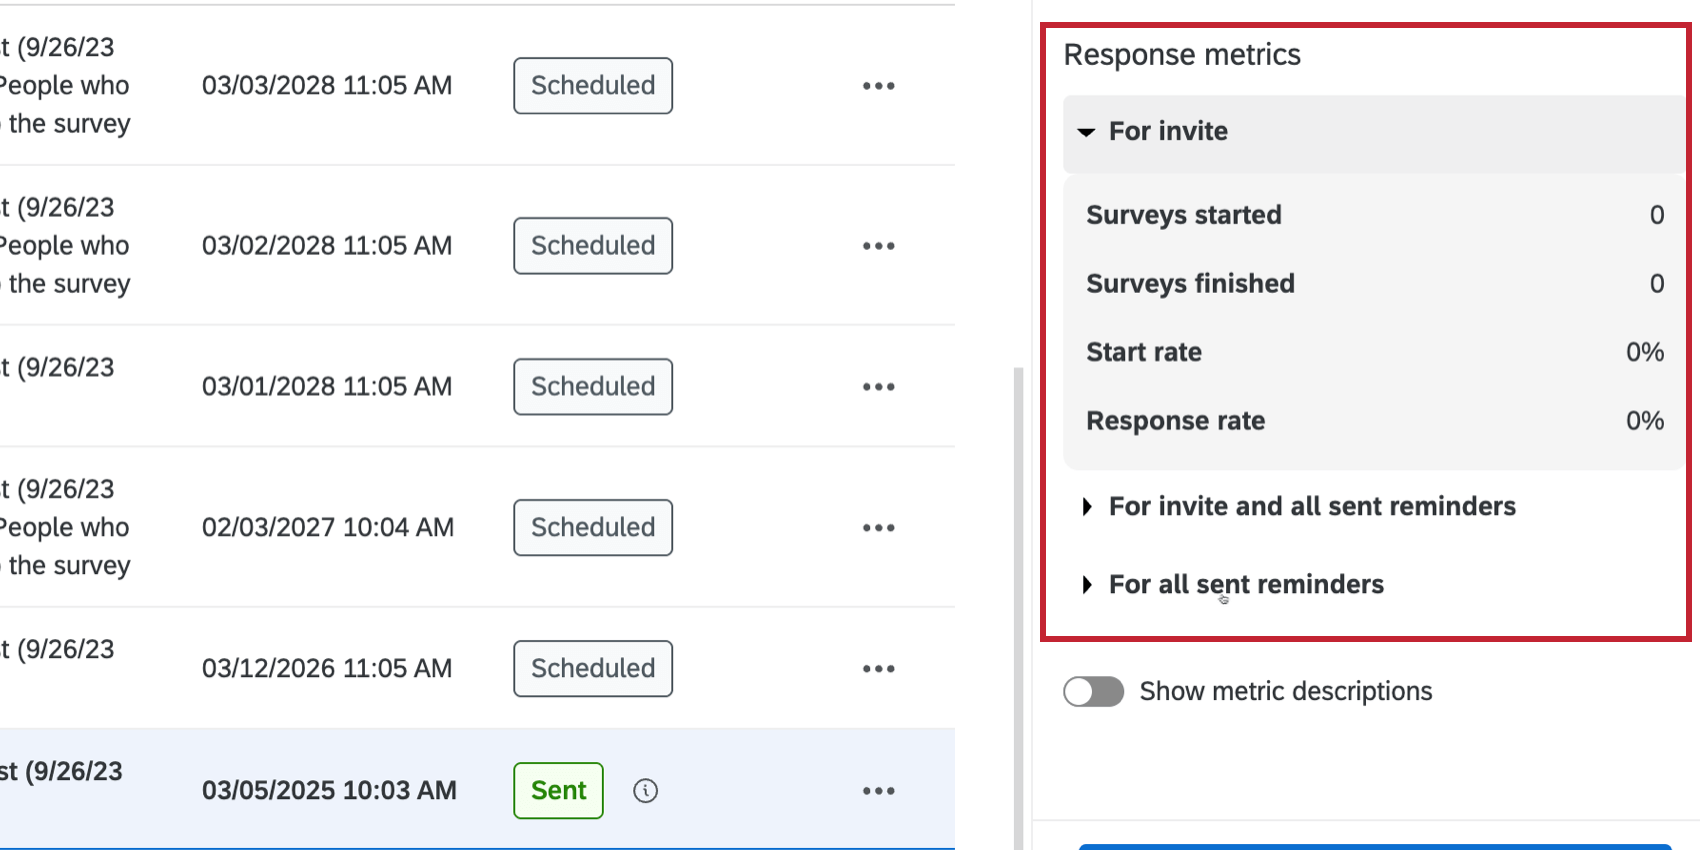
You can view metrics and statistics about the responses from your selected SMS distribution in the Response metrics section.
Depending on the distribution type (invite or reminder), you can view the following metrics:
- Invites:
- For invite: Metrics for this specific invitation.
- For invite and all sent reminders: Combined metrics for both the invitation and any reminders associated with it.
- For all sent reminders: Metrics for any reminders associated with this invitation.
- Reminders:
- For this reminder: Metrics for this specific reminder.
- For all sent reminders: Metrics for all reminders associated with this reminder’s original survey invite.
Qtip: Metrics for reminders are only available for reminders sent after May 21, 2025. Reminders sent before this date will have a dash (-) instead.
When viewing the above metrics, the following statistics are available:
- Surveys started: The number of surveys started.
- Surveys finished: The number of surveys completed.
- Start rate: The number of surveys started / number of people sent messages.
- Response rate: The number of surveys completed / number of people sent messages.
- Completion rate: This statistic is only available when considering all distributions combined. You can view this statistic if you’ve sent a single invitation distribution, or if you’re viewing the metrics “For invite and all sent reminders.” This is the percentage of all surveys finished / percentage of all surveys started.
Reviewing Distribution Details
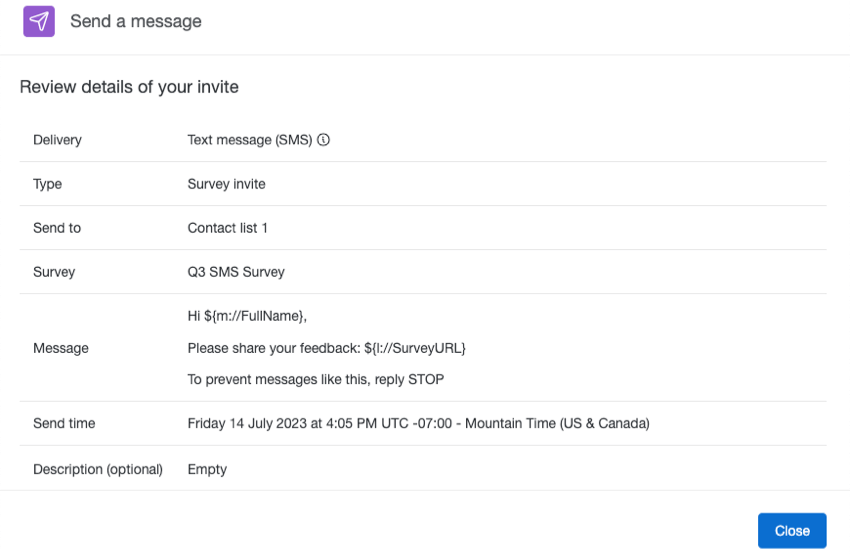
Reviewing a distribution lets you view details about a specific SMS invite. Click the 3 horizontal dots next to a message and select Review to view these details.
- Delivery: The channel of communication used to send the distribution.
- Type: The type of SMS distribution, either a survey invite, 2-way SMS conversation, or a reminder.
- Send to: The respondents who received the distribution.
- Survey: The survey that was sent in the distribution.
- Message: The message that was used.
- Send time: The date and time the distribution sent or is scheduled to send.
- Description: The description given to the distribution when it was sent.
Downloading Distribution History
To download the history of a specific distribution, click the 3 horizontal dots next to a message or the button in the message info panel and select Download history.
After you’ve downloaded your distribution history, you can see key metrics about your distribution. The Distribution History contains information about the distribution, including the status, recipient information, and more.
Click the information icon next to a distribution status to check for notes. You may see that a message(s) failed to deliver. Download the history to review recipients and see more information.
Sending SMS from an Alphanumeric ID
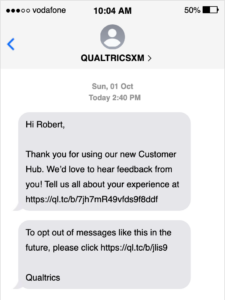
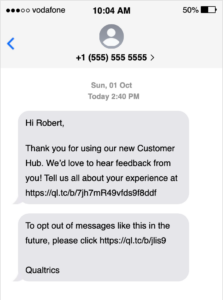
By default, all SMS distributions sent from Qualtrics are from a phone number (e.g., 888-888-8888). If desired, you may choose to send SMS from an alphanumeric ID instead (e.g., QUALTRICSXM).
Example: In the first image, the message sends from the alphanumeric ID “QUALTRICSXM.”
In the second image, the message sends from a default Qualtrics number.
Qtip: SMS sent from an alphanumeric ID must still meet all SMS opt-out compliance guidelines:
- Users must specifically opt in to receive your messages and know how to opt out before you send your first message.
- The STOP keyword does not work for alphanumeric IDs. You need to add an opt-out URL that will opt-out respondents from the contact list. To add the opt-out URL, add this piped text to your message: ${l://OptOutURL}.
Benefits of Alphanumeric IDs
Alphanumeric IDs have the following benefits over phone numbers:
- Sending messages from an alphanumeric ID has higher throughput (10 messages per second) compared to our standard setup (3 messages per second).
- Sending messages from an alphanumeric ID avoids increased carrier message filtering in many markets.
- Sending messages from an alphanumeric ID increases brand’s recognition since recipients see messages from your brand’s desired alphanumeric ID instead of a standard phone number.
Limitations of Alphanumeric IDs
Please be aware of the following limitations with alphanumeric IDs:
- Alphanumeric IDs are not available in all countries. See this page for more information about availability.
Qtip: Keep in mind that your alphanumeric ID is automatically used for all countries in which it is supported.
- Some countries require pre-registration before you can use an alphanumeric ID. See this page for more information.
- Alphanumeric IDs are only available for one-way outbound messages. Recipients cannot reply directly to messages. However, you can provide contact information in your message if you want recipients to message you.
Requesting an Alphanumeric ID
There is no additional charge for using an alphanumeric sender ID for most countries. Qualtrics offers sending messages via alphanumeric ID to those countries that don’t require any additional fee. However, for some countries that require pre-registration there may be additional charges, such as one-time setup fees or recurring monthly fees.
To request your alphanumeric ID:
- Decide what you want your alphanumeric ID to be.
Qtip: Alphanumeric IDs may be up to 11 characters. Accepted characters include both upper- and lower-case ASCII letters, the digits 0 through 9, and space (i.e., A-Z, a-z, 0-9). They may not be only numbers.
- Create a list of countries you plan on sending SMS messages to.
- Contact Account Services to request your alphanumeric ID be enabled. Make sure to include the information listed above.
Qtip: We recommend you reach out via email since the implementation process is not immediate.
Sending SMS from Multiple Alphanumeric IDs
Setting up multiple alphanumeric IDs gives you the ability to send SMS distributions from multiple sender IDs instead of using the same alphanumeric ID for your whole organization. The ability to send from multiple alphanumeric IDs is only available if you use Twilio for your SMS provider (either via the sub-account model or self-service model).
When using multiple sender IDs, you must define the specific ID you want to use within every survey you plan on distributing via SMS. To add a sender ID to your survey flow, follow these steps:
- Navigate to the survey you plan on sending SMS distributions from.
- Within the Survey tab of your project, click the Survey flow icon in the navigation bar on the left-hand side.

- Add a new element of embedded data, and name it “Sender_ID”.
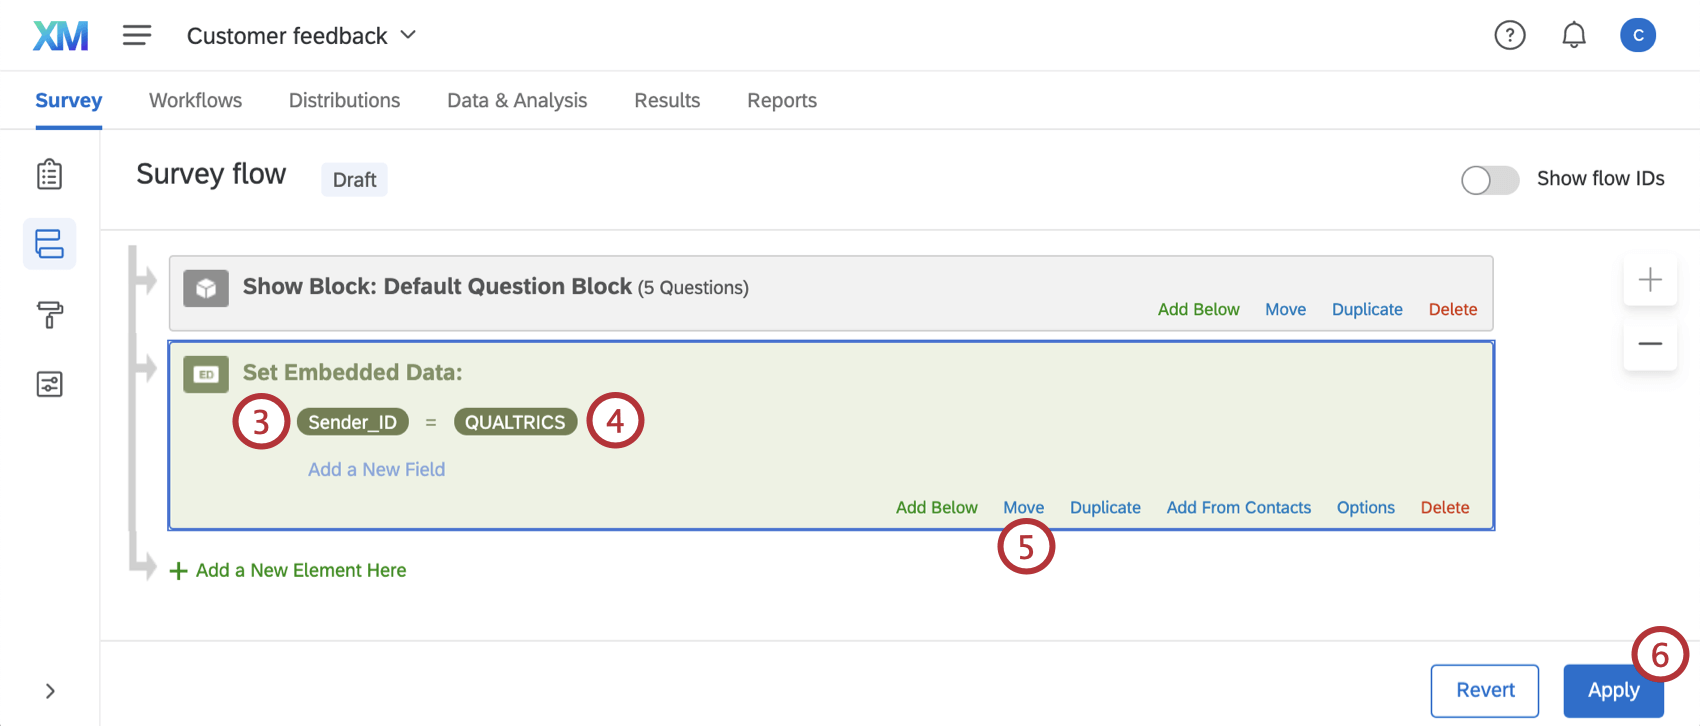
- Click Set a Value Now and enter the alphanumeric sender ID you want your SMS distributions to send from.
Qtip: Alphanumeric sender IDs may be up to 11 characters. Accepted characters include both upper- (A-Z) and lower-case (a-z) ASCII letters, the digits 0 through 9, and space. They cannot only be numbers.Attention: If there is a typo and your sender ID does not match any of the ones configured for your brand, your SMS distributions for this survey will fail. To view the status of individual invite messages you can download the distribution history.Qtip: If you want to distribute your survey from a specific phone number, you can purchase features to fulfill this need. Contact Account Services if you are interested in learning more about this.
- Move the element to the top of the survey flow, and make sure it is not nested within any branch logic.
Qtip: Survey branch logic cannot be used to choose multiple sender IDs within 1 survey. If the Sender_ID field is nested within any branch logic it will not work.
- Once your changes have been made, click Apply.
Important Considerations When Using Multiple Sender IDs
Please be aware of the following limitations when using multiple alphanumeric IDs:
- Sender IDs must be defined for each survey. If there is no sender ID specified in the survey flow and you have an alphanumeric ID set up for your brand, any SMS distributions you send will use this default alphanumeric ID.
Qtip: If you use your own SMS provider, you have the ability to set up your own default sender ID.
- Only 1 sender ID can be used in each survey. If multiple values for “Sender_ID” exist in the survey flow, only the first value will be used.
Example: If you are distributing a survey to 3 countries and want to use a different sender ID for each country, you must create 3 versions of the survey that each contain a distinct value for “Sender_ID”.
- You must have the ability to send distributions using the sender ID you enter in your survey flow, or your SMS distributions will fail. Make sure your sender ID has been configured with Qualtrics or your service provider.
- Some countries require pre-registration before you can use an alphanumeric ID. Only 1 sender ID can be used for these countries. See International Support for Alphanumeric Sender IDs for more information.
- Only 1 Sender_ID can be set in each survey. Branch logic cannot be used to dynamically assign multiple sender IDs.
Enabling Multiple Sender IDs
To request the ability to use multiple sender IDs:
- Decide what alphanumeric IDs you want to use.
- Create a list of countries you plan on sending SMS messages to.
- Contact Account Services to request your alphanumeric IDs be enabled. Make sure to include the information listed above.
Qtip: We recommend you reach out via email since the implementation process is not immediate.
SMS Across the Qualtrics Platform
SMS distributions can be used across the XM platform in a variety of tools and types of projects. This page covers how to send SMS distributions in:
Variations in Other Parts of the Platform
SMS is also available in other parts of the platform. Sometimes, the exact steps and user interface can vary. For more details, see the following pages:
- SMS Distributions in XM Directory (and XM Directory Lite)
- SMS Distributions (EX)
- Send Surveys via SMS in Workflows
- Conjoint and MaxDiff Distributions
Unsupported Projects
The following projects cannot be sent through either 2-way or invitational SMS:
