-

Qualtrics Platform -

Customer Journey Optimizer -

XM Discover -

Qualtrics Social Connect
Filtering Responses
About Filtering Responses
Sometimes, you will want to work with only a particular subset of your respondents’ data. Maybe you just want to glance at the last 3 months of data, or you are interested in exporting only the responses given by single mothers aged 18-35. No matter how specific the needs of your study, with Qualtrics, you can build filters for your response data and save them for later reuse.
Adding Filters
- In the Data & Analysis tab, navigate to the Data section.
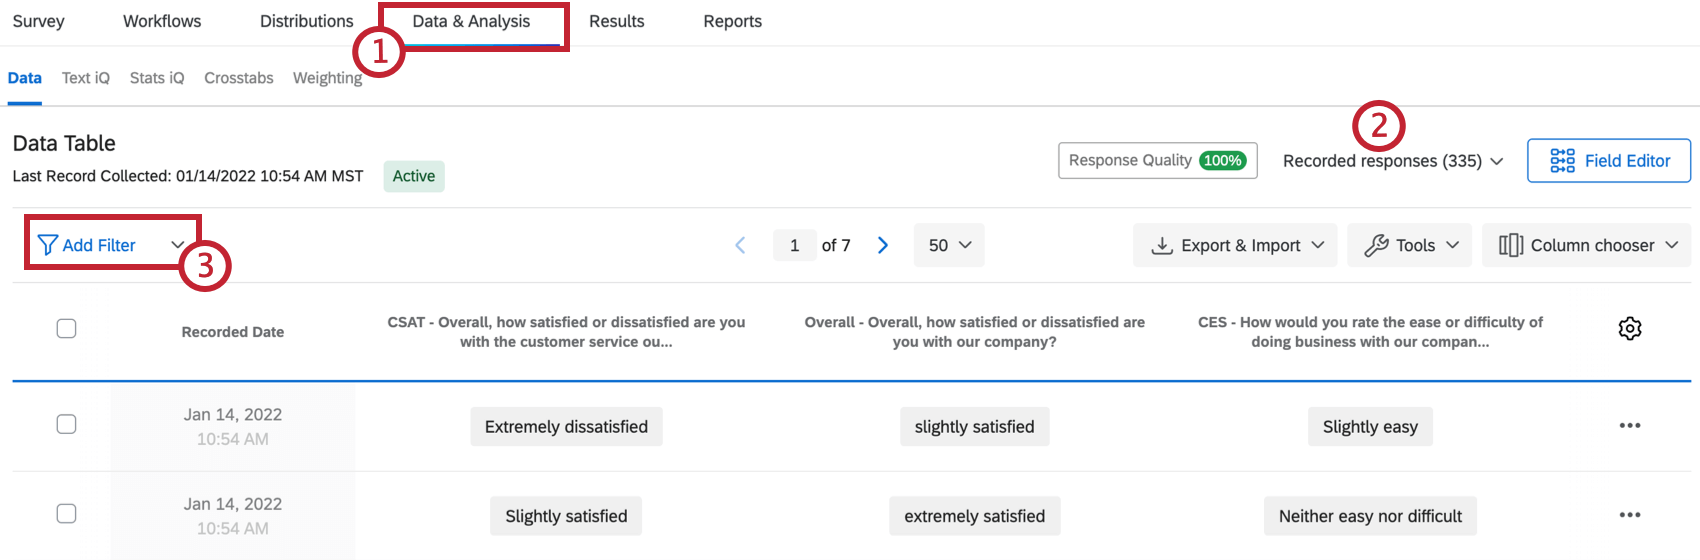
- Navigate to Recorded Responses.
- Click Add Filter.
- Name your filter.
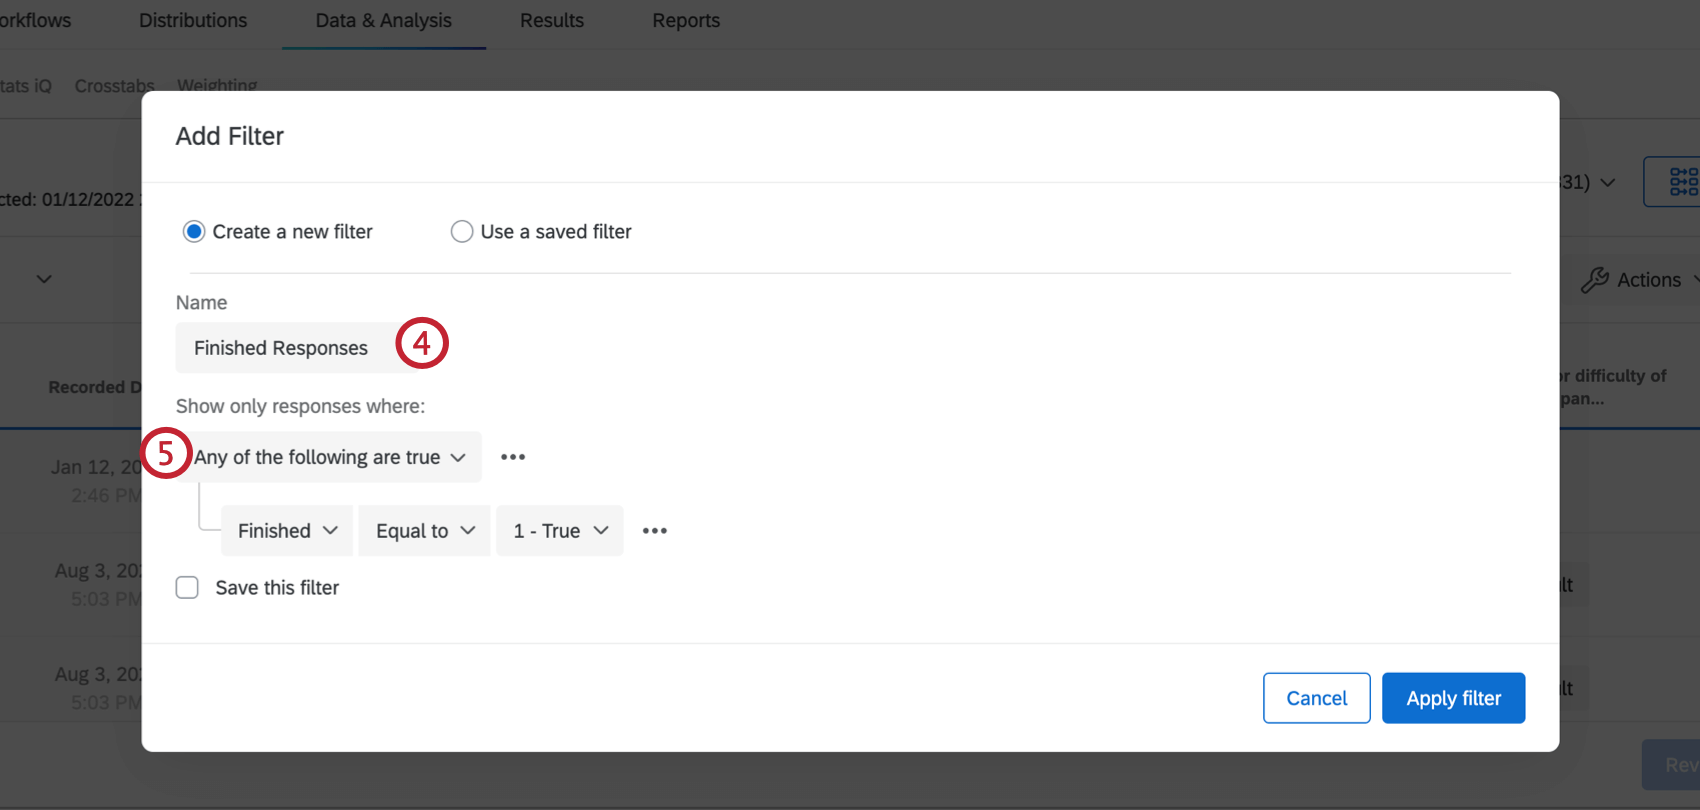
- Choose whether you want to show responses where Any of the following are true or All of the following are true.
- Select the field you wish to filter by.
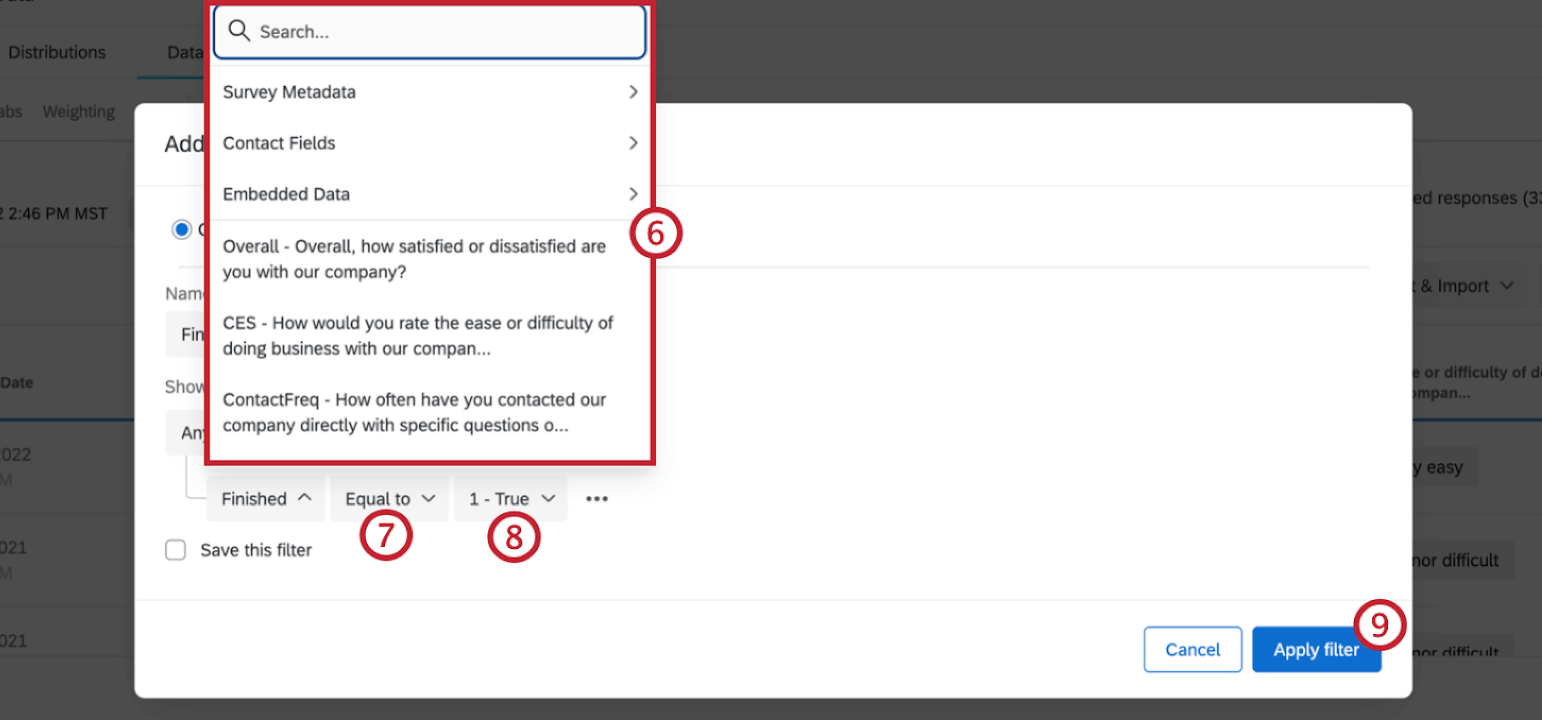
- Select an Operator.
- Select an Operand.
- Click Apply filter.
Qtip: This button will not be clickable until you make sure all your conditions are complete. Click the minus sign ( – ) to remove any incomplete conditions you do not want to complete or have added accidentally.
Once you’ve applied your filter(s), your response viewer will automatically update to show you the responses that match your criteria. You can see the total number of these responses right next to your filter. Click the x next to the filter name to remove the filter.
Saving and Reloading Filters
Saving the filters you create allows you to access them later without having to build them again. This is particularly useful for filters that have multiple conditions. This section will discuss creating and managing these saved filters.
Saving New Filters
- Build a filter.
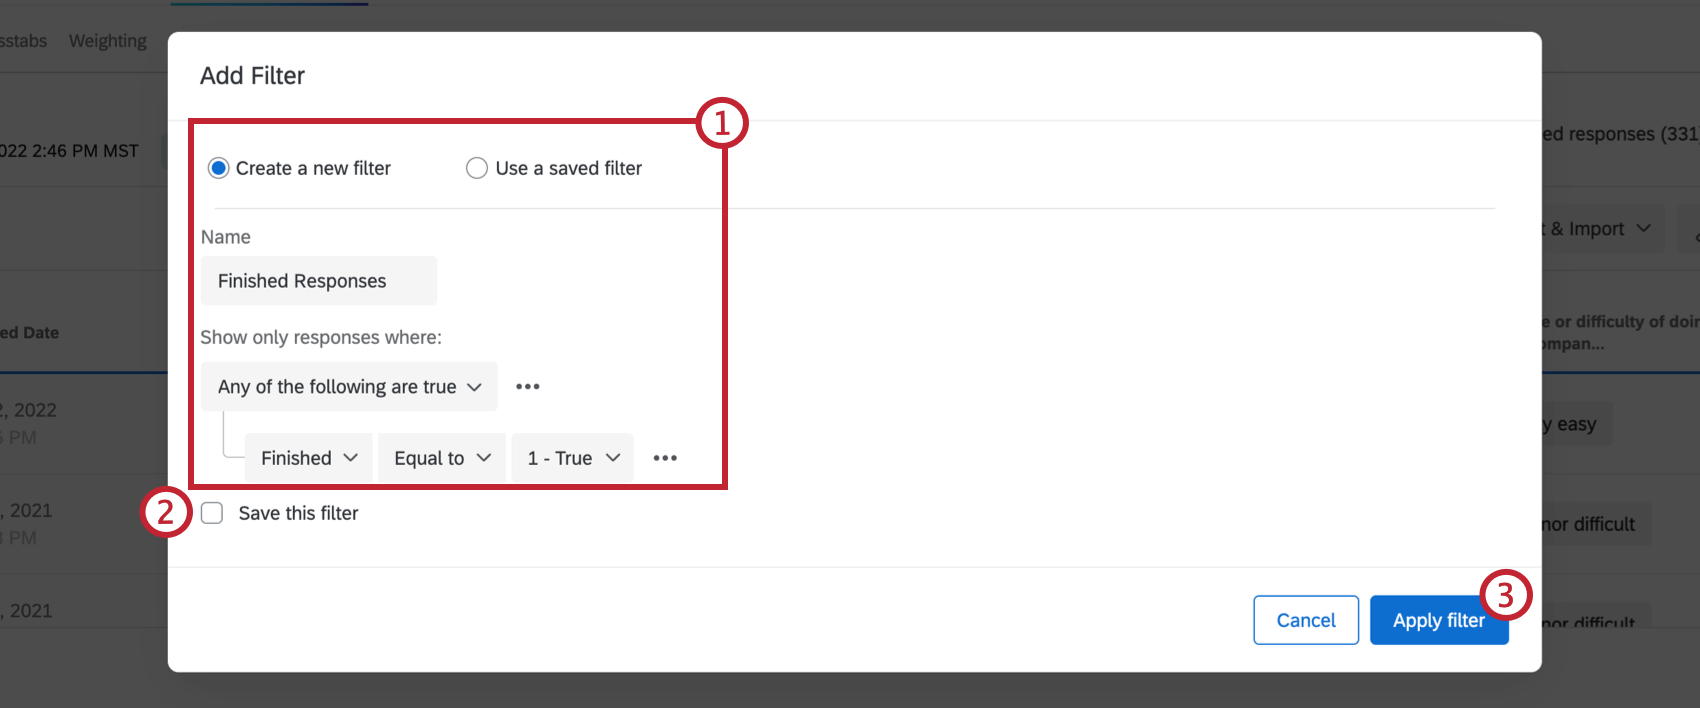
- Click Save this filter.
- Click Apply filter.
Editing Filters
If you edit your filter, you’ll need to save these changes.
- Click on the actions button next to the filter name.
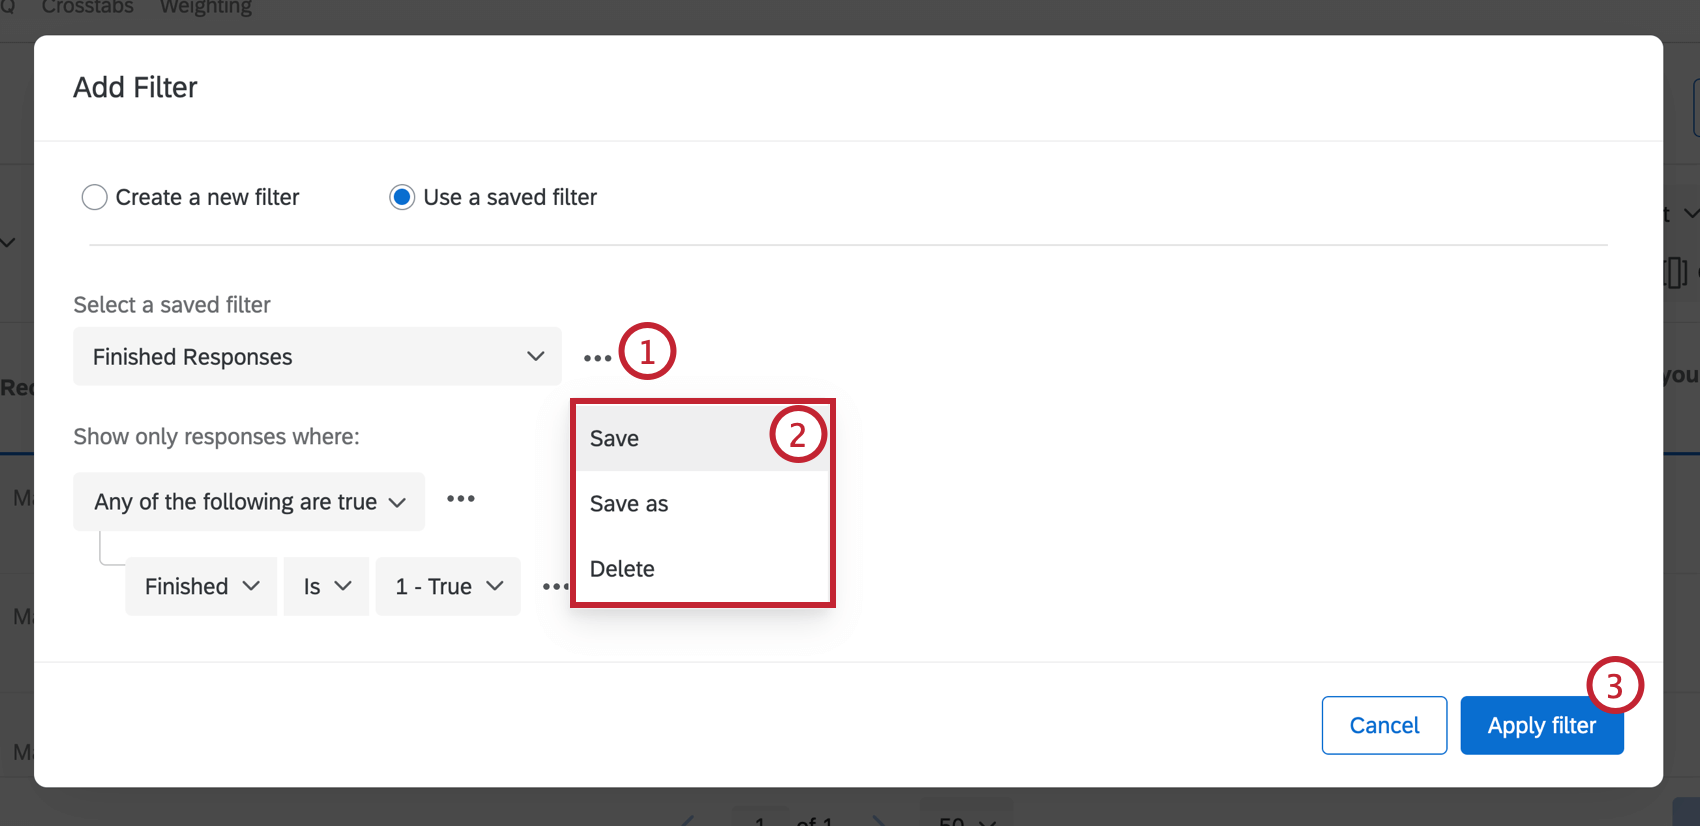
- Select an action from the dropdown menu. Save will save the changes made. Save As will allow you to rename the filter. Delete will remove this filter from your saved filters.
- Click Apply filter.
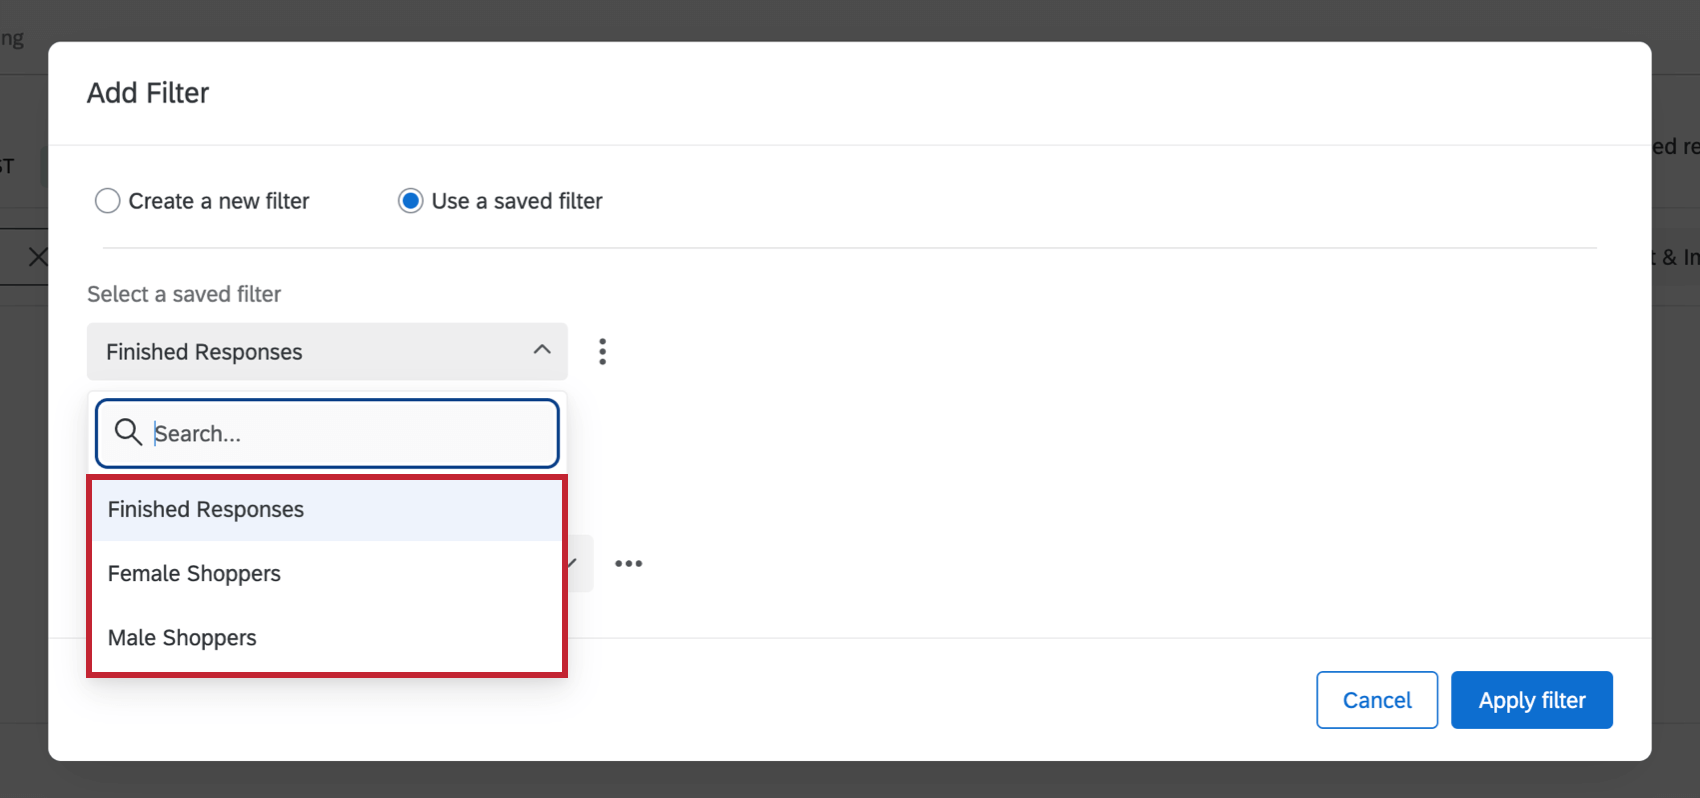
Loading Saved Filters
To select a preexisting filter to use, click the arrow next to Add Filter, and select the desired filter.
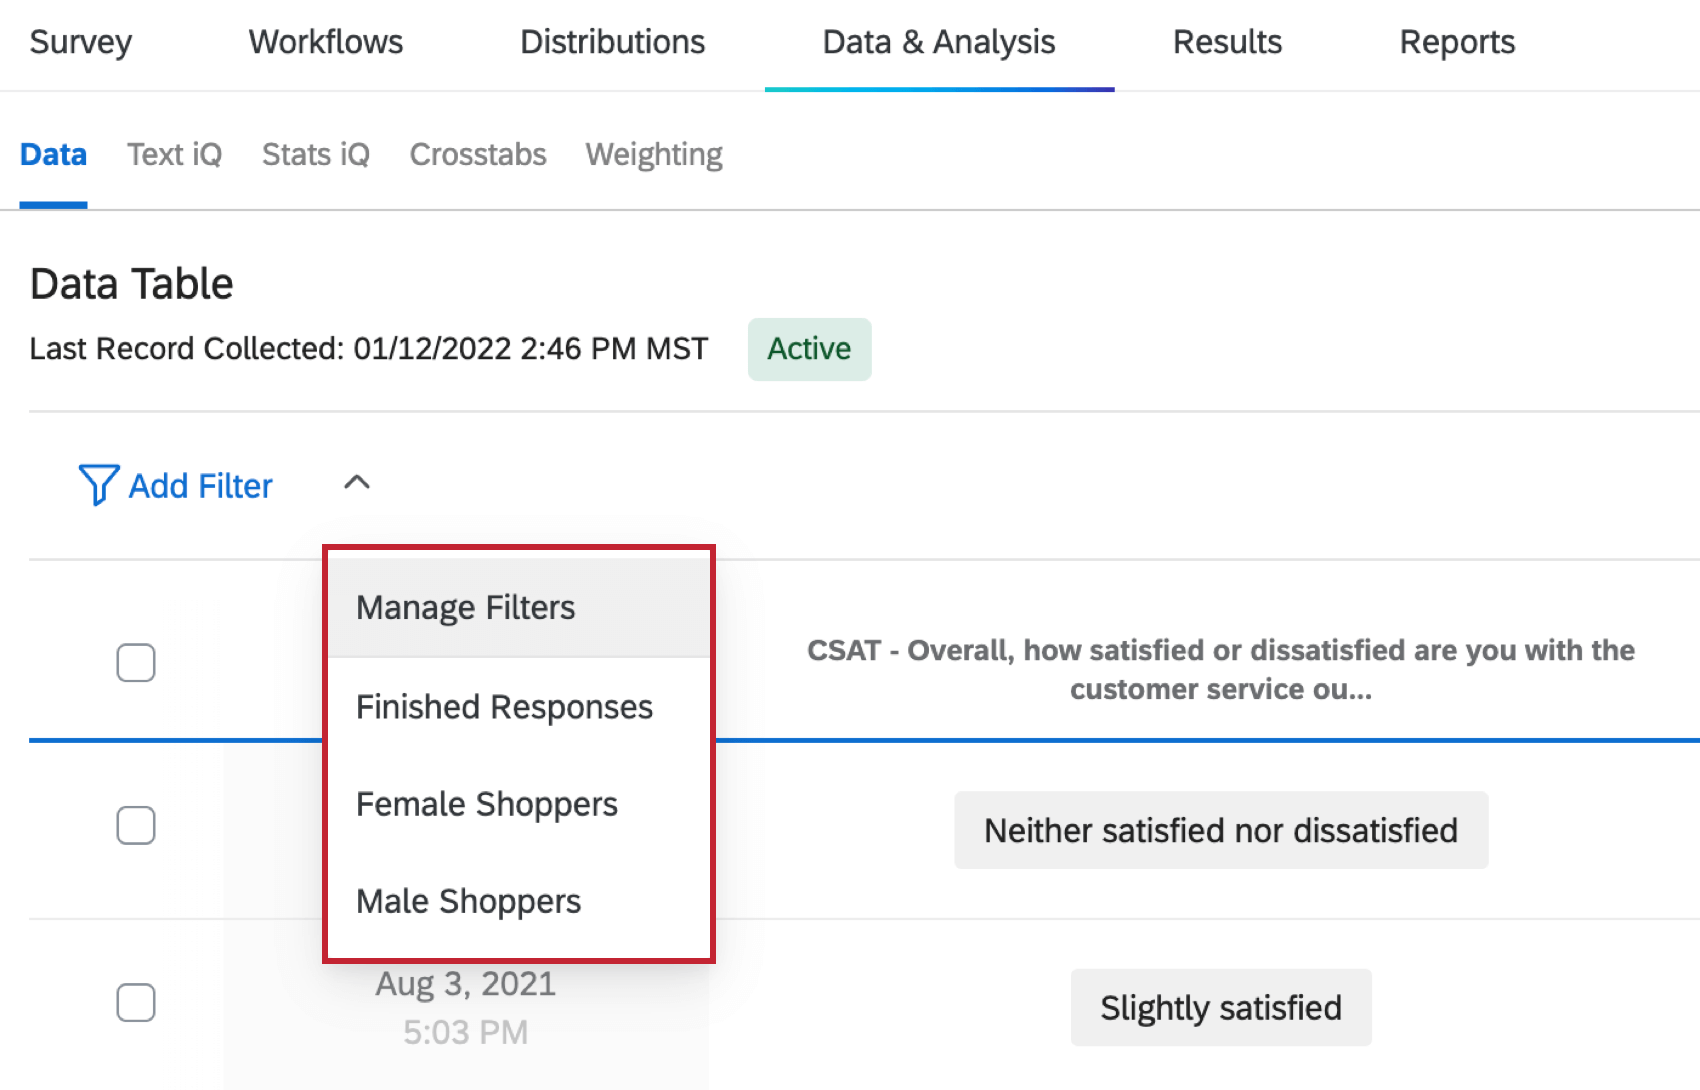
Qtip: You can also access saved filters by selecting Add Filter, clicking Use a saved filter, and then selecting the desired filter.
Managing Saved Filters
You can manage your filters by navigating to the Manage Filters window. To access this window click the window next to Add Filter and select Manage Filters.
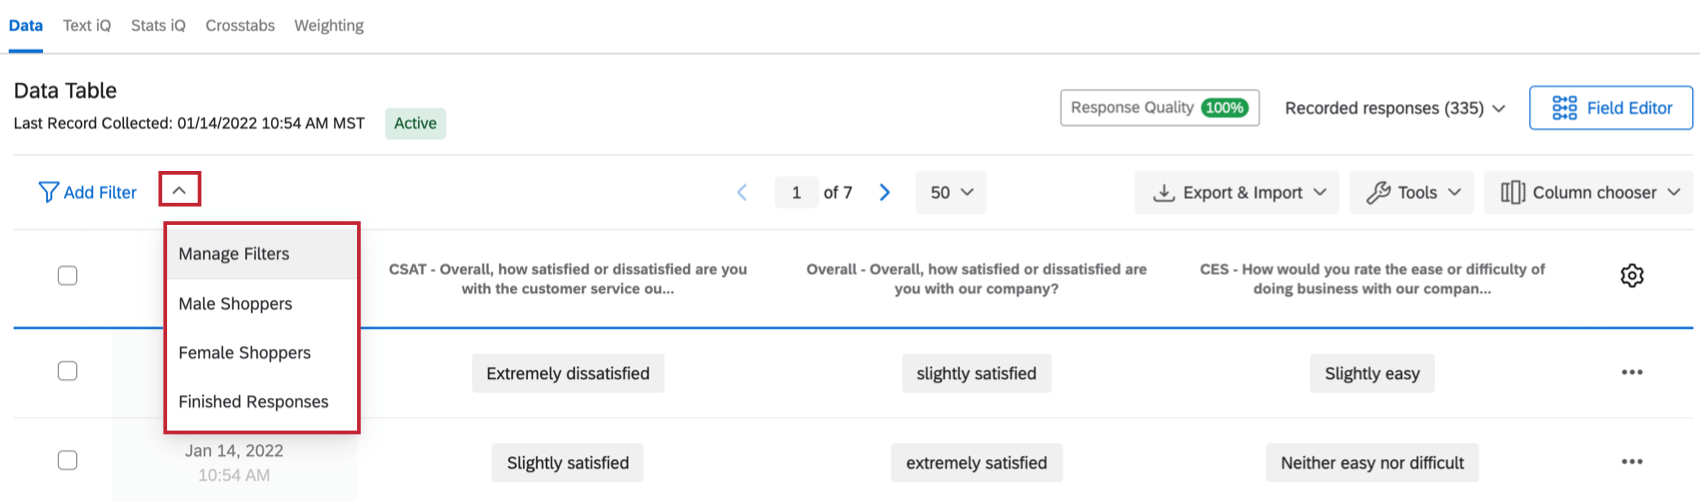
The following options are available to you:
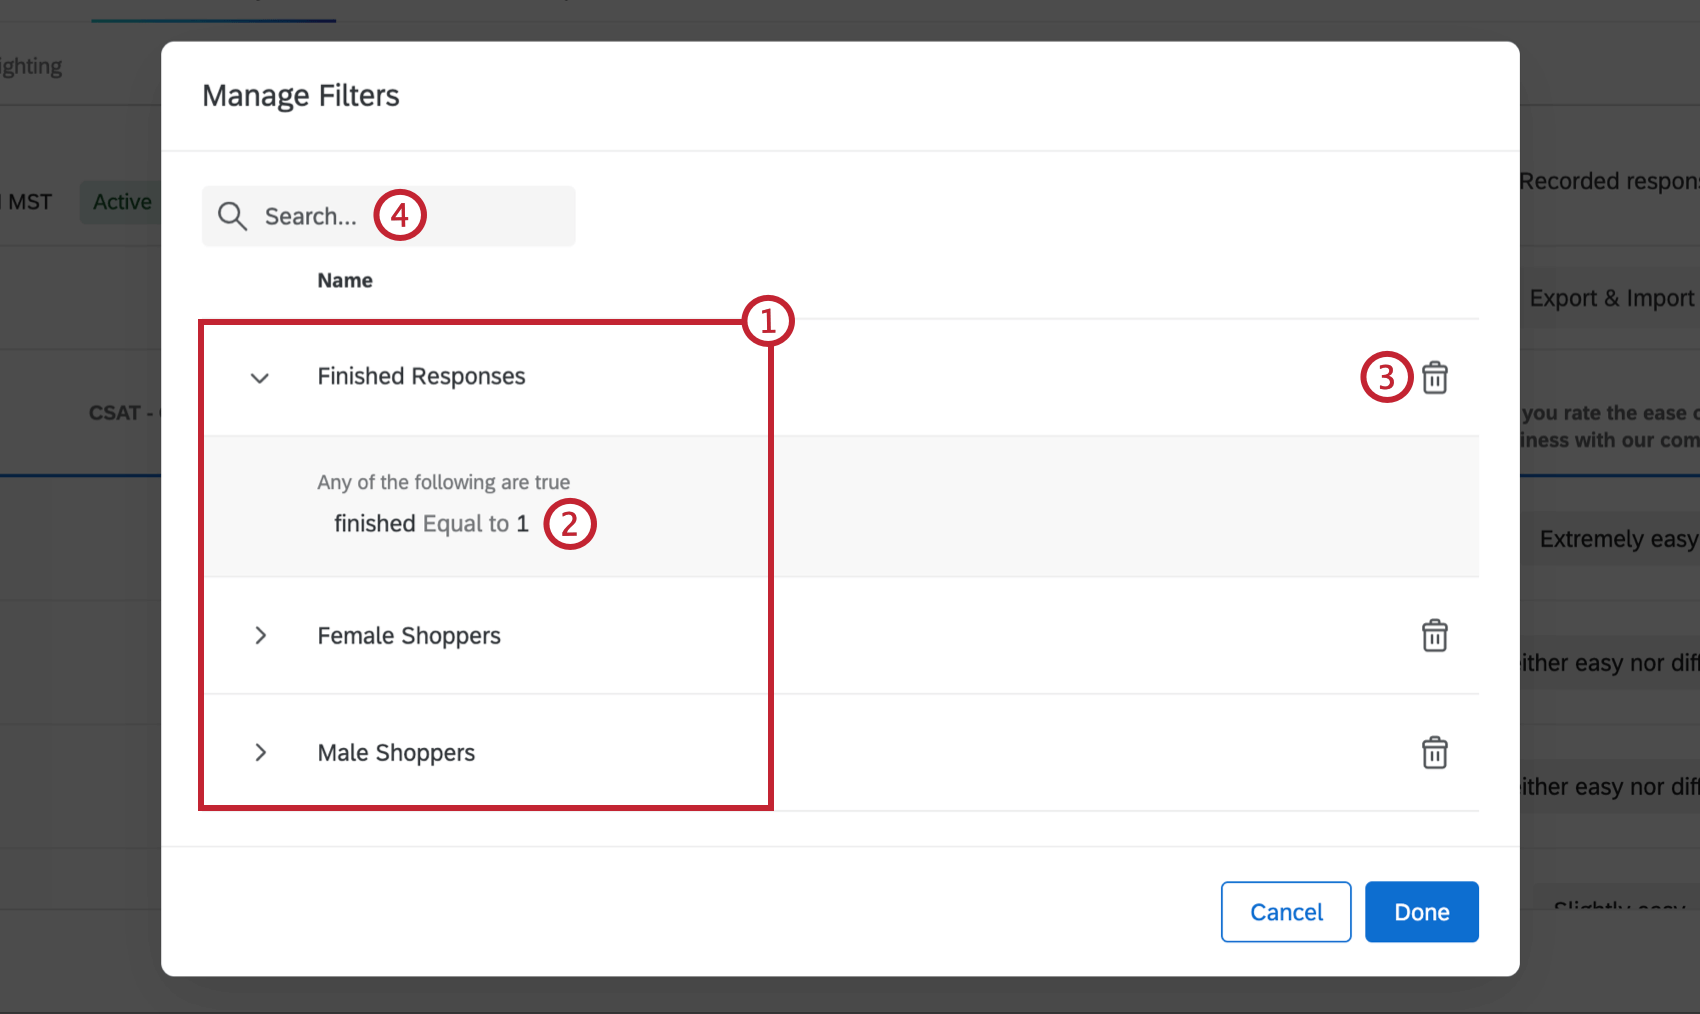
- View a list of your saved filters.
- View the filter conditions for your saved filters.
- Delete a saved filter permanently by clicking the delete icon.
- Search filters using the Search box.
Downloading Filtered Content
Once you have a filter applied at the top, you can export only the filtered data. No special steps are necessary!
See the linked support page for more instructions on exporting your data.
Fields You Can Filter By

There are 4 main types of information (or “fields”) that you can filter by: survey metadata, contact fields, question answers, and embedded data.
Survey Metadata
Survey metadata is information automatically collected when a respondent takes a survey. Survey metadata fields include the following:
- Start Date: The date and time the survey was started.
- End Date: The date and time the survey was completed.
Qtip: This time correlates to the last time the respondent interacted with the survey. Note that End Date and Recorded Date could be different times if a response was later closed as an incomplete response.
- Response Type: The type of response collected (survey preview, IP address, offline app, etc.).
Qtip: A response type of “IP Address” means the response was collected via an anonymous link, personal link, or individual link. To see how a respondent accessed a survey, filter by the Distribution Channel contact field instead.
- IP Address: The IP address collected from the respondent’s browser.
- Duration: The number of seconds it took the respondent to complete the survey.
- Finished: The status of the respondent’s survey (true = completed, false = incomplete).
- Recorded Date: The date and time the survey was recorded in the dataset.
Contact Fields
Contact field information will only be available if you uploaded a contact list and your respondent used an individual link. The following fields are available here:
- Recipient Last Name: The contact’s last name added in the LastName field when creating your contact list.
- Recipient First Name: The contact’s first name added in the FirstName field when creating your contact list.
- Recipient Email: The contact’s email address added in the Email field when creating your contact list.
- External Reference: Extra information about the contact added in the ExternalDataReference field when creating your contact list.
- Distribution Channel: The Qualtrics method that you used to distribute your survey.
Question Answers
There are many different question types in Qualtrics, and different question types have different filtering options. Some question types have only 1 filter option (i.e., only 1 way to represent the data), but for other question types you will have additional options. Possible options include the following:
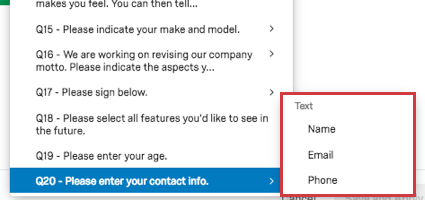
- Text Entry: For text entry questions with multiple form fields, you can choose which field you want to display.
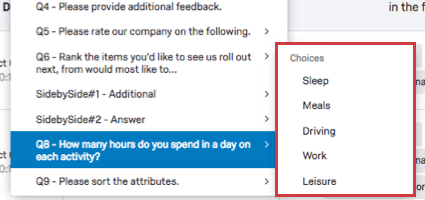
- Choices: For questions with multiple statements or components (such as a matrix table), you can choose which statement to filter by.
- NPS®: For NPS® questions, you can view the NPS® groups (Detractor, Passive, and Promoter, all calculated for you) or you can view the actual numeric values (0–10) the question displays to respondents.
Embedded Data
Embedded data is any extra information you’ve recorded in addition to your question responses. These include:
- Embedded data fields set in the survey flow
- Manual fields
- Formulas
- Bucketed fields
- Text iQ topics
- Text iQ sentiment analysis
Basics of Building Conditions
Creating a filter condition is a matter of defining when a respondent’s data should be included in your report.
Conditions have 3 parts: the field, the operator, and the operand.
Example: Maybe you’re only interested in looking at feedback from customers who were not extremely satisfied. Your filter field would be your satisfaction question, your operator would be “Not equal to,” and your operand would be “extremely satisfied.”
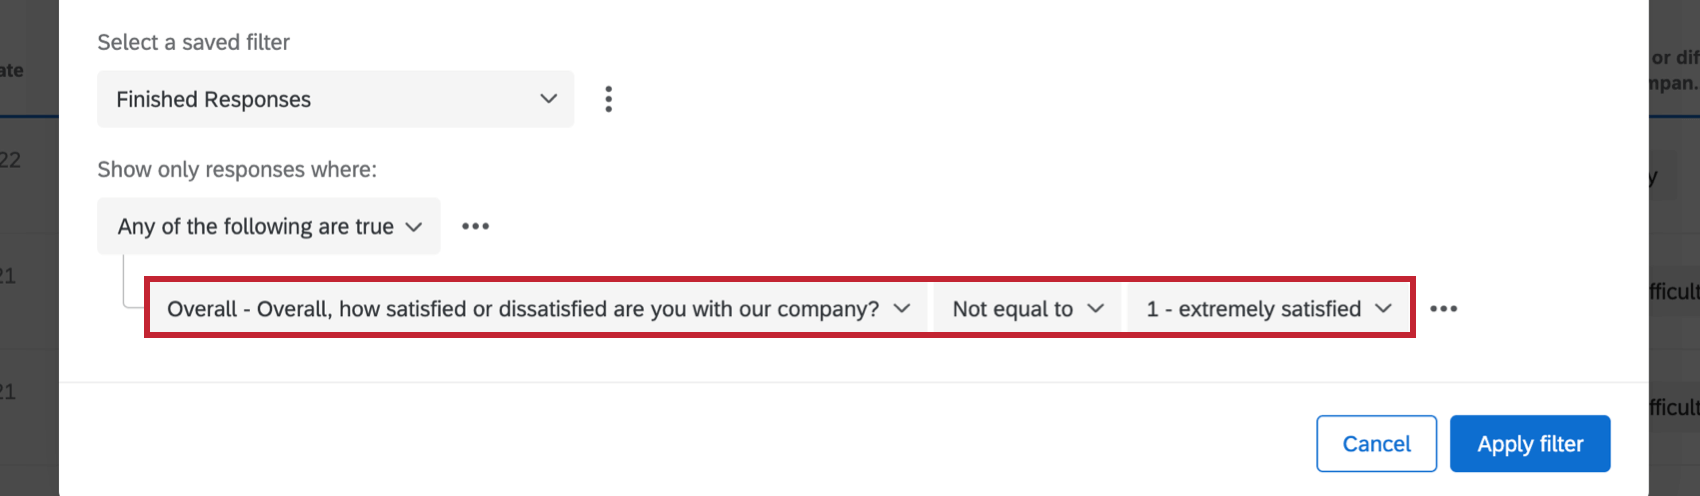
Field
The first dropdown menu in a condition determines the filter field (survey metadata, questions, or Embedded Data). Depending on the type of field you select, the remaining dropdown selection options will vary.
Operator
The second dropdown menu is the operator. Operators determine how the field relates to the final segment of the condition. The operators available depend on the field you just set.
Example: For Text Entry questions, the operators can be “Is,” “Is not,” “Contains,” and “Does not contain.” A potential condition might be, “Only show responses where the Recipient Email contains @qualtrics.com.”
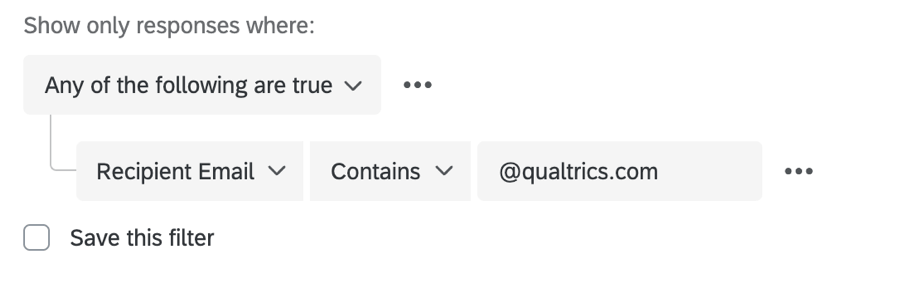
“Recipient Email” is the field and “contains” is the operator.
Operand
The final dropdown menu is the filter operand. An operand is the value you want to isolate. Let’s say you want to filter by age of your respondent. The field is age, and then the values would be 25, 32, 47, etc.
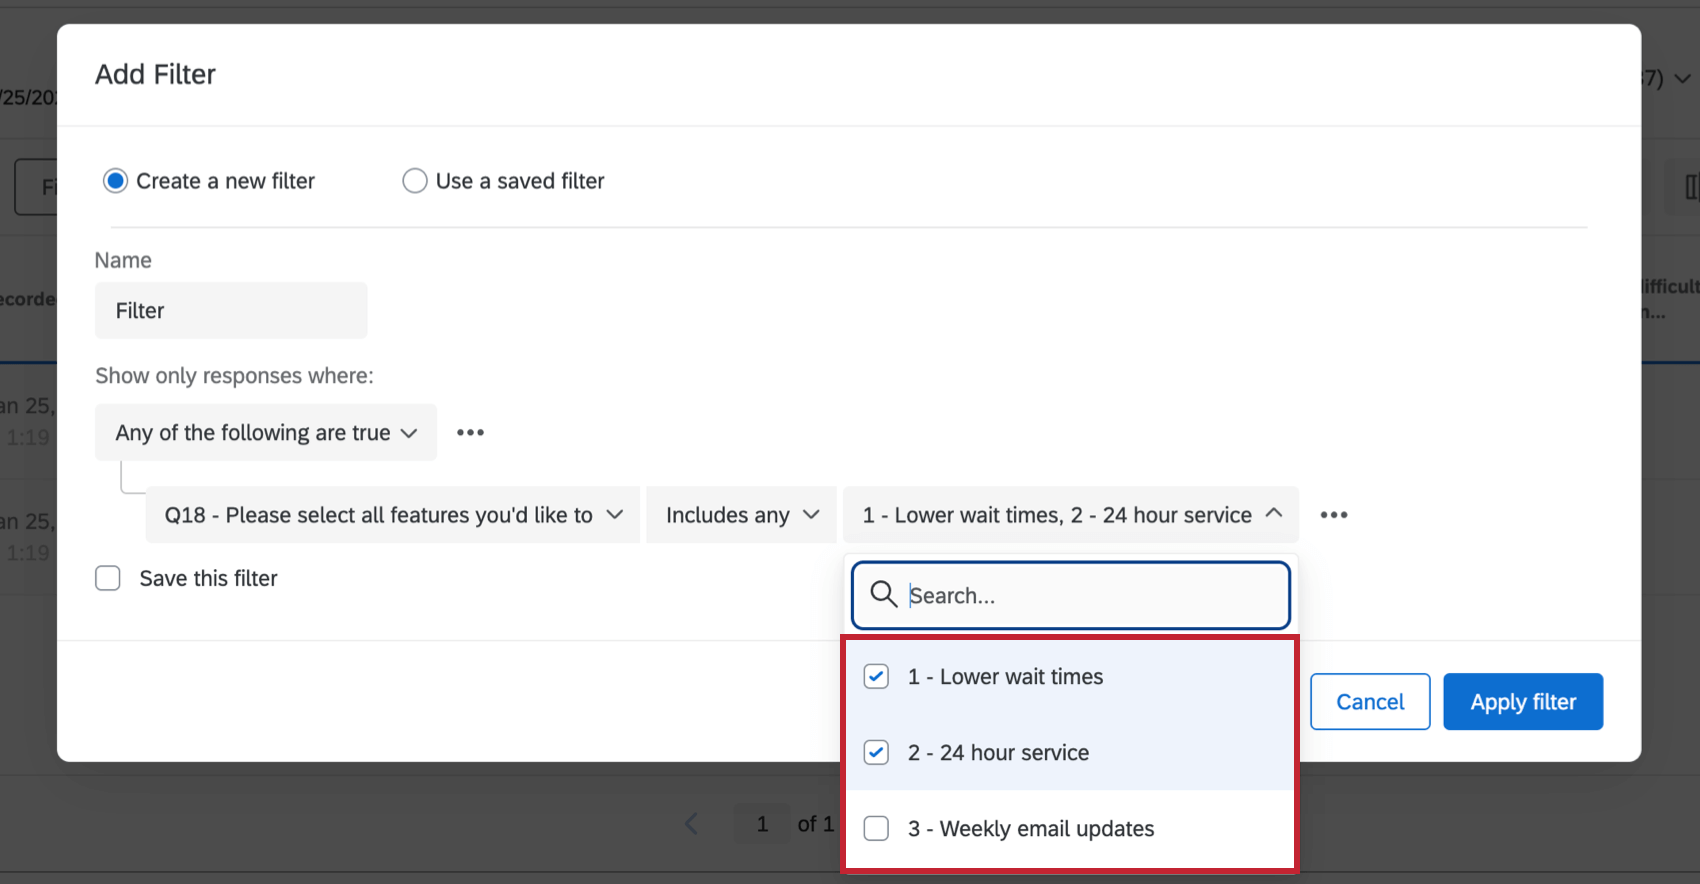
When the field is a question or data input that has discrete potential values (e.g., a Multiple Choice with a limited number of possible values), the operand will be an actual dropdown that lists all the possible options. In these instances, you can pick 1 operand or multiple.
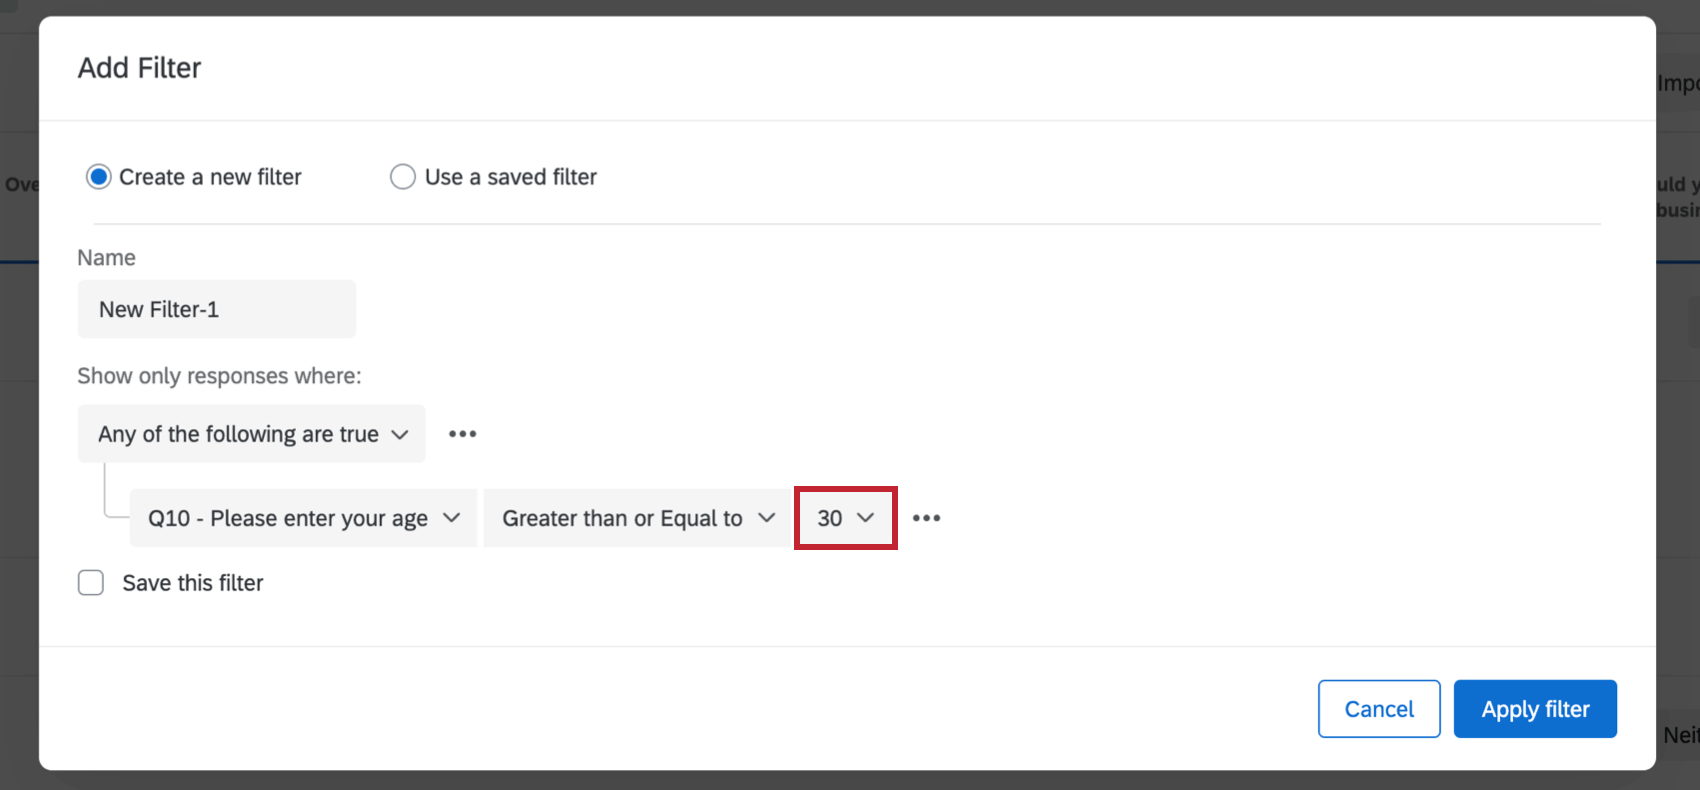
When the field is a question or data input that has an unlimited number of potential values (e.g., any type of Text Entry question), the operand will be a text entry box.
New Conditions and Condition Sets
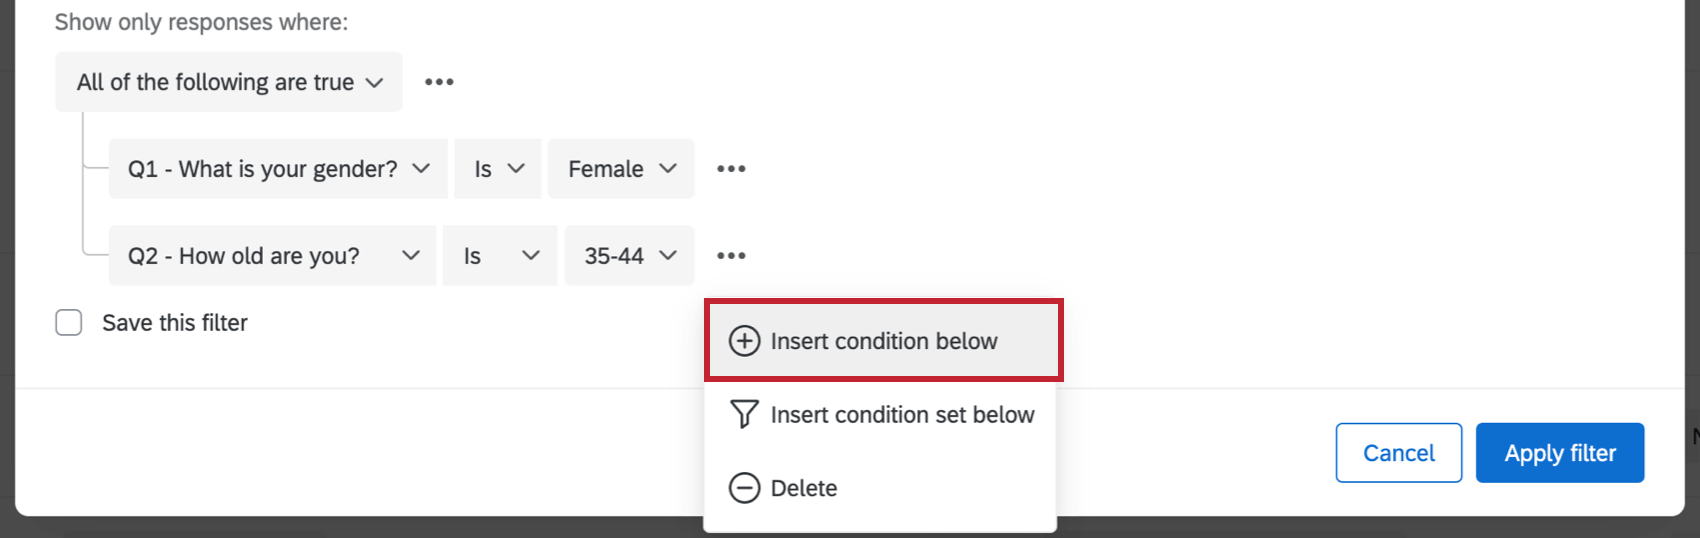
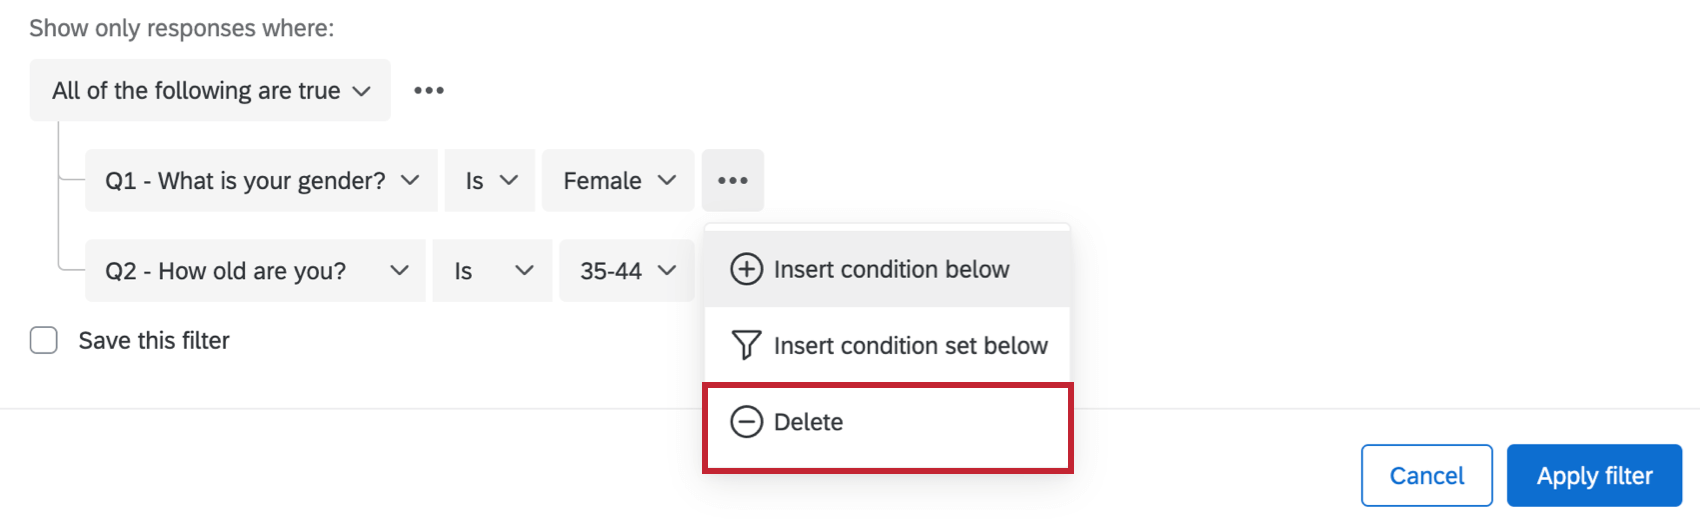
You can add new conditions by clicking the 3 dots to the right of any condition and selecting Insert condition below. This will insert a new condition right below it.
To delete conditions, click the 3 dots to the right of the condition and select Delete.
Condition Sets
You can tell which conditions are in the same set by looking at how indented the conditions are. Conditions within the same set are all indented the same amount and are beneath the same All/Any header.
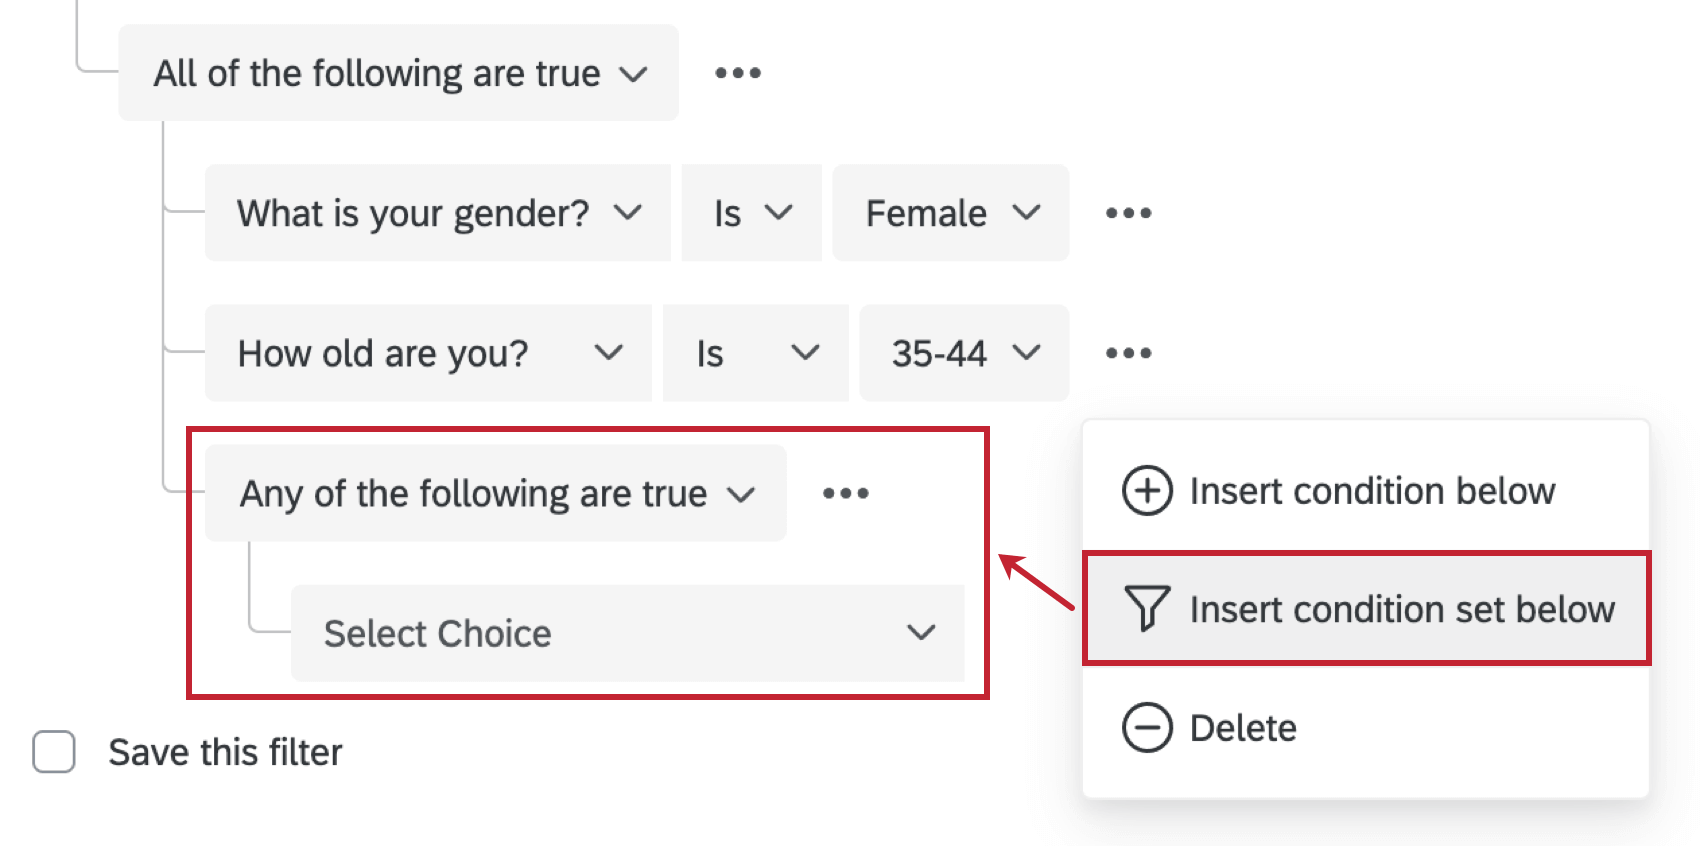
You can create new condition sets by clicking the 3 horizontal dots next to any condition and then Insert condition set below. This will add and nest a new set at the bottom of the set you’re currently in.
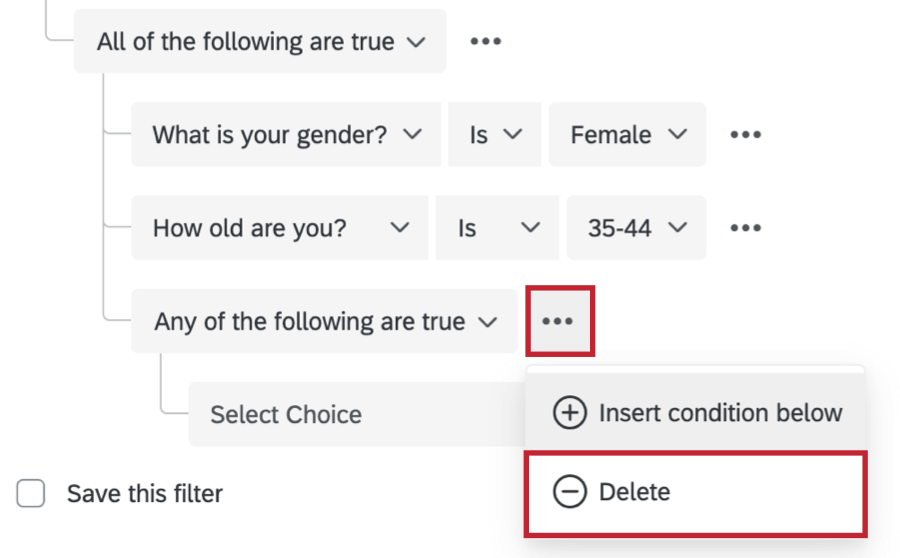
You can de-nest a set of conditions by clicking the 3 dots to the right of the set header and clicking Delete. This will delete the set.
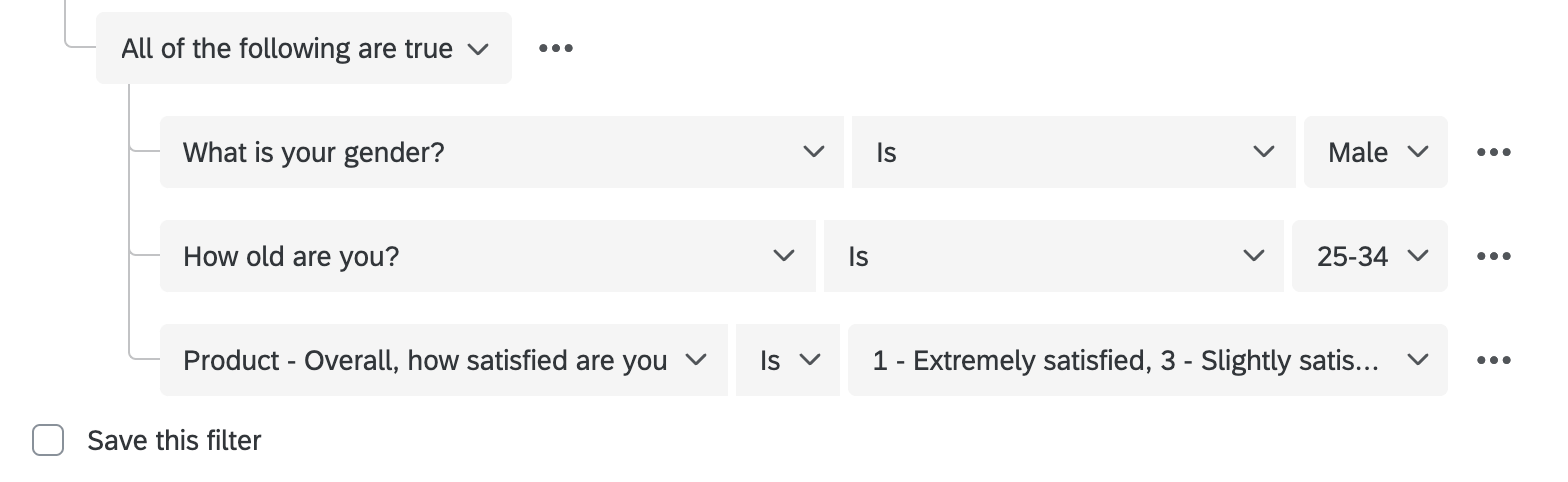
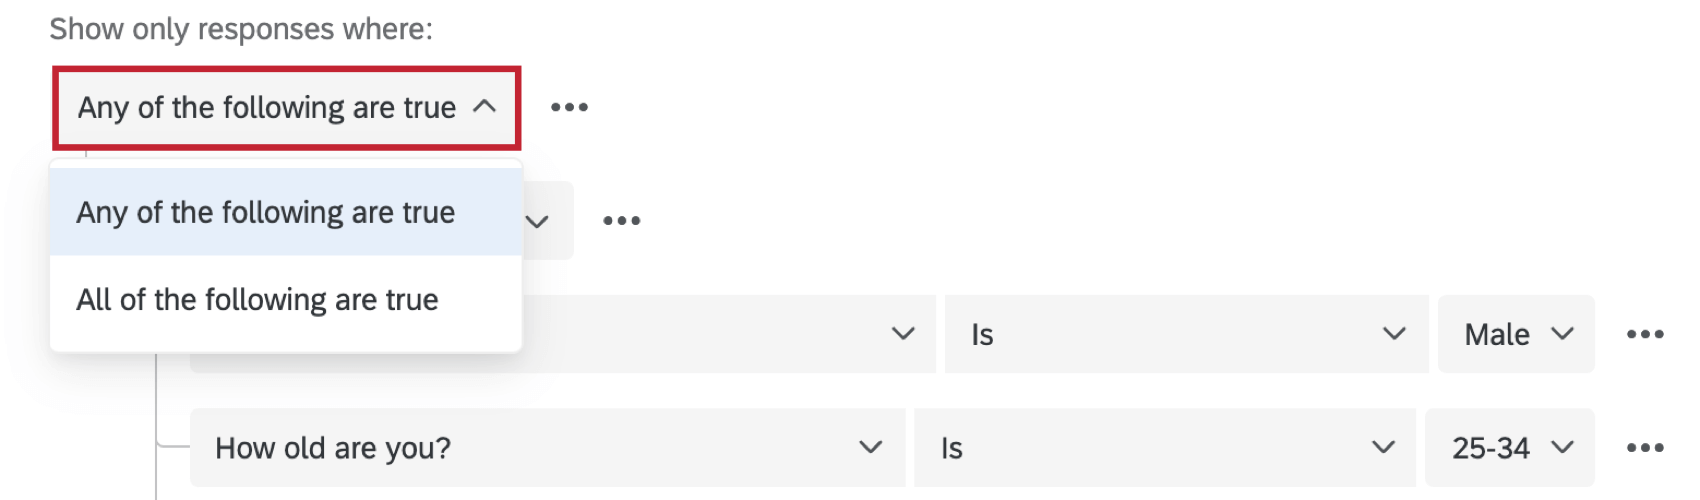
All vs. Any
Whenever you have more than 1 condition, you need to decide how the conditions are connected to each other. Do all conditions need to be met (e.g., a response must be from a particular month and for a specific manager to be included)? Or does only 1 of the conditions need to be true (e.g., data may be included in the report if it was collected either in the Northeast or the Southeast)?
Conditions linked by an and conjunction are called All condition sets (i.e., “only show data where ALL of these conditions are true”). Conditions linked by an or conjunction are called Any condition sets (i.e., “only show data where ANY of these conditions are true”).
By default, your filter window links conditions in an Any set. You can change this by clicking the dropdown and selecting All.
Nesting Logic
Nesting condition sets allows you to create more advanced criteria to filter your data by.
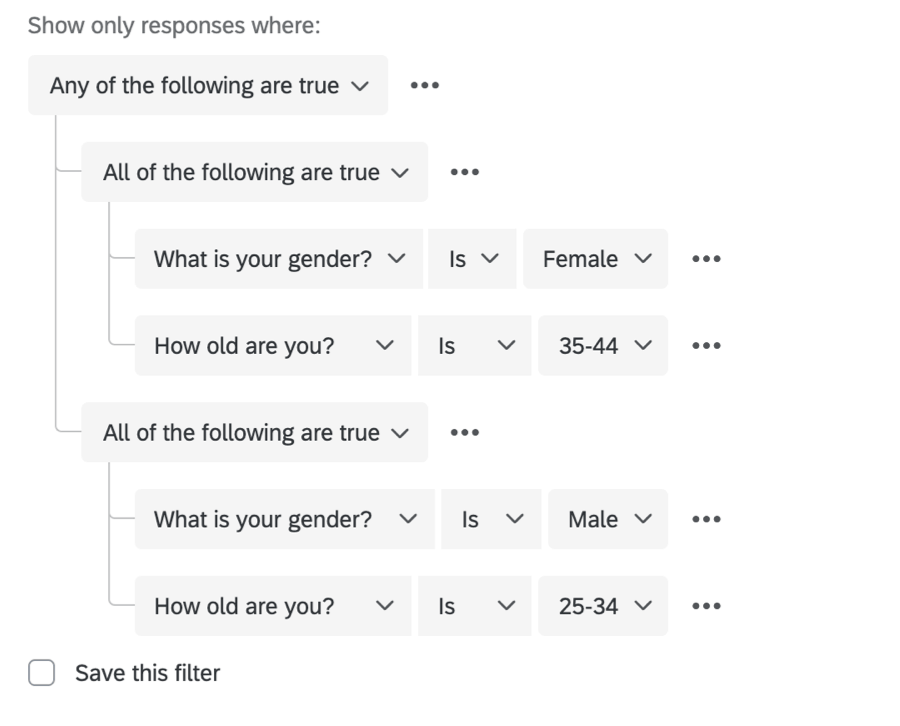
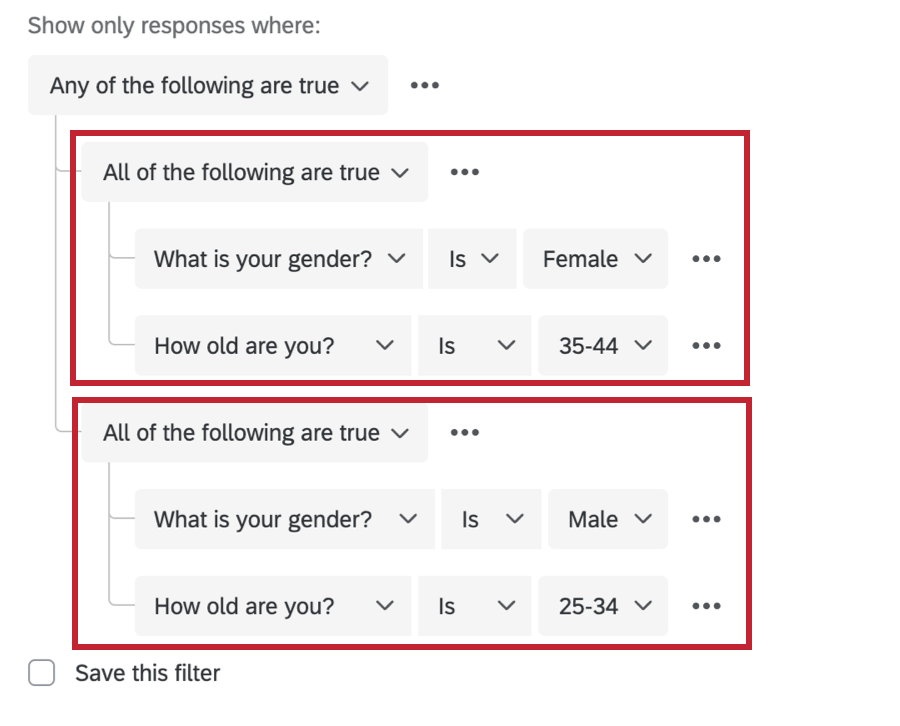
In the above example, the very outermost set is an Any set. People are either one thing or they’re another. Nested within that set are 2 All sets:
- People who are male and 25–34
- People who are female and 35–44.
This report will only include responses from people who are male and 25–34 years old or who are female and 35–44 years old.
When nesting condition sets, it is important to consider whether your outermost conditions are joined by Any or All before you start adding conditions and nesting.
Basics Nesting Rules
- Clicking Insert condition set below will nest a new set under the set you’re working on.
- Clicking Insert condition below will add a new condition on the same level.
- Click the 3 dots next to a condition and select Delete to delete it.
- To nest Any/All headers directly above each other, like in the examples above, delete the condition just below the header.
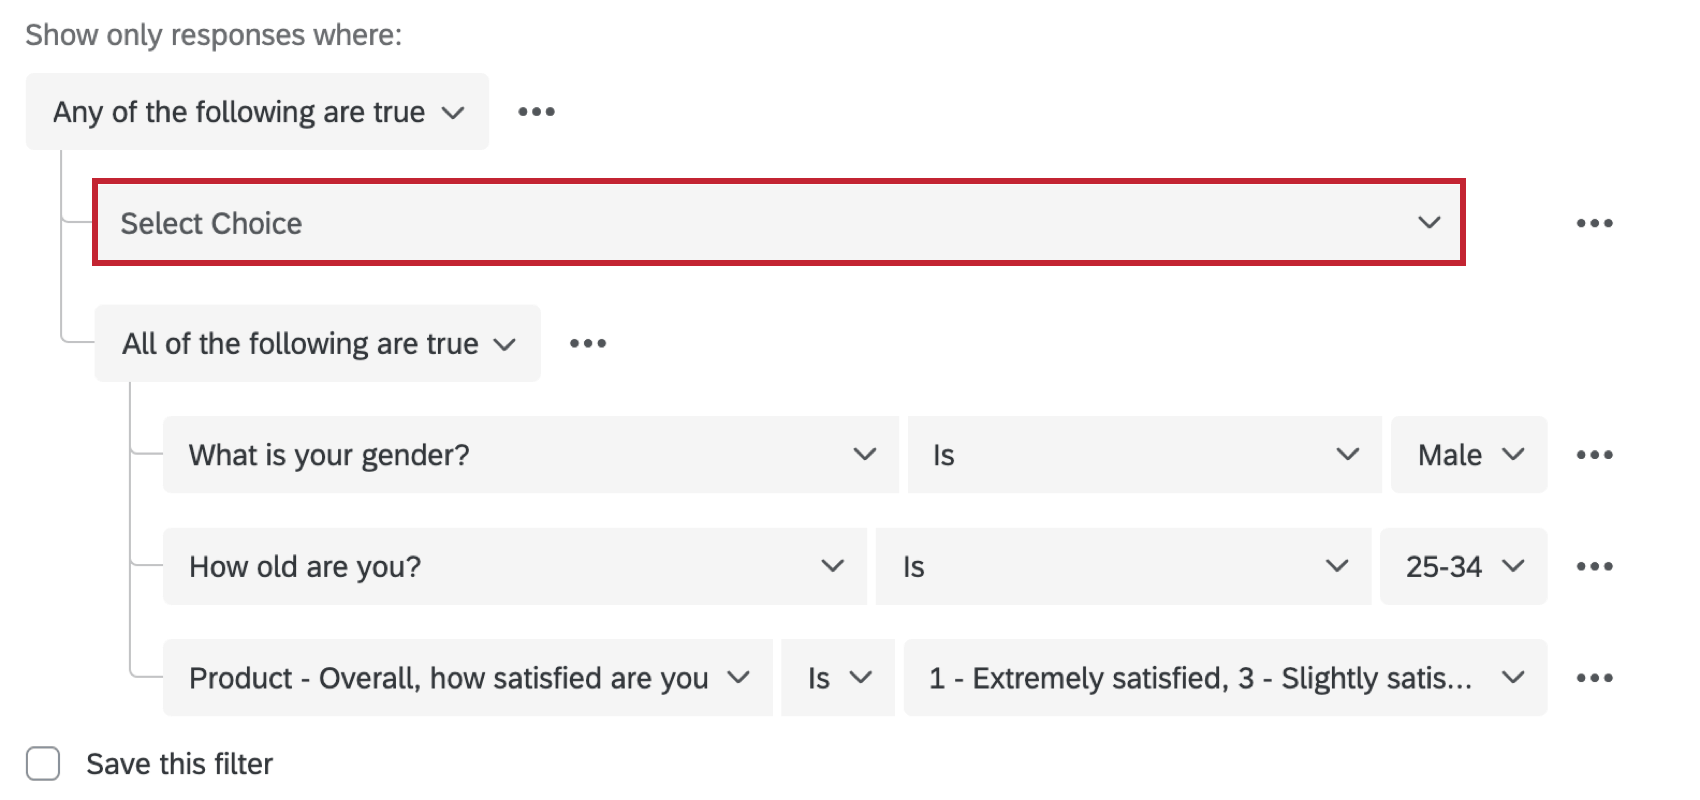
- You cannot add items a level above. You cannot reorder items.
Filtering Responses in Different Project Types
You can filter response data in many different types of projects. The steps and options described on this page apply to the following project types:
There are a few other types of projects where you can filter response data. However, there are important differences to keep in mind:
- For 360 projects, see Managing Response Data (360).
- For all other Employee Experience projects, see Managing Response Data (EX).