-

Qualtrics Platform -

Customer Journey Optimizer -

XM Discover -

Qualtrics Social Connect
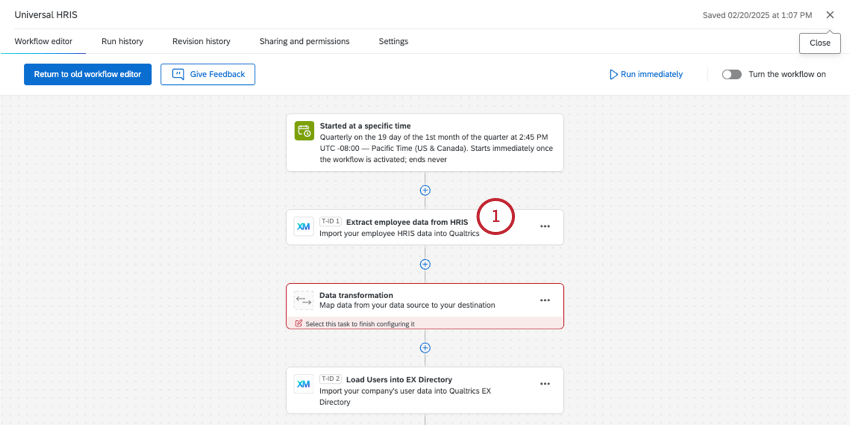
Extract Employee Data from HRIS Task
About Extracting Employee Data from an HRIS
It’s very likely that you keep employee information stored not just in Qualtrics®, but in an HRIS (Human Resources Information System), along with all kinds of important operational data for each person. You can automate the process of syncing this employee information to Qualtrics on a regular basis, keeping your directories up-to-date and enriching your employee research. To accomplish this, you create an ETL workflow that starts with an Extract employee data from HRIS task.
No matter the system you use, it’s worth trying this task out, as this task lets you choose from an incredibly wide range of HRIS platforms. See below for a short list of supported, popular platforms.
Setting Up an Extract Employee Data from HRIS Task
To use this task, you must have the Extract employee data from HRIS permission enabled.
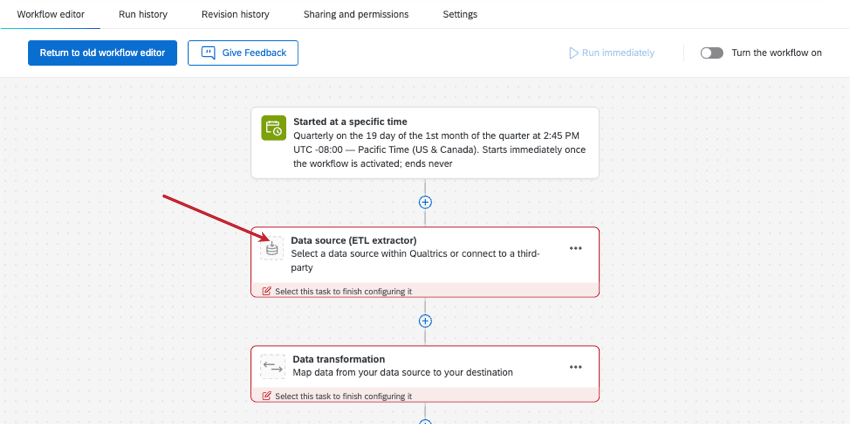
- Create an ETL workflow.
- Click Data source (ETL extractor).
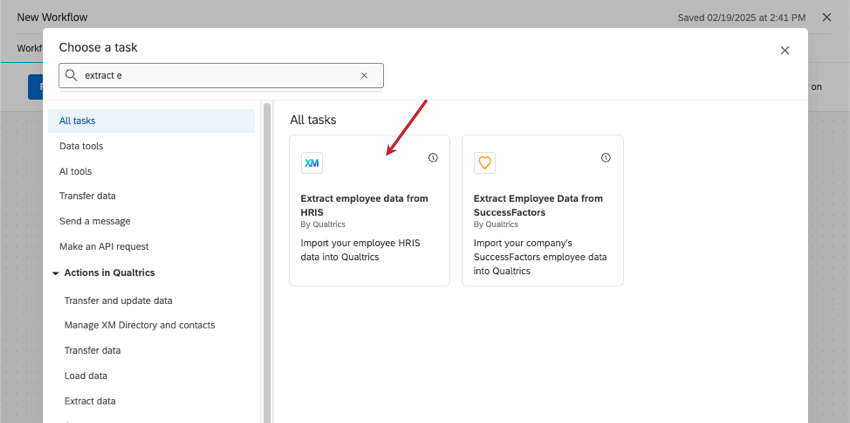
- Search and select Extract employee data from HRIS.
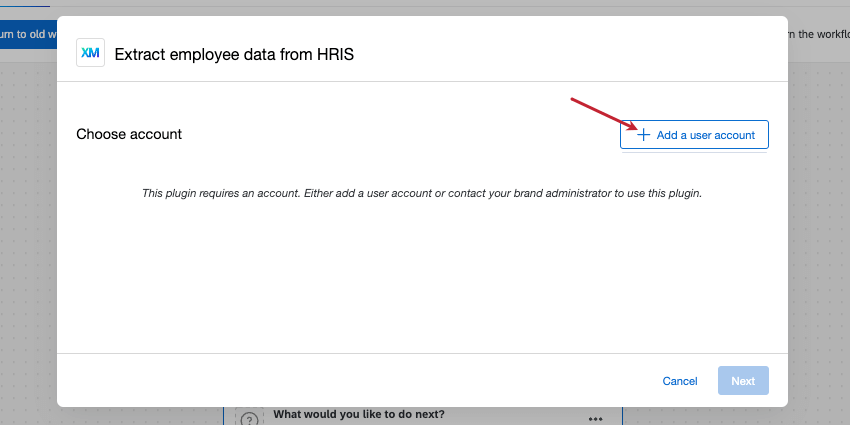
- Click Add a user account.
- Create a name for your account.
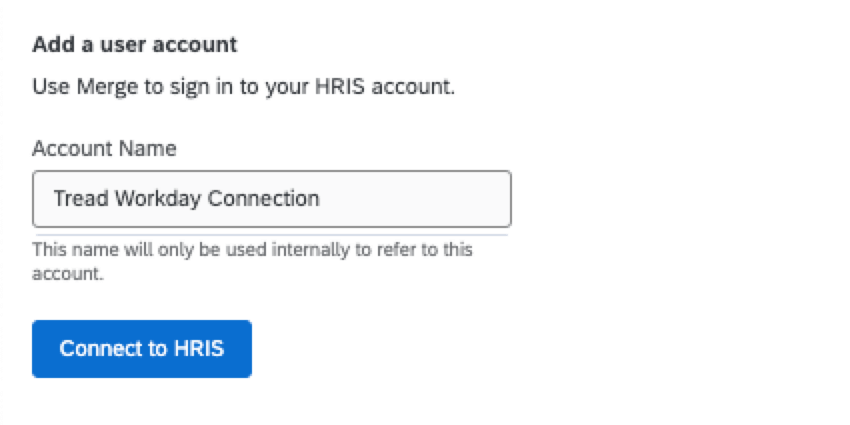 Qtip: This account name is mostly to help you identify the connection or HRIS account you plan to log into.
 - Click Connect to HRIS.
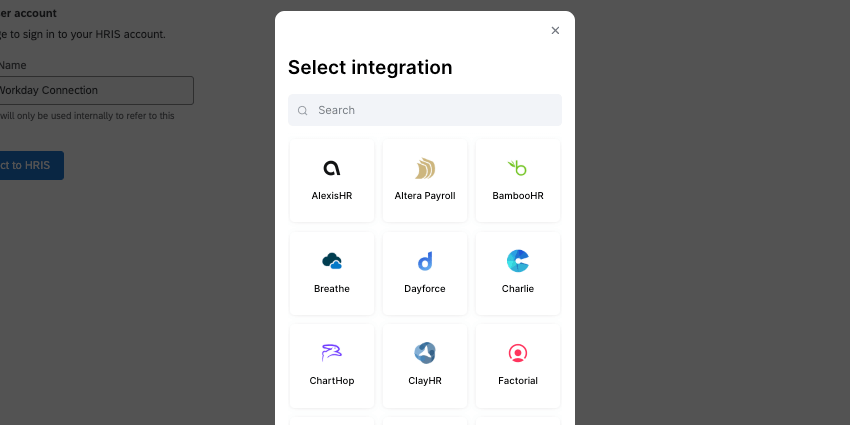
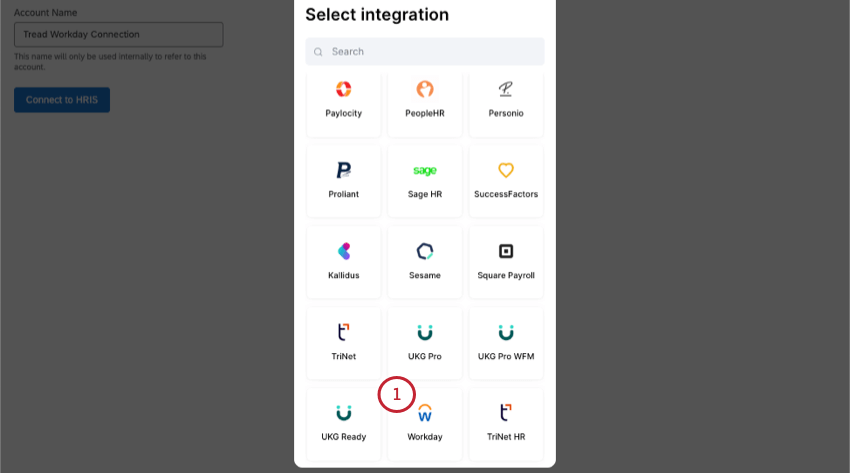
- Search and select the integration you’d like to use. See supported HRIS platforms for a non-exhaustive list.
- Depending on the HRIS you select, your next steps will vary. Follow the steps on the screen to learn the permissions you need and the actions you should take to connect to your chosen HRIS.
Qtip: See our Workday example for an idea of what next steps could look like.
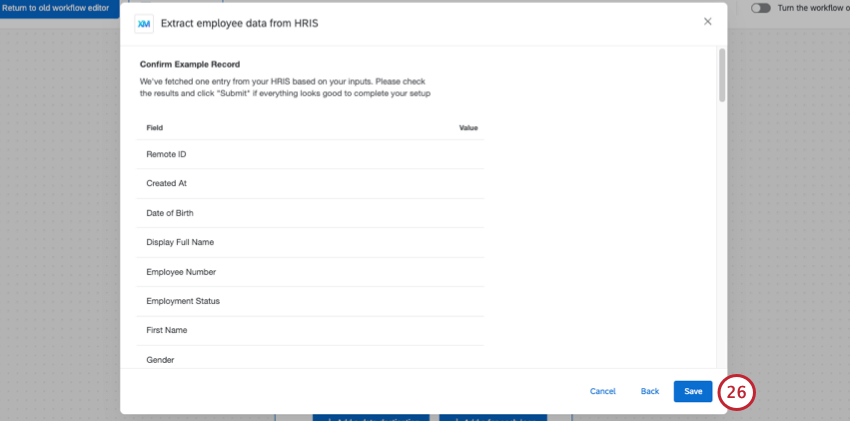
- Once you’ve connected to your HRIS, complete your workflow.
Example: Connecting to Workday
In this example, we’ll show you what it looks like to log into Workday with this task. These steps are written assuming you’ve already completed the instructions in Setting Up an Extract Employee Data from HRIS Task.
While you complete these steps, you’ll need to have your HRIS (e.g., Workday) open in another tab.
- Select Workday from the list of integrations.
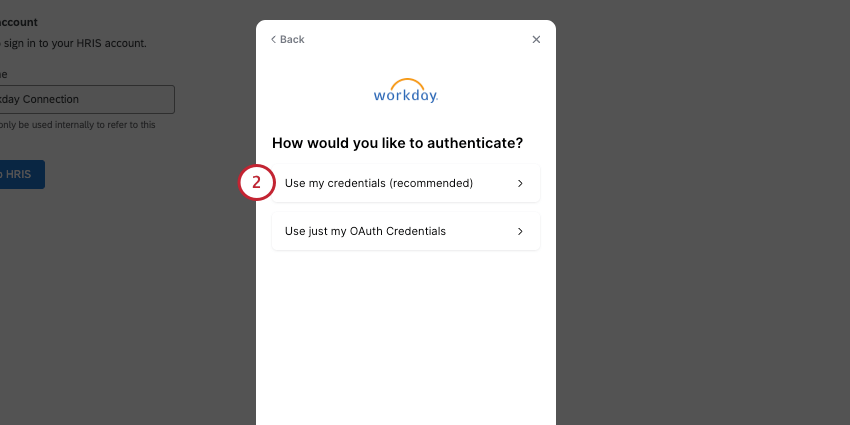
- Choose how to authenticate. In this example, we’ll select Use my credentials (recommended).
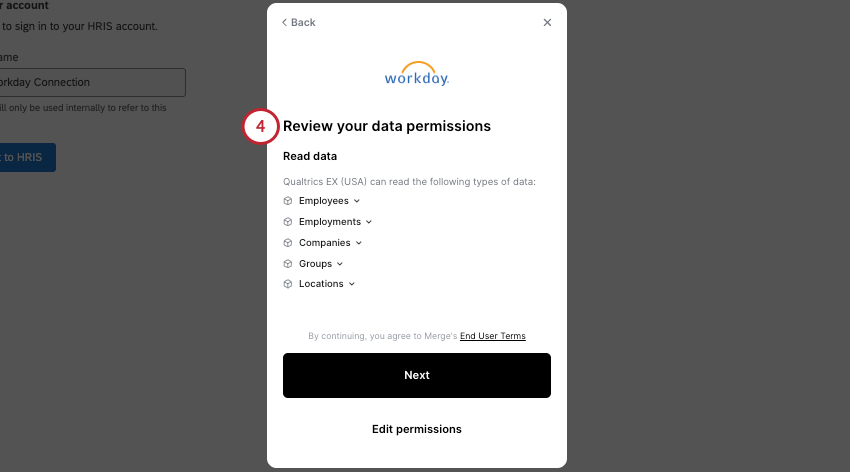
- Workday requires an administrator role to connect. Confirm you’re an admin to proceed.
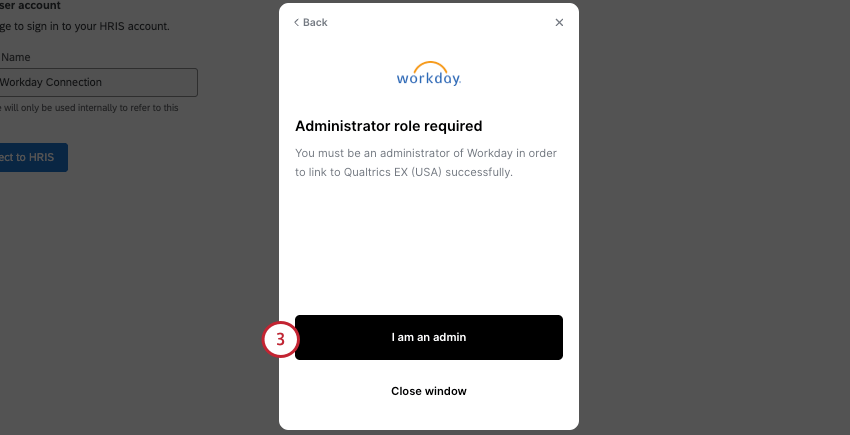 Qtip: If you’re not a Workday administrator, reach out to your organization’s IT team.
 - Review data permissions and end user terms. By proceeding, you are agreeing to these terms.
- For Select operator, choose is.
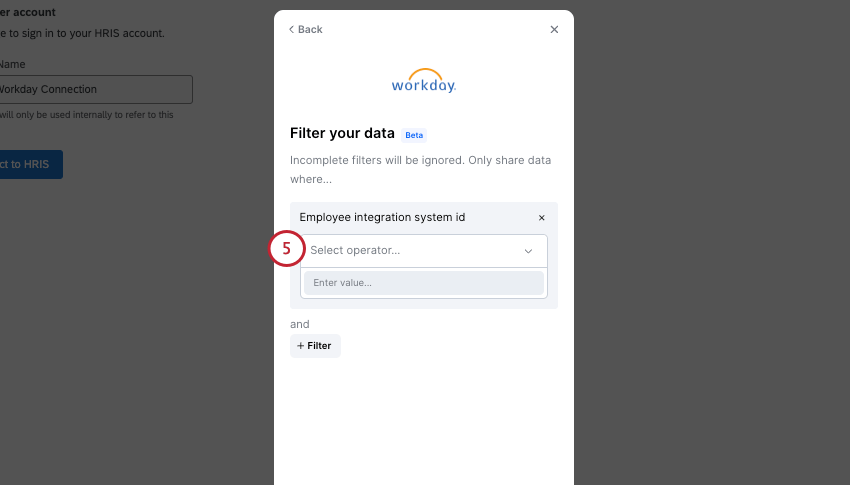 Qtip: This step (5) and the next step (6) are optional. You only need to complete these steps if you want to use custom calculated fields in Workday.
 - Enter your employee integration system ID.
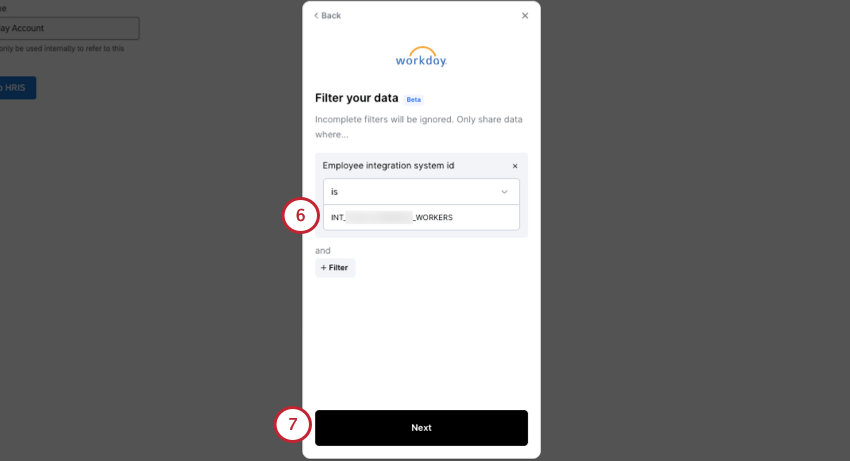 Qtip: For help setting up your integration systems user or ID, see this Merge documentation.
 - Go to the next page.
Qtip: If you need to change your answers, there is a Back button in the top-left of every page.
- Enter your Workday ISU (Integration System User) username.
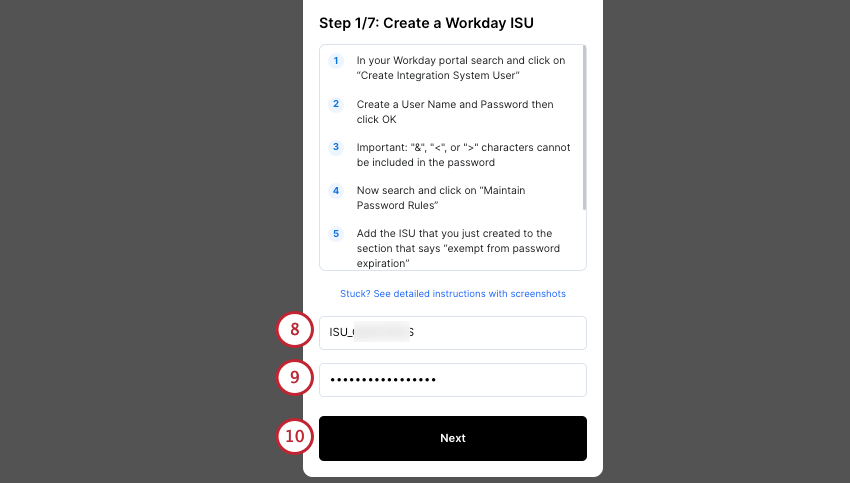 Qtip: If you’re not sure how to find your Workday information, follow the steps on the screen. You can also click Stuck? to see detailed instructions provided by Merge.
 - Enter your Workday password.
- Go to the next screen.
- The next several pages of this window are steps that you need to follow in your Workday account. Follow the steps in the window carefully, and use the links to illustrated support docs provided in the window if you need help. These steps include:
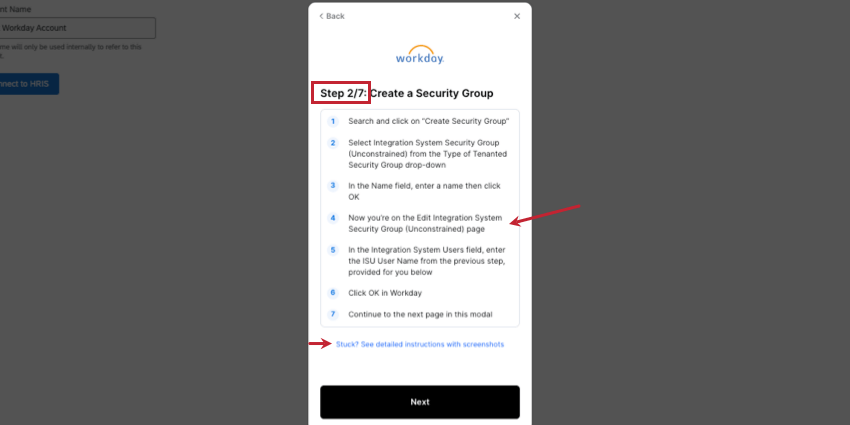
- Create a security group.
- Configure permissions.
- Activate security policy.
- Validate authentication policy.
- Activate pending authentication policy changes.
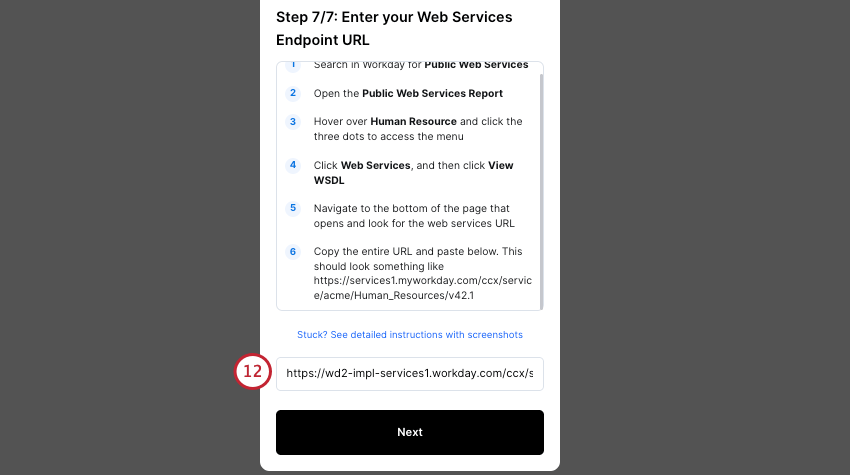
- In step 7/7, you add your Workday web services endpoint URL.
- In the next step, you’ll map fields from Workday to Qualtrics.
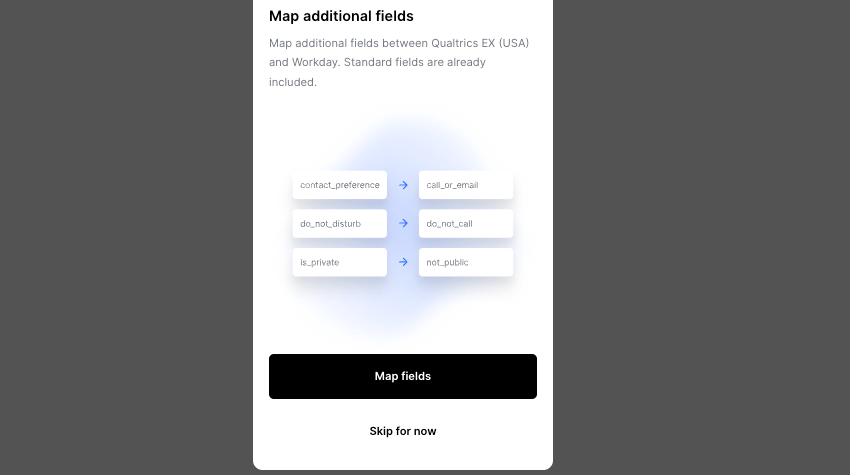 Qtip: You can also skip this and map fields later.
 - Under New target field, select the Workday field you’d like to map.
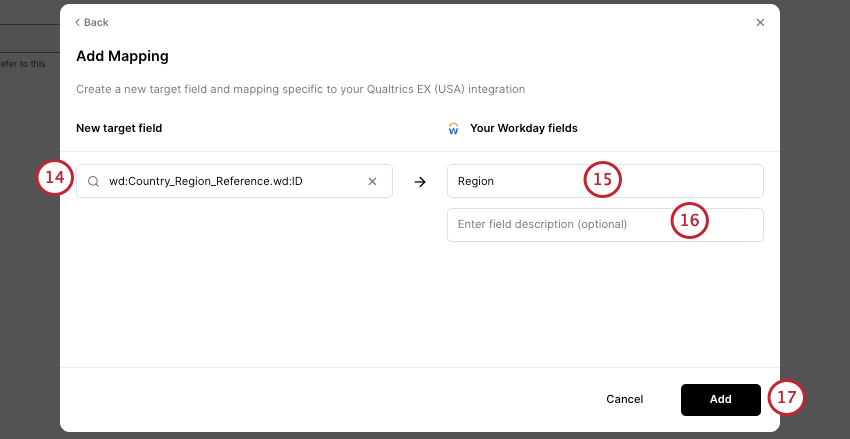
- Give this field a name.
- Enter an optional description for the field.
- Click Add.
- To add more fields, click Mapping, and repeat the previous steps.
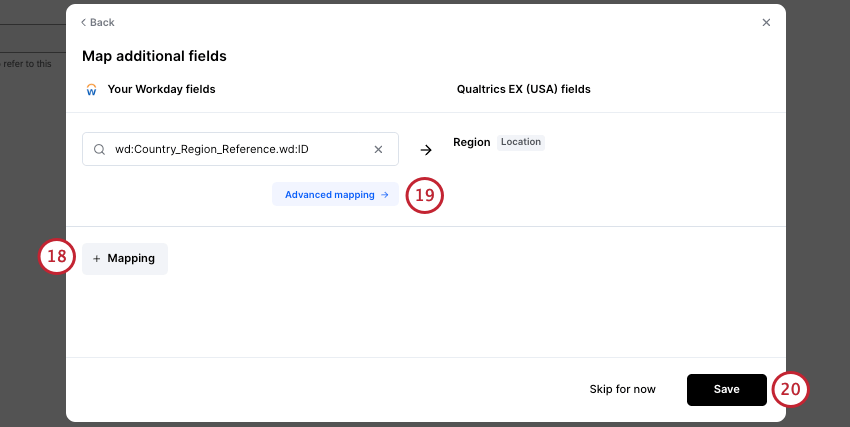
- If you are trying to map a field that is part of an ObjectList, click Advanced mapping to select the field from that list.
Qtip: If you’d like to use calculated fields, it may take the time for them to appear in the user interface. To access these calculated fields, use Wd:Worker_Data.wd:Integration_Field_Override_Data in the advanced mapper.Qtip: Advanced mapping is currently only available for List type fields. For JSON and text type fields, the Advanced mapping option will not appear.Qtip: For more information on advanced field mapping, see Merge’s field mapping guide and the Workday field mapping guide.
- When you’re finished mapping fields, click Save.
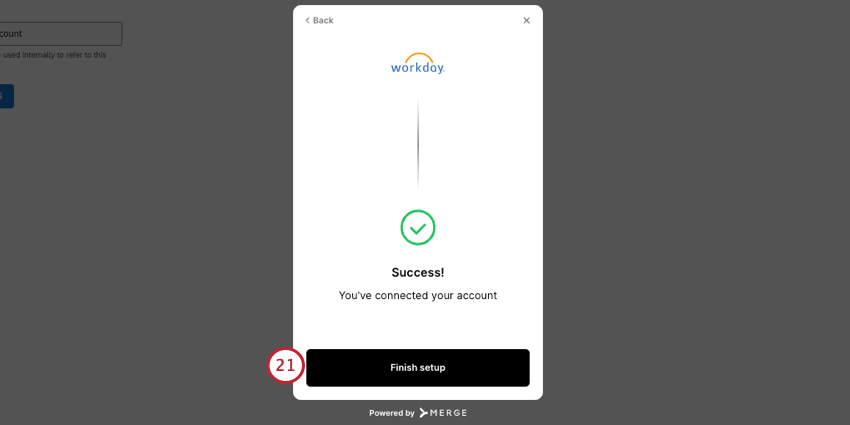
- Click Finish setup to return to Qualtrics.
- Select your integrated HRIS (Workday) account.
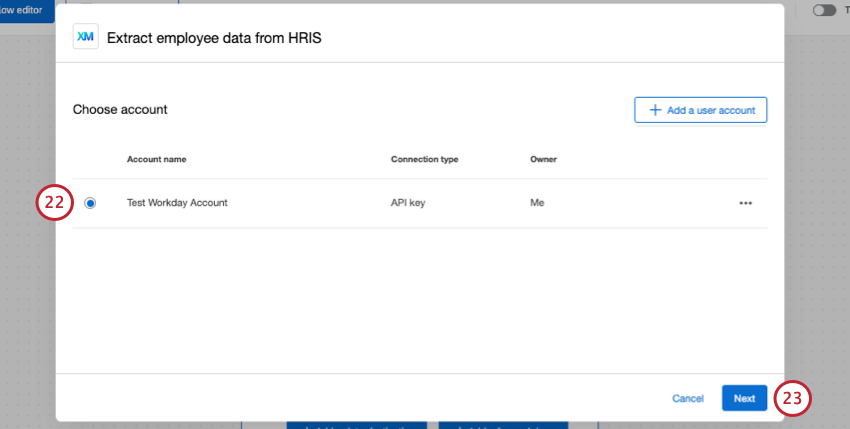
- Click Next.
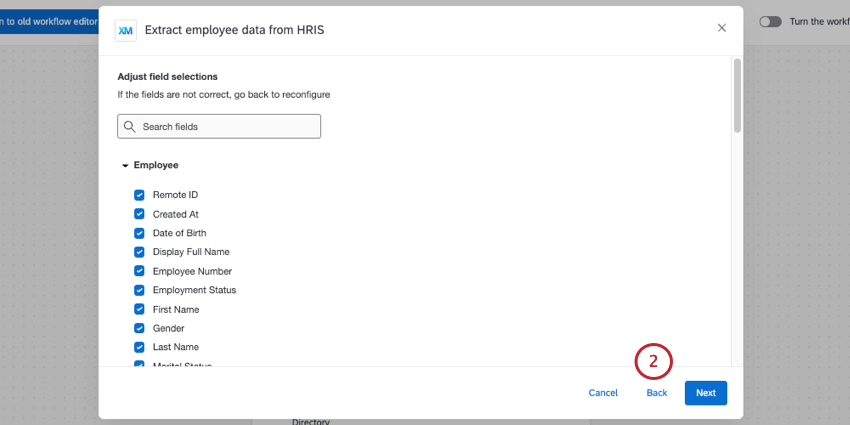
- Select the fields you’d like to carry over into your destination (employee directory).
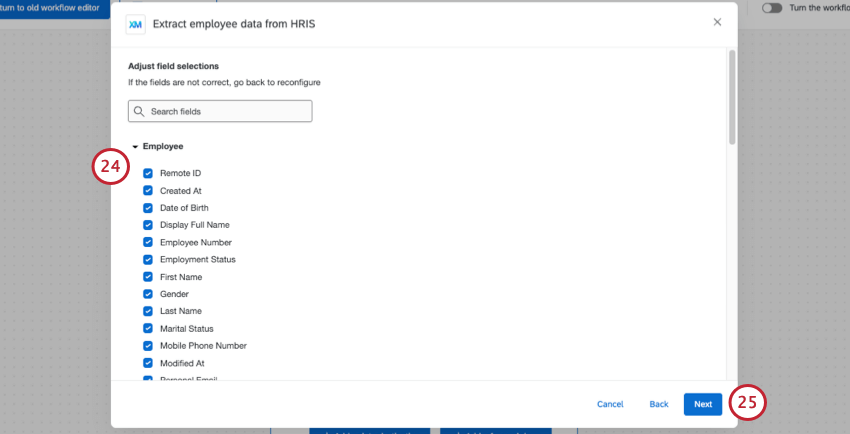 Qtip: If you notice fields missing or named incorrectly, you should edit your HRIS connection. You can skip straight to field mapping without having to complete the other steps.
 - Click Next.
- Save your changes.
- Complete your workflow.
Completing the Workflow
Once you’ve set up your Extract employee data from HRIS task, it’s time to choose a destination for your employee data.
- If you want, you can add optional data transformation.
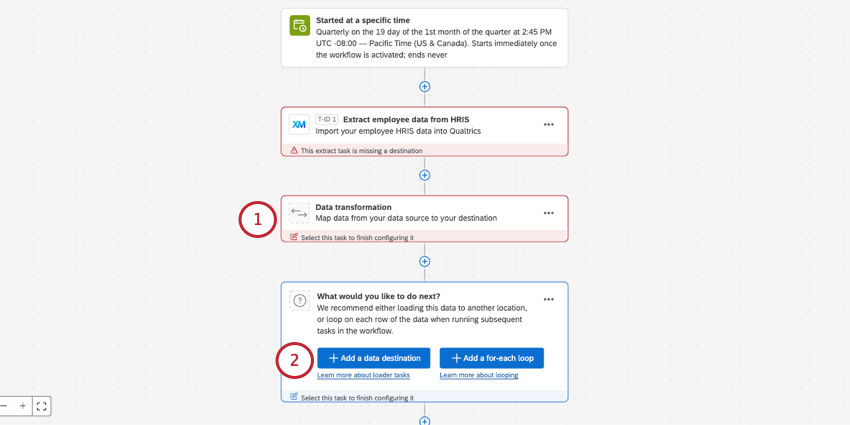
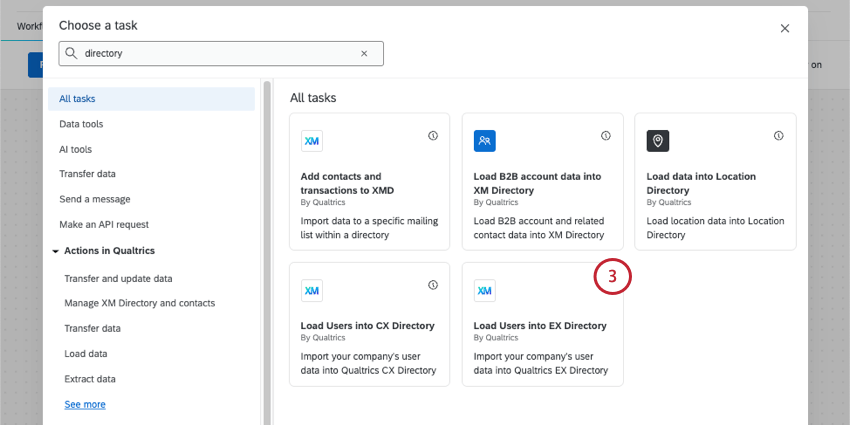
- Select Add a data destination.
- If you’re automating employee directory uploads, we recommend using the Load Users into EX Directory task. Follow the steps on the linked support page to complete your workflow.
Qtip: To test the merge connection without loading everything into your EX Directory, run the workflow immediately before adding the Load Users into EX Directory task. You can then go to the Run history section to download the results of your data pull as a CSV and manually check to ensure all your data is appearing.
- Once your workflow is activated, your employee upload automation will run on your chosen schedule.
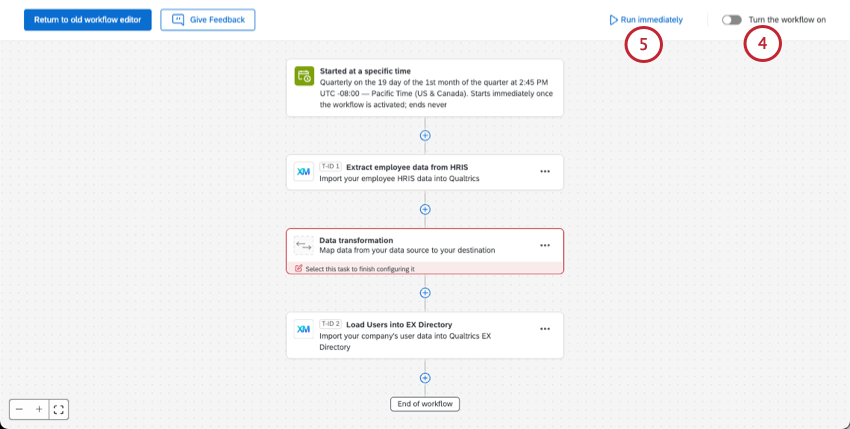
- You can also run the workflow immediately, regardless of the schedule. (This is optional.)
Supported HRIS Connections
The Extract employee data from HRIS task offers about 50 HRIS platforms you can connect to. Below is a non-exhaustive list of some of the highlights. If you have questions about authenticating into these platforms, click their names to be taken to their websites.
To learn more about the fields you can extract from each HRIS, see Merge’s documentation. Scroll to the right on the linked table to see more HRIS platforms.
- BambooHR
- Dayforce (Ceridian)
- Factorial
- Google Workspace
- Hibob
- Microsoft Entra
- Namely
- Okta
- OneLogin
- Paylocity
- Proliant
- Square Payroll
- UKG Pro
- UKG Pro WFM
- UKG Ready
- Workday
- SAP SuccessFactors
Qtip: The Extract employee data from HRIS task does not yet support custom objects in SuccessFactors. As an alternative, we have tasks designed to extract employee data from SuccessFactors that support custom objects.
Editing HRIS Connections and Mappings
Editing a Workflow’s HRIS Connection
You can edit the Extract employee data from HRIS task in an existing workflow. By doing this, you can edit the mappings, resync the connection, or make other changes to this task.
- Click the Extract employee data from HRIS task.
- Click Back.
- Click the 3 dots next to your HRIS.
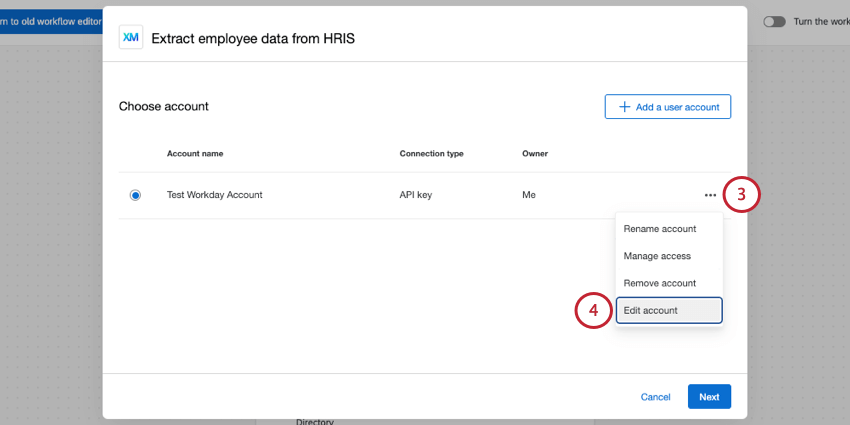
- Click Edit account.
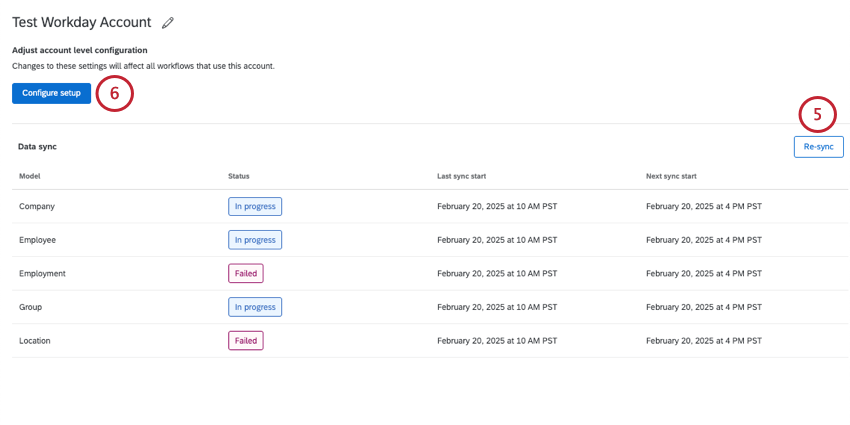
- The Re-sync option can be helpful if you’ve recently updated field configurations in your HRIS, or if you need to immediately import data. This option syncs data between the HRIS and Merge (the third party back-end of the task). Data is synced between Merge and Qualtrics on the workflow schedule.
 Qtip: You can also run the workflow immediately to resync data between your HRIS and Qualtrics.
 - Under Configure setup, you can choose from the following:
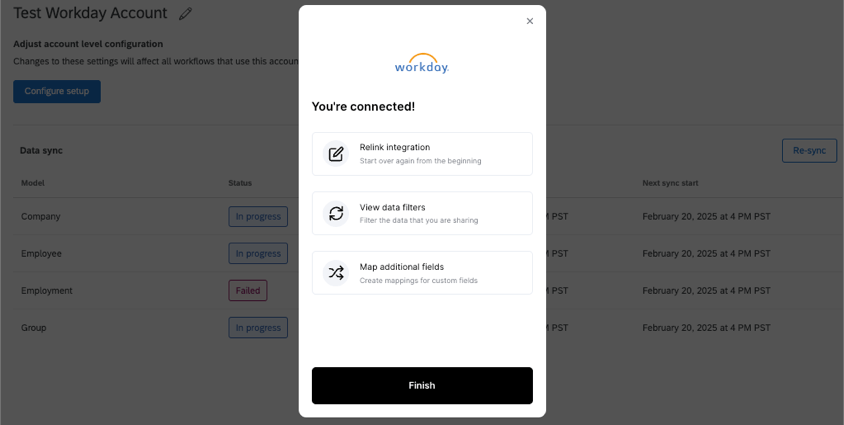
- Relink integration: Redo the entire connection and login portion of your HRIS connection.
- View data filters: Filter down the data you pull in from your HRIS connection. For Workday, this is also used to provide the integration system ID.
- Map additional fields: Create or edit mappings for custom fields.
Managing Account Connections as a Brand Admin
As with other extensions, Brand Administrators can make edits to connected HRIS accounts. This extension is named the same as the task, Extract employee data from HRIS.
See the following sections of the Extensions Administration page for help with:
- Managing Extensions
- Adding an Account
- Determining Who Can Use an Extension Account
- Deleting an Account
From here in the Extensions Admin page, you can also make the same edits described in the previous section (relinking, filters, mapping fields). Just select the 3 dots, then Edit account.