Tickets Task
About Tickets Tasks
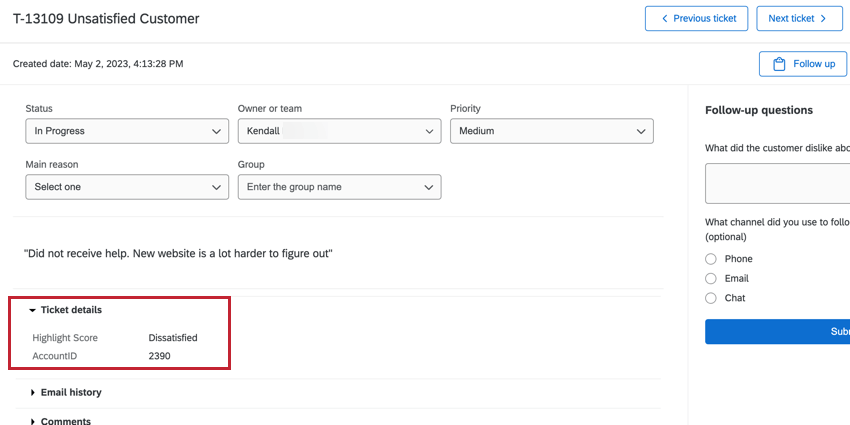
Ticketing is a way to assign ownership of a task to an individual or role so you can take quick action. Tickets tasks let you create tickets based on previous events. Once you create a ticket, you can manage your tickets through the Follow-up page.
Setting Up the Tickets Task
- Navigate to the Workflows tab of your project or the stand-alone Workflows page.
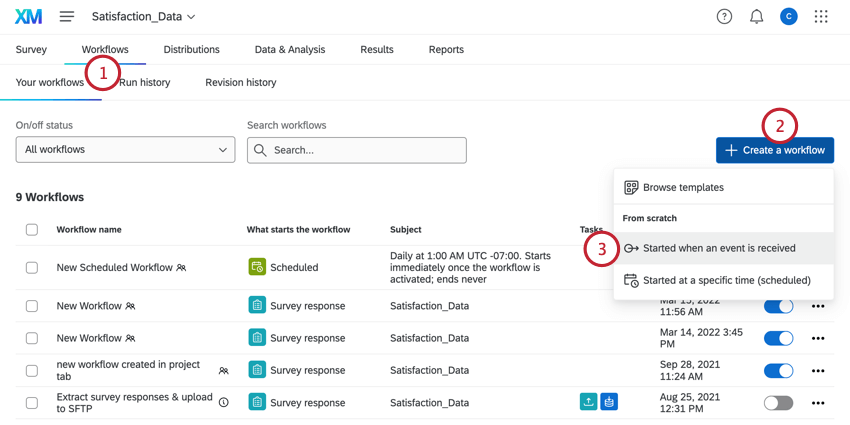
- Click Create a workflow.
- Select Started when an event is received.
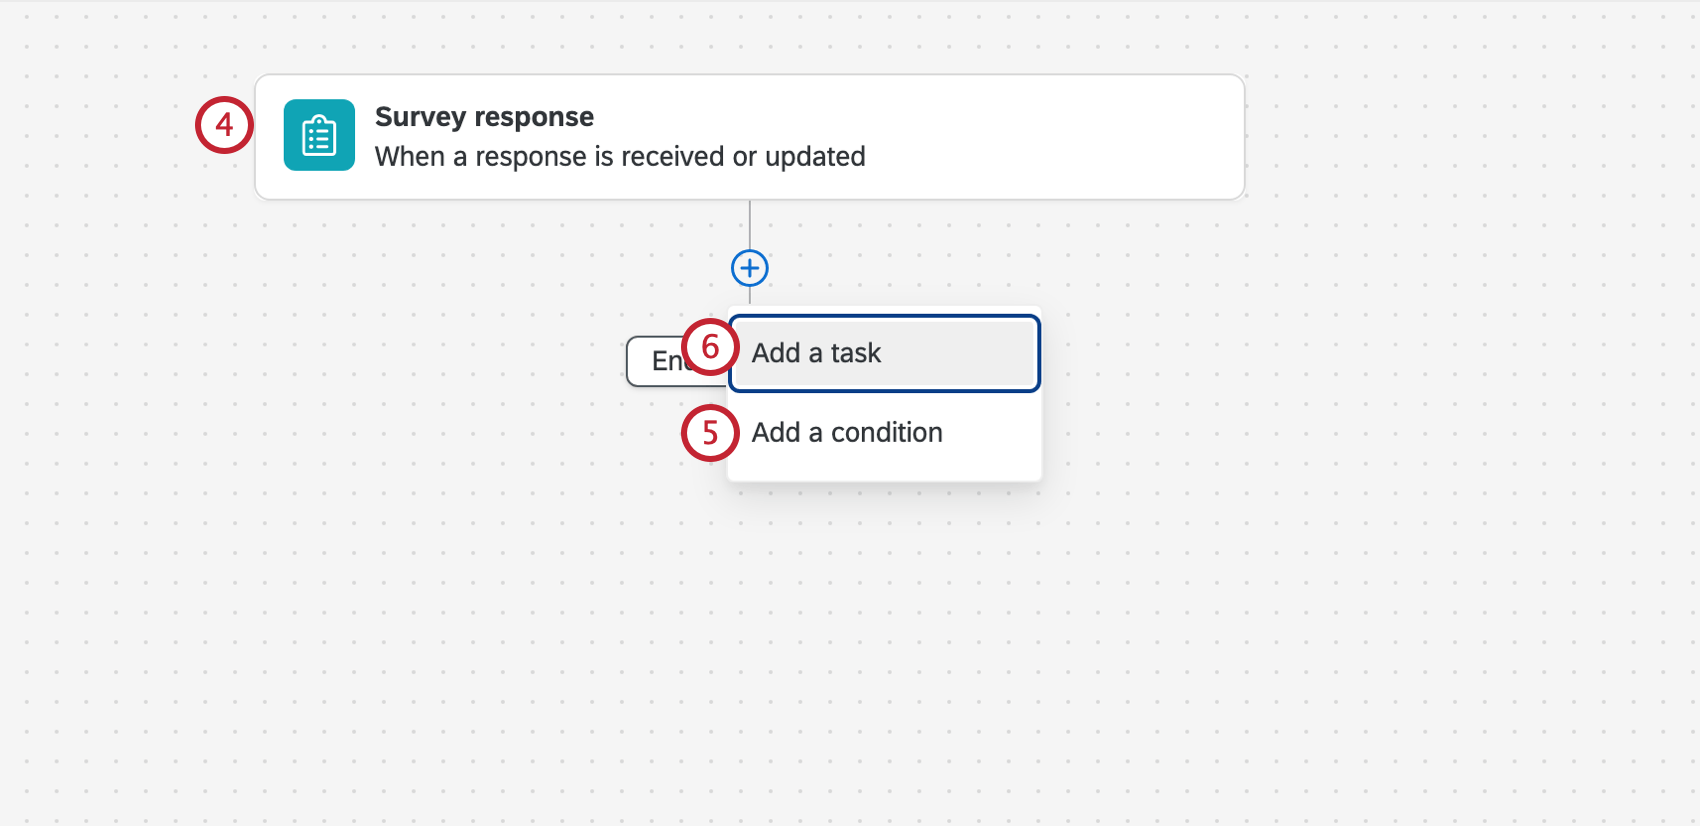
- Set up the event for your workflow. More information can be found on the event-based workflows support page. Usually, this will be a survey response event.
 Warning: When using a ticket task, your survey response event should only be connected to a survey project. Using another project type, like Employee Experience, can lead to unexpected behavior, such as certain data not getting pulled into the ticket.
 - If desired, click the plus sign ( + ) and then Conditions to add conditions for your workflow, which determine when your workflow runs. See the linked page for more information.
- Click the plus sign ( + ) and select Task.
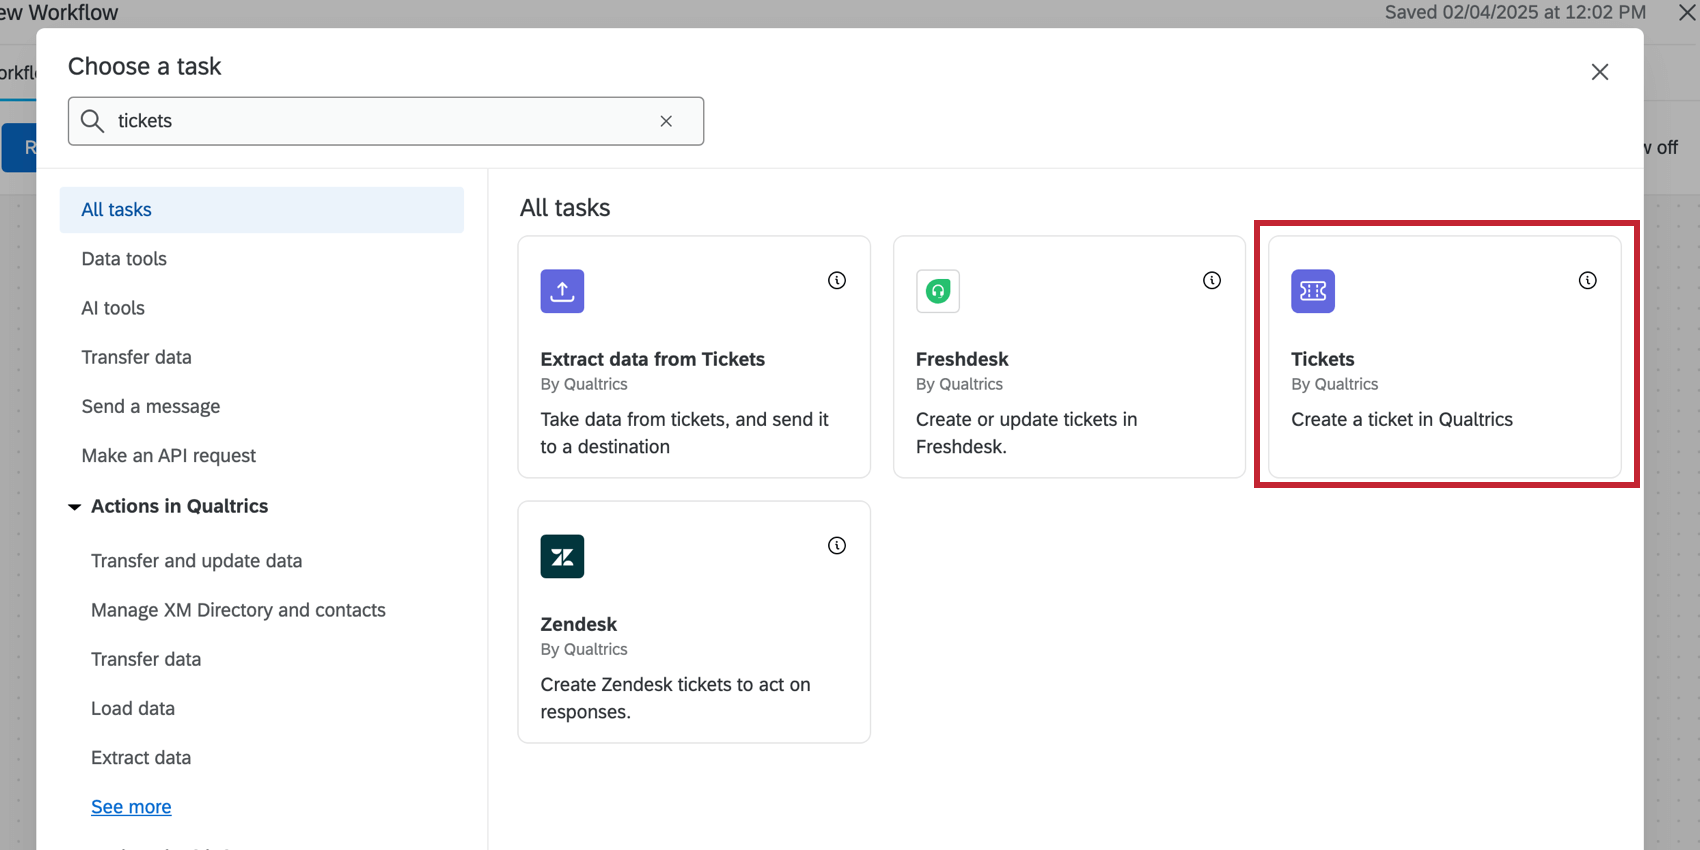
- Select Tickets.
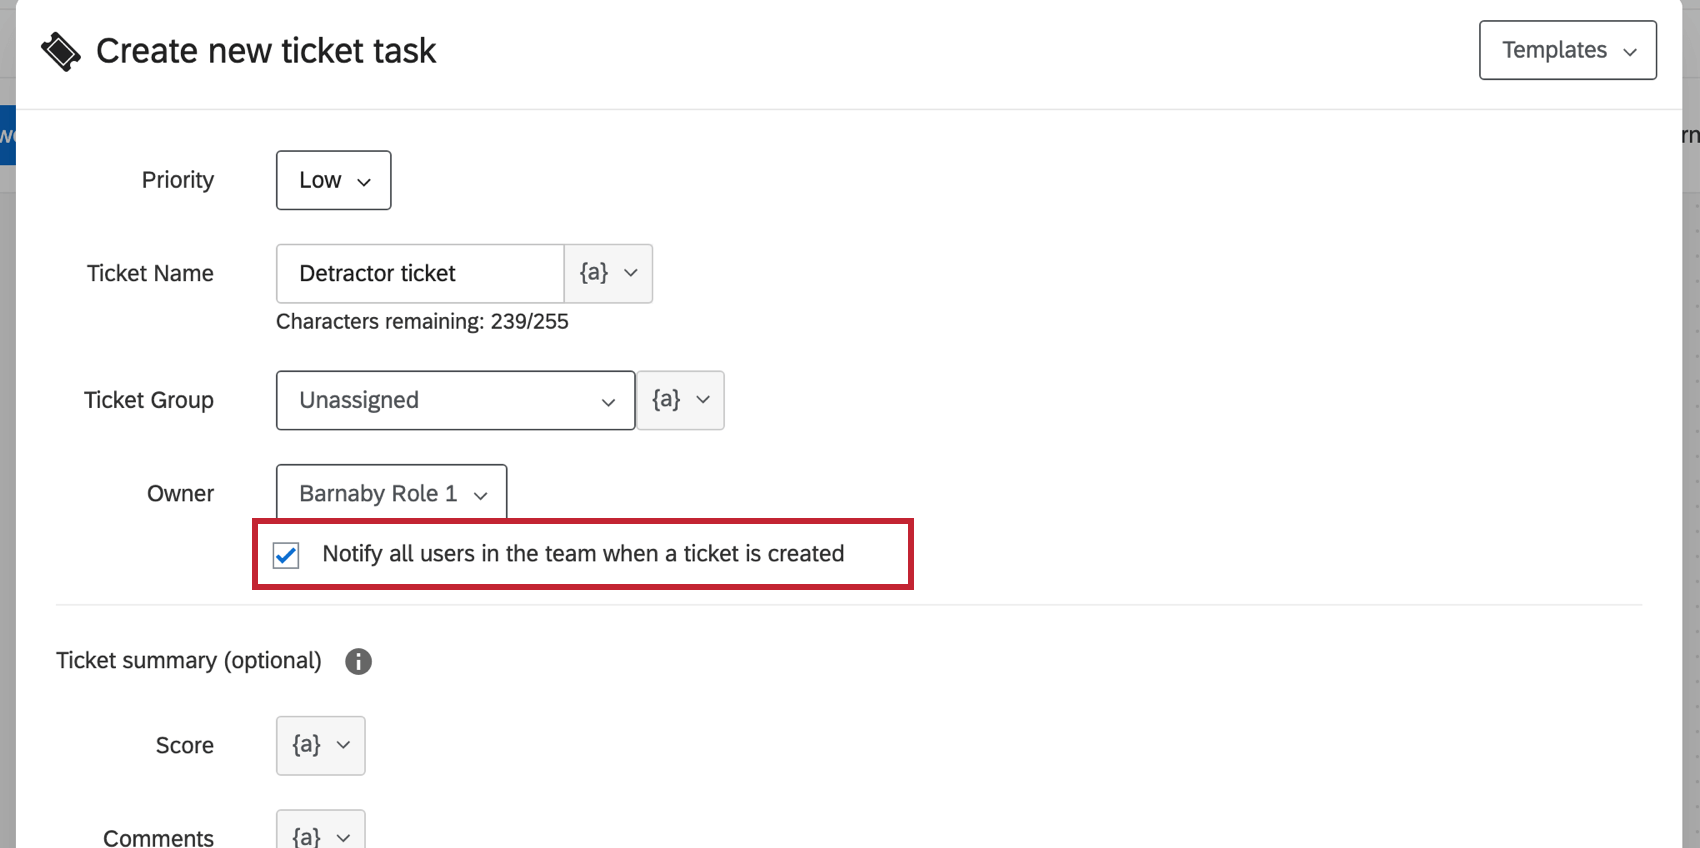
- Fill out the Priority. This can be either High, Medium, or Low.
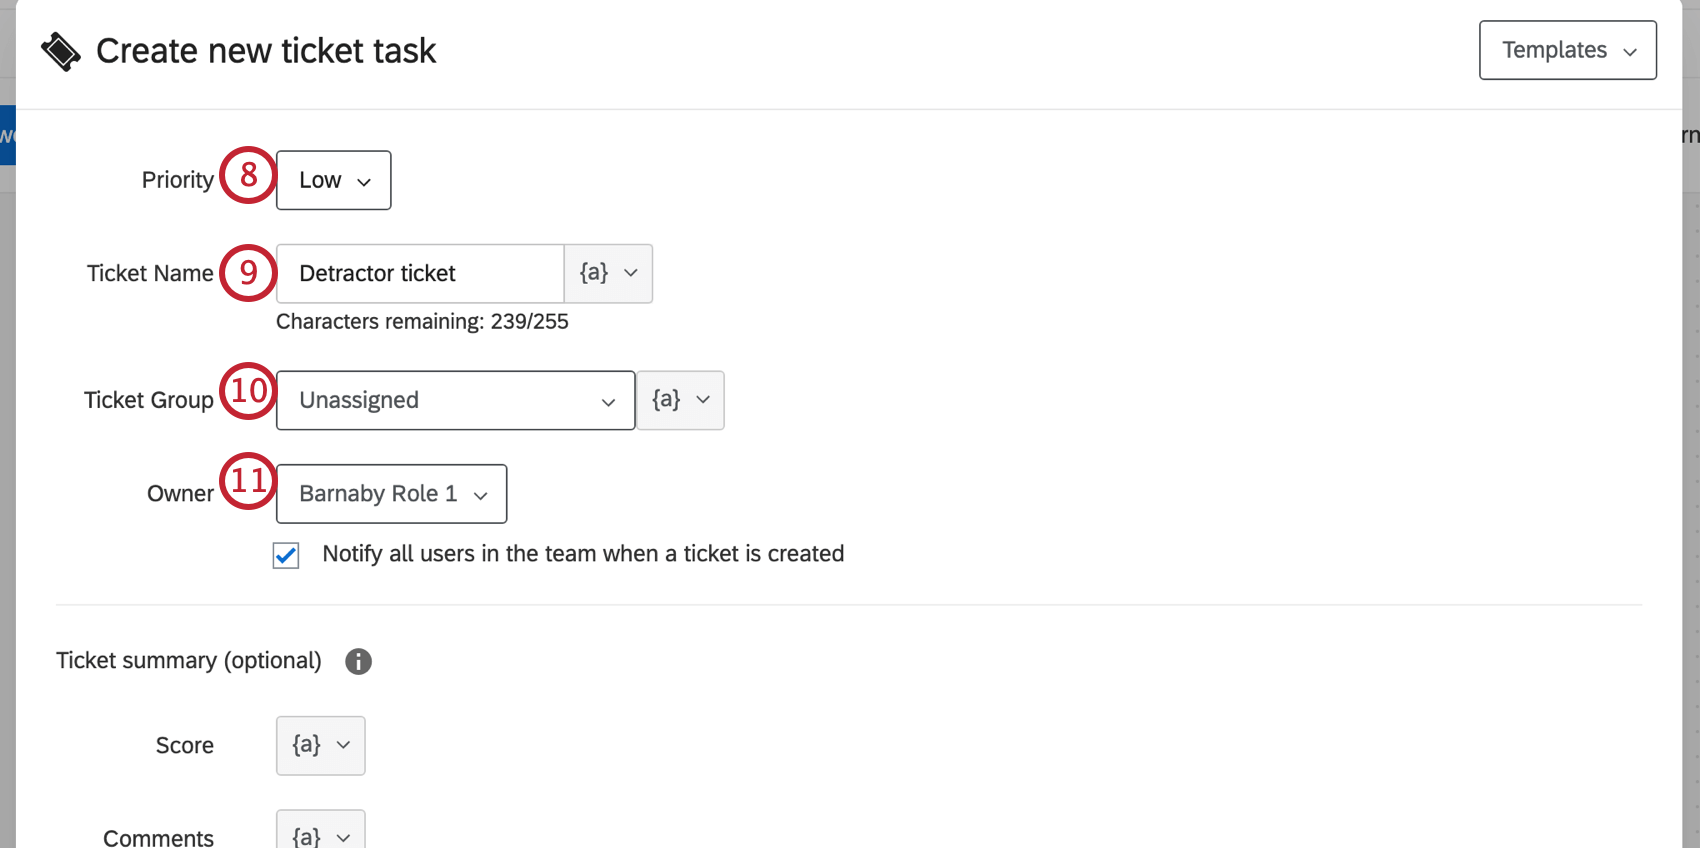
- Fill out the Ticket Name. Using the {a} dropdown, you can insert piped text that will change the ticket name based on the respondent. For example, you can insert a respondent’s name or their answer to a survey question.
Qtip: Ticket names can be up to 255 characters long.
- If desired, choose a Ticket Group to associate the ticket with. By default, the ticket is unassigned to a ticket group. Ticket groups are not required.
- Assign an Owner. This can be a user or a team. You may need to type out the full name of the person or team before the option appears. See the Access Organization Address Book permission for more information on why this is.
- If desired, set a Ticket Summary. You may use any information in the survey, such as the answers respondents provide on a survey, or the values of their embedded data.
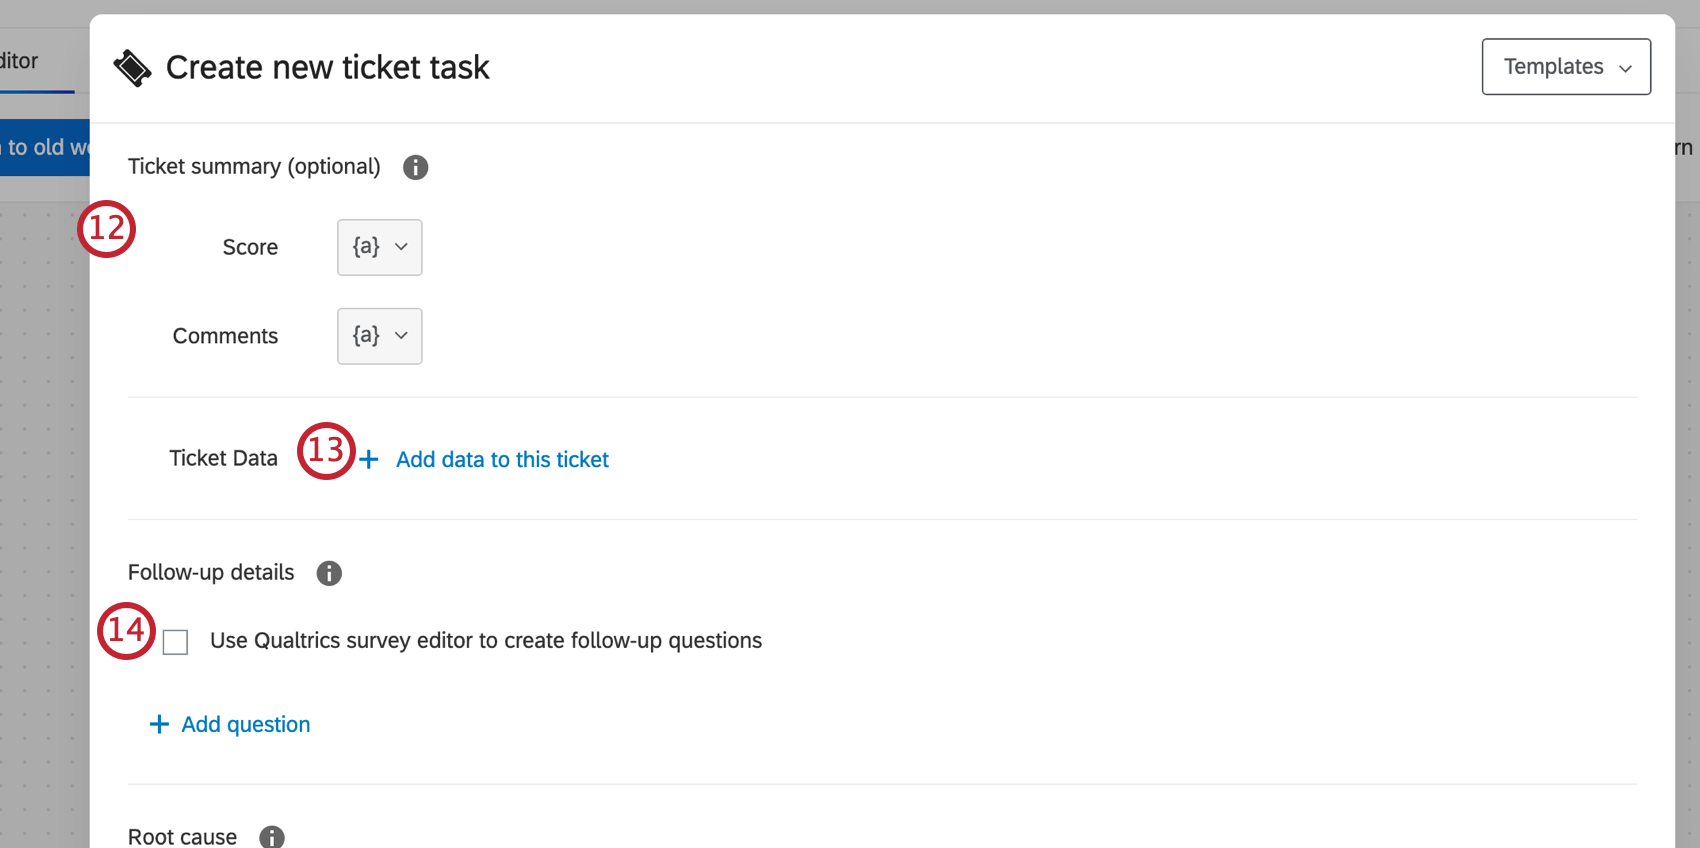 Qtip: These are highlights to help your ticket owners understand why the ticket needs to be actioned. For example, Score can be the CSAT a customer gave, and Comments can be the feedback they wrote.
 - If desired, assign additional ticket data by clicking Add data to this ticket. See the ticket data section below for more information on dynamic uses of ticket data.
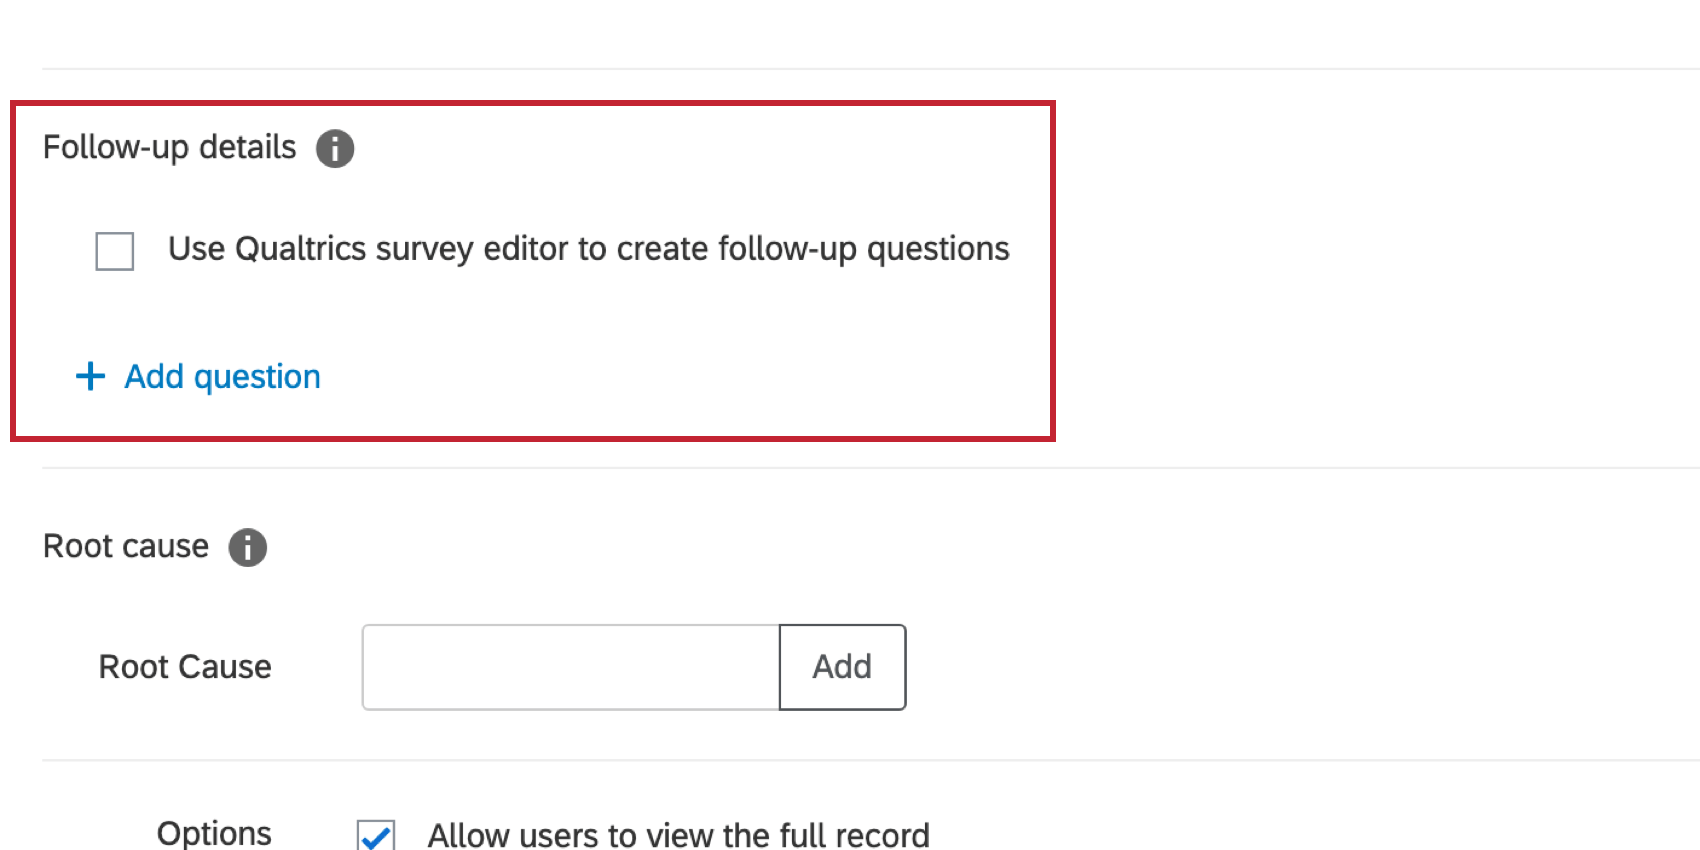
- If desired, add a follow-up survey or click Add question to create follow-up questions. See the support pages linked for more information.
Qtip: Select Force response if ticket owners must answer this follow-up detail before closing out their ticket.
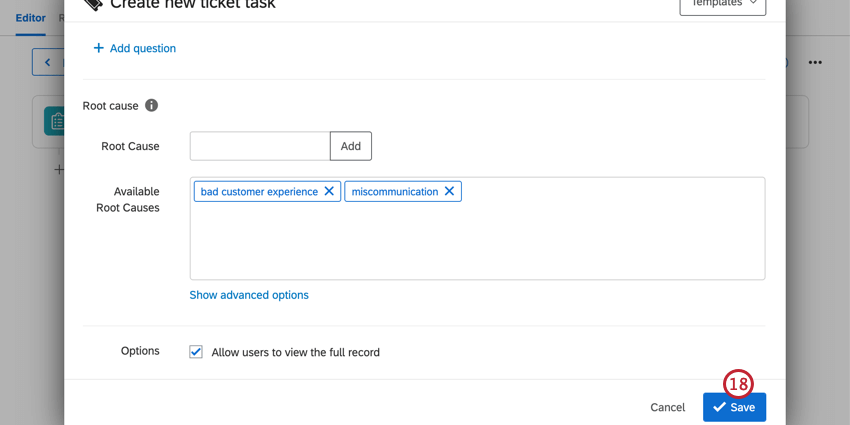
- If desired, assign Root Cause(s) by typing a cause and clicking Add. You can use these to search through your tickets later.
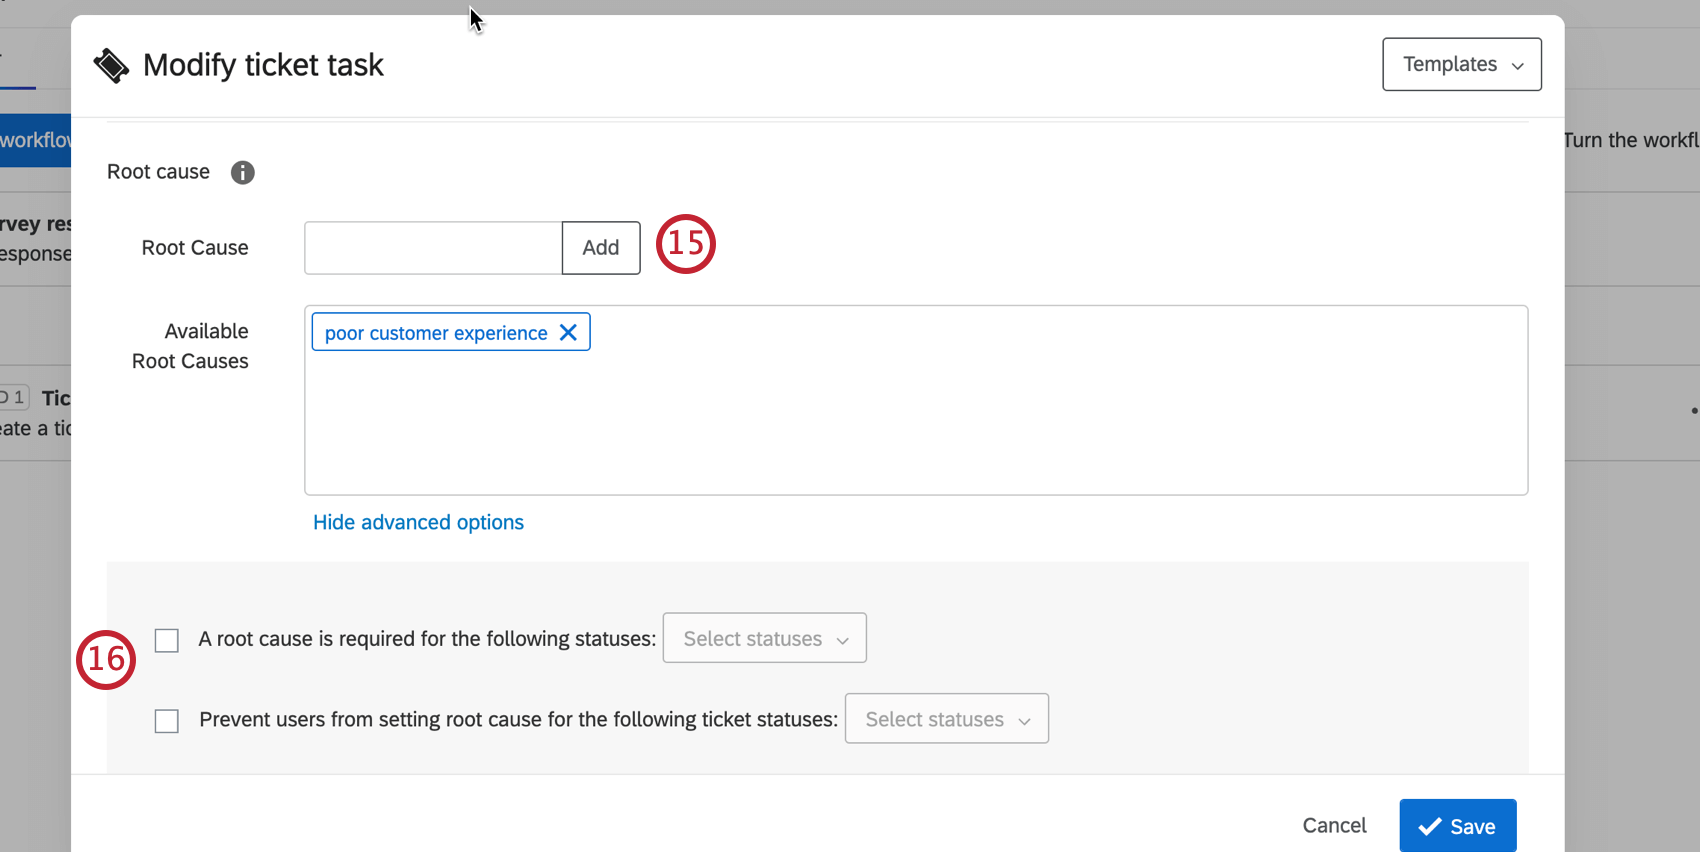 Qtip: Root causes are options for the ticket owner. Later, when following up with a ticket, the user will have the option to select one of these root causes.Attention: You can provide up to 100 root causes. Any root causes created past this limit will not be visible until prior root causes are removed.
 - If you’ve added root causes, you will have these additional options when you click Show Advanced Options:
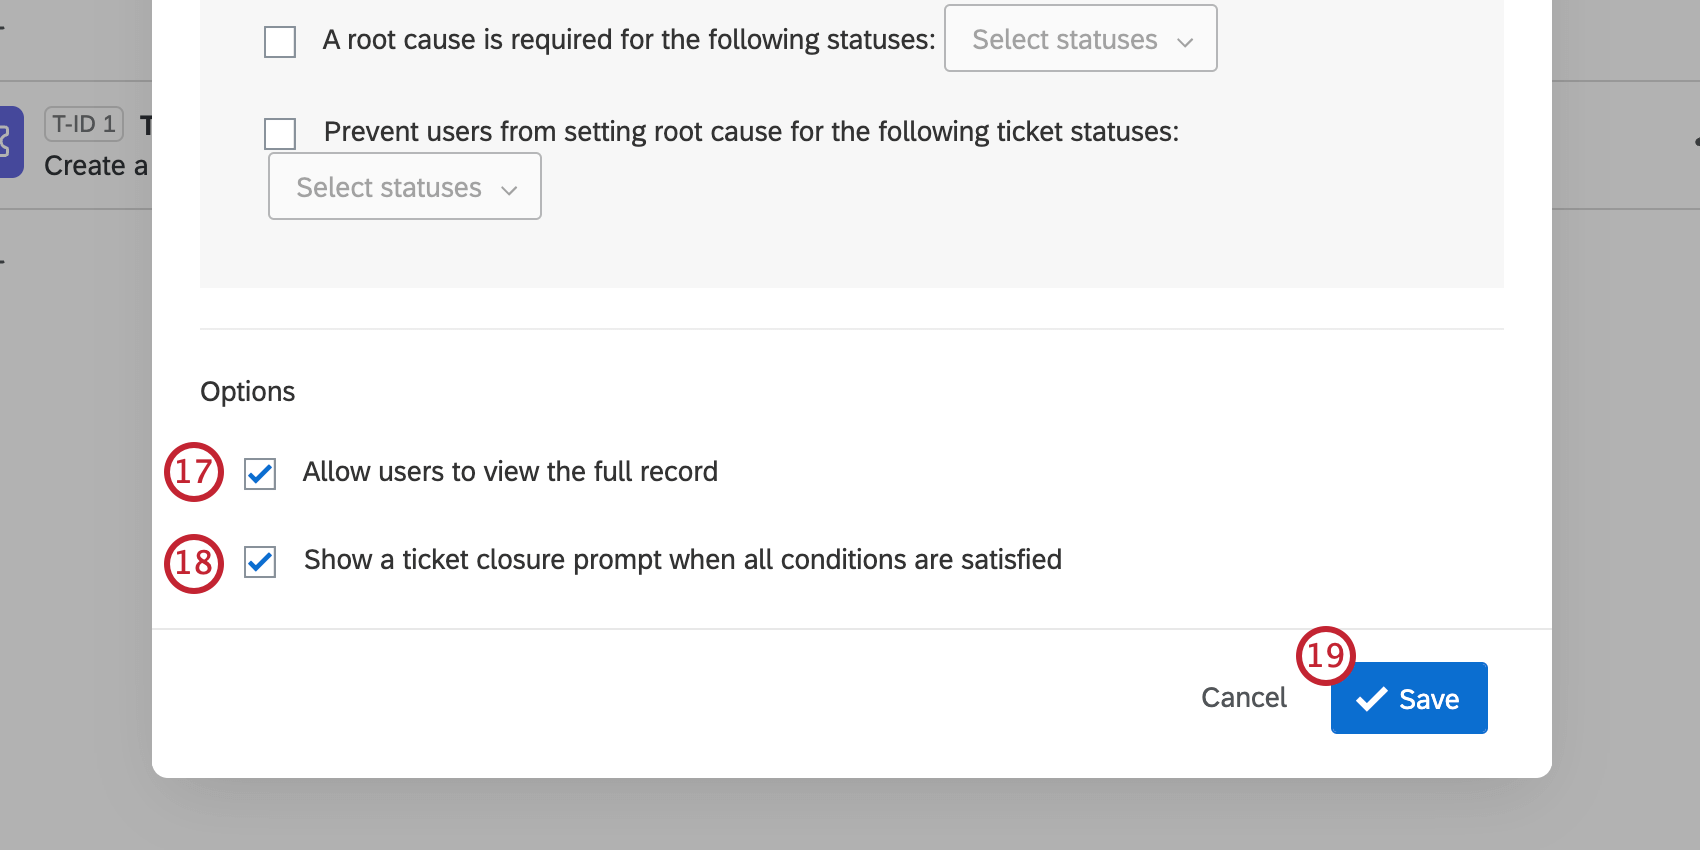
- A root cause is required for the following statuses: When configured, ticket owners will not be able to switch their tickets to the selected statuses unless they provide root causes. This can be especially helpful for statuses that track escalations or unresolved issues.
- Prevent users from setting root cause for the following ticket statuses: This prevents ticket owners from selecting a root cause in cases where it might not make sense. For example, in a ticket that’s still open, there might not be any insight into the root cause of the issue yet.
- If desired, select Allow users to view full record. This adds all information recorded in the individual’s survey response onto the ticket.
 Attention: The survey must be either owned by or collaborated with you in order for you to view the full record or file uploads.Qtip: To include a downloadable response report in your ticket data, add a ticket data field and set the value to Response Link.
 - If desired, edit Show a ticket closure prompt when all conditions are satisfied. With this enabled, users are prompted to close the ticket after they submit or update their follow-up details.
- Click Save.
Follow-up Details
Adding follow-up details to your ticket task allows ticket owners to answer additional questions on the ticket. You may add a ticket feedback survey, or add multiple choice or text entry questions in your follow-up details.
To add a follow-up questions, click Add Question in the Follow-up Details section and select which question type you’d like to use. The sections below explain how to manage each question type.
Text Entry
Once a text entry question has been added to your follow-up details, you can edit the following fields. Note that these fields can be edited in any order.
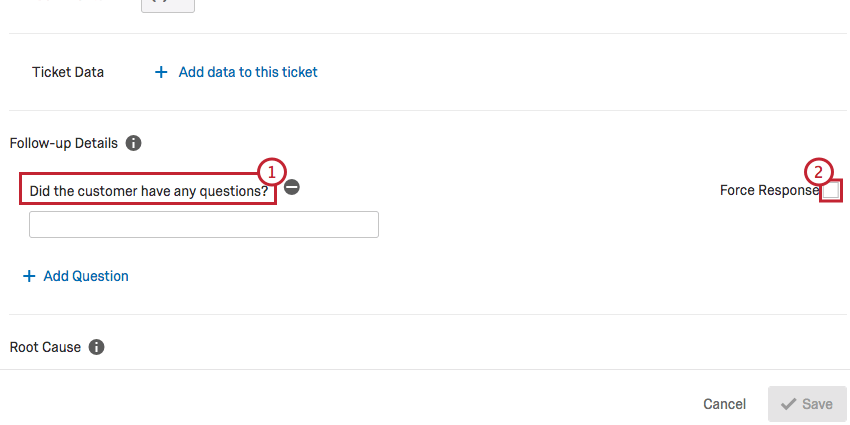
- Click on the question text to edit it.
- If desired, enable Force Response.
Multiple Choice
Once a multiple choice question has been added to your follow-up details, you can edit the following fields. Note that these fields can be edited in any order.
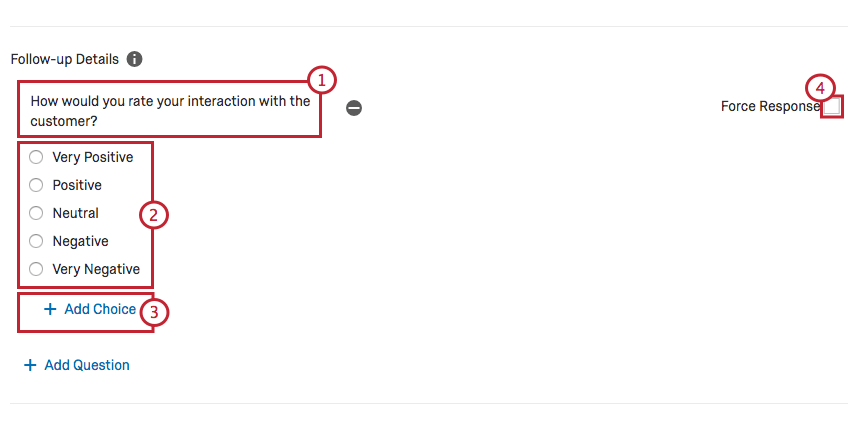
- Click on the question text to edit it.
- Click on individual answer choices to edit the choice.
- If desired, click Add Choice to add additional choices.
- If desired, enable Force Response.
Managing Follow-Up Details
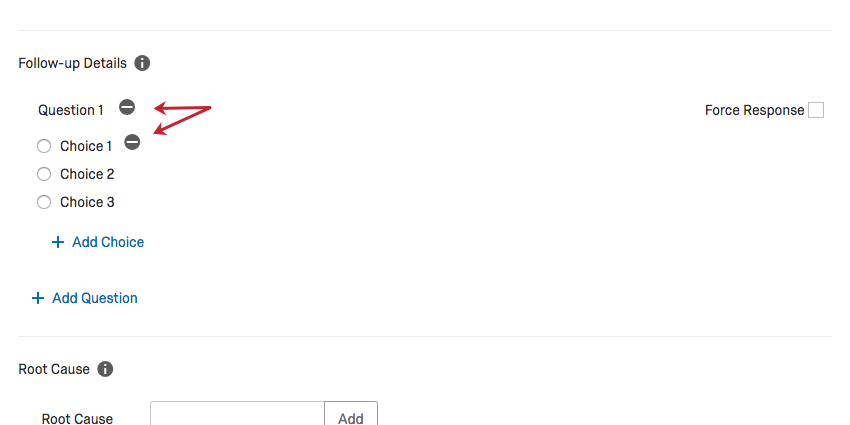
When editing your follow-up details, you can delete a survey or question by clicking the minus ( – ) button next.
HOW FOLLOW-UP QUESTIONS EDITS AFFECT TICKET REPORTING
When you edit your ticket follow-up questions, you may impact your ticket reporting dataset. Continue reading about how different edits will impact your dataset.
Adding / Deleting Answer Choices
This change does not have negative implications for ticket reporting. None of the existing responses will be impacted. Responses after the addition / deletion will simply be in the new range of possible answers.
Editing Question Text
This change impacts your ticket reporting dataset. Rephrasing a follow-up question is the equivalent of creating a new one. None of the existing responses will be affected; however the new phrasing will need to be mapped as a new field in ticket reporting as it is considered a new field. All future responses to the new phrasing will appear in the newly mapped field, and none will go to the old field.
Deleting a Follow-Up Question
This does not have negative implications for ticket reporting. None of the existing responses will be impacted. After the deletion, no new responses can be collected for the old field.
Using Ticket Data
When you are setting up a ticketing task, you are allowed to add additional information to the ticket called ticket data. These fields can be customized however you like, pulling in survey responses, embedded data values, and much more.
However, this feature is not just for adding additional information to a ticket. You can also use ticket data to assign tickets simultaneously to an individual and a team (rather than just one or the other) and to link similar responses together for quick access on your tickets. You can also use the ticket data as conditions in an update ticket task.
Managing Ticket Data
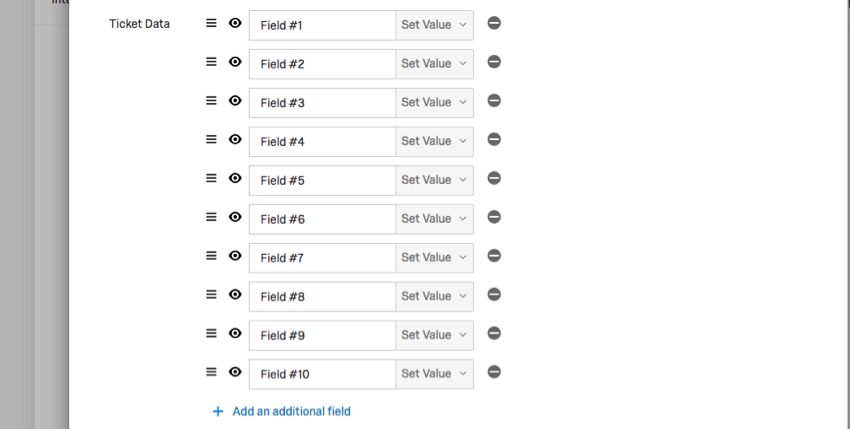
After you create your ticket data, you can change the order that ticket data appears on a ticket, hide certain fields so they don’t appear to the ticket owner, or remove the ticket data altogether.
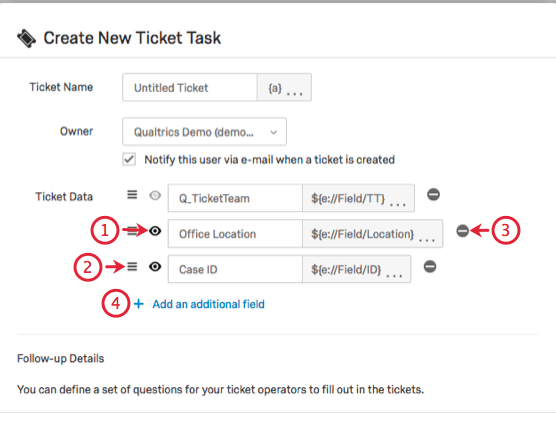
- Click the eye icon to hide ticket data. This means the ticket owner won’t see it.
- Click the icon and drag to change the order in which your ticket data appears.
- Click the minus sign ( – ) to remove that ticket data.
- Click Add an additional field to add more ticket data.
Reordering Ticket Data
When a ticket is created, ticket data is displayed in two columns of data.
When you reorder ticket data during ticket creation, use this table to understand what it’ll look like on the final ticket:
| Field #1 | Data | Field #2 | Data |
| Field #3 | Data | Field #4 | Data |
| Field #5 | Data | Field #6 | Data |
| Field #7 | Data | Field #8 | Data |
| Field #9 | Data | Field #10 | Data |
Editing Ticket Data Fields
You can change these details even after your tickets are created. Just go back to your Workflows tab and click the ticket task to edit your ticket data. However, be careful: certain edits to ticket data may have unexpected consequences for tickets. Below we walk through the different edits you can take on ticket data fields.
- Renaming fields will remove all associated data for that field across all tickets created with that task. However, reverting the field name back to the old name or adding in a new field with the old name will restore the removed data.
Example: Let’s say you have a field called Client that’s mapped to a contact list field. If you change the field name to be Customer, all data for the field will disappear across all tickets that were generated from the ticket task. Renaming the field back to Client will restore the data.
- Changing the mapped value for a ticket field will only affect future tickets. This change is not retroactive and will not change the values for tickets that have already been created.
Example: Let’s say you have a field called Phone that’s mapped to a contact list field. If you change the field so it is now mapped to a survey question, the data on your previously generated tickets will not change. Only newly created tickets after the change will have the updated value.
Dynamic Ticket Assignment
Tickets are usually assigned to just one user or team at a time. However, it is possible to assign tickets to users or teams based on embedded data that you set in the survey flow. This way, you can build a series of dynamic conditions in the survey flow to assign tickets.
- In the Survey tab, navigate to the Survey flow.
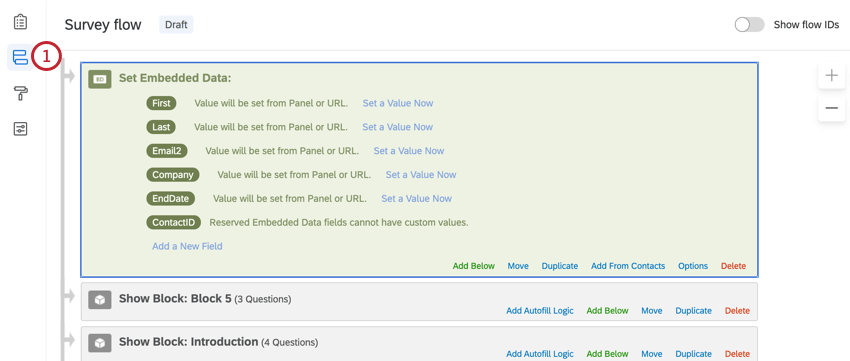
- Click Add a New Element Here and select Embedded Data.
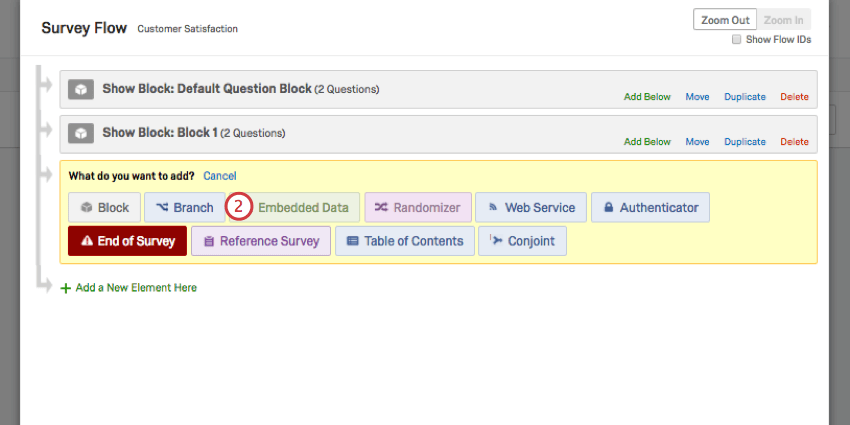
- Add embedded data fields for the team being assigned the ticket and the single user being assigned the ticket. These can be named whatever you want. The example here is “Manager” and “Team.”
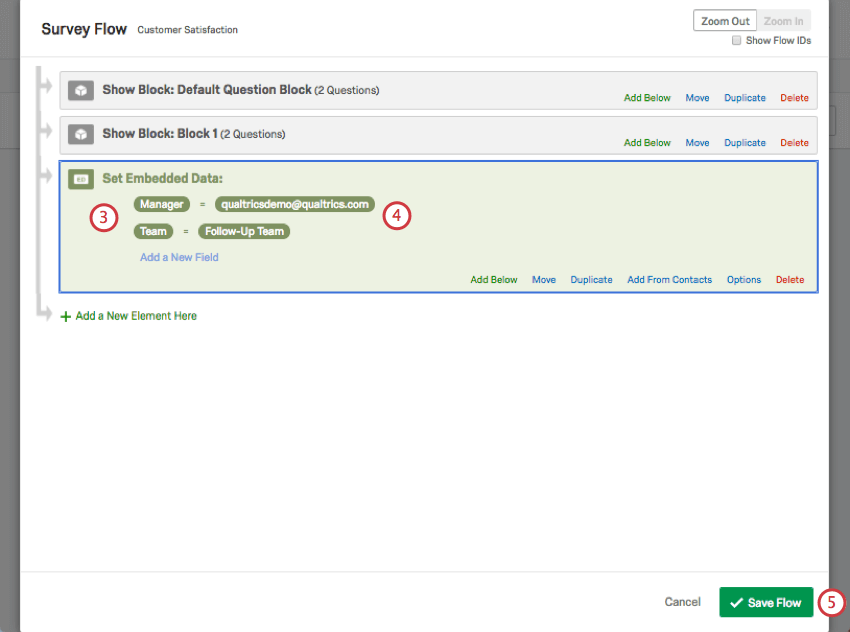
- Assign values to the fields. For a team embedded data, the value must be the name of the team. For a single user embedded data, the value must be the username of the Qualtrics account.
Qtip: This embedded data field will need to match the spelling, capitalization, and punctuation of the username or team exactly! Note that an individual’s username is not always their email. Make sure you have the proper username.
- Click Save Flow.
- Navigate to the Workflows tab.
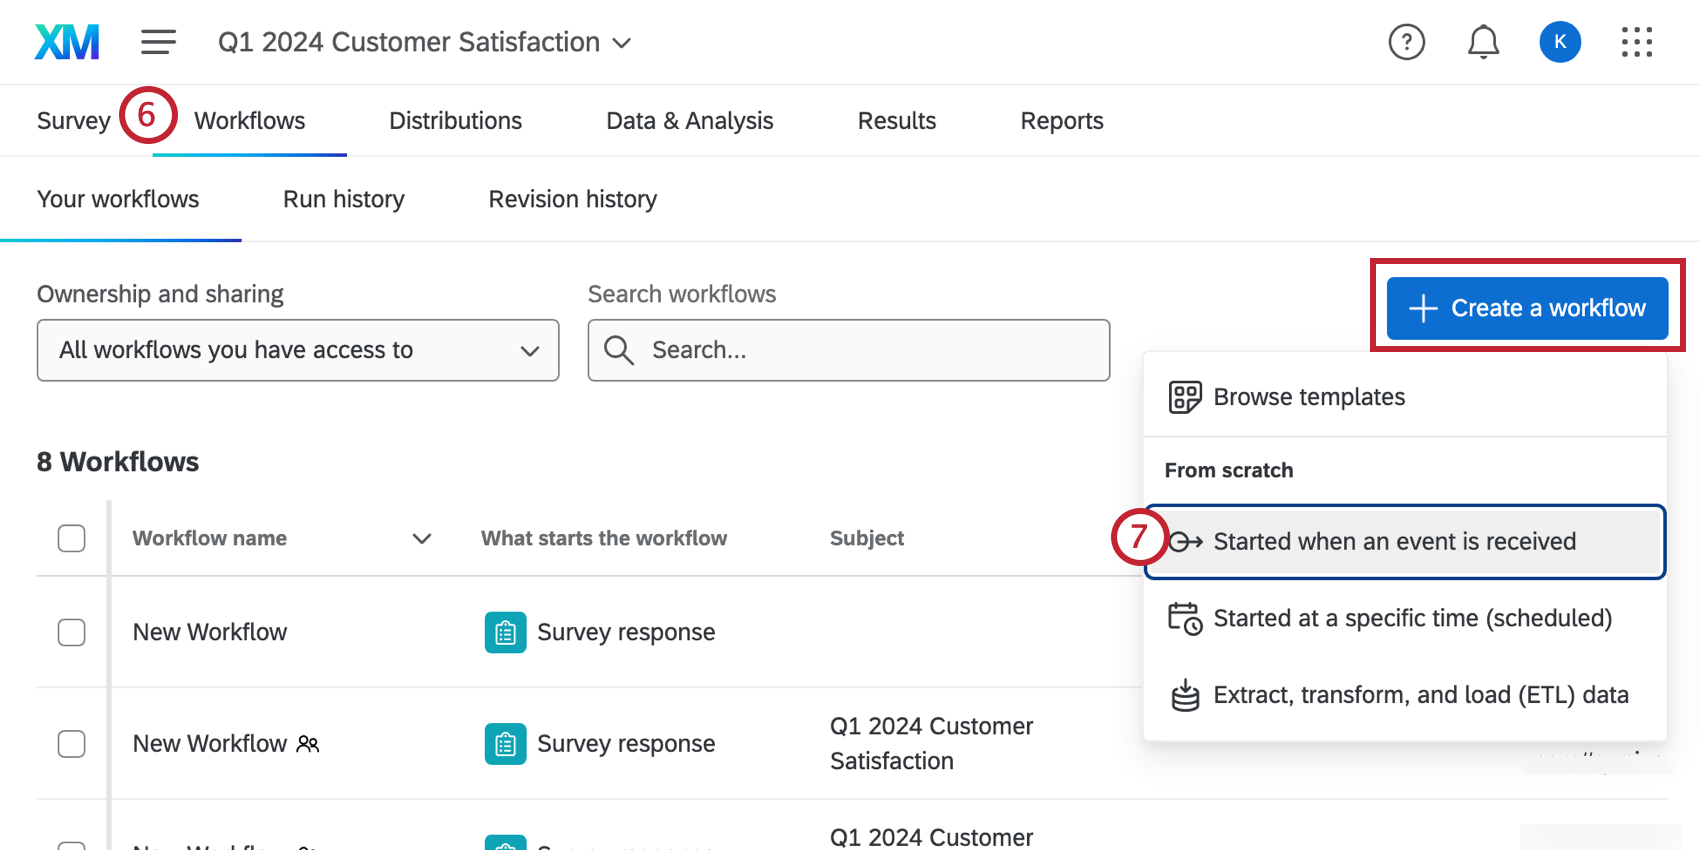
- Click Create a workflow and begin setting up a tickets task workflow.
- For the workflow’s task, select Tickets.

- Assign an Owner, which will be the default backup in case an owner cannot be assigned through embedded data. This must be a ticket team. If an individual user is selected here, then dynamic ticket assignment will not work.
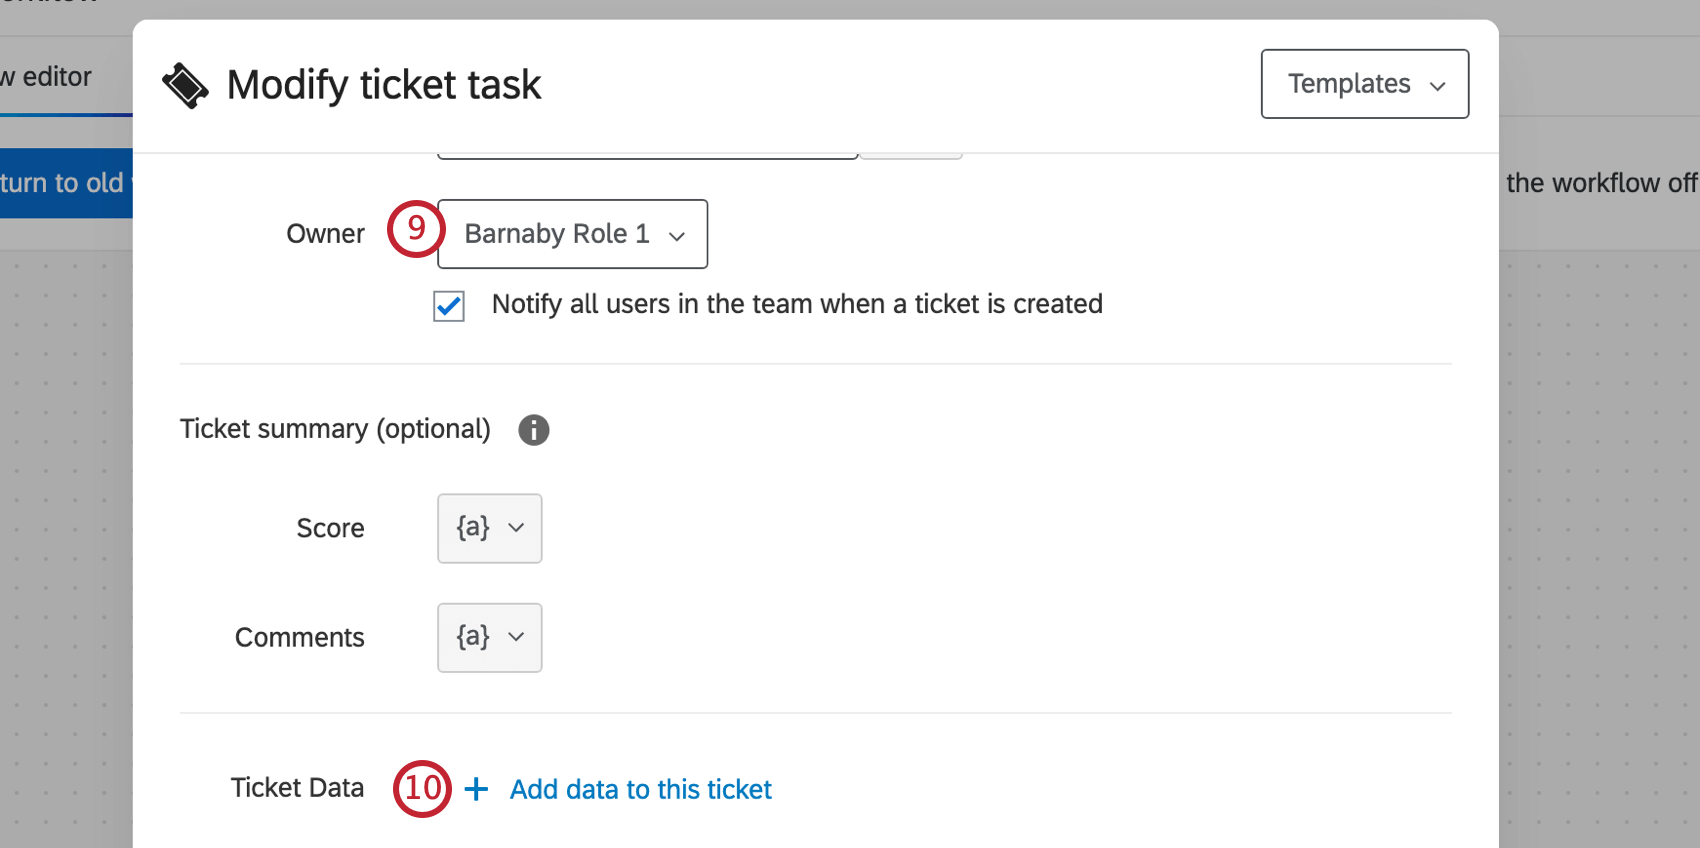
- Click Add data to this ticket.
- Type out Q_TicketTeam in the field.
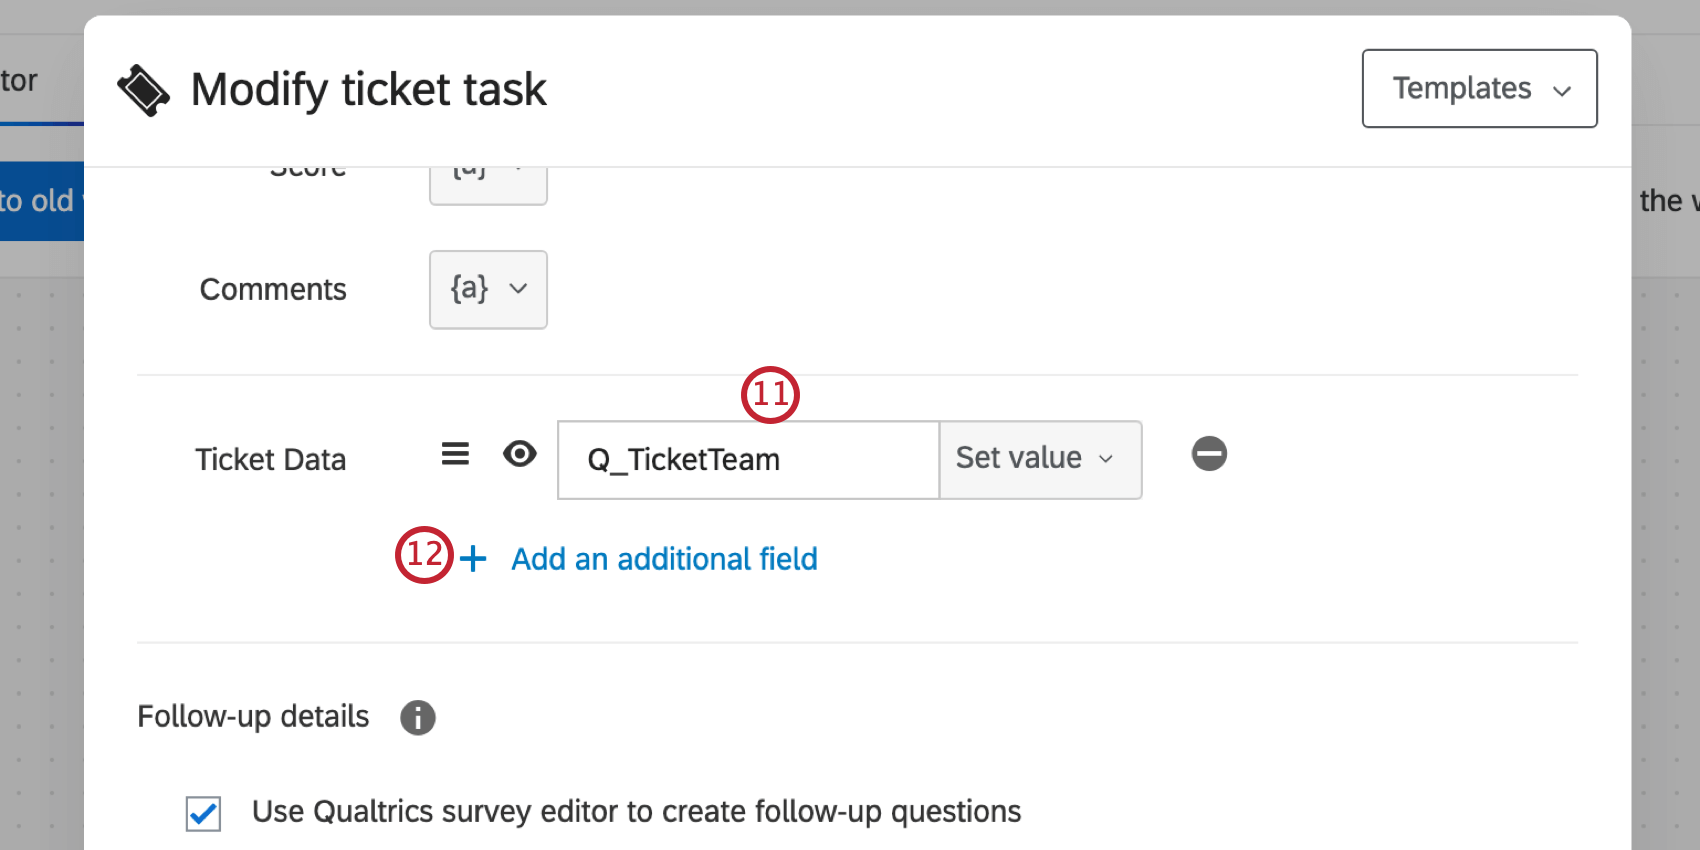
- Click Add an additional field.
- Type out Q_TicketOwner in the field.
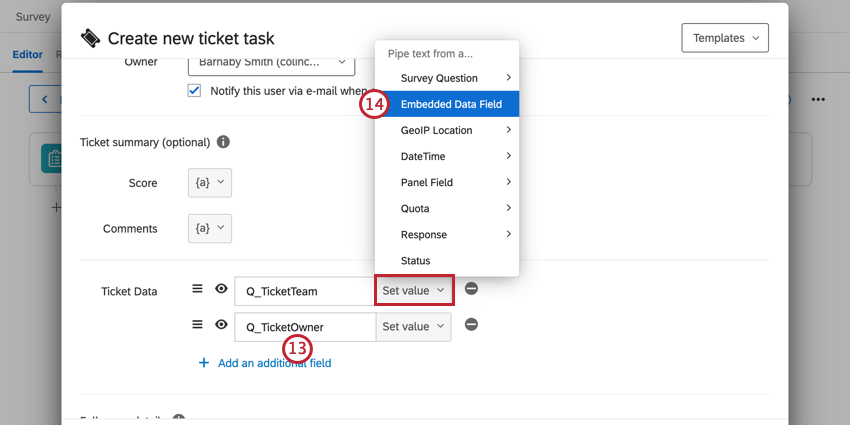 Qtip: If Ticket Assignment Email Notifications are enabled, the dynamic owner will receive the email notification, not the owner set in the Setting Up the Tickets Task.
 - Click Set Value and select Embedded Data Field.
- Type in the name of the embedded data you created in your survey flow. Spelling, capitalization, and punctuation must match. Make sure this is the embedded data that corresponds to the ticket data – eg, for Q_TicketTeam, you want to type the name of your embedded data named Team.
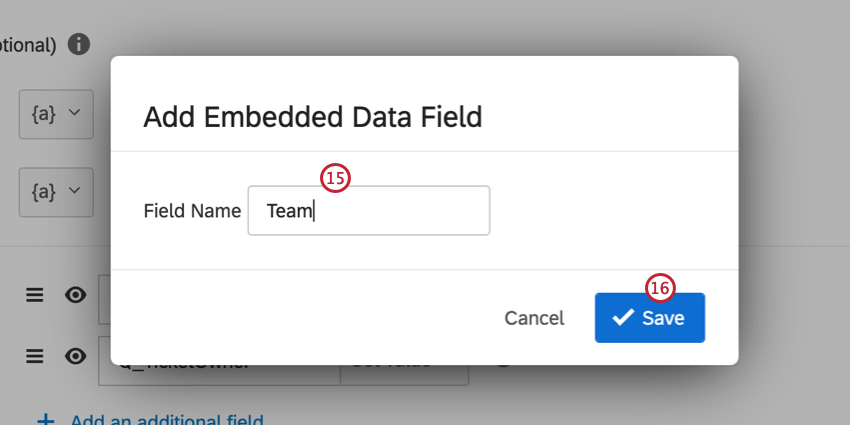
- Click Save. Make sure to add values for both of your ticket data fields.
- Add any additional details or settings you’d like to the ticket.
- When you’re done, click Save.
Dynamically Linking Responses
You can use ticket data to link related responses together. After more than one response triggers a ticket with the same Related Response Field and Value, you will be able to view these related responses on the follow-up page.
- In the Survey tab, navigate to the Survey flow.
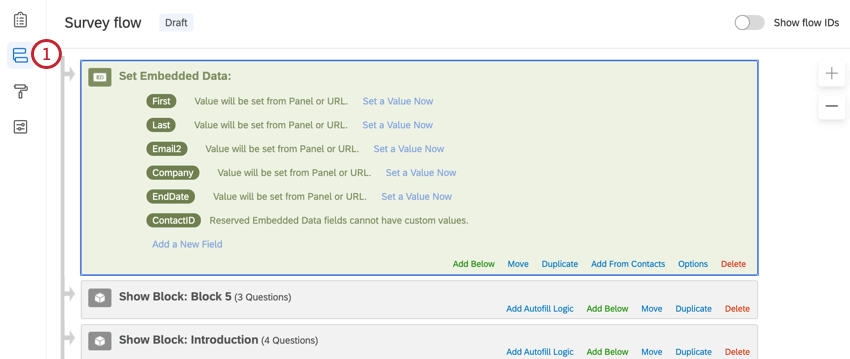
- Click Add a New Element Here and select Embedded Data.

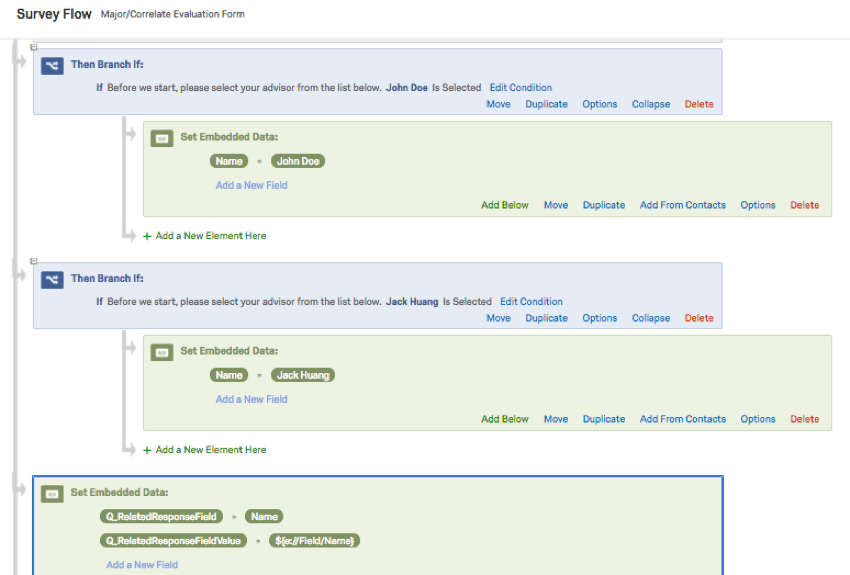
- Add a single embedded data field for the content you want to link tickets together with. This can be a name, an email, an External Data Reference, an ID number, or whatever content you want to link tickets by.
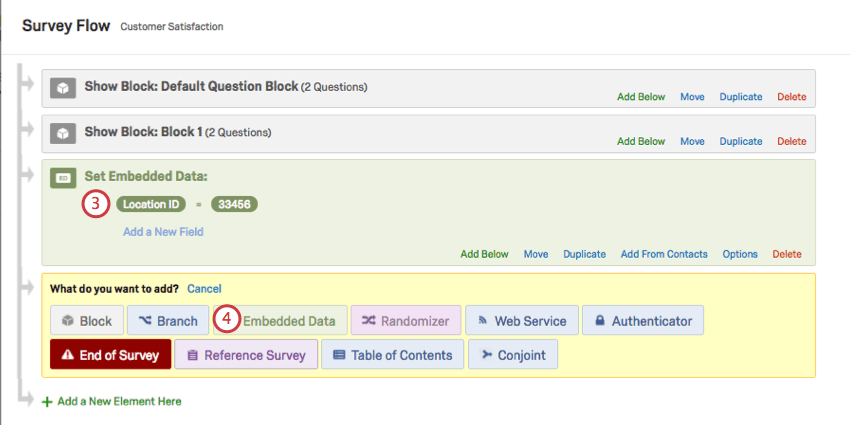
- Click Add a New Element Here and select Embedded Data again.
- Add an embedded data field named Q_RelatedResponseField. Set it equal to the name of your embedded data field from step 3.
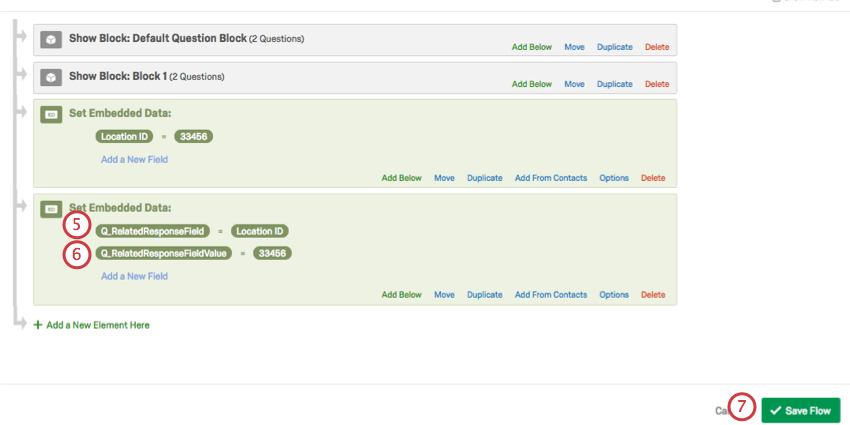
- Add an embedded data field named Q_RelatedResponseFieldValue. Set it equal to the value of the embedded data from step 3. This can be a typed value or piped text.
- Click Save Flow.
- Navigate to the Workflows tab.
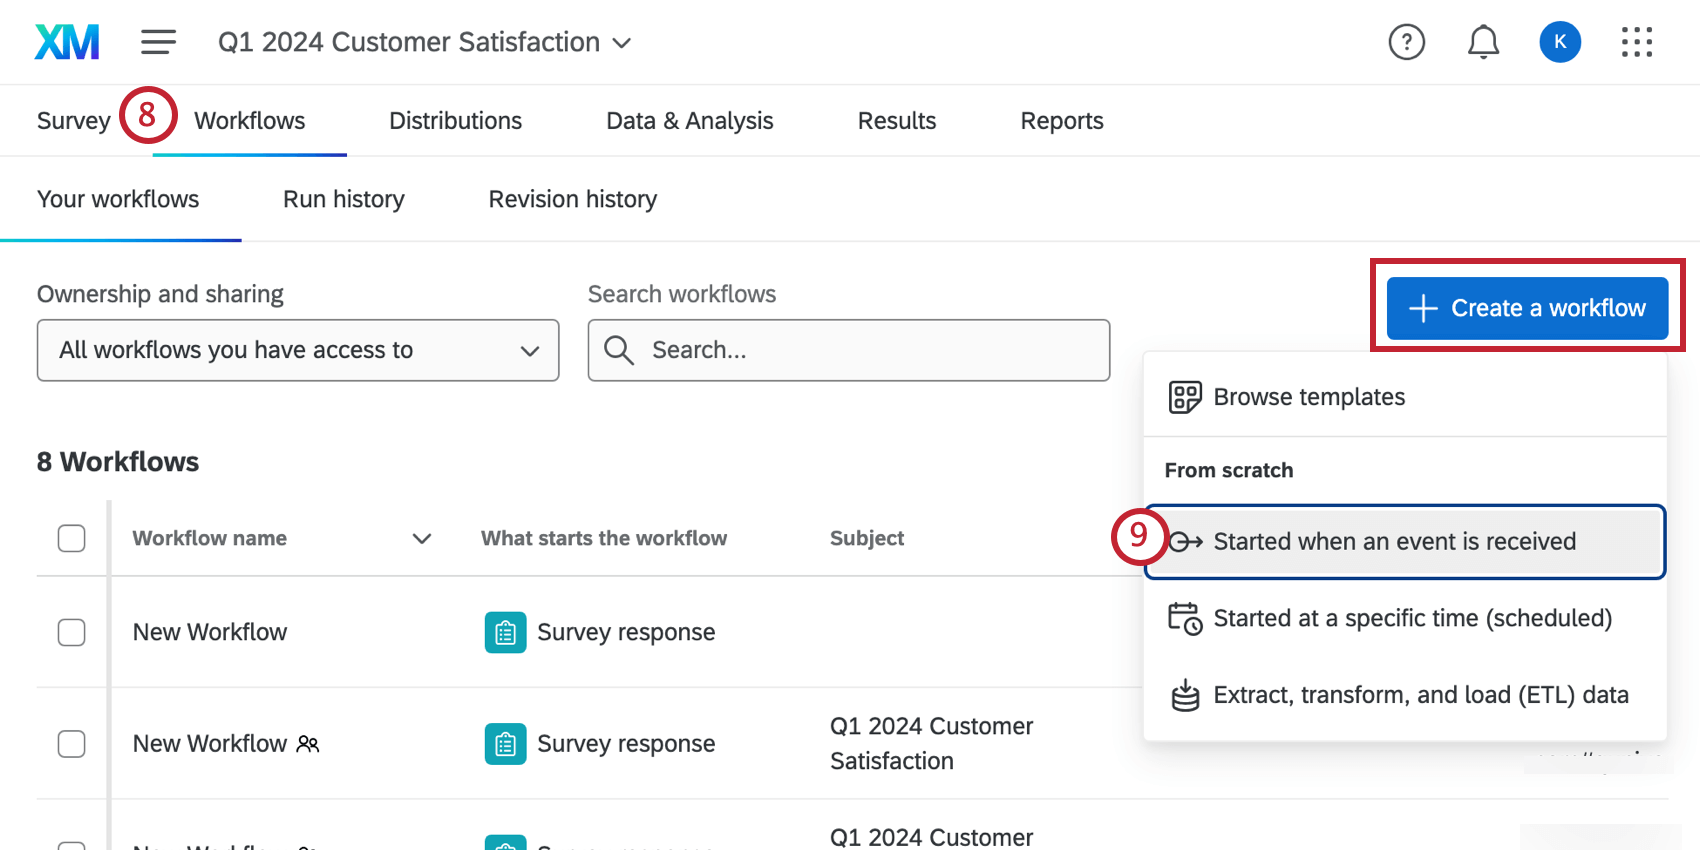
- Click Create an workflow and begin setting up a tickets task workflow.
- For your workflow’s task, select Tickets.

- Click Add data to this ticket.
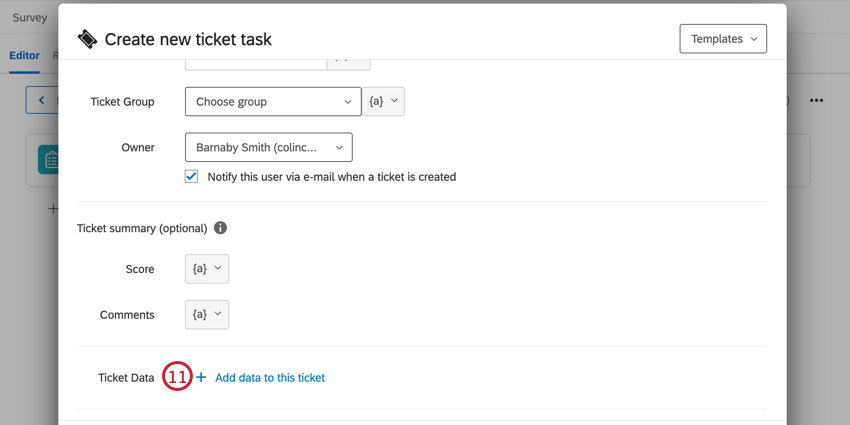
- Type out Q_RelatedResponseField in the field.
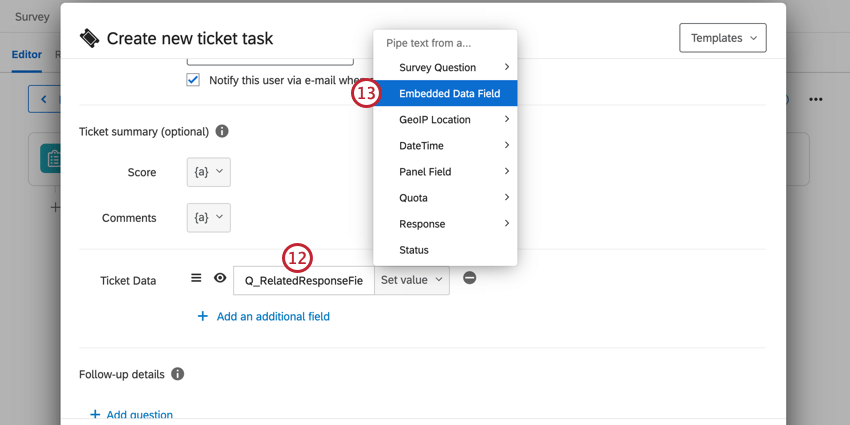
- Click Set Value and select Embedded Data Field.
- Type in Q_RelatedResponseField.
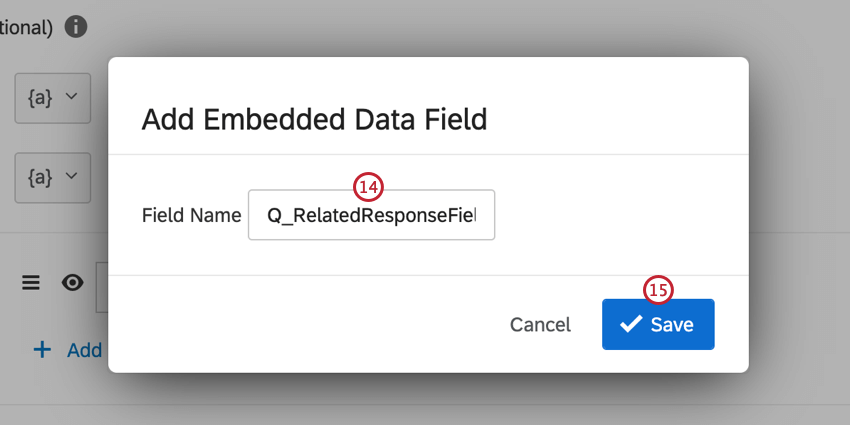
- Click Save.
- Click Add an additional field.
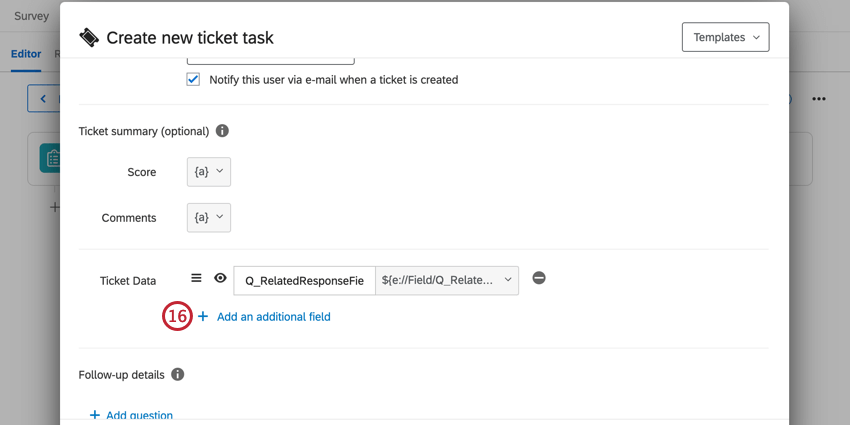
- Type out Q_RelatedResponseFieldValue in the field.
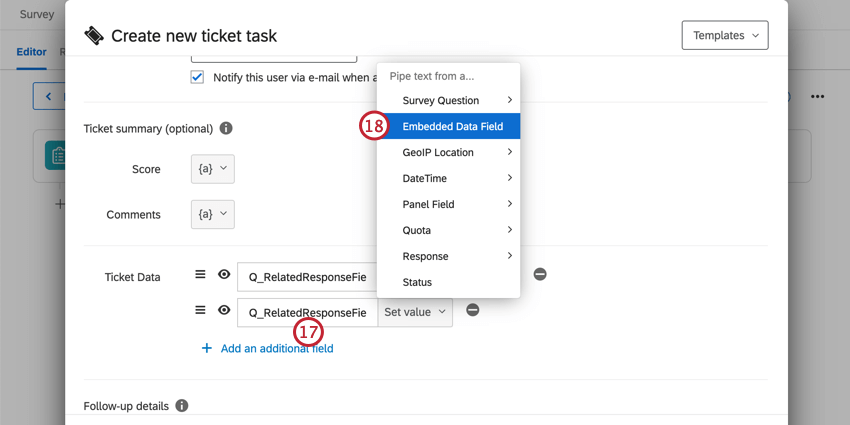
- Click Set Value and select Embedded Data Field.
- Type in Q_RelatedResponseFieldValue.
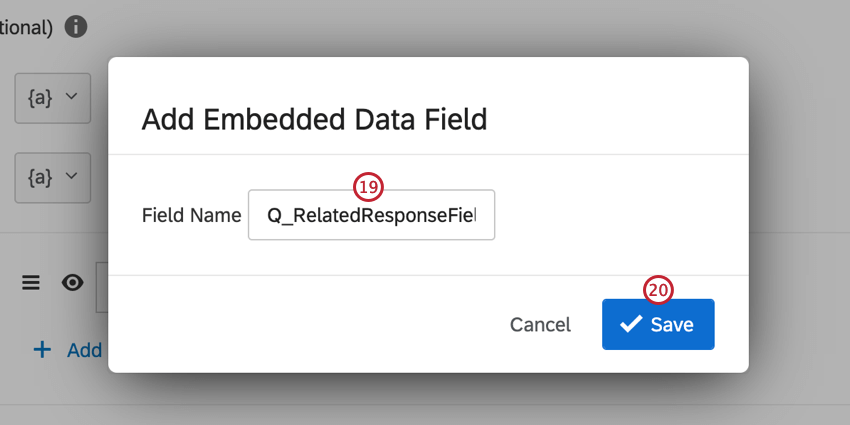
- Click Save.
- Add any additional details or settings you’d like to the ticket.
- When you’re done, click Save.
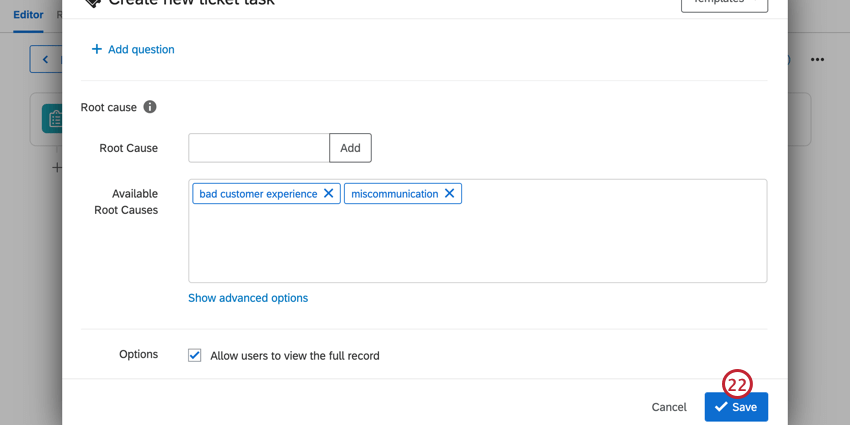
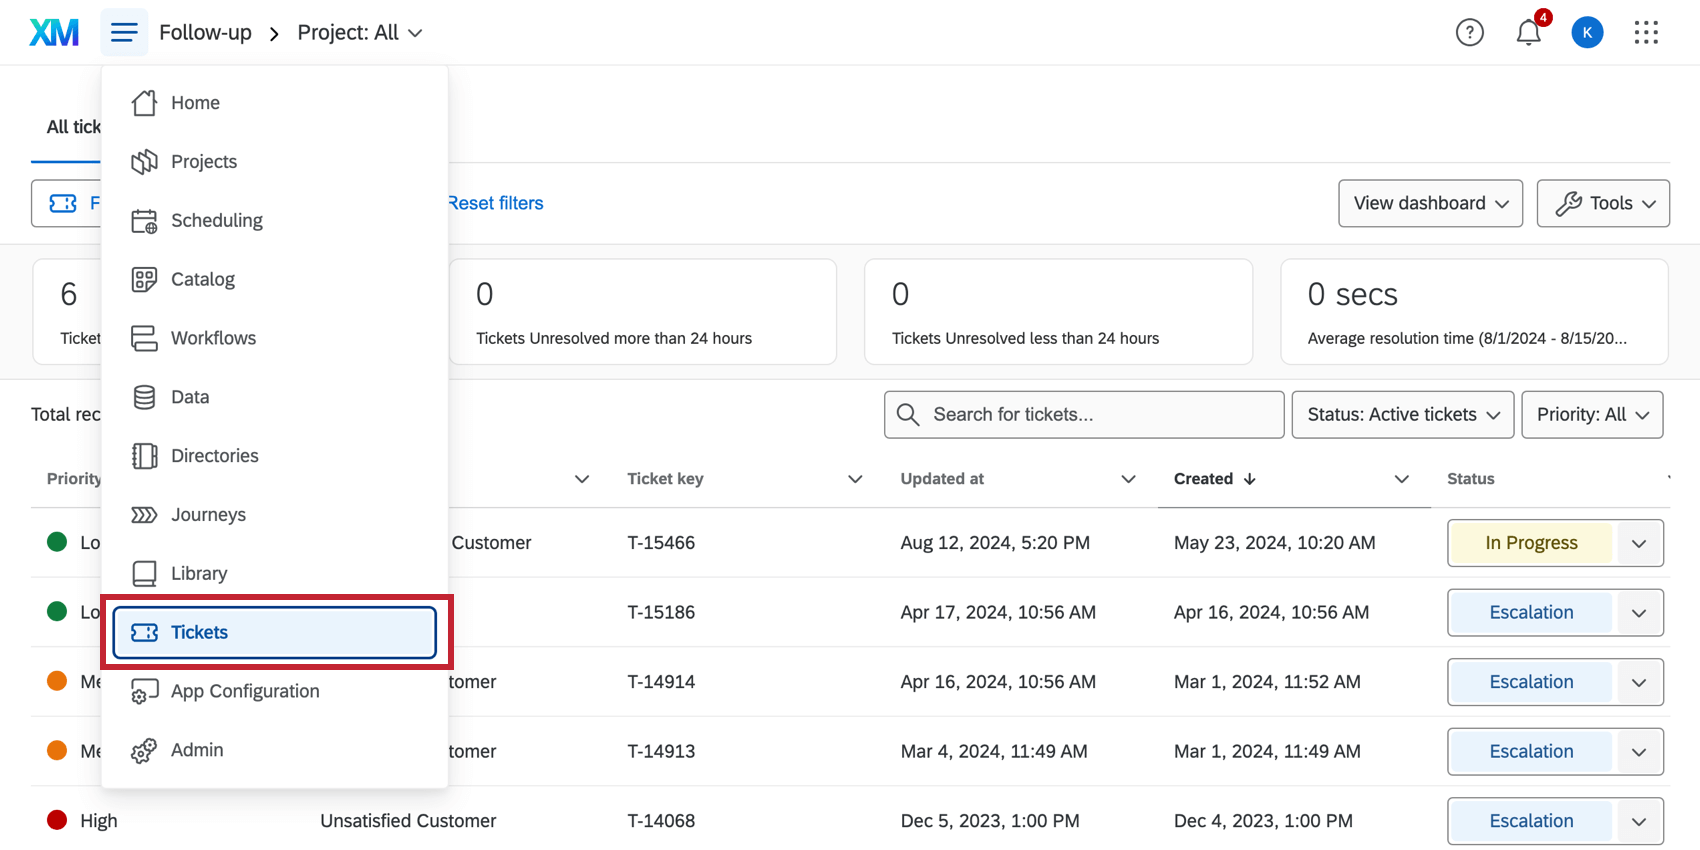
The tickets with matching Q_RelatedResponseField and Q_RelatedResponseFieldValue in the Ticket Data will be linked. To see this data, navigate to your follow-up page by clicking Tickets from the global navigation menu.
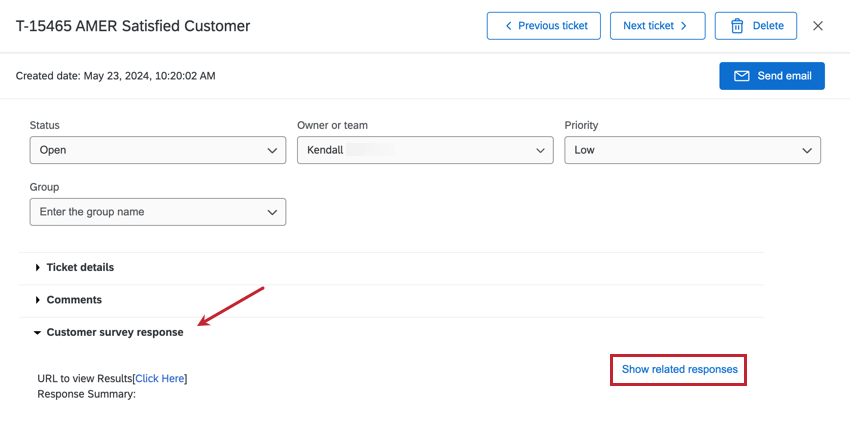
Click on a ticket to open it, then click Show related responses in the Customer survey response section.
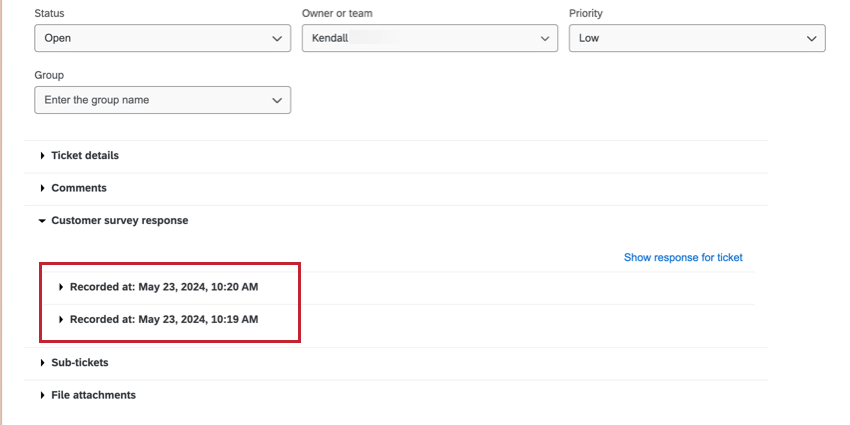
All related responses will be listed below with the date on which they were recorded. Click on a response to expand it.
Default Follow-Up Email Address
You have the option to set a default email address to contact when you click Send Email on a ticket. You can even make this email address dynamic, changing based on what a respondent says in the survey.
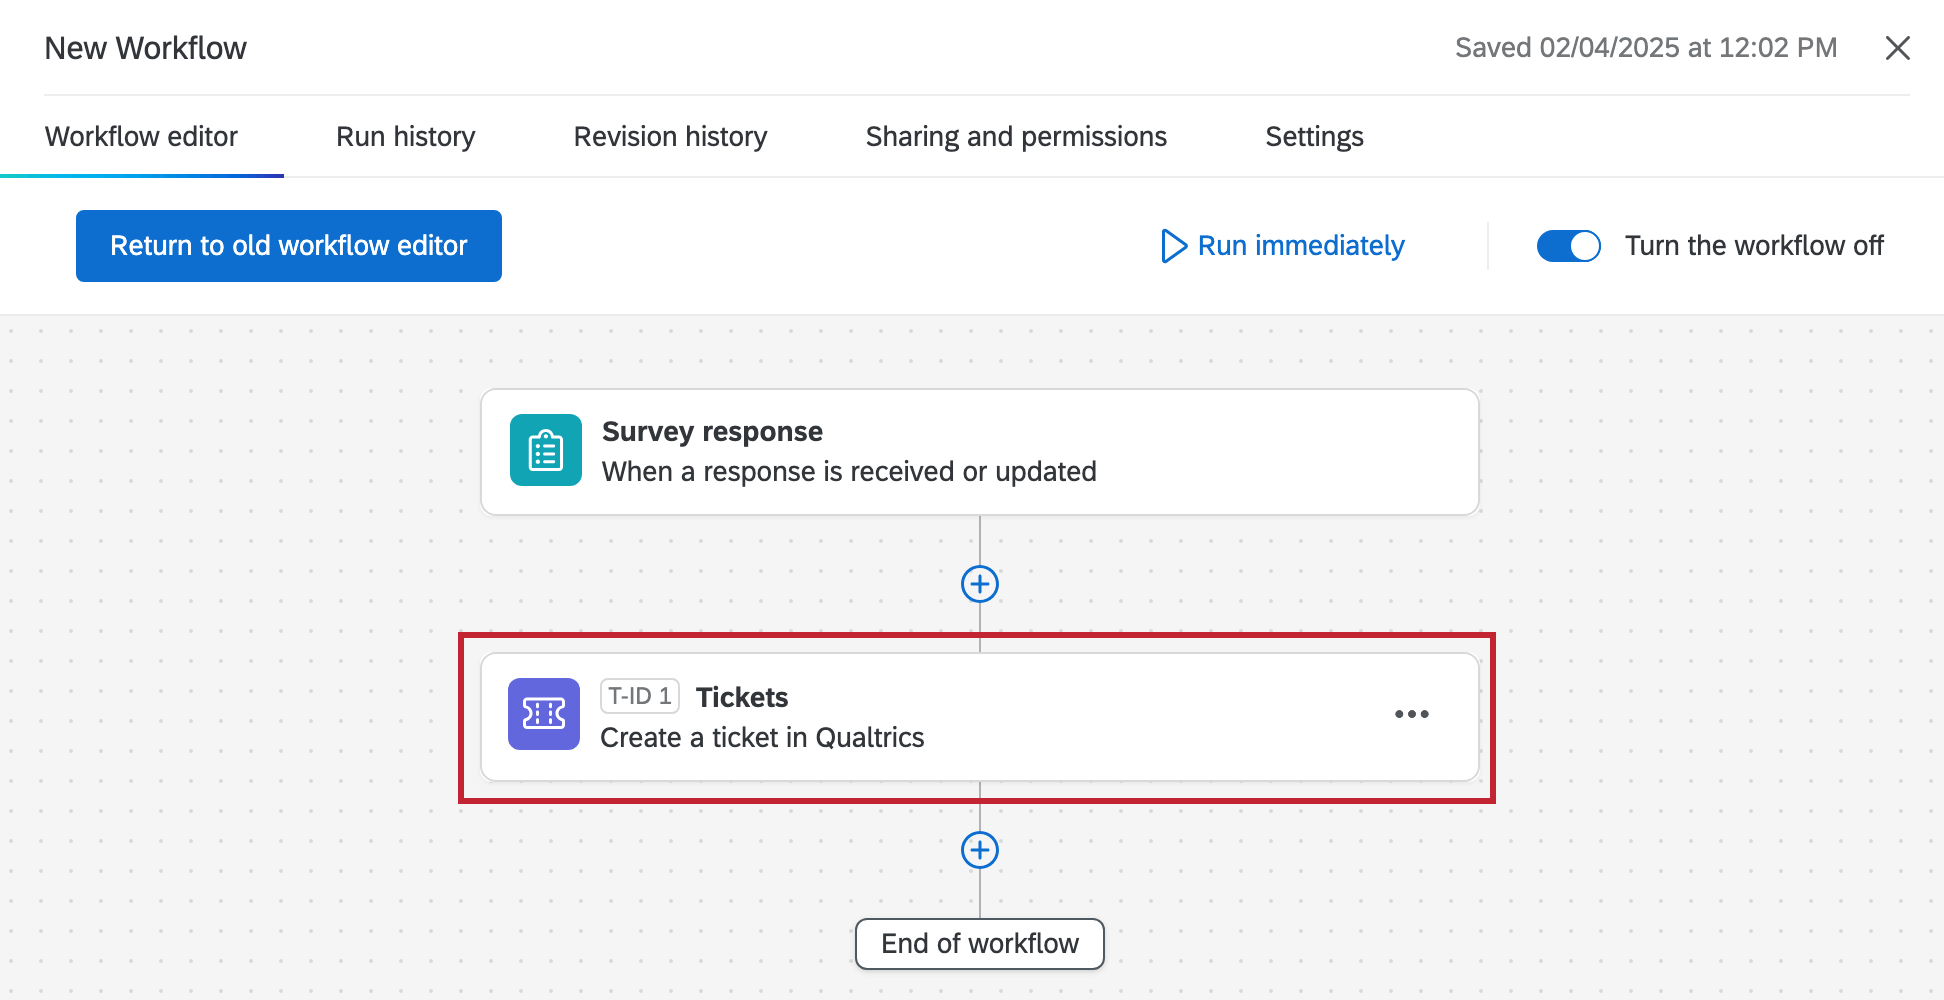
- Go to your Tickets task.
- Click Add an additional field.
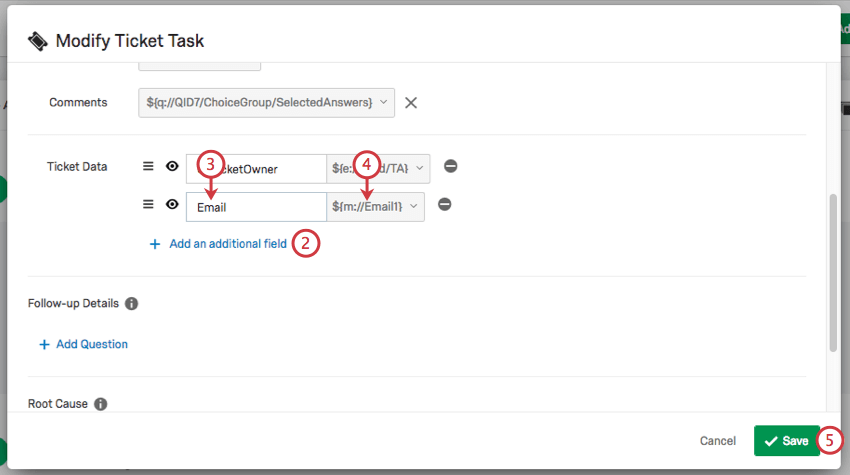
- Name the ticket data Email.
- Depending on how the survey was sent, do one of the following:
- Use the dropdowns to set the value of the Ticket Data equal to the Panel Field called Recipient Email.
- Use the dropdowns to set the value of the Ticket Data equal to the Survey Question where you ask for the respondent’s email address.
- Save your ticket.
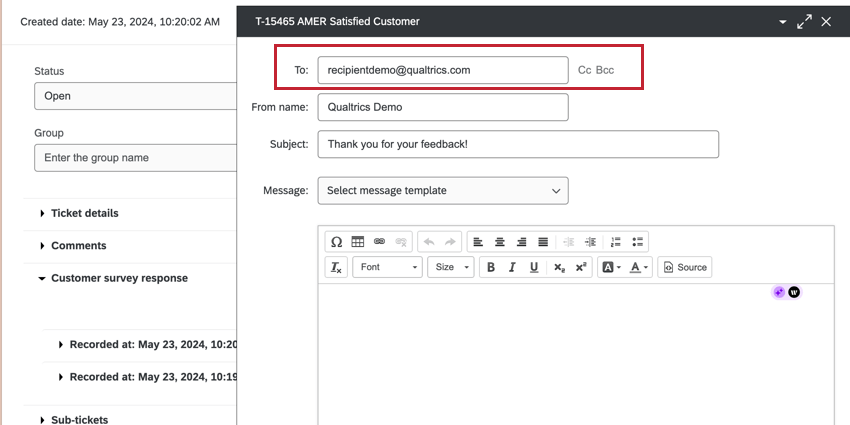
- Now, the appropriate email will prepopulate when you click Send Email on a ticket.
