Automation Recipes and Webhooks
About Automation Recipes and Webhooks in Qualtrics Social Connect
Automation recipes allow you to kickstart certain actions in your account based on different events. For example, when a user has completed handling a customer request and has sent their last reply, you can create an automation recipe that will resolve that case or interaction after 30 minutes have passed with no additional customer response.
You can create an automation that runs based on new mentions and cases, or create an automation that runs based on updates to cases.
Automations for New Mentions and Cases
Automation recipes allow you to trigger actions on your mentions or cases the moment they land in your inbox. You can decide when your automation should occur and what actions should take place in your workflow.
- Click your user icon in the top right corner and navigate to Account settings.
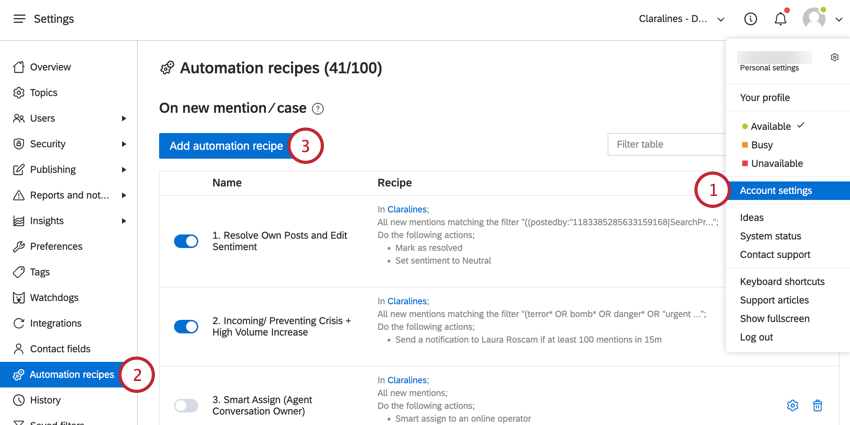
- Select Automation recipes.
- Underneath “On new mention / case,” click Add automation recipe.
- Give the automation recipe a name.
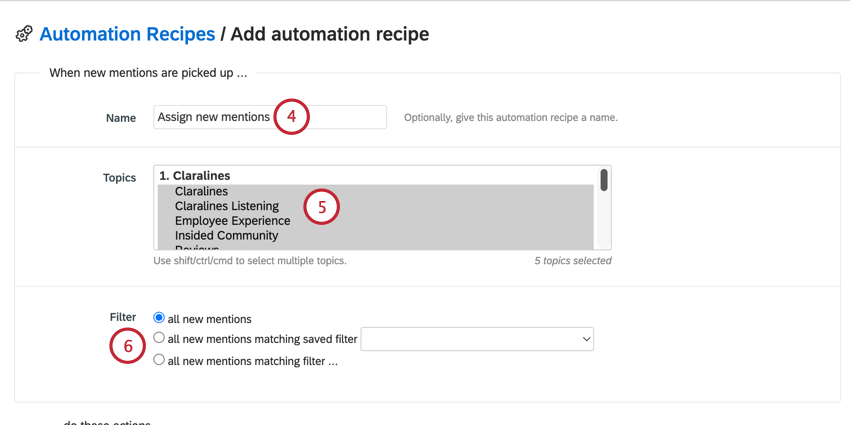
- Select the topic(s) your recipe will apply to. This determines which mentions or cases will trigger the automation.
- Apply a filter to further narrow the mentions or cases that your automation recipe should apply to. You have 3 options for filtering mentions:
- all new mentions: All mentions of the selected topic will be included.
- all new mentions matching saved filter: Use the dropdown menu to choose a saved filter to apply to mentions.
- all new mentions matching filter: Build your own filter conditions. See Filtering in Social Connect for more information.
Example: If you only want your automation recipe to apply to messages from your customers, and not to the replies your agents are sending, you can use this section to filter for “Status” “Type” “is not” “Sent.”
- Select which action(s) you want to occur when new mentions or cases come into your inbox. You can select as many actions as you would like, but keep in mind that whichever actions you select will happen to all mentions and cases that meet the automation recipe criteria. The available actions are:
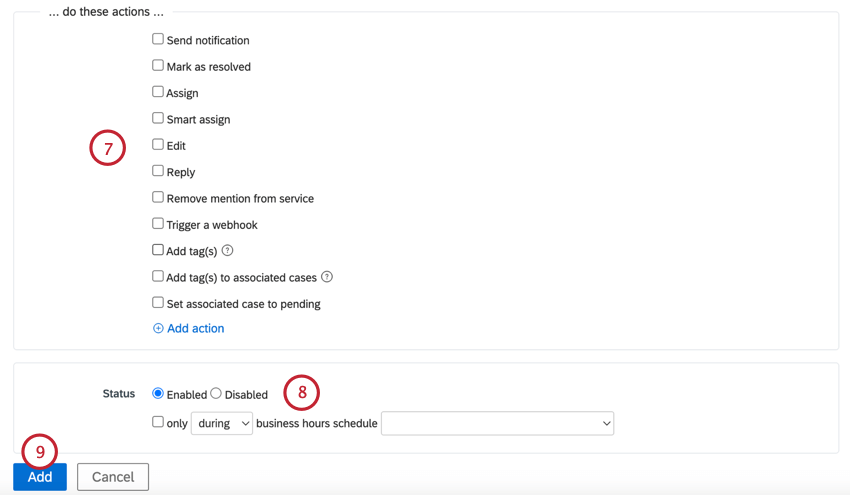
- Send notification: Send a push, email, or both notifications to select user(s) in your account. You can choose how many new mentions or cases need to come in before this notification is sent, and how often the notification should be sent.
- Mark as resolved: Automatically resolve the incoming mentions and cases.
Qtip: This is a great way to reduce the work your agents need to do manually. If there are certain mentions that cannot be actioned by a team member, set up your automation filters so that those mentions get resolved as soon as they come into your account.
- Assign: Assign incoming mentions and cases to a selected user or team.
Example: If you have different teams that handle customer feedback versus billing questions, you can use automatic assignment to make sure those mentions go directly to the appropriate team based on keywords or phrases like “product” or “cancel subscription.”
- Smart assign: Assign mentions and cases to an agent or team that has handled a conversation with the same contact recently. You can choose from last 3 hours, last 24 hours, last 2 days, last 3 days, or last week.
Qtip: Use smart assignments to provide a more seamless customer experience by having them communicate with the same agent or team for the entire conversation. This also prevents new agents from picking up an existing conversation they do not have all the necessary context for.
- Edit: Change a property in the mention or case details. You can change the country, language, sentiment, category, and priority (cases only).
- Reply: Send a pre-written reply to incoming mentions. You can set this reply to be sent for approval first, to be saved as a draft for further edits by agents, or to be sent immediately.
Attention: The auto-reply option is only available for Twitter, Facebook, or Email mentions. When setting up your automation, be sure that the mentions that will trigger the automation come from the service you want to reply with. This means that if you want to send out auto-replies from your Facebook page, you need to include Facebook mentions in your recipe’s trigger.
- Remove mention from service: Remove the mention from its native platform. You can choose from deleting the mention completely, hiding it, or blocking the contact (author).
Example: If you notice a lot of spam content coming in on your Facebook posts, you can create an automation that filters for common swear words or other inappropriate language found in those posts, and choose to have those mentions deleted from Facebook itself.Attention: Deleting or hiding a post from the native platform will make it invisible to others, but will not remove the post from your Social Connect inbox. Use caution when setting this action in your recipe, as deleting or hiding posts cannot be reversed.
- Trigger a webhook: Send a webhook to your brand’s web application when new mentions and cases come in.
- Add tag(s): Add specific tag(s) to the mention or case.
Qtip: You can use this option to save agents time tagging mentions manually. Applying tags in an automation is different from smart tags. A mention will only be tagged by your automation recipe when it first comes into your account. In contrast, smart tags will apply to any mentions that meet their filter criteria, but will apply the moment the mention meets that criteria, even if the mention has been in your inbox for a while (e.g., if your smart tag requires that a mention be assigned, the tag will apply to the mention as soon as an agent assigns the mention).
- Add tag(s) to associated cases: Apply tag(s) to the case that an incoming mention belongs to.
Qtip: If you are handling a customer interaction about a certain topic or issue, you can label the overall case accordingly based on the content of the mentions within that case.
- Set associated case to pending: Update the status of case to “pending” based on the content or other criteria of new mentions within that case.
Qtip: For actions that involve associated cases, your brand will need to have the cases feature turned on in your account.
- Add action: Use this option if you’d like to use the same action more than once in your automation recipe. For example, if you want to edit the mention’s category and sentiment in the same automation, you will need to click “Add action” to add the second edit action.
- Toggle the status of the automation recipe between Enabled or Disabled.
- If you select “Enabled” you can choose for the automation to run only during or outside of a selected business hours schedule.
Qtip: Use the disabled status if you still have edits you want to make to your automation before pushing it live.
- If you select “Enabled” you can choose for the automation to run only during or outside of a selected business hours schedule.
- Click Add.
Automations for Case Updates
If your team handles customer interactions using cases, you can streamline the details, actions, and status of those cases by using automation recipes that trigger based on changes to those cases.
- Click your user icon in the top right corner and navigate to Account settings.
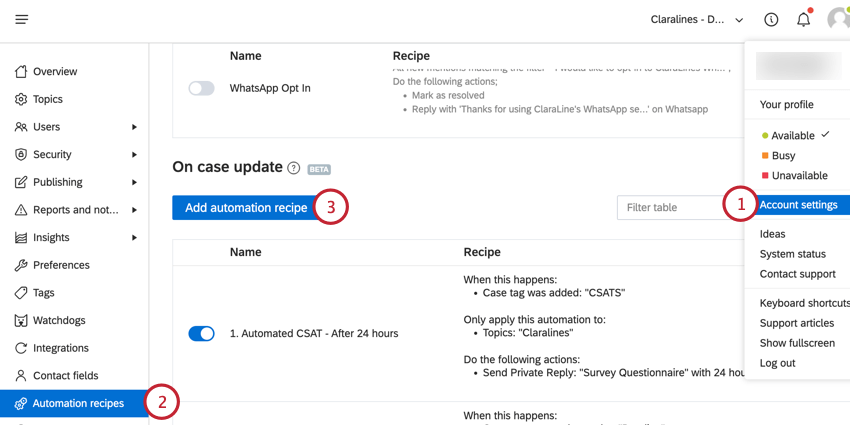
- Select Automation recipes.
- Scroll down the page and click Add automation recipe in the “On case update” section.
- Give your automation recipe a name.
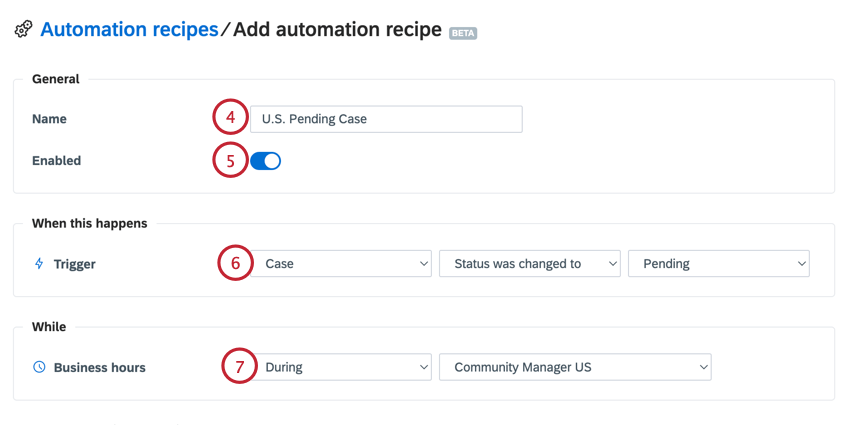
- Only turn on the Enabled toggle once you’re ready to start running your automation.
- Choose a trigger for your automation recipe. You can choose to trigger the recipe on a mention or a case.
Qtip: You’ll see different trigger options available depending on if you select mention or case. If you selected mention, the recipe will trigger when a new mention comes in. If you selected case, the recipe will trigger when a specific tag is added to the case, or when the status of the case changes. Cases can be set to the following statuses:
- Unresolved: The case is open and ready for action by an agent/user
- Pending: The case has been actioned and is waiting for further action or response from the customer
- Resolved: The case has been fully actioned and is now closed
- Select whether the recipe should be triggered During or Outside of your business hours. For either option, choose the business hours schedule that should be followed.
- Click the plus sign ( + ) to choose which topic(s) that the recipe should apply to.
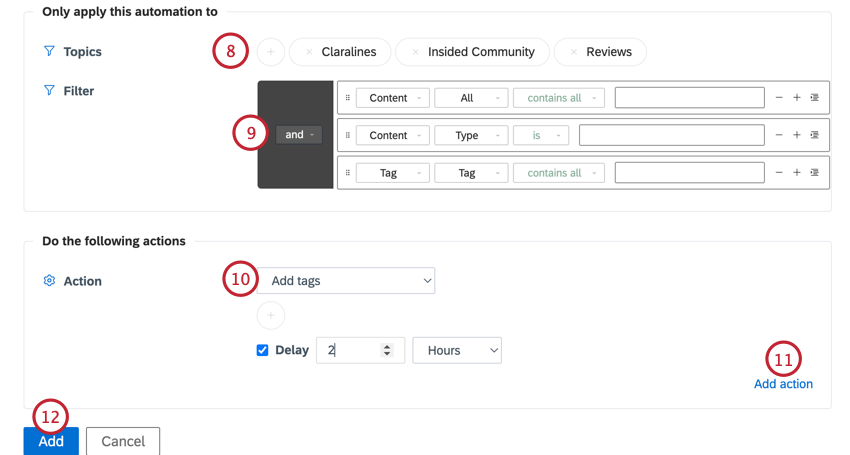
- Apply a filter to further narrow down the cases that your automation recipe should apply to. See Filtering in Social Connect for an overview of filtering.
- Select the action(s) that will trigger. The available actions depends on if you selected a mention or case for your trigger:
- Mention actions:
- Assign (Associated) Case: Assign the case to one or all of the selected user(s) or team(s). If the case was already assigned, it can be reassigned based on the selections you’ve made here.
- Add tags: Add specific tag(s) to the mention or case.
Qtip: You can add tags to cases to help agents track their status. For example, set a tag “question answered” to apply to a case when the case’s status changes to “pending”. A pending status indicates that the case is waiting for action from the customer’s side, rather than action by the agent.
- Assign Mention: Assign the mention to one or all of the selected user(s) or team(s).
Qtip: You may notice that it is possible to assign a mention using either of the two automation recipe types. When deciding which option to use, consider if you want the mention to be assigned as soon as it lands in your inbox for the first time, or after action has been taken on it.
- Change Status To: Change the case’s status to Resolved.
- Delete tags: Remove a selected tag from the case.
- Send Private Reply: Send a pre-written private message response. You can choose from sending a message, CSAT or NPS survey, or initiating a flow response.
- Send Public Reply: Send a pre-written public response. Select the message, the service you want to send it from (Facebook or Twitter), and the specific profile the message should come from.
- Trigger Webhook: Send a webhook containing the mention and its details to your web application. See the Triggering a Webhook section for more details about this option.
- Case actions:
- Assign Case: Assign the case to one or all of the selected user(s) or team(s). If the case was already assigned, it can be reassigned based on the selections you’ve made here.
- Add tags: Add specific tag(s) to the mention or case.
- Change Status To: Change the status of the case to pending or resolved. This option is only available if you select “Status was changed to” as the recipe trigger.
- Delete tags: Remove a selected tag from the case
- Send Private Reply: Send a pre-written private message response. You can choose from sending a message, CSAT or NPS survey, or initiating a flow response.
Example: Create a text reply that confirms if your customer’s questions have been answered, or if they require additional assistance from your team. You can then send this text response as a private message reply in your automation recipe, so if they respond that more help is needed, the case will reopen, or if they do not respond after a designated amount of time, the case resolves.
- Send Public Reply: Send a pre-written public response. Select the message, the service you want to send it from (Facebook or Twitter), and the specific profile the message should come from.
- Trigger Webhook: Send a webhook containing the case and mention details to your web application. See the Triggering a Webhook section for more information about this option.
- Mention actions:
- Click the Add action to reuse an action (for example, let’s say you want to trigger 2 different webhooks in the same automation).
- Click Add when finished.
Triggering a Webhook
This section covers how to trigger a webhook as an action within an automation. If you are familiar with API calls, or have another web application that you would like to use your Social Connect data with, you can use a webhook to send mentions from your Social account to your web application, along with the mention details you want to include.
Follow the instructions in the above sections to create a new automation. Once you’ve created your automation and are choosing the automation’s action, follow the below steps:
- Select Trigger a webhook as your action (this can be used in addition to other actions within the same recipe).
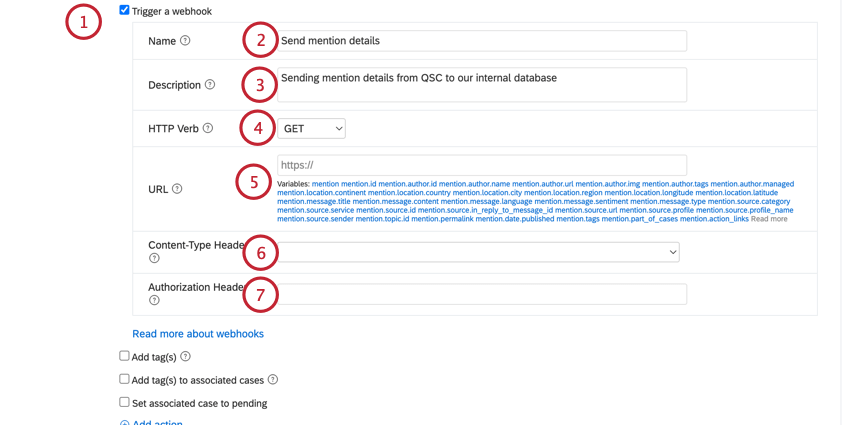 Qtip: Triggering a webhook allows you more customization options when used within a new mention/case recipe. If you only want to pass specific details about incoming mentions to your web application, we recommend using the new mention/case automation recipe option.
 - For new mention or case recipes, enter a name for your webhook. This name will be logged in the history of the mentions that trigger this webhook. Skip this step if you are using a case update recipe.
- For new mention or case recipes, enter a description for your webhook. This is for your internal use. Skip this step if you are using a case update recipe.
- For new mention or case recipes, select an HTTP verb: GET or POST. You will select this based on the service you are sending your request to. Skip this step if you are using a case update recipe, since this will make a POST request by default.
- Enter the URL for your webhook. This information is provided by the service you are using to send your webhooks.
Qtip: For case update recipes, the webhook request will automatically include the mention object. This includes any of the variables associated with the mention object. If you are using a new mention or case recipe, you can specify certain variables to be included in your webhook request body from the list provided in your webhook settings.
- For new mention or case recipes, enter the Content-Type Header for your webhook. This can be left as application/json if you are unsure of what to enter. Skip this step if you are using a case update recipe.
- Enter the HTTP Authorization Header for your webhook. This header typically contains the credentials to authenticate a user agent with a server. This header should follow the pattern <type> <credentials>.
- Toggle the status of the automation recipe between Enabled or Disabled.
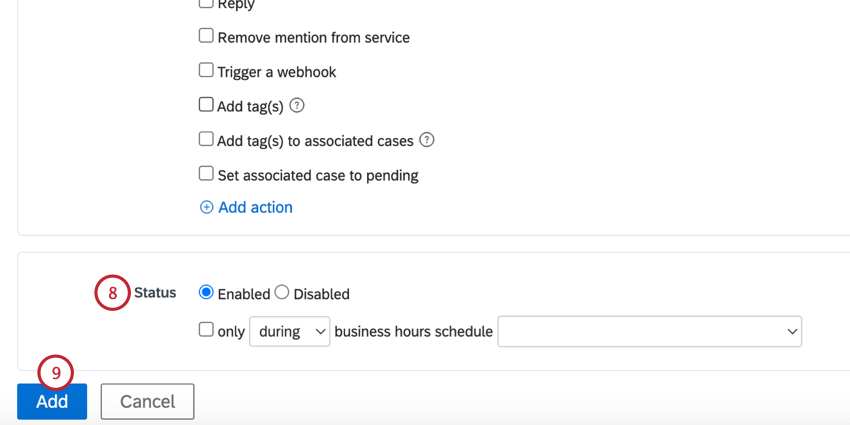
- If you select “Enabled” you can choose for the automation to run only during or outside of a selected business hours schedule.
Qtip: Use the disabled status if you still have edits you want to make to your automation before pushing it live.
- If you select “Enabled” you can choose for the automation to run only during or outside of a selected business hours schedule.
- Click Add.
Viewing Automation History
Once your automation recipes are set up and enabled, you can check to see if they’re running on mentions as expected by looking at the histories of your mentions and cases. Whenever an action takes place on a mention or case, it will be logged in the history of that interaction. This includes actions taken by an agent, or actions completed by an automation recipe.
To confirm if a given mention or case has triggered one of your automation recipes, click on the dropdown arrow to the right of the interaction in your inbox.
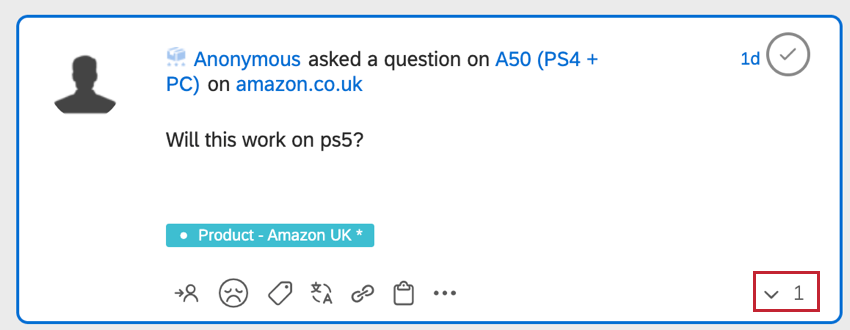
If this mention or case has triggered an automation recipe, it will be listed in the history.