User Permissions and Business Hours Schedules
About User Permissions and Business Hours Schedules
A Qualtrics Social Connect user can take many different actions and have access to different types of data. As an Administrator of your organization, you can decide how much access your users should have. This is accomplished by using user roles that have permissions that allow access to certain features. There are a variety of default user roles that you can use, or you can create custom roles that fit your organization’s specific needs.
In addition to user roles, you can also set up business hours for your company. You can then assign business hours to a user which is used to calculate time based metrics such as response time.
Default User Roles
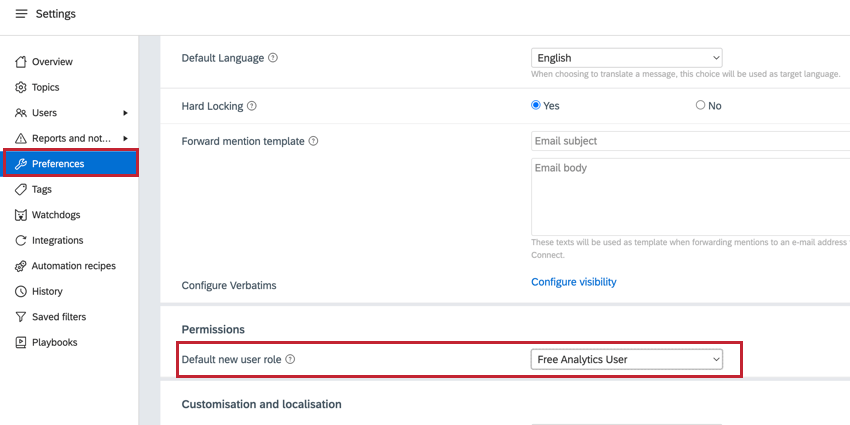
If you want all new users to be assigned the same role, you can go to your Account Settings, click on the Preferences tab and select a Default new users role from the dropdown.
Depending on your Social Connect license, there are a few default user roles available to assign to your users:
- Administrator: The Administrator has the ability to set permissions for all other users, as well as manage all administrative settings for your organization. Administrators are also the only default users role besides Manager that can connect authorized data streams in your account.
Attention: Administrator is the only default user role with permission to unlock, disable, and re-enable users in your account.
- Contributor: This user can view most content in the account, but can only create drafts and send replies for approval on authorized streams.
- Editor: This user can view most content in the account, and has permission to create and send replies on authorized streams.
- Free Analytics User: This user can only view your insights section, including custom dashboards, view the inbox, and use the Social Connect mobile application.
- Manager: Managers have nearly unlimited access to the settings in your account, but they cannot add, edit, or delete users or teams.
- Viewer: This user can view most sections in the account, but cannot reply to or engage with any content.
Custom User Roles
If the default user roles do not meet your needs, or you would like to create roles with more specific permissions, you can create custom user roles instead.
To create a custom user role:
- Navigate to Account Settings.
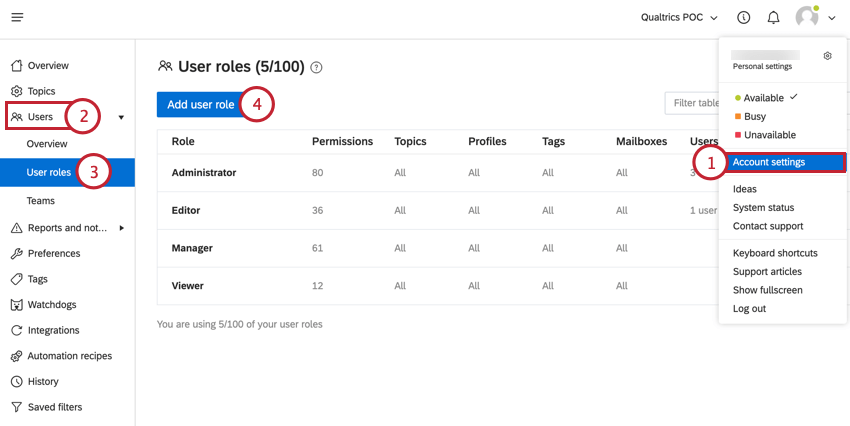
- Select Users from the left-hand menu.
- Click User roles.
- Click Add users role.
- Give the user role a Title.
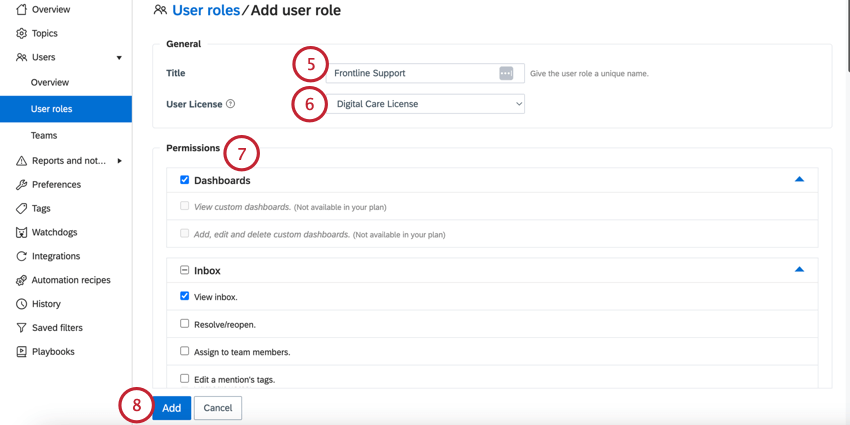
- Select the User License for the role. There are 2 license types available:
- Digital Care License: This license is paid, and counts towards the seats available in your organization’s license. You can free up license seats by disabling existing users in your account.
- Free Analytics License: This license is unpaid, and does not count towards the seats available in your organization’s license.
- Select the permissions you want the users to have in their account. See Available Permissions for an explanation of each permission.
- When finished, click Add.
Available User Permissions
User permissions in Social Connect include action permissions (such as replying, creating tags, and building dashboards), as well as data access permissions (based on your data sources), which means that you can define which topics or streams of data users can see or not see, as well as what they can do with that data.
Dashboards
- View custom dashboards: Users can see custom dashboards created by any users in the account, unless specifically excluded in the dashboards checklist.
- Add, edit and delete custom dashboards: Users can create, edit, or delete custom dashboards, including those created by other users.
Inbox
- View inbox: Users can view the Inbox section of the account, as well as any inboxes/mailboxes/smart folders allowed in their user role.
- Resolve/reopen: Users can resolve and reopen mentions and cases in the inbox.
- Assign to team members: Users can assign mentions and cases to themselves, or other team members.
- Edit a mention’s tags: Users can add or remove tags from a mention (if they have access to all existing tags, this means they can also create new ones directly from a mention by typing in a tag name).
- Edit a contact’s tags: Users can add or remove tags from a contact within the contact details.
- Edit sentiment: Users can edit the sentiment rating of a mention.
- Edit properties of mentions (Country, category, language, etc.): Users can access the “edit” option on a mention to change the values for country, category, language, etc.
- Add/edit notes: Users can add or edit their own notes to mentions or cases.
Attention: Users can only edit notes that they have added themselves, and cannot edit notes added by other users. If another user has added a note containing a to-do list, however, the users can still check or uncheck to-do list items in that note.
- Delete notes: Users can delete notes they have added to a mention or case.
- Delete mentions and/or cases from topics: Users can delete mentions and cases from topic inboxes. This only deletes the content from Social Connect, not from the native platform itself.
- Delete original messages on authorized stream: Users can delete messages published by the brand from the authorized stream.
Attention: To use this feature, you must also enable the “Delete mentions and/or cases from topics” permission.
- Erase PII and content of a mention: Users can remove personal details or text content of mentions.
Attention: This permission is often used to be in compliance with data privacy rules, including GDPR, so that customer information is not stored if not permitted. See GDPR and Social Connect for more information.
- Hide original messages on authorized stream: Users can hide messages published by the brand from the authorized stream.
- View contact information: Users can view the contact details added to the customer’s contact pane.
- Add and edit contact information: Users can edit or add to the contact details in the customer’s contact pane.
- Delete a contact and all its information and history: Users can delete a contact and all of their contact information (including any contact history).
- Add, edit, and delete mailboxes and smartfolders: Users can create, edit, and delete mailboxes and smart folders from within the Inbox
- Block contact of mention: Users can block the author of a customer mention.
- Can disable locking for themselves: Users can disable hardlocking for themselves
Qtip: This permission is recommended for Administrators, Managers, and other supervisory users who may need to review and assist agents with customer interactions. We recommend that hardlocking be turned on for all users, but this permission allows supervisors to view the entire context of a mention that is already locked to an agent for coaching purposes, without taking ownership of that mention in the process.
- Take over mentions that are hardlocked for others: Users can take over mentions that another agent has locked, and lock it to themselves instead.
- Add & edit cases, group mentions into cases, and assign cases: Users can create new cases, edit the details of a case, add mentions into a case, or assign cases to themselves or others.
- Allow to rebut Quality Management scorecard cases*: Users can change the scorecard values for a quality management case from pass or fail.
Attention: Rebutting scorecard cases is only an option if your Social Connect plan is set to Quality Management. This plan type requires that you have access to XM Discover, and have case alerts turned on in your XM Discover Designer account. For more information about this feature and plan type, contact Support.
Insights
- View insights: Users can view the Insights section of the brand’s account.
- Create custom charts with the chart builder: Users can create new custom charts in the Chart Builder section of the account.
- Add, edit, and delete chart templates from chart builder: Users can create, edit, and delete chart templates from the Chart Builder section, including charts created by other users. See the Building Charts for more information.
Publishing and replying
- View publishing: Users can view the Publishing section of the brand’s account.
- Create drafts & send messages for approval for authorized streams: Users can write responses to customer messages and create new post content for authorized social streams, and either save those responses or posts as drafts, or send them for approval by a supervisor.
- Publish and approve new posts for authorized streams: Users can create and publish new posts on authorized profiles, as well as approve posts written by other users.
- When allowed to publish posts to authorized streams, also allow to retweet: Users can retweet tweets that come into the inbox.
- Publish and approve new replies & comments for authorized streams: Users can create and publish new replies and comments on authorized profiles, as well as approve replies and comments written by other users.
- When allowed to reply & comment to authorized streams, also allow to like: Users can like posts and comments that come into the inbox.
- Add, edit, and delete canned responses: Users can create, edit, and delete canned responses from within Account Settings.
- Edit saved targeting settings: Users can edit existing saved targeting settings from within Account Settings.
- Add, edit, and delete publishing guidelines: Users can create, edit, and delete publishing guidelines from within Account Settings.
Team performance
- View team performance statistics: Users can view the Team Performance
- View users details in team performance statistics: Users can view individual users performance metrics within the Team Performance.
- View watchdogs: Users can view the Watchdogs section within Team Performance.
- Add, edit, and delete watchdogs: Users can create, edit, and delete watchdogs for use in the Inbox and Watchdogs
Topics and profiles
- Add, edit, and delete topics: Users can create, edit, and delete topics.
- Add, edit, and delete streams to topics: Users can create, edit, and delete data streams within topics.
Account settings
- Access to live help: Users can access the Live Help feature to connect with Qualtrics Support from within their Social Connect account.
- View account settings: Users can view the Account Settings section.
Attention: Users with this permission enabled can view the Account Settings section, but will only have access to each section of those settings if they also have permissions for those settings turned on as well.
- View account history: Users can see the account history section.
- Add, edit, and delete tags: Users can create, edit, and delete tags for use on mentions and cases.
- View exports from all users: Users can view exports created by themselves and other users (including exports from Insights and the Inbox), as long as they have access to that data.
- Edit account preferences: Users can edit account preferences for the entire account.
- Add, edit, and delete account users: Users can create, edit, and delete users in the account.
- Add, edit, and delete account administrators: Users can create, edit, and delete users with an Administrator role in the account.
- Add, edit, and delete business hours schedules: Users can create, edit, and delete business hours schedules.
- Add, edit, and delete teams: Users can create, edit, and delete teams and change which users belong to them.
- Add, edit, and delete automation recipes: Users can create, edit, and delete automation recipes.
- Add, edit, and delete saved filters: Users can create, edit, and delete saved filters.
- Add, edit, and delete command centers: Users can create, edit, and delete command centers.
- Edit interface design settings: Users can edit style settings within the account, such as color scheme, under “Custom branding tab” in the Preferences
- Edit the domain Allowlist: Users can edit the allowlisted domains available in the account. This includes profile manager (live chat) and integrations.
- Edit integration settings: Users can add or edit applications in the Integrations section of Account Settings
- Edit contact settings: Users can add, edit, or delete contact fields within the Contact fields section of Account Settings.
- Import a list of entities (tags, responses, users): Users can use the import feature in the Users, Tags, and Canned responses sections of Account Settings to upload these items in bulk, rather than entering these items manually.
- Add, edit, and delete auto case creation rules: Users can create, edit, and delete case creation rules in the Cases section of Account Settings.
- Add, edit, and delete segmentations: Users can create, edit, and delete segmentations to break out data in charts and widgets.
- Add, edit, and delete Playbooks: Users can create, edit, and delete Playbooks within Account Settings.
- Activate and disable Playbooks: Users can toggle Playbooks on or off.
- Mark Playbook to-do list items as done: Users can check off items in a Playbook’s to-do list.
- Edit profile settings (configure themes, etc.): Users can edit the settings of social profiles they have access to, including Facebook, Twitter, Instagram, WhatsApp, and Live Chat.
- Add, edit, and delete profile themes: This permission is currently not in use.
- View profile themes: This permission is currently not in use.
- Add and delete Twitter custom profiles: Users can create and delete custom Twitter profiles for themselves and other users.
- View profile groups: Users can view profile groups within Profile Manager.
- Add, edit, and delete profile groups: Users can create, edit, and delete profile groups in Profile Manager.
- Can disable Badges & Titles feature: Users can disable the Badges feature so that badges do not display in the banner of a user’s account when they earn a “badge.”
- Add, edit, and delete Custom Badges: Users can create custom badges to give to other users.
- Can give Custom Badges to other users: Users can give badges to other users in their account.
Security settings
- Log in on and use the official mobile apps: Users can log into and use the Clarabridge mobile application.
- Access to the API (to use 3rd-party applications): Users can use the Qualtrics Social Connect (Engagor) API to connect their 3rd-party application with their Social Connect account and POST or GET data.
- View security audit log: Users can view the Audit log under the Security tab in Account Settings.
- Edit security settings: Users can edit the security settings for the entire account under the Security tab in Account Settings.
- Edit the IP Allowlist: Users can edit the allowlisted IP addresses for the account in the Security
Restrictions
- Can only view Inbox folders in focus view: Users can only view individual interactions in their permitted inboxes and mailboxes in focus view, and cannot see the inbox mini-mentions list.
Qtip: This permission can be used to keep agents from “cherry-picking” mentions and cases from the inbox.
- Can only reply and change status of mentions/cases when assigned to the mention or case: Users can only reply to or update the status on cases in the inbox if they are assigned to those mentions or cases.
- Only show mentions and cases assigned to the users or one of their teams: Users can only see mentions or cases that are assigned to them or a team they are a member of while viewing the inbox.
Projects and topics
All of your projects and topics will be listed in the next section. By checking the box beside a given project or topic, you give users with that user role access to the data in that project or topic. This means that if a project or topic is not checked, then users will not be able to see data from that project or topic.
Authorized Streams
This section includes a table of all of the authorized social and messaging data streams you have connected across all of your topics. Beside each stream, you’ll see three options that determine the users’s access to those streams:
- Editor: Users can approve and post replies publicly on the stream.
- Contributor: Users can create draft replies and send those replies for approval for that stream.
- None: Users cannot publish any replies to the stream, but can view the data in the inbox, and view insights data for that stream.
Dashboards
This section includes a table with the name of all the Insights dashboards currently added in your organization’s account, and the three access levels a user can have for each:
- View & Edit: Users can view and make changes to the dashboard, including adding new widgets and editing existing widget settings.
- View: Users can view the dashboard, but cannot make any changes to it, other than applying dynamic filters (e.g. changing the date range for the dashboard).
- No Access: Users cannot access the dashboard.
Tags
This section includes a list of all of the tags that exist in the account organization-wide. This includes any manual tags as well as smart tags. If a tag is checked for the users, they can add or remove it from mentions and cases. If they do not have access to a tag, they will still see it on mentions or cases if it has been applied by other users with access to that tag, but they will not be able to edit it themselves.
Visible Mailboxes & Topics
Select which mailboxes and topics (inboxes contain only one topic’s data each) will be visible to the users when working from the Inbox. If you select all or none of the listed mailboxes, the users will have access to all mailboxes, as well as any newly created mailboxes. If only a subset of those mailboxes are selected, the users will only be able to view those selected mailboxes.
Canned responses
Choose which canned responses the users can use in their mention and case replies. Canned responses are organized by folders. If you select all of the folders, the users will have access to all canned responses, as well as any newly created canned responses. If only a subset of those canned responses are selected, the users will only be able to view those selected canned response folders.
Setting Business Hours Schedules
If your organization has users working in different shifts or timezones, you can create and assign different business hours schedules that determine when those users should be online and working in Social Connect. This information is especially useful if your organization uses Team Performance to evaluate key agent performance metrics like response time, handle time, and resolve time.
- Navigate to the Users section of Account settings.
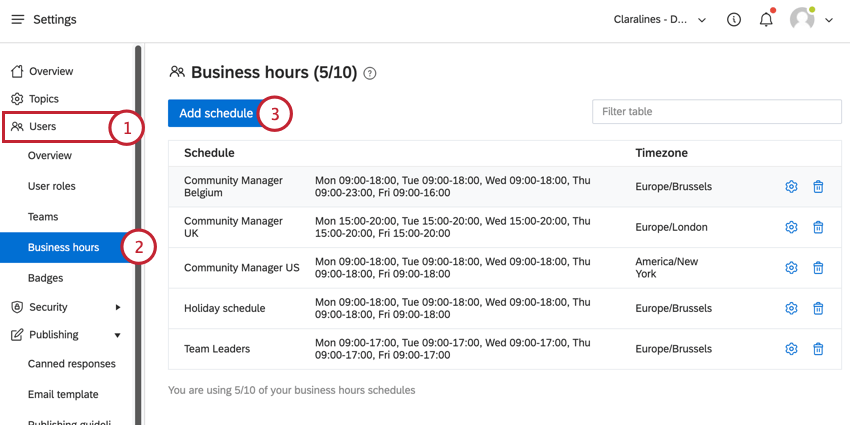
- Go to Business hours.
- Click Add schedule.
- Give the schedule a name.
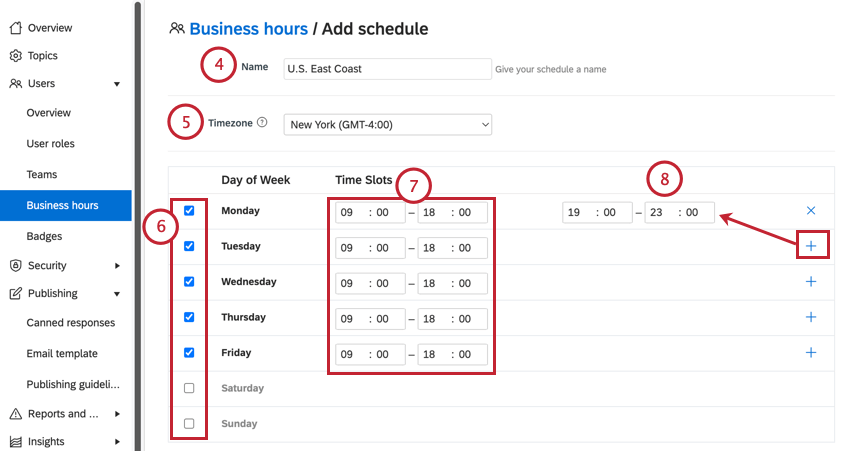
- Select a timezone for the schedule. This will determine when the business hours schedule is in effect.
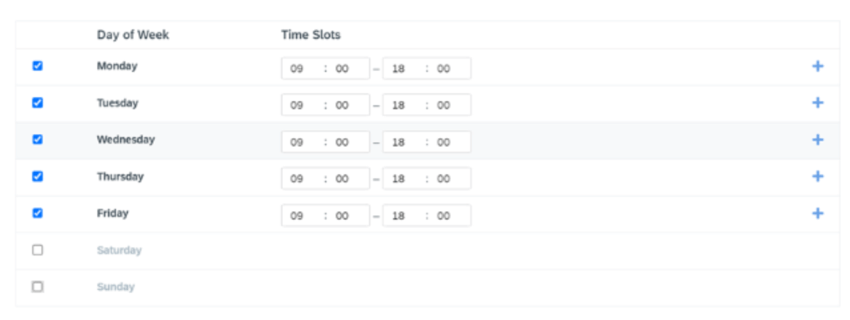
- Check the box next to each day of week that you want to include in your schedule.
- In the time slots field, enter the start and end times for the schedule. Note that these fields use 24-hour time.
- You can add a second time slot to your day’s schedule by clicking the plus sign ( + ) for that day and then setting a second time slot. This option is useful for scheduling a break into your day.
- If there are any holidays that need to be included in the schedule, include them in the Upcoming Holidays section.
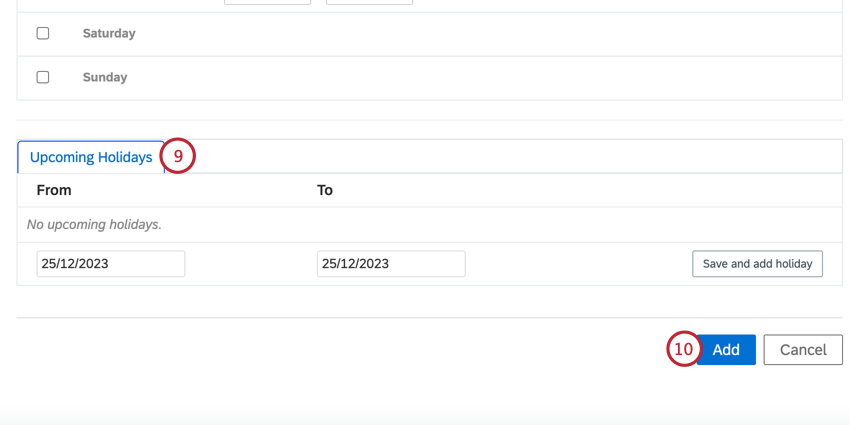
To add your holiday:- Enter the start date in the From box using dd/mm/yyyy format.
- Enter the end date in the To box using dd/mm/yyyy format.
- Click Save and add holiday.
- When finished creating your schedule, click Add.
Adding Business Hours to Users
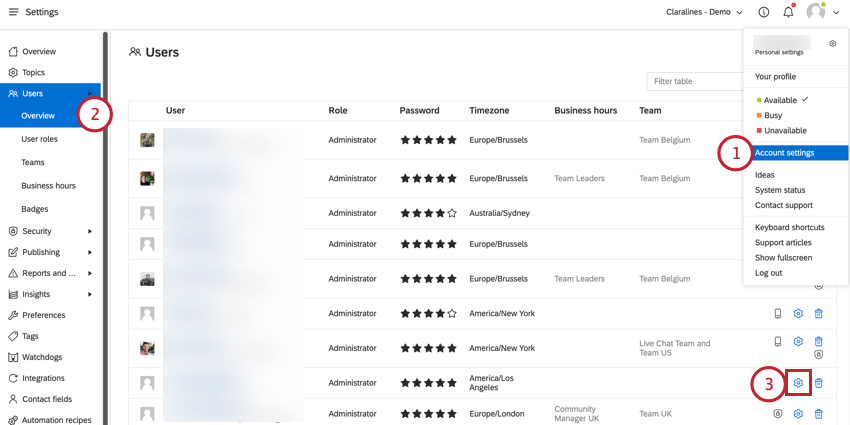
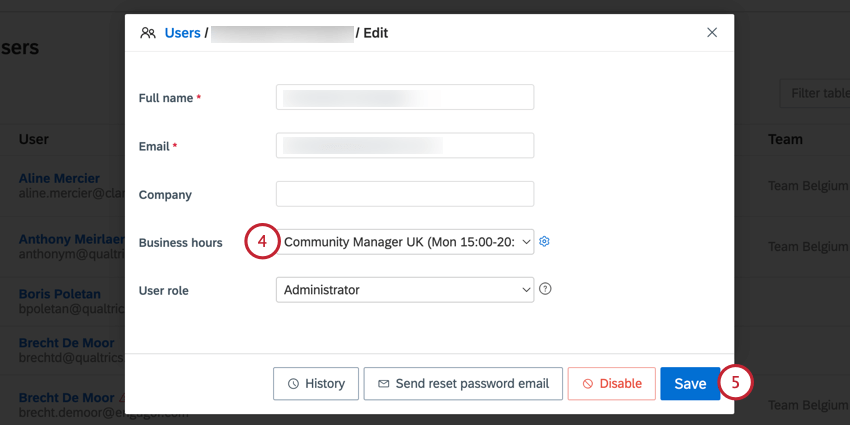
After creating a business hours schedule, you must add the schedule to specific Social Connect users.
