Conector de entrada da Trustpilot
Sobre o conector de entrada da Trustpilot
Você pode usar o conector de entrada da Trustpilot para importar classificações e avaliações da Trustpilot para o XM Discover. Isso permite que você agregue e estude o feedback dos clientes usando os recursos de análise e relatórios do XM Discover.
Qdica: você precisará de seu token de API da Trustpilot para configurar a conexão.
Configuração de um trabalho de entrada da Trustpilot
Qdica: a permissão “Manage Jobs” (Gerenciar trabalhos) é necessária para usar esse característica.
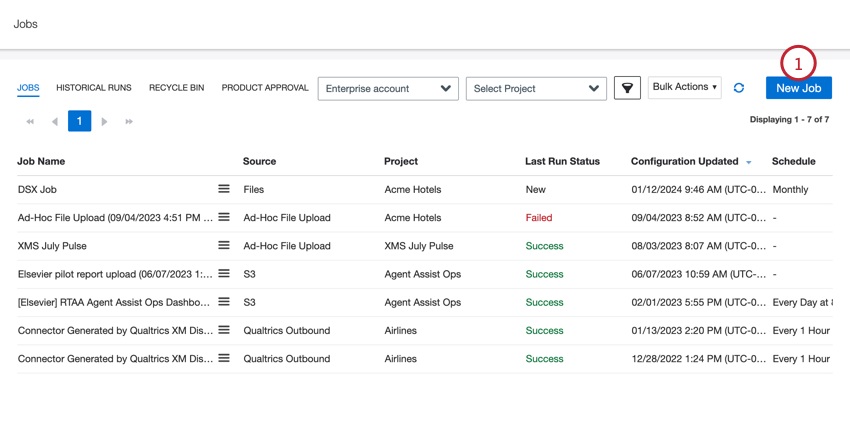
- Na página Jobs, clique em New Job (Novo trabalho).
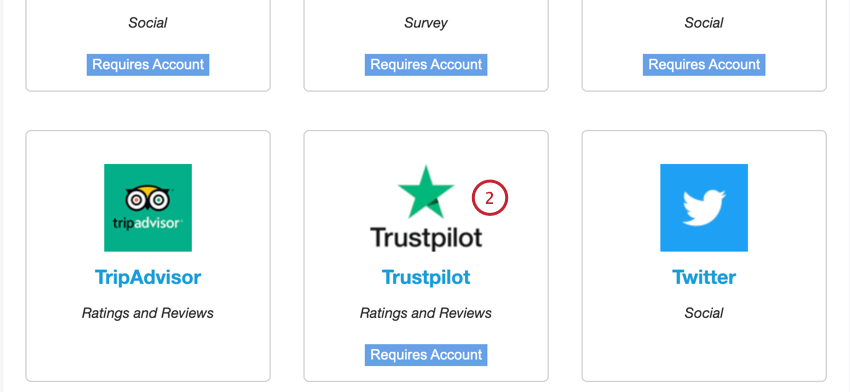
- Selecione Trustpilot.
- Escolha o projeto para carregar os dados.
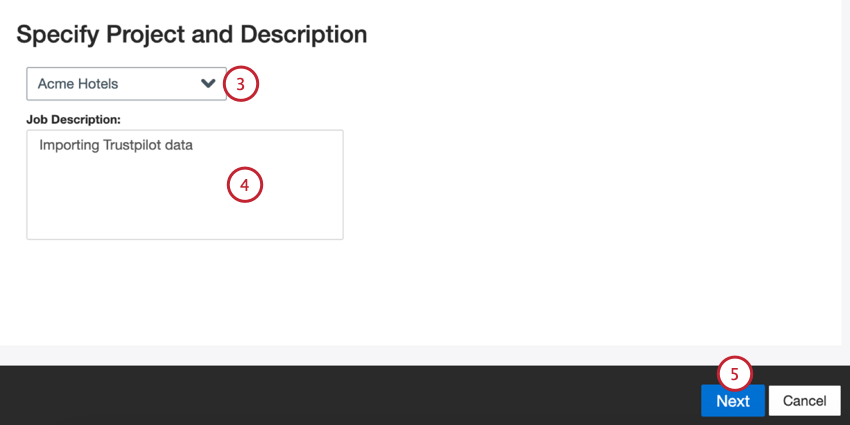
- Faça uma descrição do seu trabalho para que você saiba o propósito dele.
- Clique em Seguinte.
- Escolha uma conta da Trustpilot para usar ou selecione Adicionar nova para adicionar uma nova conta.
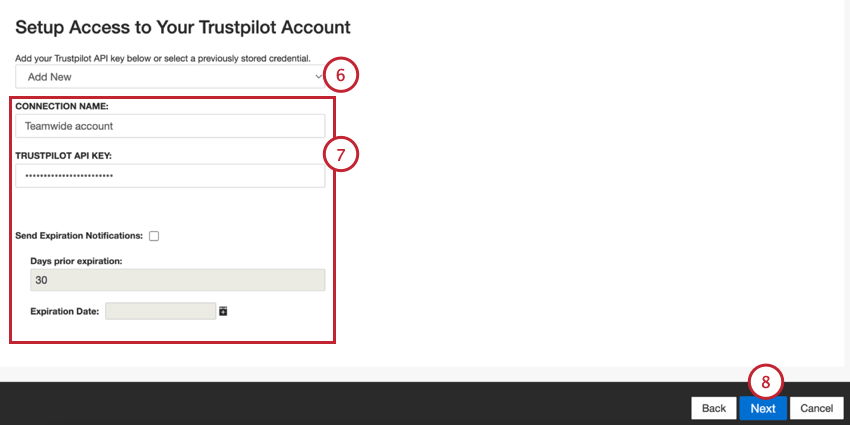
- Se estiver adicionando uma nova conta, digite o seguinte:
- Nome da conexão: Dê um nome à conexão para que você possa identificá-la.
- Chave API da Trustpilot: Sua chave API da Trustpilot.
- Enviar notificações de expiração: Se quiser que as credenciais conta sua conta expirem após um determinado período de tempo, selecione essa opção.
- Dias antes da expiração: Se estiver ativando as notificações de expiração, insira quantos dias você gostaria de ser notificado antes da expiração. Você pode inserir um valor entre 1 e 100 dias.
- Data de expiração: Defina a data em que as credenciais expirarão. Clique na caixa para abrir um calendário e escolher a data.
- Clique em Seguinte.
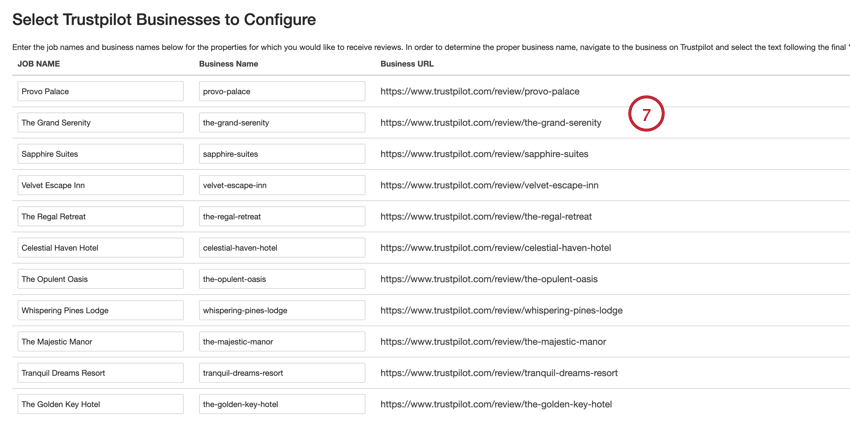
- Forneça um ou mais nomes de propriedades de um hotel, restaurante ou atração para os quais você deseja obter dados. Você pode fazer isso manualmente ou por meio de um arquivo.
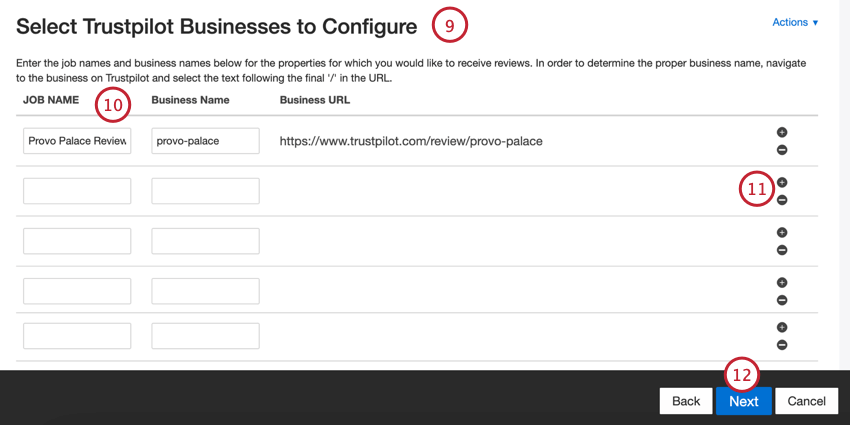 Qdica: essas etapas abrangem a adição manual de propriedades. Consulte Upload de propriedades por meio de um arquivo para saber como fazer upload de um arquivo.
 - Se estiver adicionando propriedades manualmente, insira as seguintes informações:
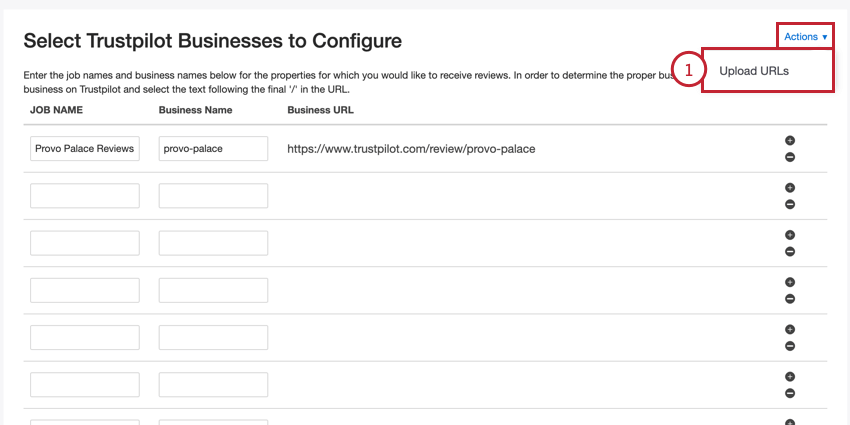
- Nome do trabalho: Um nome para a propriedade e para o trabalho de dados. Esse é o nome que aparecerá para a tarefa no XM Discover
- Nome da empresa: A parte final do URL da propriedade da Trustpilot.
Qdica: para encontrar o nome correto da empresa, navegue até a empresa na Trustpilot e selecione o texto após o “/” final no URL.Exemplo: Se o URL da propriedade for “https://www.trustpilot.com/review/provo-palace”, você digitará “provo-palace”Qdica: o campo URLda empresa será atualizado automaticamente com base no nome da empresa. Você pode verificar novamente se esse URL corresponde ao URL da Trustpilot.
- Você pode adicionar outras propriedades clicando no sinal de mais ( + ) ou remover propriedades clicando no sinal de menos ( – ) .
- Clique em Seguinte.
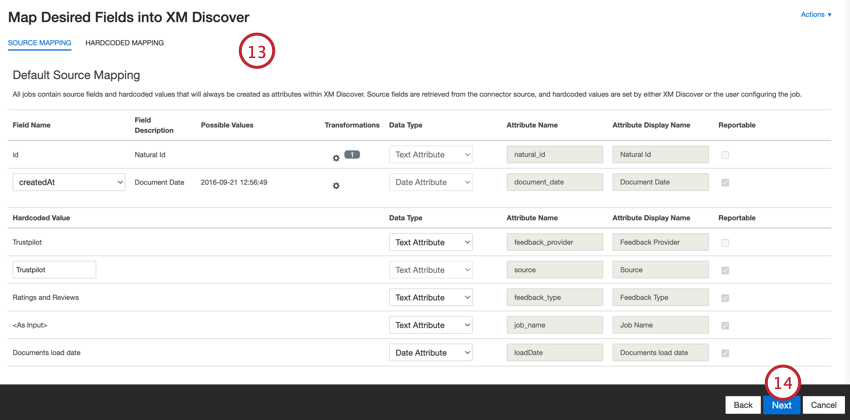
- Se necessário, ajuste seus mapeamentos de dados. Consulte a página de suporte do Mapeamento de dados para obter informações detalhadas sobre o mapeamento de campos no XM Discover. A seção Mapeamento de dados padrão contém informações sobre os campos específicos desse conector.
- Clique em Seguinte.
- Se desejar, você pode adicionar um filtro de conector para filtro os dados de entrada e limitar os dados importados.
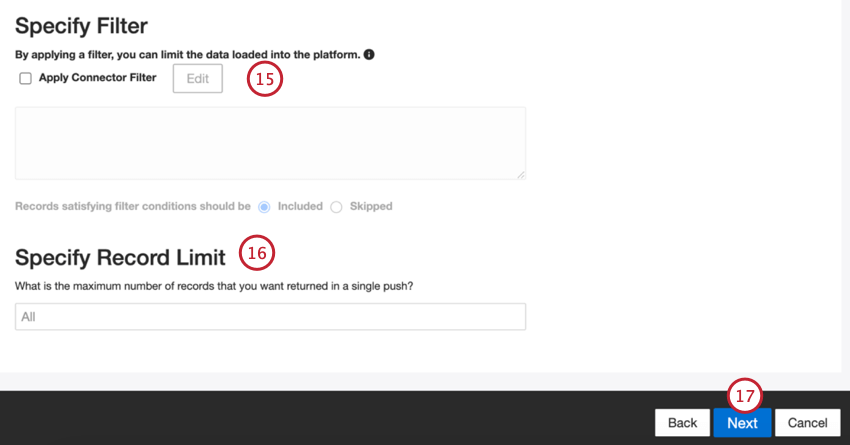
- Também é possível limitar o número de registros importados em um único trabalho inserindo um número na caixa Specify Record Limit (Especificar limite de registros ). Digite “All” se quiser importar todos os registros.
- Clique em Seguinte.
- Escolha quando você gostaria de ser notificado. Consulte Notificações de trabalho para obter mais informações.
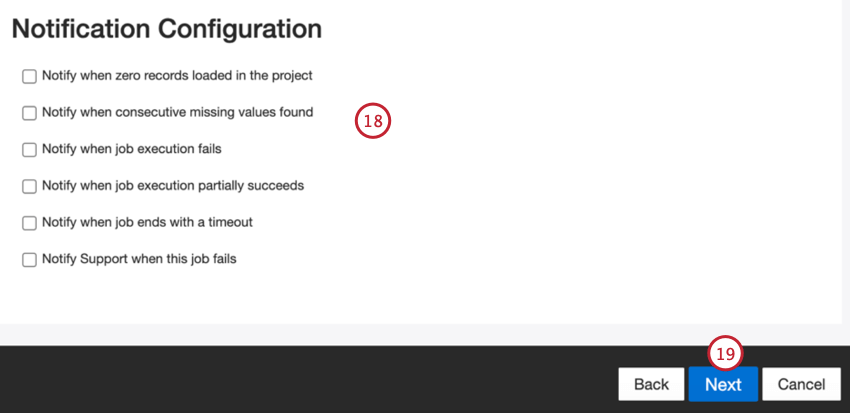
- Clique em Seguinte.
- Escolha como os documentos duplicar são tratados. Consulte Tratamento de Duplicar para obter mais informações.
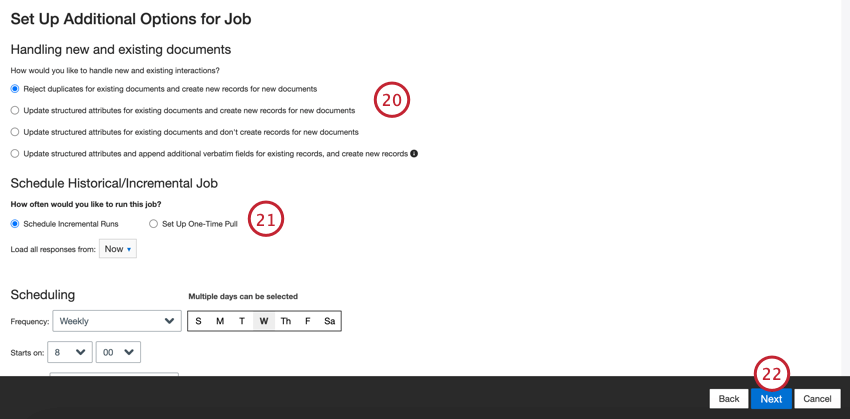
- Selecione Schedule Incremental Runs (Agendar execuções incrementais ) se quiser que o trabalho seja executado periodicamente em uma programação ou Set Up One-Time Pull (Configurar execução única ) se quiser que o trabalho seja executado apenas uma vez. Consulte Agendamento de trabalhos para obter mais informações.
- Clique em Seguinte.
- Revise sua configuração. Se você precisar alterar uma configuração específica, clique no botão Edit (Editar ) para ser levado a essa etapa na configuração do conector.
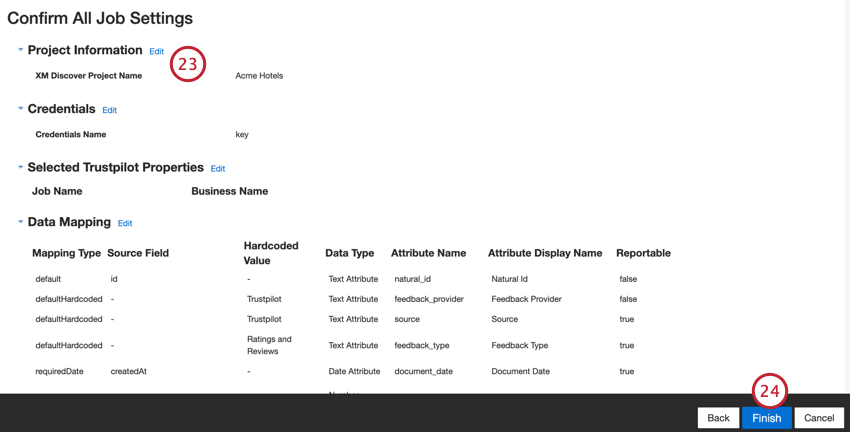
- Clique em Finish (Concluir ) para salvar o trabalho.
Mapeamento de dados padrão
Esta seção contém informações sobre os campos padrão dos trabalhos de entrada da Trustpilot.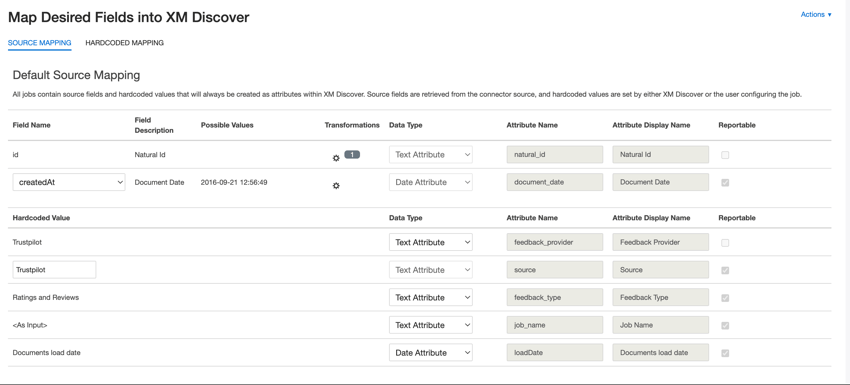
- natural_id: Um identificador exclusivo de um documento. É altamente recomendável ter um ID exclusivo para cada documento para processar as duplicatas corretamente. Para Natural ID, você pode selecionar qualquer campo de texto ou numérico de seus dados. Como alternativa, você pode gerar IDs automaticamente adicionando um campo personalizado. Para a ID natural, XM Discover usa IDs de origem prefixadas pelo nome do conector por meio de uma transformação personalizada: Natural ID = Connector-name; Source-ID.
- document_date: o campo de data primária associado a um documento. Essa data é usada nos relatórios, tendências e alertas XM Discover, entre outros. Você pode usar uma das seguintes opções:
- createdAt (padrão): A data em que a revisão foi publicada.
- updatedAt: A data em que a revisão foi atualizada.
- createdAt: A data em que a empresa respondeu a uma avaliação, se disponível.
- Se os dados de origem contiverem outros campos de data, você poderá selecioná-los para a data do documento.
- Você também pode definir uma data específica adicionando um campo personalizado.
- feedback_provider: Identifica os dados obtidos de um provedor específico. Para uploads da Trustpilot, o valor desse atributo é definido como “Trustpilot” e não pode ser alterado.
- source_value: Identifica os dados obtidos de uma fonte específica. Isso pode ser qualquer coisa que descreva a origem dos dados, como o nome de uma pesquisa ou de uma campanha de marketing móvel. Por padrão, o valor desse atributo é definido como “Trustpilot” Use transformações personalizadas para definir um valor personalizado, definir uma expressão ou mapeá-lo para outro campo.
- feedback_type: Identifica os dados com base em seu tipo. Isso é útil para a geração de relatórios quando o seu projeto contém diferentes tipos de dados (por exemplo, pesquisas e feedback de mídia social). Por padrão, o valor desse atributo é definido como “Rating and Reviews” e não pode ser alterado.
- job_name: Identifica os dados com base no nome do trabalho usado para carregá-los. Você pode modificar o valor desse atributo ao adicionar propriedades durante a configuração do trabalho.
- loadDate: indica quando um documento foi carregado no XM Discover. Esse campo é definido automaticamente e não pode ser alterado.
Carregamento de propriedades por meio de um arquivo
Esta seção aborda como fazer upload de propriedades por meio de um arquivo Excel em vez de inseri-las manualmente no XM Discover.
- Ao adicionar informações de propriedade, clique em Actions (Ações ) e depois em Upload URLs (Carregar URLs).
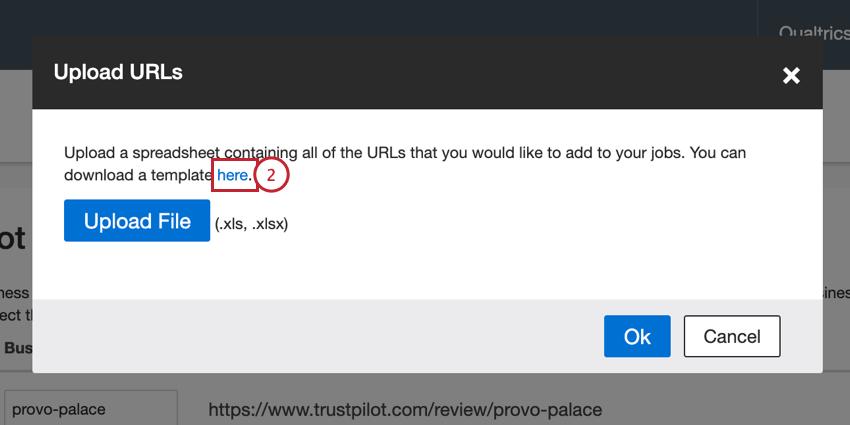
- Clique no hiperlink “aqui” para fazer download de um arquivo XLSX modelo. Abra esse arquivo no Excel ou em outro editor de planilhas no seu computador.
- Adicione as informações de sua propriedade nas duas primeiras colunas:
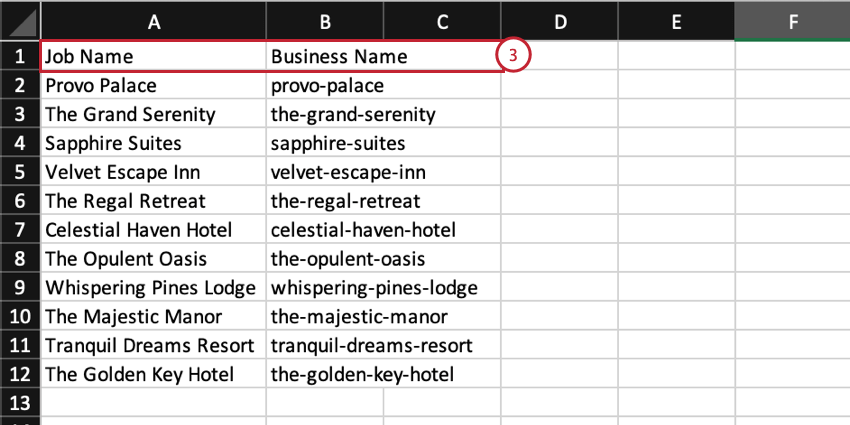
- Nome do trabalho: Um nome para a propriedade e para o trabalho de dados. Esse é o nome que aparecerá para a tarefa no XM Discover
- Nome da empresa: A parte final do URL da propriedade da Trustpilot.
- Salve seu arquivo como um arquivo XLS ou XLSX.
- No XM Discover, clique em Upload File (Carregar arquivo ) e escolha o arquivo salvo em seu computador.
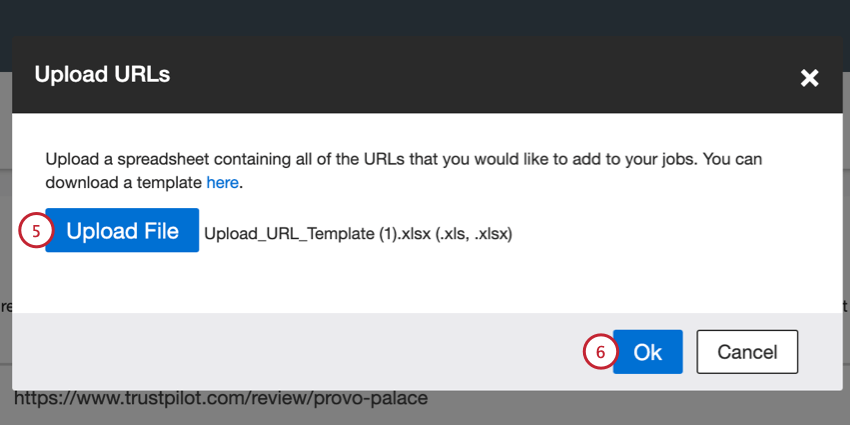
- Clique em Ok.
- Verifique novamente se há erros em suas propriedades. Você pode corrigir manualmente qualquer nome de trabalho e nome de empresa ou carregar um arquivo atualizado.
