Painel on-line
Sobre os painéis on-line
Um painel é um grupo de participantes que foram recrutados para fornecer feedback sobre um tópico de pesquisa. Você pode definir critérios de segmentação e lançar seu estudo de pesquisa para esse público. Por exemplo, digamos que você esteja lançando um produto projetado para donos de animais de estimação e gostaria de obter feedback sobre os primeiros conceitos. Você pode usar um painel para enviar sua pesquisa somente para donos de animais de estimação, o que lhe permite coletar rapidamente feedback preciso e relevante sem o incômodo de encontrar essas pessoas por conta própria.
Preparação de uma Pesquisa para painéis on-line
Siga as etapas abaixo para preparar seu pesquisa para distribuição por meio de um painel on-line:
- Certifique-se de que o pesquisa esteja 100% concluído em termos das perguntas que deseja fazer, da visual do pesquisa, etc.
- Não configure nenhum rastreador ou pergunta demográfica que planeja usar com cotas, pois eles são configurados automaticamente pelo painel on-line.
- Certifique-se de ter adicionado quaisquer perguntas de triagem personalizadas (por exemplo, perguntando se um cliente usou seu produto recentemente).
- Publicar sua pesquisa.
Configuração de um Painel on-line
Ao configurar um painel, você pode escolher em uma lista de modelos e, em seguida, personalizar o painel para o seu estudo. O processo de alto nível para lançar um painel inclui:
- Definição de seu destino
- Especificando as necessidades de seu estudo
- Confirmar a viabilidade e o custo do painel
- Iniciando o painel
- Vá para a seção painel on-line da guia Distribuições.
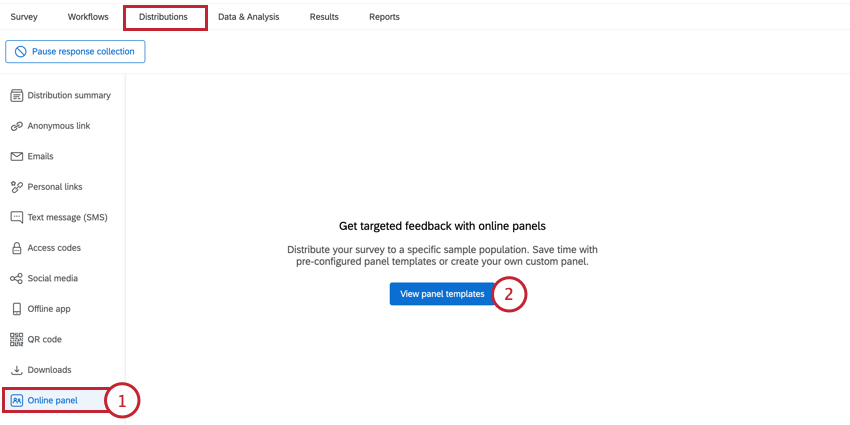
- Clique em Exibir modelos painel.
Qdica: se você já tiver criado um painel, esse botão indicará Criar novo painel.
- Selecione um dos modelos painel para usar como base para seu painel. Você pode ler mais informações sobre as pessoas incluídas no painel no lado direito da tela.
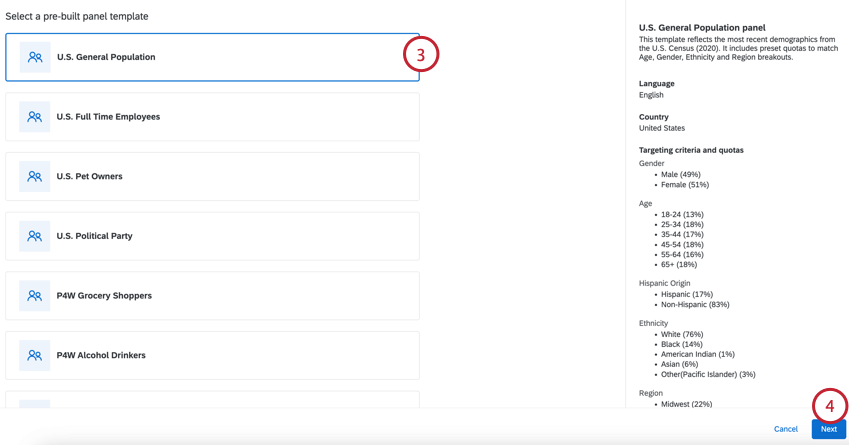 Qdica: você pode personalizar o modelo nas etapas a seguir. Essas personalizações incluem a edição e a remoção de cotas, a inclusão ou exclusão de valores de critérios de triagem ou a remoção completa de perguntas de triagem.
 - Clique em Seguinte.
Qdica: você pode clicar em Salvar e sair em qualquer etapa da configuração para salvar seu painel como um rascunho.
- Se desejar, na seção Required Criteria (Critérios obrigatórios ), escolha o país de origem dos respondentes e o idioma que deseja que eles falem.
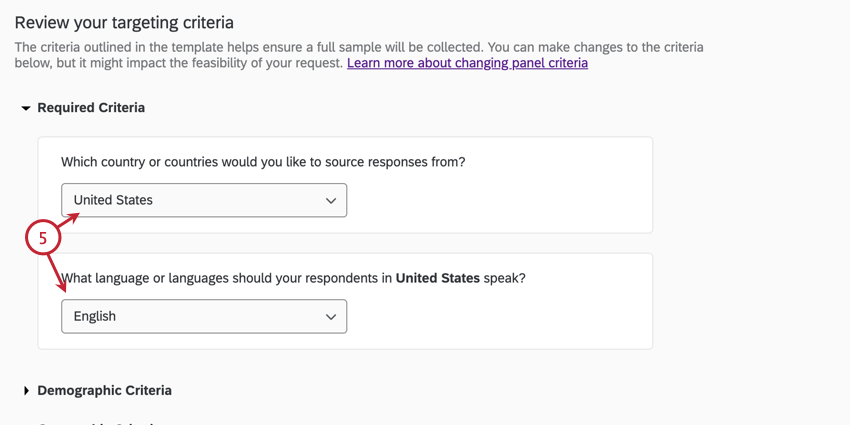 Atenção: As cotas e perguntas do modelo são baseadas no país e no idioma padrão. Se você modificar o país ou o idioma, faça os ajustes apropriados nos critérios cota e pergunta restantes para garantir que o painel seja válido e viável.
 - Nas seções de critérios a seguir (Demográfico, Comportamental ou Geográfico, dependendo do modelo), é possível personalizar as cotas específicas e as perguntas incluídas para o seu painel. Os valores das perguntas de triagem são armazenados no conjunto de dados do pesquisa como campos dados integrados.
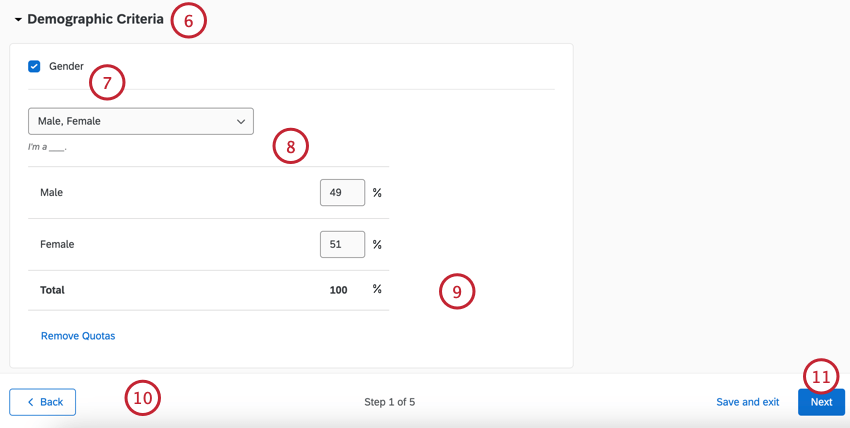 Atenção: Alterações nos dados demográficos de seu painel podem afetar o custo e a viabilidade painel mesmo. Consulte Custo e viabilidade Painel para obter mais informações.
 - Para remover uma pergunta dos critérios, desmarque a caixa de seleção avançar do nome do demográfico.
- Você pode selecionar quais valores de uma pergunta serão incluídos usando o menu suspenso (por exemplo, você pode excluir todos os homens, se desejar).
Qdica: O texto da pergunta que é mostrado aos questionados é exibido abaixo desse menu.
- Se desejar, você pode ajustar a composição percentual para cada grupo demográfico.
Qdica: Os entrevistados que são excluídos pelas perguntas do rastreador não são registrados e não contam como respostas auditáveis.
- Clique em Remove Quotas (Remover cotas ) se quiser fazer a pergunta aos participantes do painel, mas sem exigir o cumprimento de determinadas metas cota.
Qdica: se necessário, você pode clicar em Reset to default template values (Redefinir para valores de modelo padrão ) na parte inferior da página para anular todas as suas alterações.
- Clique em Seguinte.
- Por padrão, os detalhes do seu painel serão pré-preenchidos com base no modelo selecionado. Analise cuidadosamente os campos a seguir e faça as alterações necessárias para seu estudo específico:
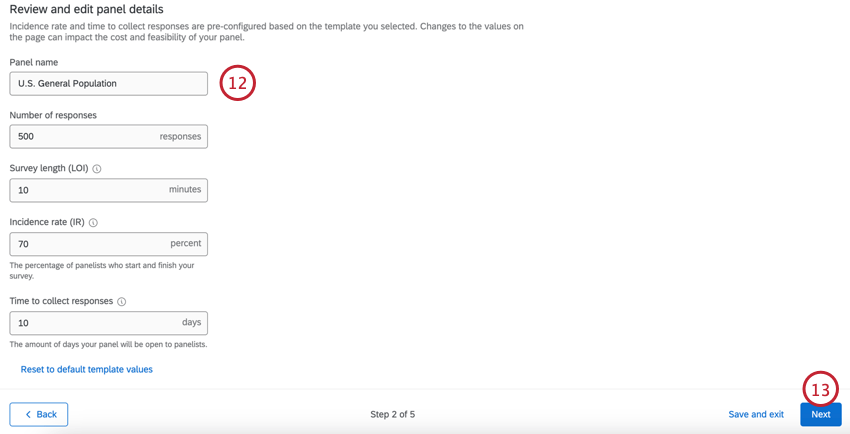
- Nome Painel: Dê um nome ao seu painel para que você possa identificá-lo mais tarde.
- Número de respostas: O número de respostas que você gostaria de coletar para a sua pesquisa. Você pode coletar de 50 a 10.000 respostas por painel.
Qdica: ao determinar esse número, você deve considerar as análises que deseja realizar nos dados coletados. Para um intervalo de confiança de 95% ±5, a orientação geral é de ~350 respostas por corte do conjunto de dados. Por exemplo, se você planeja analisar os dados de homens e mulheres separadamente, precisará de 700 respostas (350 por grupo). Consulte a Calculadora de tamanho de amostra para obter ajuda na determinação do tamanho da amostra.
- Duração Pesquisa (LOI): O tempo necessário para concluir sua pesquisa. Esse tempo deve ser de 1 a 60 minutos.
Qdica: ExpertReview pode informar a duração prevista do seu pesquisa.
- Taxa de incidência (IR): A destino de participantes do painel que concluem a pesquisa depois de iniciá-la. Consulte Cálculo da taxa de incidência para obter ajuda na determinação de sua taxa de incidência.
- Tempo para coletar respostas: O número de dias em que o painel estará aberto para respostas. Esse período deve ser de 1 a 20 dias.
Atenção: Alterar qualquer um desses campos, exceto o nome painel, pode afetar o custo e a viabilidade do seu painel. Consulte Custo e viabilidade Painel para obter mais informações.Qdica: se necessário, você pode clicar em Reset to default template values (Redefinir para valores de modelo padrão ) na parte inferior da página para anular todas as suas alterações.
- Clique em Seguinte.
- Analise a composição, o custo e a viabilidade de seu painel.
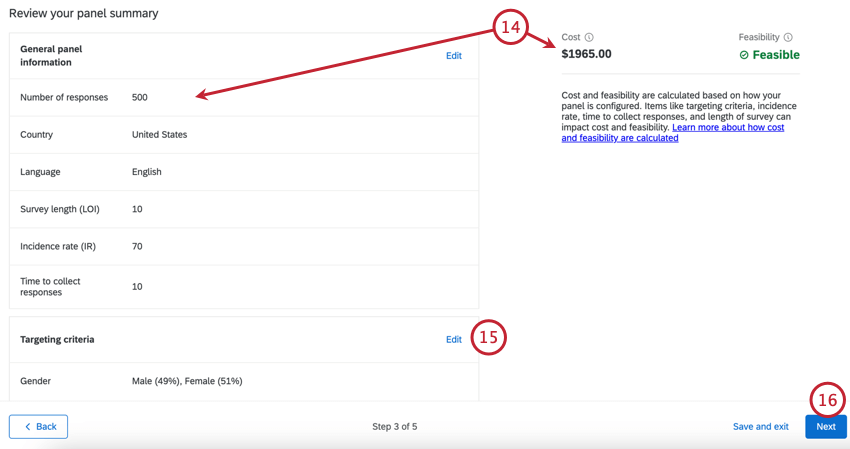 Qdica: Se o seu painel não for viável ou se o custo for muito alto para ser adquirido na plataforma, você pode entrar em contato com o representante do Qualtrics Research Services. Se você não tiver um representante de pesquisa ou não tiver certeza das informações contato dele, entre em contato com a equipe da sua Conta.
 - Se você precisar editar seu painel, clique em Edit (Editar ) para ser levado a essa etapa da configuração.
- Clique em Seguinte.
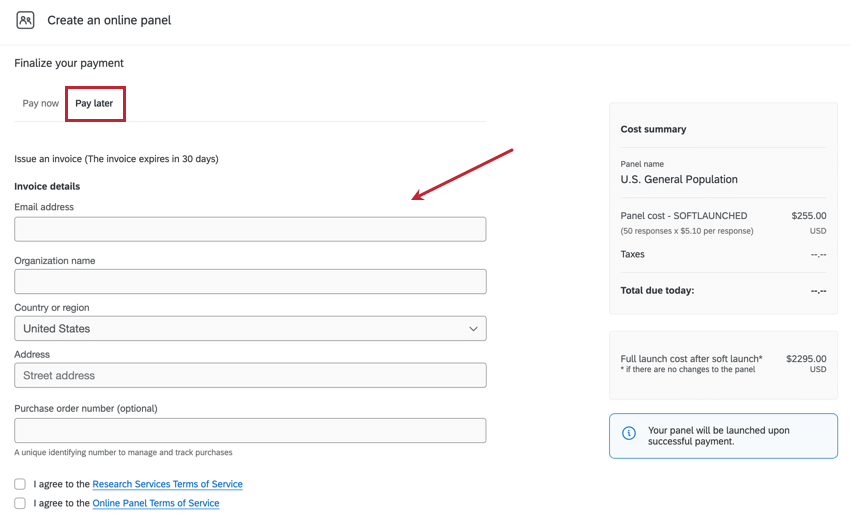
- Selecione quando você gostaria de pagar. Para obter mais informações, consulte Opções de pagamento.
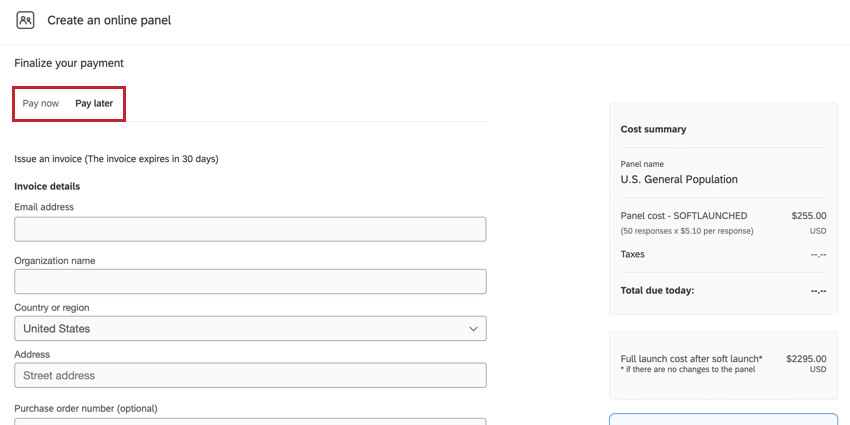
- Pague agora: Digite seus detalhes de pagamento (somente cartão de crédito).
- Pagar depois: Emitir uma fatura.
- Aceitar os Termos de Serviços.
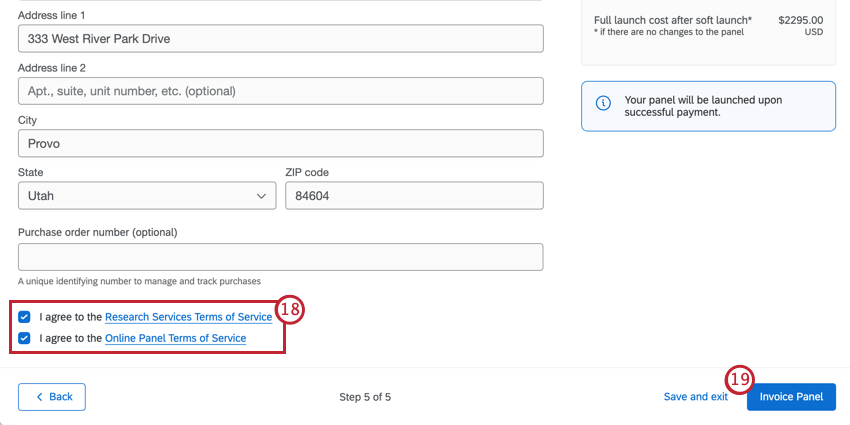
- Clique em Invoice Painel de faturas) ou Purchase Painel compras).
Opções de pagamento
Você pode optar por gerar uma fatura em vez de inserir os detalhes do pagamento ao pagar pelo seu painel on-line. Na guia Pay later (Pagar mais tarde ), insira as informações da empresa ou pessoa para a qual você gostaria de enviar a fatura. Depois de gerada, um PDF da fatura e um URL de pagamento privado serão enviados para o endereço de e-mail informado. O URL de pagamento pode ser compartilhado com outra parte.
Como os painéis mudam sua Pesquisa
Depois de adquirir um painel, seu pesquisa será atualizado automaticamente para garantir que os dados do painel sejam coletados corretamente. Essas alterações ocorrem no fluxo da pesquisa do seu projeto . 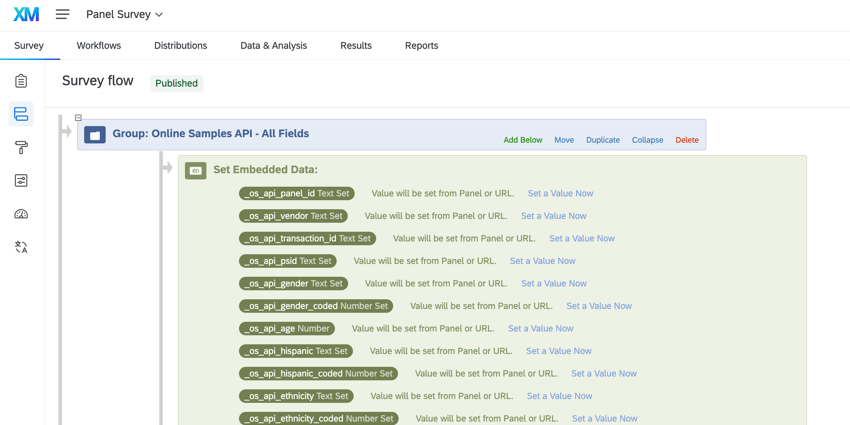
Depois de criar um painel, você notará as seguintes adições ao fluxo da pesquisa:
- Uma nova ramificação chamada ” API de amostras on-line – todos os campos” na parte superior do fluxo da pesquisa, que inclui os dados integrados painel usados para rastrear os dados do respondente do fornecedor painel.
- Uma nova ramificação de segurança na parte inferior do fluxo da pesquisa para garantir a segurança painel.
- Quando o painel for fechado, a ramificação de segurança será automaticamente excluída do fluxo da pesquisa. A ramificação “All Fields” permanecerá para que você possa usar os campos dados integrados em sua análise.
- Se você iniciar outro painel no mesmo pesquisa, todos os novos campos serão adicionados à ramificação”Todos os campos” existente. A ramificação de segurança também será adicionada novamente enquanto o novo painel estiver ativo.
Qdica: os campos existentes não são duplicados. Somente novos campos são adicionados.
Gerenciamento de painéis
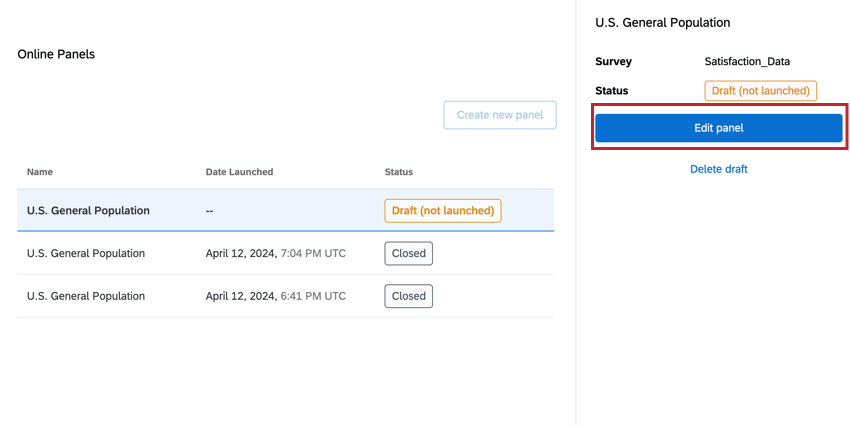
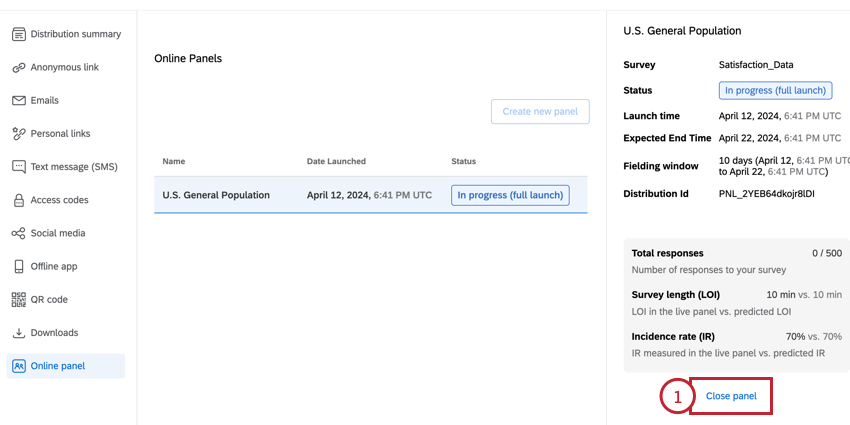
Depois que você solicitar o painel e seu pagamento for processado, seu painel será criado. Em seguida, você pode clicar no painel para ver mais informações sobre o status do painel, a hora prevista de término, o número de respostas coletadas e muito mais.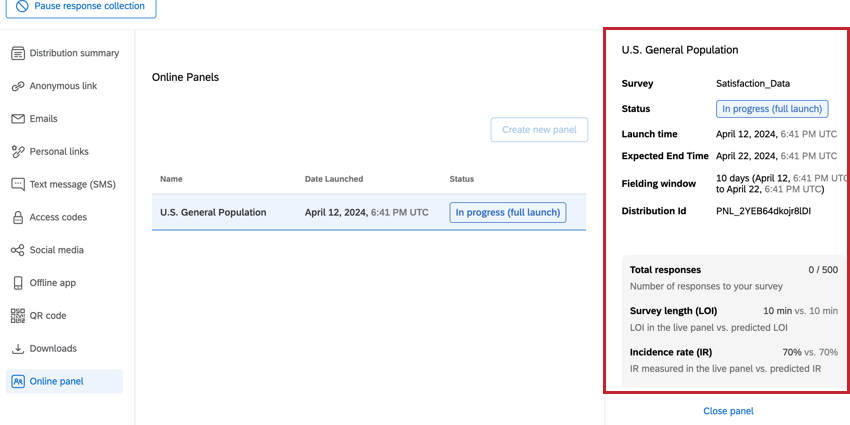
Após selecionar o painel, será aberta uma janela que exibirá as seguintes informações sobre o painel:
- Pesquisa: O nome da pesquisa que está sendo usada para esse painel.
- Status: O status do painel. Os status possíveis incluem:
- Rascunho (não lançado): O painel ainda não foi criado porque não está totalmente configurado.
- Em andamento (lançamento suave): O painel lançamento suave está aberto no momento e recebendo novas respostas.
- Em andamento (lançamento completo): O painel totalmente lançado está aberto e recebendo novas respostas.
- Lançamento suave concluído: O lançamento suave painel foi concluído e não está mais coletando respostas.
- Lançamento completo concluído: O lançamento completo painel foi concluído e não está mais coletando respostas.
- Pausado: O painel não está coletando respostas no momento, mas pode ser retomado.
Qdica: pausar um painel não estende a janela de campo. O painel deixará de coletar respostas 20 dias após o lançamento.
- Coleta encerrada: O painel não conseguiu coletar todas as respostas no prazo de 20 dias e interrompeu a coleta de respostas.
- Fechado: O painel está fechado e nenhuma nova respostas pode ser coletada por meio do painel.
- Aguardando pagamento: A fatura do painel foi enviada, mas ainda não foi paga. A data de vencimento e o link para a fatura são fornecidos abaixo do status.
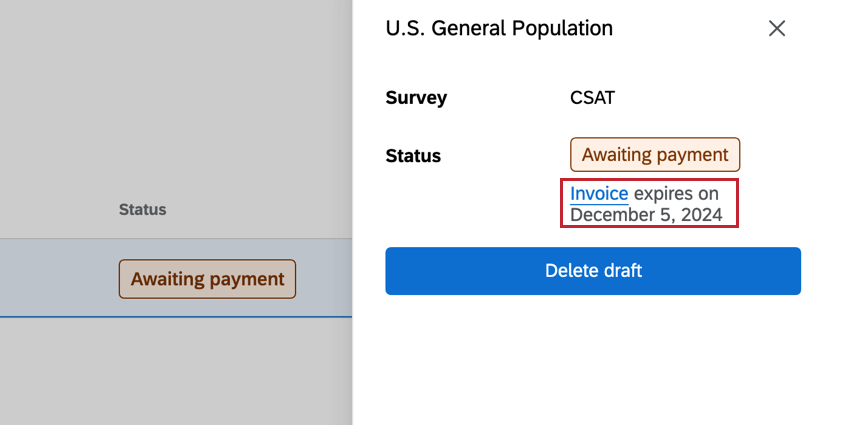
- O pagamento falhou: O link da fatura expirou ou o pagamento enviado pelo link da fatura falhou. Você pode clicar no link da fatura abaixo do status para reenviar o pagamento ou pode excluir o painel e começar novamente com uma nova fatura.
- Hora de início: A data e a hora em que o painel foi criado.
- Hora de término prevista: A data e a hora solicitadas para a conclusão do painel (ou seja, quando o número desejado de respostas for coletado).
Qdica: Embora o tempo de término esperado seja a destino, é possível que o painel não seja concluído dentro desse prazo. O painel permanecerá aberto por um período máximo de 20 dias para tentar coletar todas as respostas.
- Janela de campo: O número de dias entre o horário de lançamento e a data de término prevista.
- ID da Distribuição: O ID da distribuição. Esse valor também aparecerá em seu recibo de compra.
- Total de respostas: O número de respostas coletadas e a meta de número de respostas.
- Comprimento Pesquisa (LOI): O comprimento de pesquisa observado medido no painel ativo em comparação com o comprimento pesquisa previsto.
- Taxa de incidência (IR): A taxa de incidência observada medida no painel ativo em comparação com a taxa de incidência prevista.
Qdica: se a LOI e o IR observados tiverem um desempenho pior do que o previsto e a coleta painel parecer improvável de coletar todas as respostas, recomendamos fechar o painel e criar um novo com parâmetros atualizados para obter novos custos e viabilidade.
Lançamento completo de um Painel
Se você criou um painel lançamento suave e seu teste foi bem-sucedido, poderá fazer um lançamento completo do painel clicando no botão painel de lançamento completo na janela de informações painel.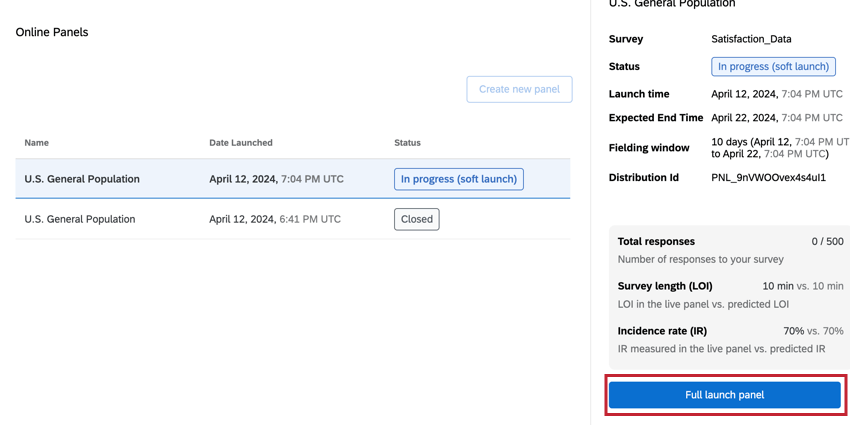
Em seguida, será solicitado que você confirme seus detalhes de pagamento e aceite os Termos de Serviços. Você também pode modificar o número de respostas solicitadas, se preferir.
Fechamento de um Painel
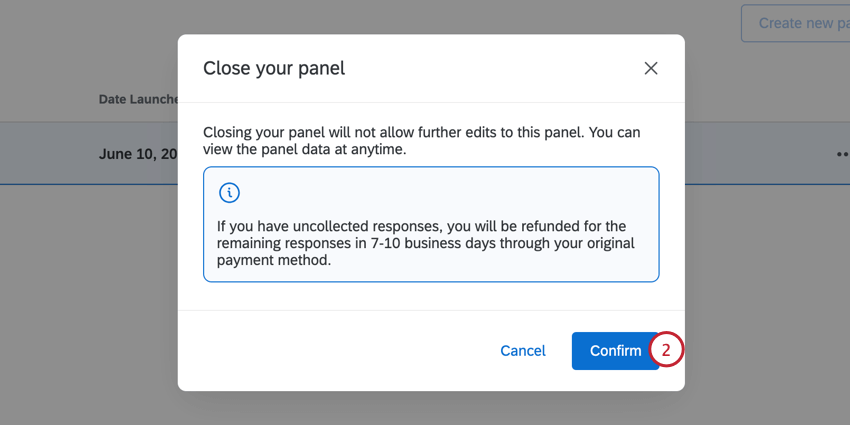
Você só pode ter um painel aberto e em execução por vez. Para criar um novo painel, você deve primeiro fechar o painel aberto:
Custo e viabilidade Painel
O custo e a viabilidadePainel são duas métricas importantes ao configurar seu painel. Esta seção aborda as duas métricas e como a personalização do seu painel pode afetar esses valores.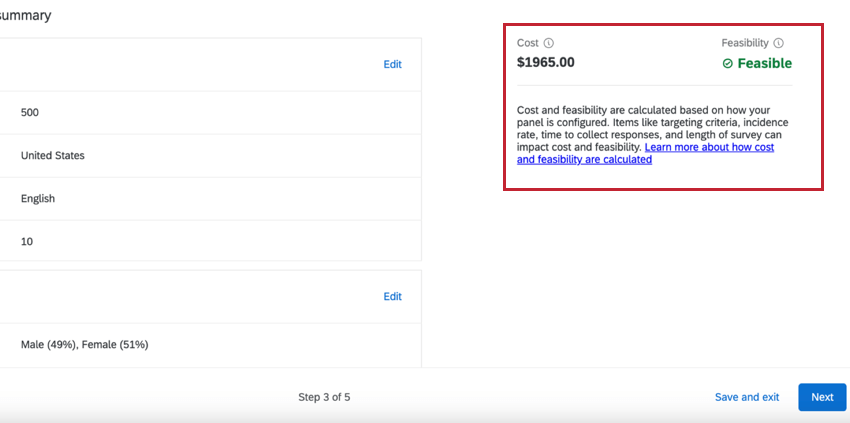
- Custo: O custo é calculado com base na duração da pesquisa, na taxa de incidência, no tempo para coletar respostas, no modelo selecionado e no número de respostas. A alteração desses valores alterará o preço painel.
- Viabilidade: A viabilidade mede a confiança de que seu painel coletará todas as respostas desejadas. Seu painel pode ser viável ou não viável, dependendo da configuração painel.
Qdica: você não poderá iniciar seu painel se ele for “Not Feasible”
Em geral, quanto mais complicado for o público painel seu painel, maior será o custo do painel e menor será a probabilidade de encontrar respondentes que atendam aos critérios do painel. Em geral, os itens a seguir aumentam o custo e reduzem a viabilidade:
- Quanto mais respostas forem adquiridas (por exemplo, 5.000 respostas é mais difícil do que 500)
- Quanto mais longa for a pesquisa (por exemplo, uma pesquisa 50 minutos é mais difícil do que uma pesquisa de 5 minutos)
- Quanto menor for a taxa de incidência (por exemplo, 20% de IR é mais difícil do que 80% de IR)
- Quanto mais curto for o tempo de coleta (por exemplo, 1 dia é mais difícil do que 10 dias)
- Quanto mais específico for o seu critério de segmentação (por exemplo, é mais difícil encontrar funcionários em tempo integral na agricultura do que cidadãos americanos em geral)
Cálculo da taxa de incidência
A taxa de incidência é a porcentagem de pessoas de uma destino que atendem a critérios de elegibilidade específicos para participar da sua pesquisa e que a concluem. Esta seção abordará como estimar uma taxa de incidência para o seu pesquisa e como a taxa de incidência do seu pesquisa é calculada quando você começa a coletar respostas.
Estimativa das taxas de incidência
A estimativa de uma taxa de incidência é importante porque afeta diretamente o custo e a viabilidade de seu painel. Siga as etapas abaixo para calcular sua taxa de incidência:
- Defina sua destino: Comece definindo claramente sua destino, incluindo a especificação de características demográficas relevantes, localização geográfica e quaisquer critérios comportamentais que seu público-alvo deva apresentar.
Exemplo: Digamos que queremos fazer pesquisa a população americana em geral que usa smartphones. Continuaremos usando essa população de exemplo para as etapas restantes.
- Especifique os critérios de elegibilidade para sua destino: Descreva os critérios exatos que os indivíduos devem atender para serem elegíveis para a pesquisa do estudo. Esses critérios devem se tornar a base da definição do seu painel e das perguntas de triagem pesquisa
Exemplo: Como estamos realizando uma pesquisa sobre o uso de smartphones, nossos critérios de elegibilidade incluem possuir um smartphone e estar dentro de uma faixa etária específica (18-35, 35-54 e 55+). Além disso, estamos interessados apenas em pesquisar pessoas que moram nos Estados Unidos.
- Colete dados relevantes sobre a prevalência do seu público: Utilize as fontes de dados existentes para entender o tamanho e as características da destino. Essas informações podem vir de fontes como estatísticas e censos governamentais, relatórios do setor ou bancos de dados internos.
Exemplo: Com base em pesquisas independentes, cerca de 85% dos americanos têm smartphones. Além disso, os dados do censo dos EUA mostram que cerca de 78% dos americanos têm mais de 18 anos de idade.
- Calcule a taxa de incidência estimada: Depois de ter dados sobre a porcentagem da população que se enquadra em sua destino, você pode multiplicar as porcentagens para encontrar a taxa de incidência da destino.
Exemplo: Se 85% dos americanos possuem smartphones e 78% dos americanos têm mais de 18 anos, então 66% dos americanos têm mais de 18 anos e possuem um smartphone.
- Use uma taxa de incidência estimada conservadora para a configuração painel seu painel: Os painéis on-line nem sempre são distribuídos da mesma forma que uma população geral e podem ter uma representação tendenciosa em algumas áreas. Por exemplo, os painéis on-line tendem a ter maior representação de mulheres de 35 a 54 anos e menor representação de dados demográficos mais difíceis de alcançar, como homens hispânicos de 18 a 24 anos. Considera-se uma prática recomendada ser conservador na estimativa de incidência no início do estudo para garantir que o preço e a viabilidade sejam precisos para o seu projeto.
Exemplo: Como nossa taxa de incidência estimada é de 66%, usamos 60% como nossa destino de taxa de incidência.
Além disso, os seguintes aspectos de elaboração pesquisa podem afetar a taxa de incidência do seu pesquisa:
- Duração da Pesquisa: Quanto mais longa for a pesquisa, maior será a probabilidade de um respondente desistir, o que diminui a taxa de incidência da pesquisa.
Atenção: Uma verificação de atenção é uma pergunta criada para garantir que o respondente pesquisa esteja prestando atenção. Muitas verificações de atenção ou verificações de atenção muito rigorosas podem reduzir o número de pessoas que se qualificam para a sua pesquisa. - Cotas complexas: Quando você tem muitas cotas, algumas combinações podem ser preenchidas mais rapidamente do que outras. Como resultado, os participantes elegíveis podem não se qualificar porque essas cotas já foram preenchidas.
Taxas de incidência observadas
À medida que os participantes do painel responderem ao seu pesquisa, a taxa de incidência do pesquisa será calculada para fornecer uma visão geral de como os entrevistados estão progredindo no pesquisa.
A taxa de incidência é calculada usando a seguinte fórmula
: Taxa de incidência = (Número de Respostas completas Pesquisa ) / (Número de cliques válidos)
Na fórmula acima, as variáveis são definidas como:
- Número de Respostas completas Pesquisa: O número de respostas qualificadas que concluíram a pesquisa completa e foram validadas por medidas de qualidade.
- Número de cliques válidos: O número total de vezes que o pesquisa foi clicado, que é calculado pela soma dos seguintes valores:
- Respostas completas: o número de respostas qualificadas que concluíram a pesquisa completa e foram validadas por medidas de qualidade.
- Respostas acima da cota: O número de respostas que foram removidas da pesquisa porque preenchiam uma cota que já estava cheia.
- Respostasexcluídas : O número de respostas que foram removidas da pesquisa por não atenderem aos critérios de triagem.
- Respostasdescartadas : O número de respostas que foram encerradas devido a 24 horas de inatividade. Um respondente abandonado pode ser o resultado de erros de programação de pesquisa, problemas de redirecionamento ou um respondente que perdeu o interesse em um pesquisa e não o concluiu.
Criação de perguntas de triagem personalizadas
Se quiser adicionar um screener que não esteja incluído nas opções de segmentação atuais, é possível configurá-lo manualmente no seu projeto pesquisa. Siga as etapas abaixo antes de publicar seu pesquisa e configurar o painel on-line. Lembre-se de que mais perguntas de triagem podem fazer com que sua taxa de incidência seja menor (já que há mais chances de os entrevistados serem desqualificados).
- Em geral, as perguntas de triagem devem ser colocadas no início da pesquisa. Recomendamos colocar as perguntas de triagem em seu próprio bloco no início do pesquisa.
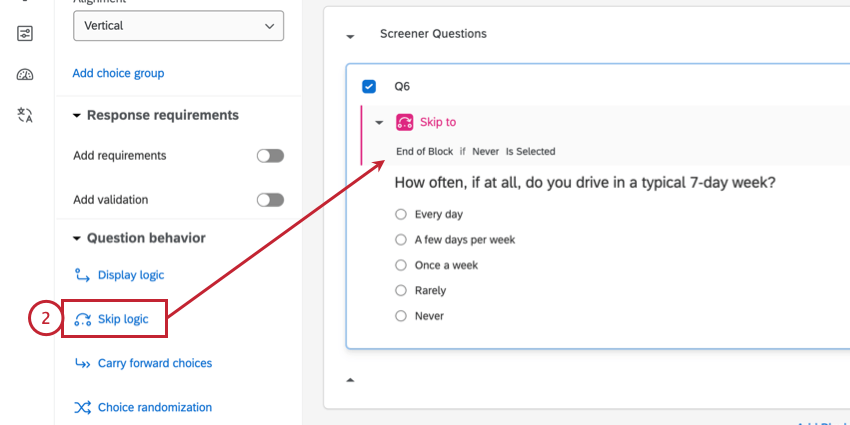
- Para as respostas de triagem, adicione lógica de salto para enviar o respondente para o Fim do Bloco se essa resposta for selecionada.
- Vá para o Fluxo da pesquisa.
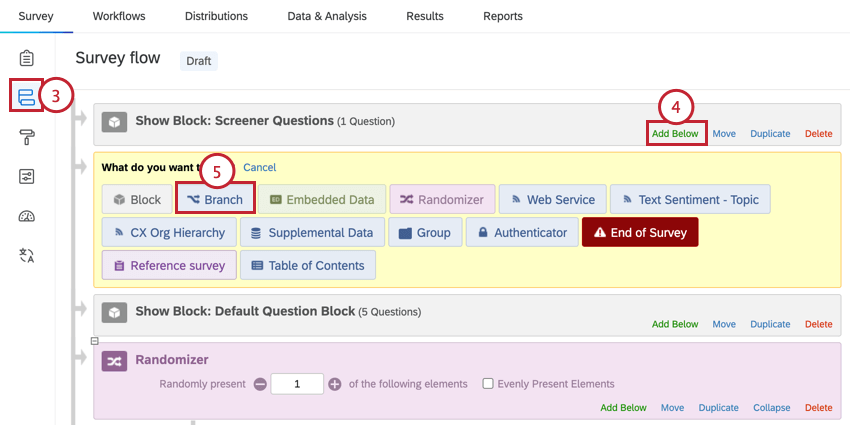
- Em seu bloco de perguntas de triagem, clique em Add Below (Adicionar abaixo).
- Selecione Ramificação.
- Para a lógica de ramificação, crie a mesma lógica que você criou para a lógica de salto perguntas na etapa 2.
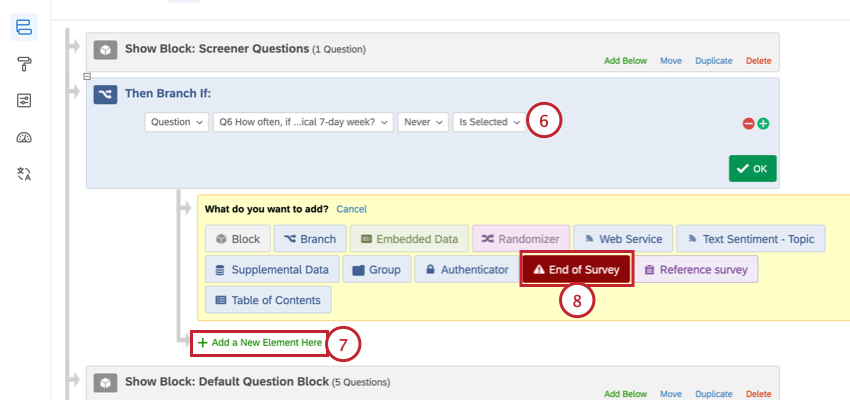
- Clique em Add a New Element Here (Adicionar um novo elemento aqui ) abaixo da ramificação.
- Selecione Fim da Pesquisa.
- Clique em Personalizar no fim da pesquisa elemento da pesquisa.
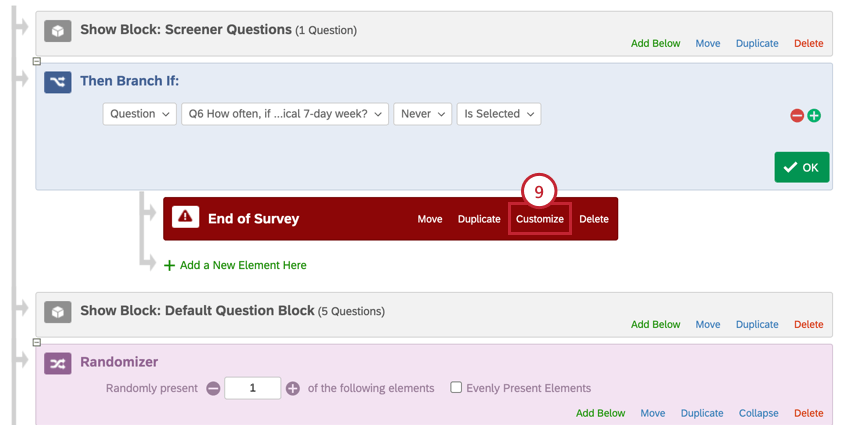
- Selecione Override Pesquisa Options (Substituir opções de pesquisa).
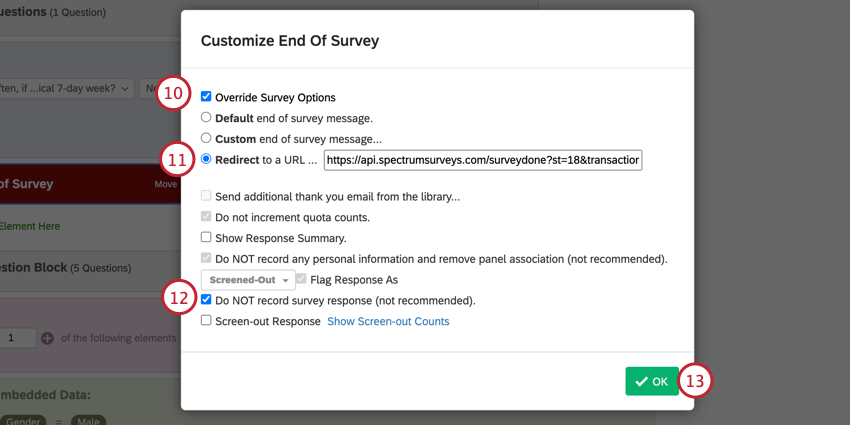
- Ative a opção Redirecionar para um URL e digite o seguinte URL:
https:api transaction_id=${e://Field/transaction_id} - Selecione NÃO registrar a resposta pesquisa.
- Clique em OK.
- Clique em Aplicar ) para salvar suas alterações.
Exibição de dados Painel
Você pode visualizar suas respostas navegando até a página Dados e amp; Análise do seu pesquisa. Respostas às perguntas de triagem são adicionadas às respostas pesquisa como dados integrados. Os nomes dos campos dados integrados usam o esquema de nomenclatura: “_os_api_variable”
Há alguns campos dados integrados adicionais incorporados para cada pesquisa que usa painéis on-line:
- _os_api_panel_id: A ID da distribuição. Isso corresponderá à sua ID distribuição para o projeto painel.
- _os_api_vendor: Fornecedor painel terceiros usado para obter os respondentes painel.
- gc: Significa “bom completo” Um valor de “1” significa que o respondente concluiu totalmente a pesquisa e será pago pelo seu tempo.
- psid: Um valor exclusivo que o fornecedor painel atribui ao participante da pesquisa para identificá-lo anonimamente.
- transaction_id: Um valor exclusivo que o fornecedor painel atribui para associar a sessão de pesquisa ao participante da pesquisa.
- pureSpectrumRedirectUrl: Os participantes da pesquisa são redirecionados de volta ao portal do fornecedor do painel após a conclusão da pesquisa.
- pureSpectrumSignatureValue: Uma medida de segurança para evitar fraudes.
Campos adicionais estão disponíveis dependendo dos critérios demográficos usados em seu painel:
- _os_api_gender_coded: O gênero do respondente. Os valores possíveis incluem:
- 111 = Masculino
- 112 = Feminino
- 113 = Prefere não dizer
- _os_api_hispanic_coded: Indica se o respondente é hispânico. Os valores possíveis incluem:
- 111 = Sim
- 112 = Não
- _os_api_ethnicity_coded: A etnia do respondente. Os valores possíveis incluem:
- 111 = Branco
- 112 = Negro ou afro-americano
- 113 = asiático
- 114 = nativo do Havaí ou de outras ilhas do Pacífico
- 115 = Índio americano ou nativo do Alasca
- 116 = Outros
- _os_api_region_coded: A região do respondente nos Estados Unidos. Os valores possíveis incluem:
- 1 = Nordeste
- 2 = Centro-Oeste
- 3 = Sul
- 4 = Oeste
