-

Qualtrics Platform -

Customer Journey Optimizer -

XM Discover -

Qualtrics Social Connect
Editing Contacts in a Mailing List (XM Directory)
About Editing XM Directory Contacts in a Mailing List
Once your contacts have been added to a mailing list, you can edit the contact’s information, remove them from the list, opt them in and out of lists, and much more.
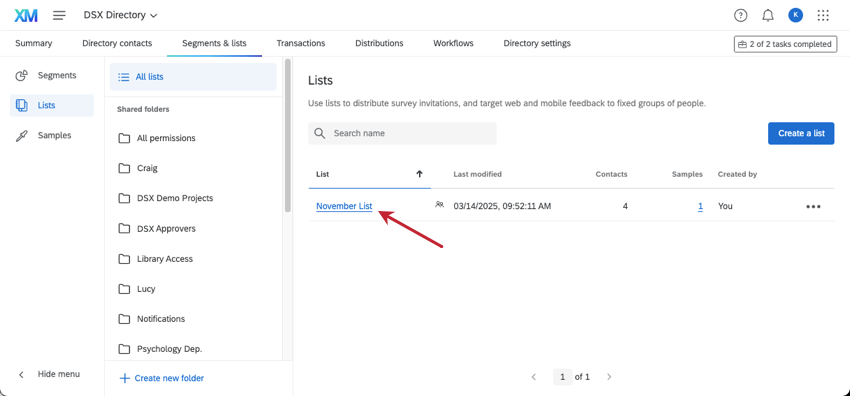
This page covers the information you can see and can edit for a contact when you go to Segments & lists, open a specific list, and then select a contact (or multiple contacts).
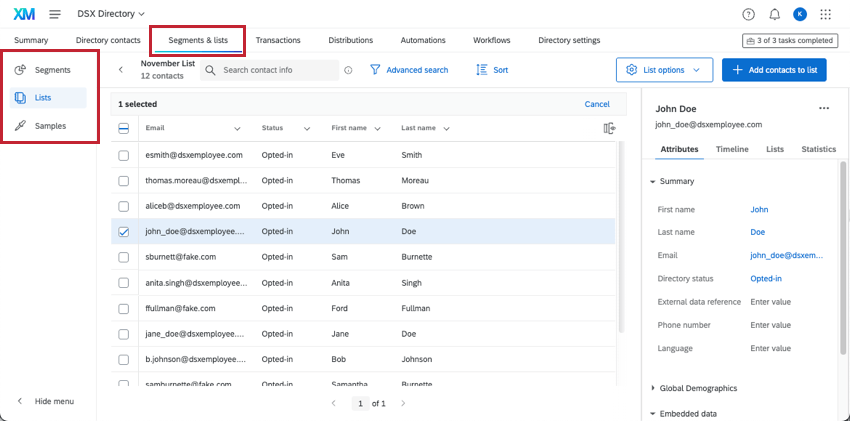
Contact Information Menu
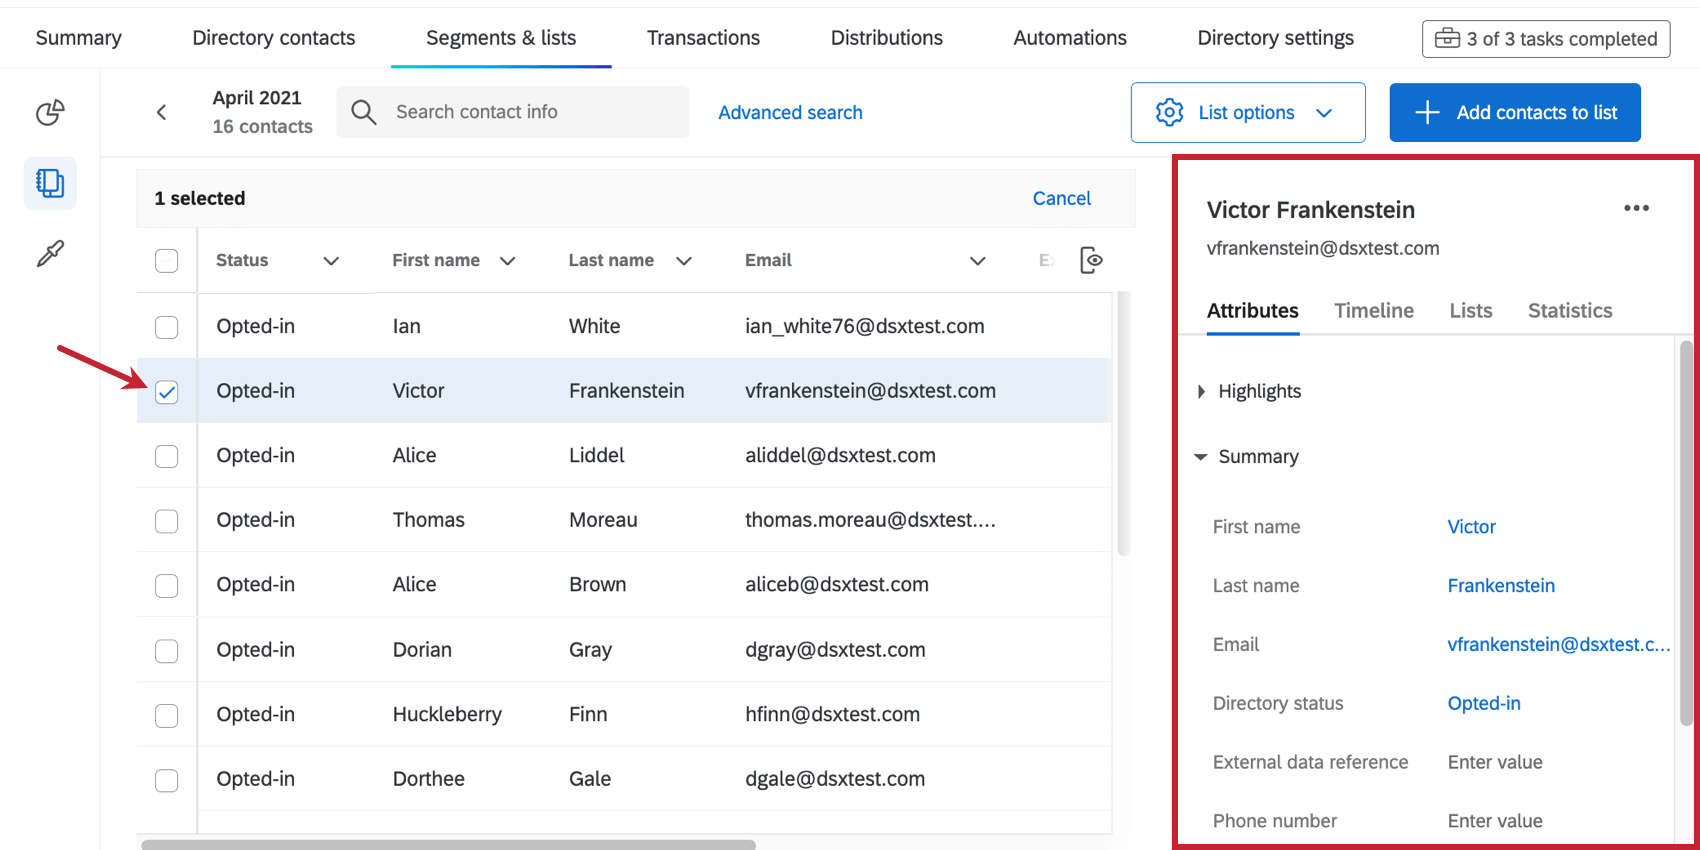
When you select a contact, a menu opens to the right containing information about them.
Much of the information shown in this menu is directory-wide. If you make edits to this information, it’ll be reflected not just in the mailing list, but anywhere else this contact exists in the directory, such as other lists, samples, and segments.
Attributes
The Attributes section contains information about contacts, such as their name and email, phone number, and other assorted embedded data. Attributes can be a mix of reserved contact fields, certified demographics, and custom embedded data fields.
Any private data for your contact will also be displayed here. Private data is only visible to users with access to the list the private data belongs to.
Edits to attributes are reflected anywhere the contact exists in the directory. Because of this, the steps to edit these attributes is the same whether you’ve selected the contact in the directory, a mailing list, a sample, or a segment. See Editing Contacts’ Attributes.
Timeline
The timeline you see for a contact in a mailing list works exactly as it does in the Directory Contacts tab. The timeline reflects every time the contact has been interacted with in the context of this directory, not just this list.
See Understanding the Touchpoint Timeline.
Lists
You’ll still see all of the lists, samples, and segments a contact belongs to in the Lists section. You can also manage list removal and opt-outs from here. However, if you don’t have directory administrative access, you’ll only be able to remove contacts from lists you have access to, either because you created the list, or it was shared with you.
See Viewing a Contact’s List, Segment, and Sample Membership.
Statistics
Adding Contacts to a Mailing List
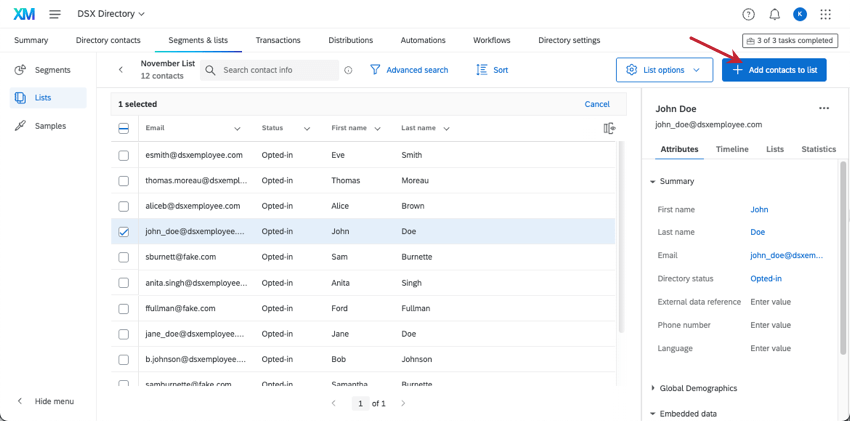
You can include contacts you want to add when you initially create a mailing list. However, once your list is created, you can also add more contacts by opening the list and clicking Add contacts to list.
You can add contacts to a lists by uploading a file or by manually adding contacts. See the linked pages for details.
You can also use the upload option to update existing contacts in a list. See Importing Updates to Contacts below.
Adding an Existing Contact to Another List
If you want to add contacts to a different mailing list, you don’t have to leave the page you’re on and go to that list. You can follow the steps below instead.
- Select the contact(s) you wish to add.
- Click the 3 dots.
- Select Add to List for one contact. (Or Add to another list for multiple contacts.)
- Select the list you wish to add them to.
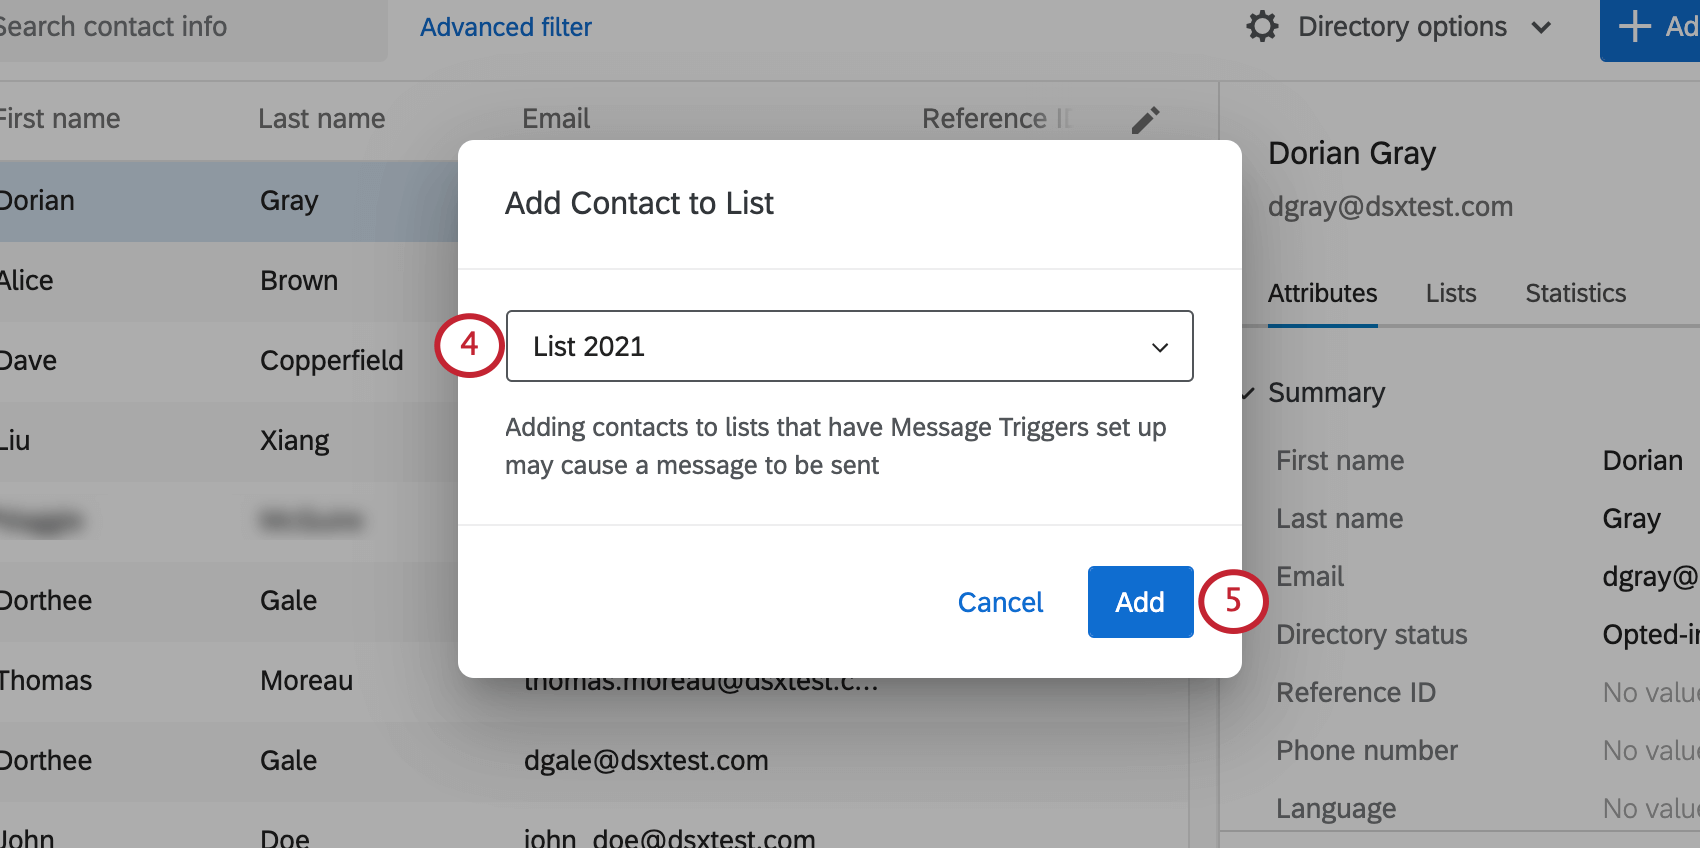
- Click Add.
Removing Contacts from a Mailing List
If you’re using the 3 dot menu, there are a few ways to remove contacts from lists. You can even remove contacts from other lists in the directory. Below, we outline each of the options available.
Removing Multiple Contacts from the Current Mailing List
- Select the contacts you want to remove from the list.
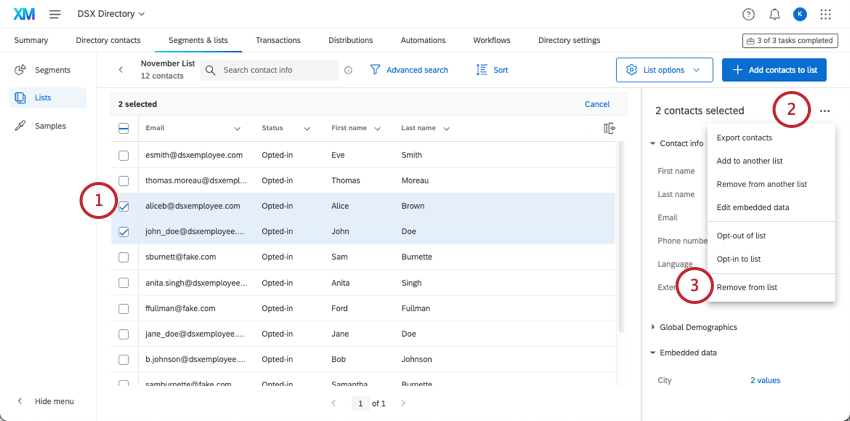
- Select the 3 dots.
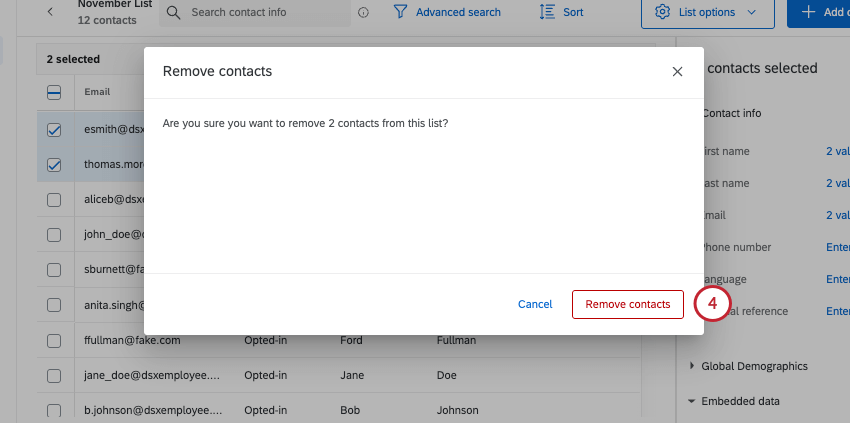
- Select Remove from list.
- To confirm, click Remove contacts.
Removing One Contact from Mailing Lists
Use these steps to remove just one contact from your list, or from any list in the directory.
- Select one contact.
- Click the 3 dots.
- Select Remove from list.
- Select the contact list (or lists) you wish to remove them from.
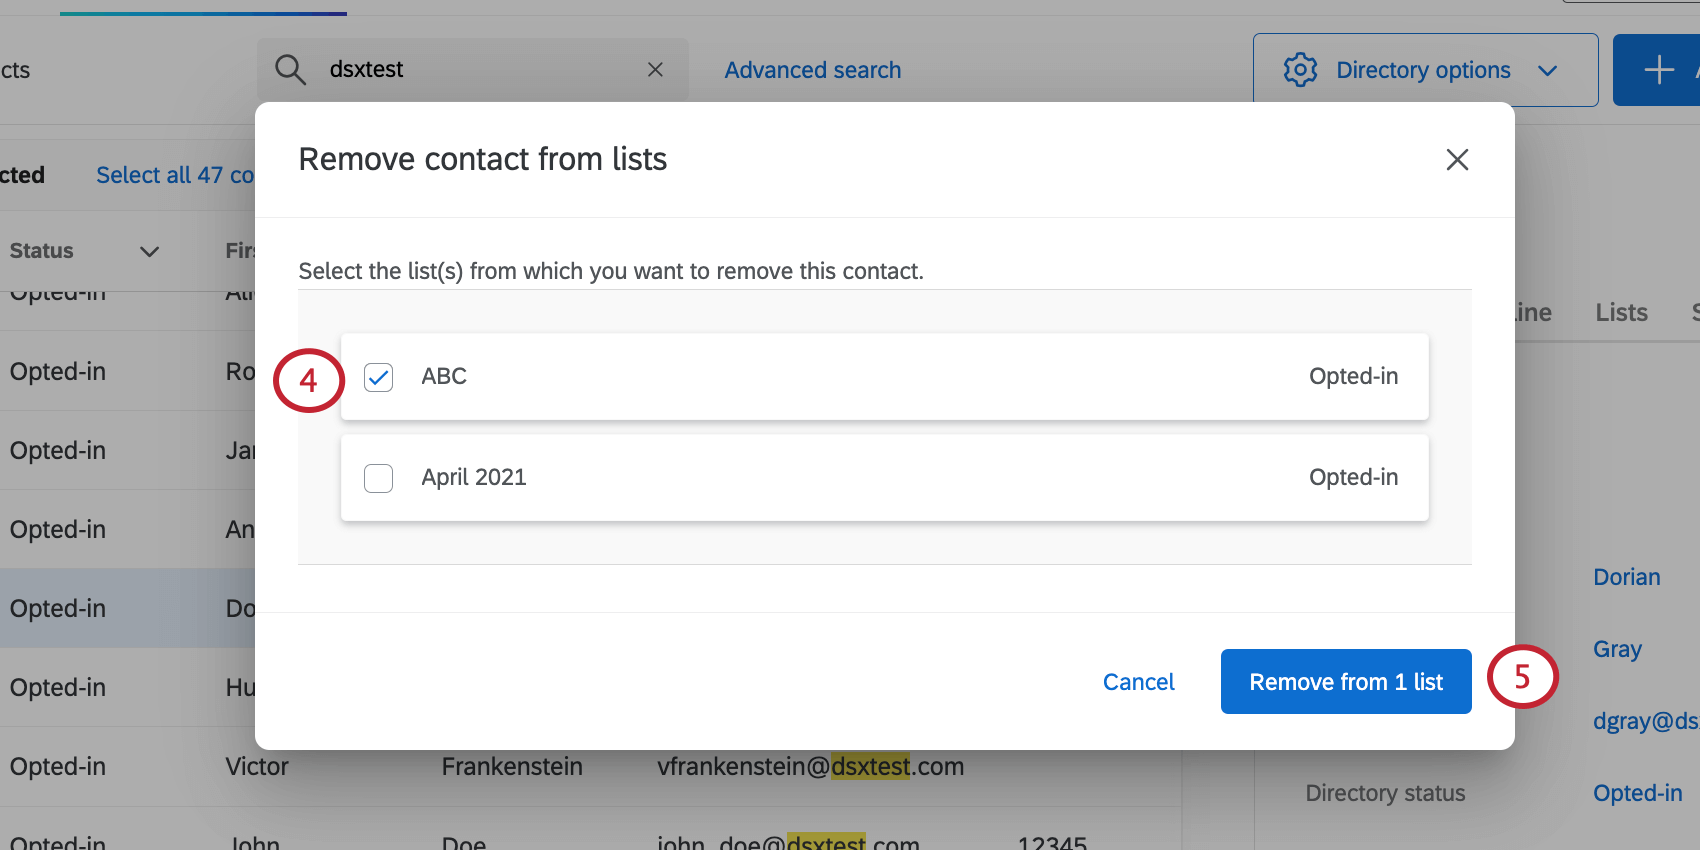
- Click Remove from X list(s).
Removing Multiple Contacts from Another Mailing List
If you want to remove a group of contacts from another list, you don’t necessarily have to leave the page you’re on. Follow the steps below to remove selected contacts from a different list in the directory. This function can be helpful if you’re reorganizing your lists.
- Select the contacts you want to remove from a list.

- Select the 3 dots.
- Select Remove from another list.
- Select the contact list you wish to remove them from.
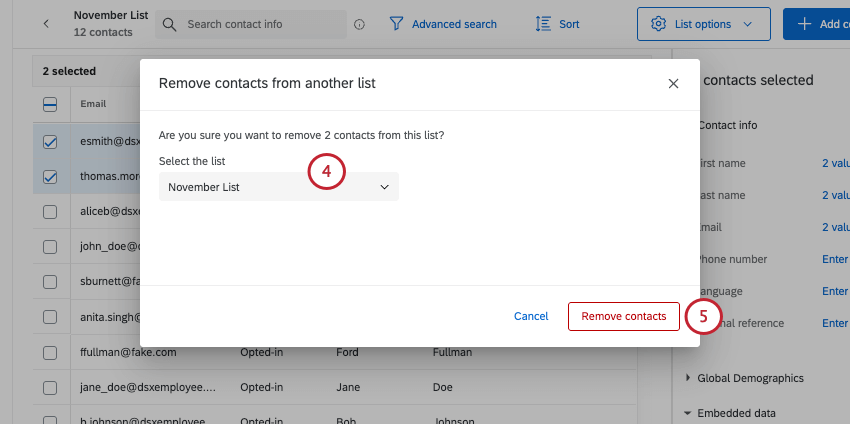
Qtip: You will see every list you have access to in the directory, regardless of whether the selected contacts actually belong to these lists. - Click Remove contacts.
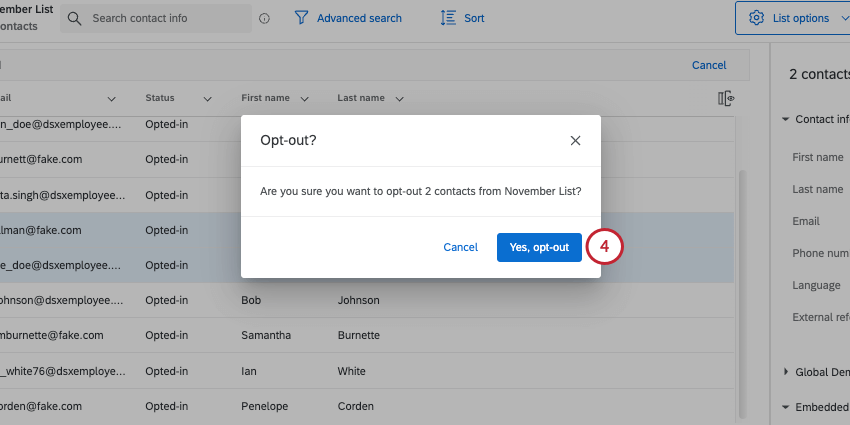
Opting Contacts Out of the Mailing List
- Select the contacts you want to remove from the list.
- Select the 3 dots.
- Select Opt-out of list.
- To confirm, select Yes, opt-out.
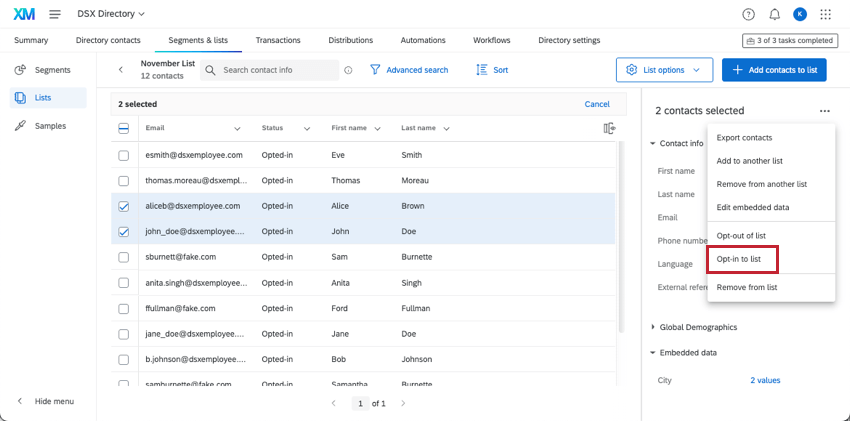
Qtip: Select contacts and choose Opt-in to list to opt all of your selected contacts back into the list.
Exporting Selected Contacts
You can export the contacts you’ve selected in a CSV or TSV file, and specify which embedded data you’d like to include.
- Open your mailing list.
- Select contacts.
 Qtip: Try a search or a filter to narrow down the contacts you see.
 - Click the 3 dots on the right.
- Select Export contacts.
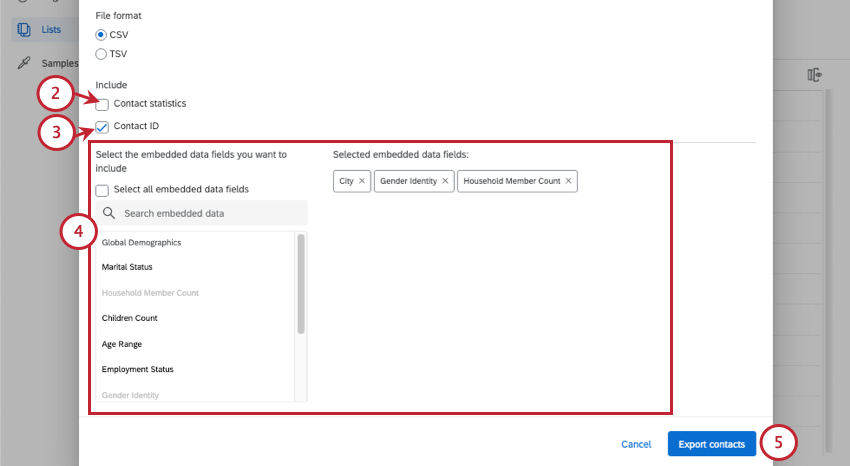
- Select a File format. You can select either CSV or TSV.
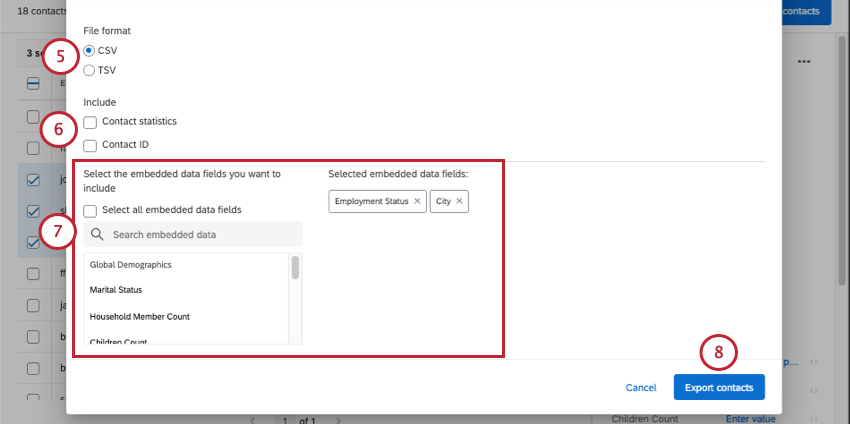
- Select from the following information to include in your export:
- Contact statistics: This includes the invite count, email count, average response time, response rate, last invite date, last response date, and response count. Response count includes incomplete but closed responses. Average response time is in milliseconds.
- Contact ID: Each XM Directory contact has a randomly generated, unique ID. This ID cannot be changed and is used as a unique identifier in API calls.
- Search and select the embedded data you’d like to include with each contact. Selected embedded data appears to the right.
Qtip: Click Select all embedded data fields to include all embedded data in the directory. Keep in mind that depending on how many fields are in your directory, this can drastically increase the file’s size. See our guide on cleaning directory embedded data.
- Click Export contacts.
Directory Actions
When you select a contact or multiple contacts in a list, you can click the 3 dots to see an actions menu. There are a few actions in this menu that are directory-wide instead of just affecting the list you’re in. For example, from this menu you can edit information for a contact as it appears throughout the directory, opt the contact into and out of lists across the directory, opt them out of the directory altogether, or delete the contact altogether.
The directory actions available tend to be similar regardless of whether you selected the contact in the directory, a mailing list, a sample, or a segment.
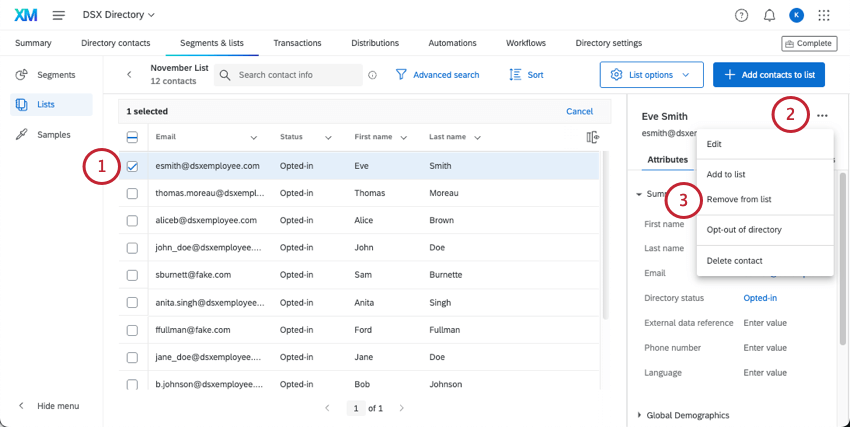
Editing One Contact
First, select just 1 contact.

By clicking the 3 dots on the contact, you’ll see the following options:
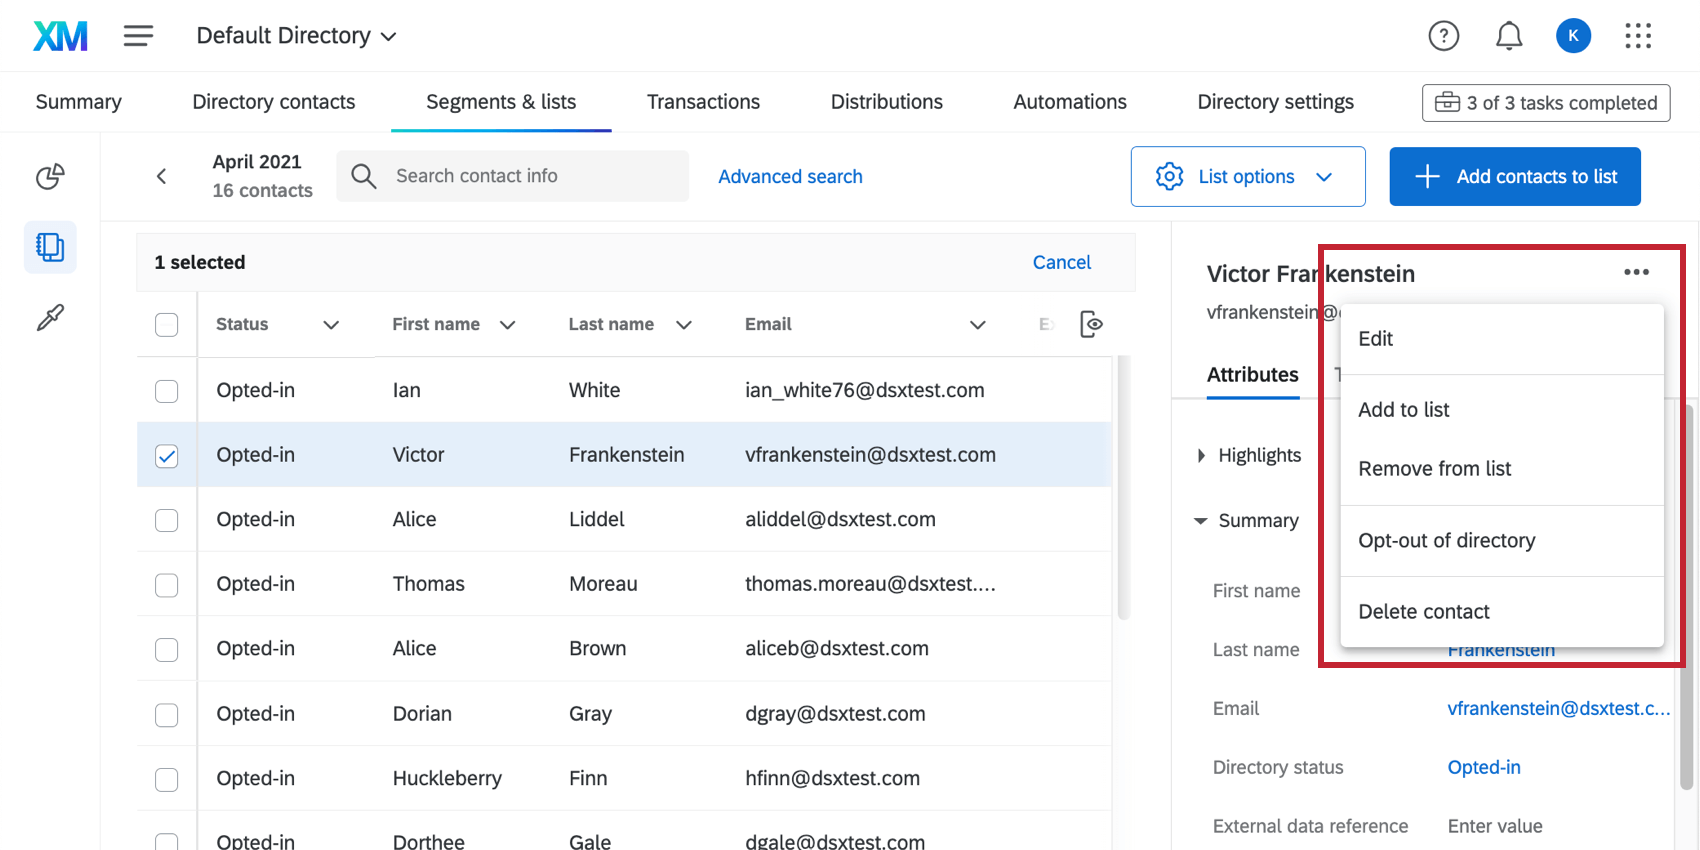
- Edit: Edit the contact details, such as name, email address, and embedded data. These edits affect the contact as they appear across the directory.
- Add to list: Allows you to add the selected contacts to another list.
Qtip: Looking to combine the contents of two lists into one? This is the best method for merging mailing lists.
- Remove from List: Remove selected contact from any mailing lists they belong to. This option doesn’t remove the contact from the directory.
- Opt-out of directory: Opt the contact out of the entire directory.
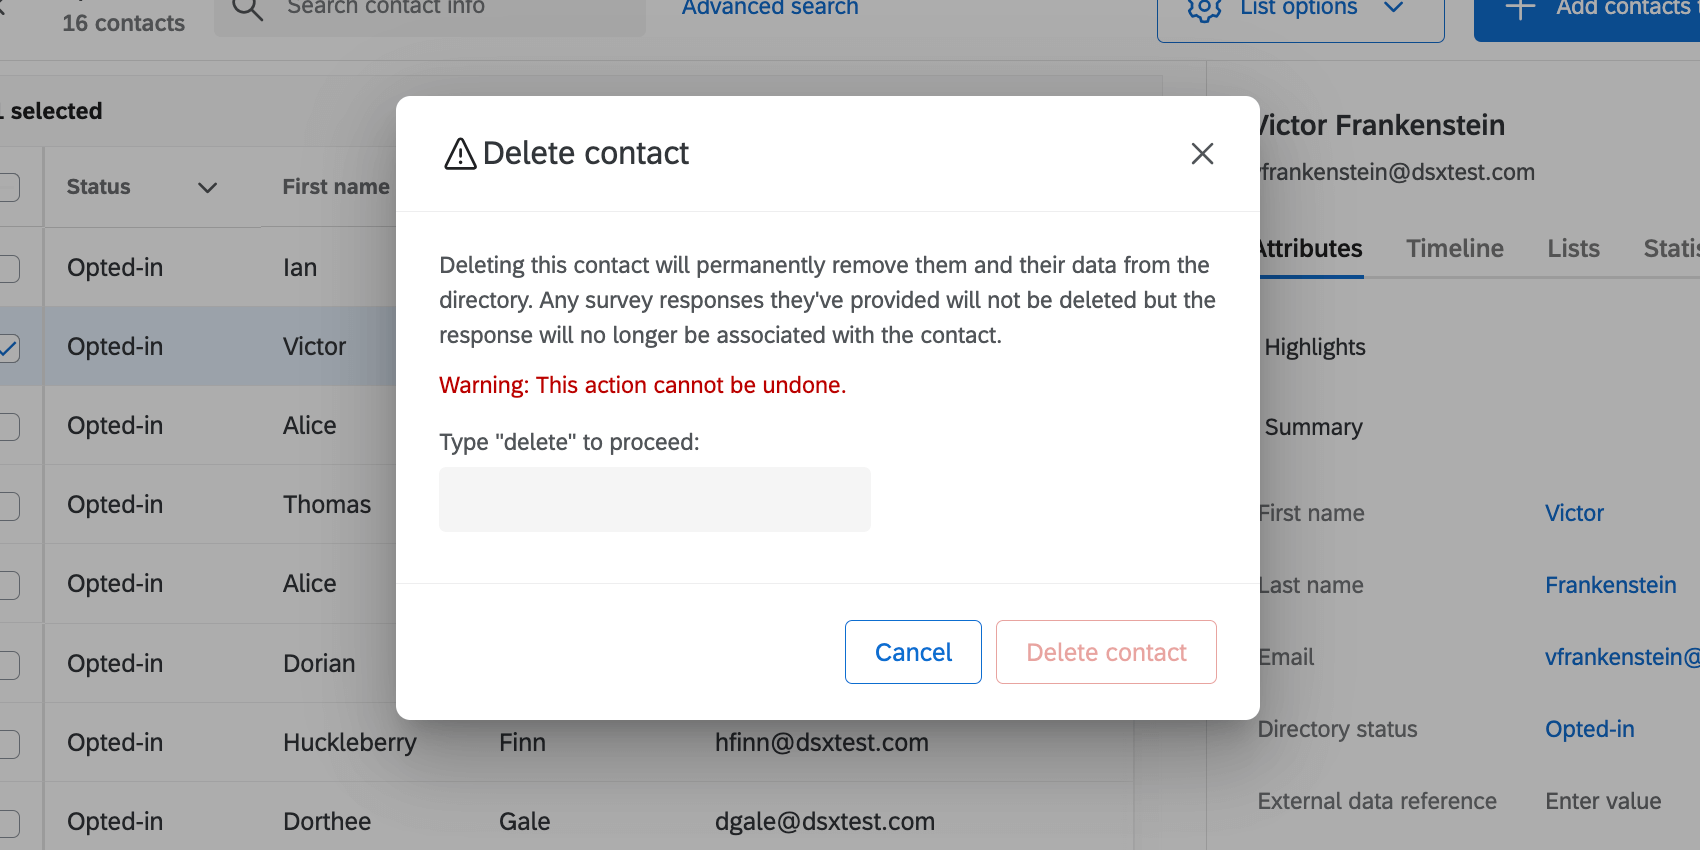
- Delete contact: Delete the contact from the entire directory.
Warning: Deleting a contact will permanently remove it and its data from the directory. Any survey responses this contact has provided will not be deleted, but the response will no longer be associated with the contact. This cannot be undone.
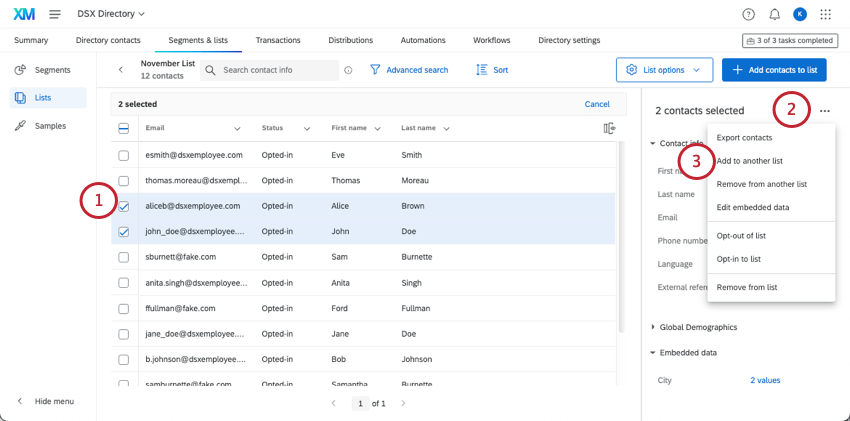
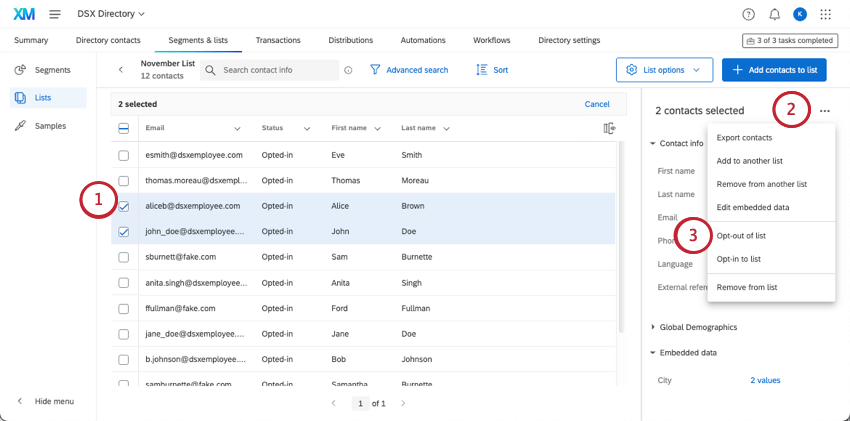
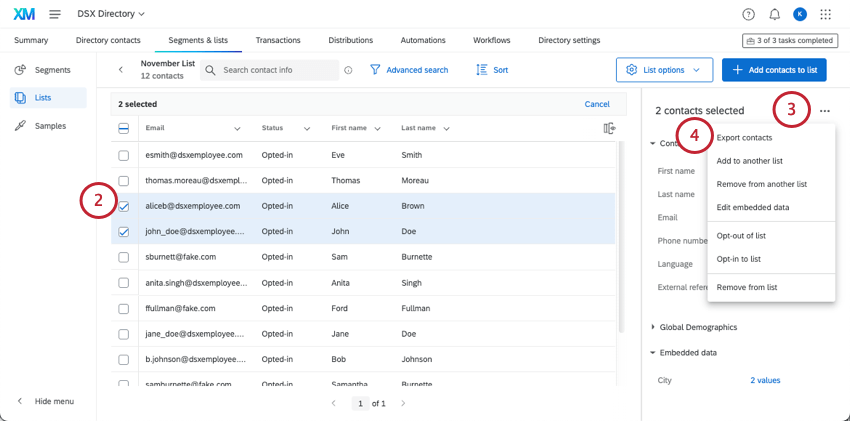
Editing Multiple Contacts at a Time
You can edit multiple contacts at a time by selecting the checkboxes to their left. You’ll notice the contact information menu will display less information (for example, no timeline), to reflect that the contacts selected don’t have the exact same information or demographics.
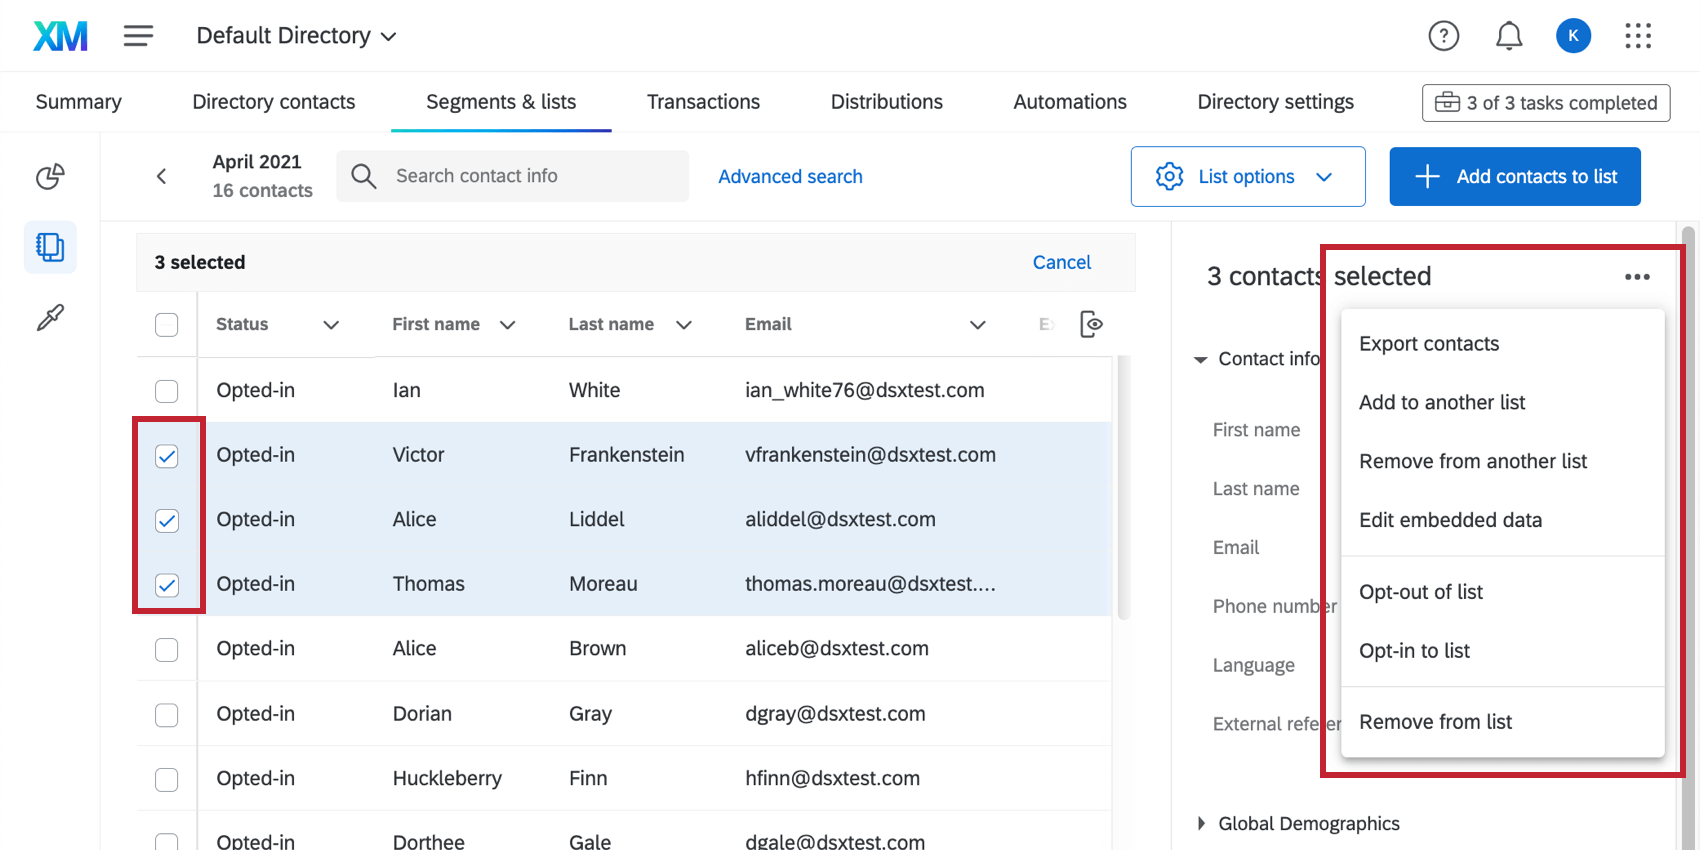
- Export contacts: Allows you to export only the selected contacts.
- Add to list: Allows you to add the selected contacts to another list.
Qtip: Looking to combine the contents of two lists into one? This is the best method for merging mailing lists.
- Remove from List: Remove selected contact from any mailing lists they belong to. This option doesn’t remove the contact from the directory.
- Edit embedded data: Edit embedded data.
- Opt-out of list / Opt-in to list: Opt the selected contacts in or out of the list. Contacts can be opted-out on multiple levels. See Opt Out Behavior for how these levels interact with each other.
Qtip: When a recipient marks your email as spam, they can be opted out of the list, although they will not be opted out of the directory. See Avoid Being Marked As Spam for more details.
- Remove from list: Remove the select contacts only from the list you’re currently inside.
Importing Updates to Contacts
Sometimes you may want to update contact information for many contacts all at once. You can update contact information in bulk by uploading a file with a ContactID included. By following these steps, not only can you update a contact’s embedded data, but subscription (opt-in) status and identifying information, like names and emails.
Settings that can affect how contacts are uploaded
Directory admins can adjust a couple of settings that affect how new information is added to contacts.
- Identity resolution: By default, anyone can use ContactID to update contacts. However, to keep directory data clean, you can choose other identifying fields to determine when contacts should be merged, reducing the chance of duplicates appearing and keeping contact information up to date. This option can essentially allow directory users to update contacts without contact IDs.
- Blank values: By default, blank values will be ignored during import and will not overwrite existing data. However, administrators can choose to allow blank values to overwrite existing ones on specific fields.
Steps to upload changes to a contact
- Export the contacts you want to edit. There are a few ways to do this:
- Do not include contact statistics.
- Make sure you include ContactID.
- Select any fields you want to edit.
- Export the file.
- Open the file on your computer.
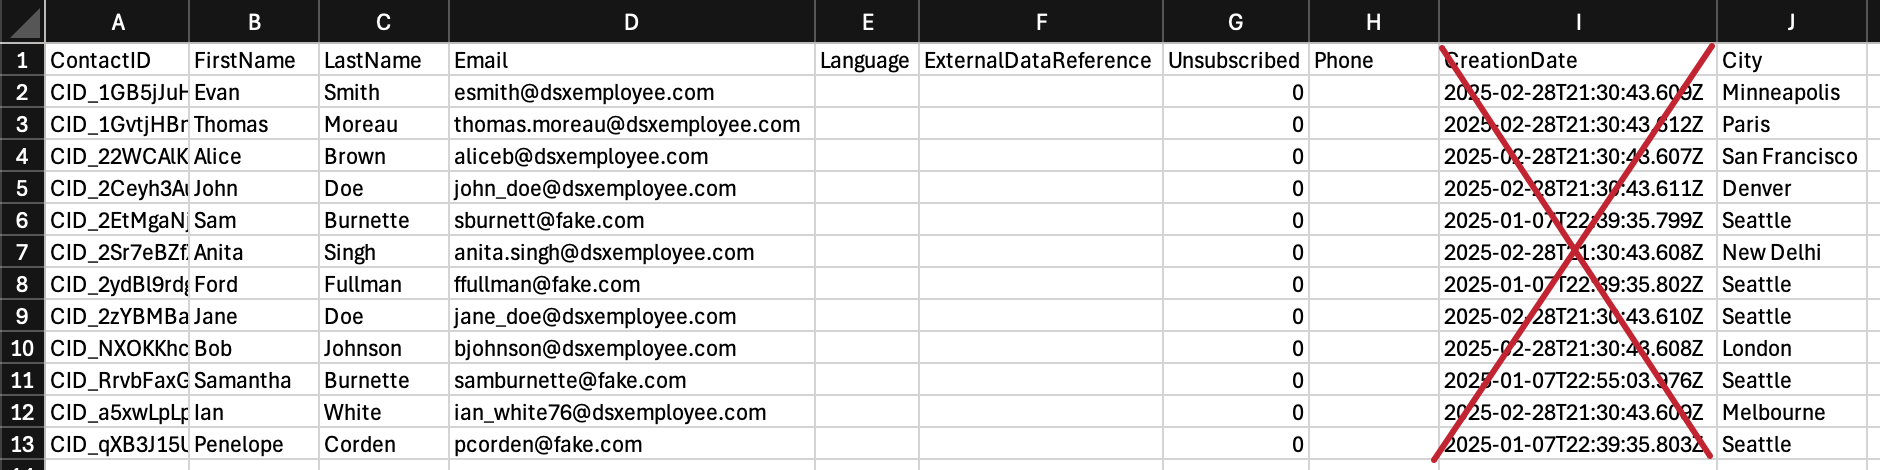
- In the file, remove extraneous columns such as CreationDate, in addition to any information you don’t want to update. Make sure you keep fields used to identify the contact. This may vary by organization, but are often Email or ExternalDataReference (which can be a unique ID or username of some sort). The safest option is usually to keep ContactID.
- Edit / add the information you want to update, and save your changes.
Warning: Do not edit the information in the ContactID column! To successfully edit your contacts, leave this information exactly as it appears.
- Upload the file in your directory or mailing list.
Searching for Contacts in a Mailing List
So far, we’ve covered a lot of actions you can take with contacts. However, you may want to locate specific contacts in your list before you do any of these things.
You can find contacts in a lot of ways, including quick searches, advanced filtering, and sorting. You can even add and remove columns of information in your list so you can glean information without having to download anything.
These functions work the same in mailing lists as they do in the directory. Thus, see Searching and Filtering Directory Contacts for detailed steps.