Distribution Automation
About Distribution Automations
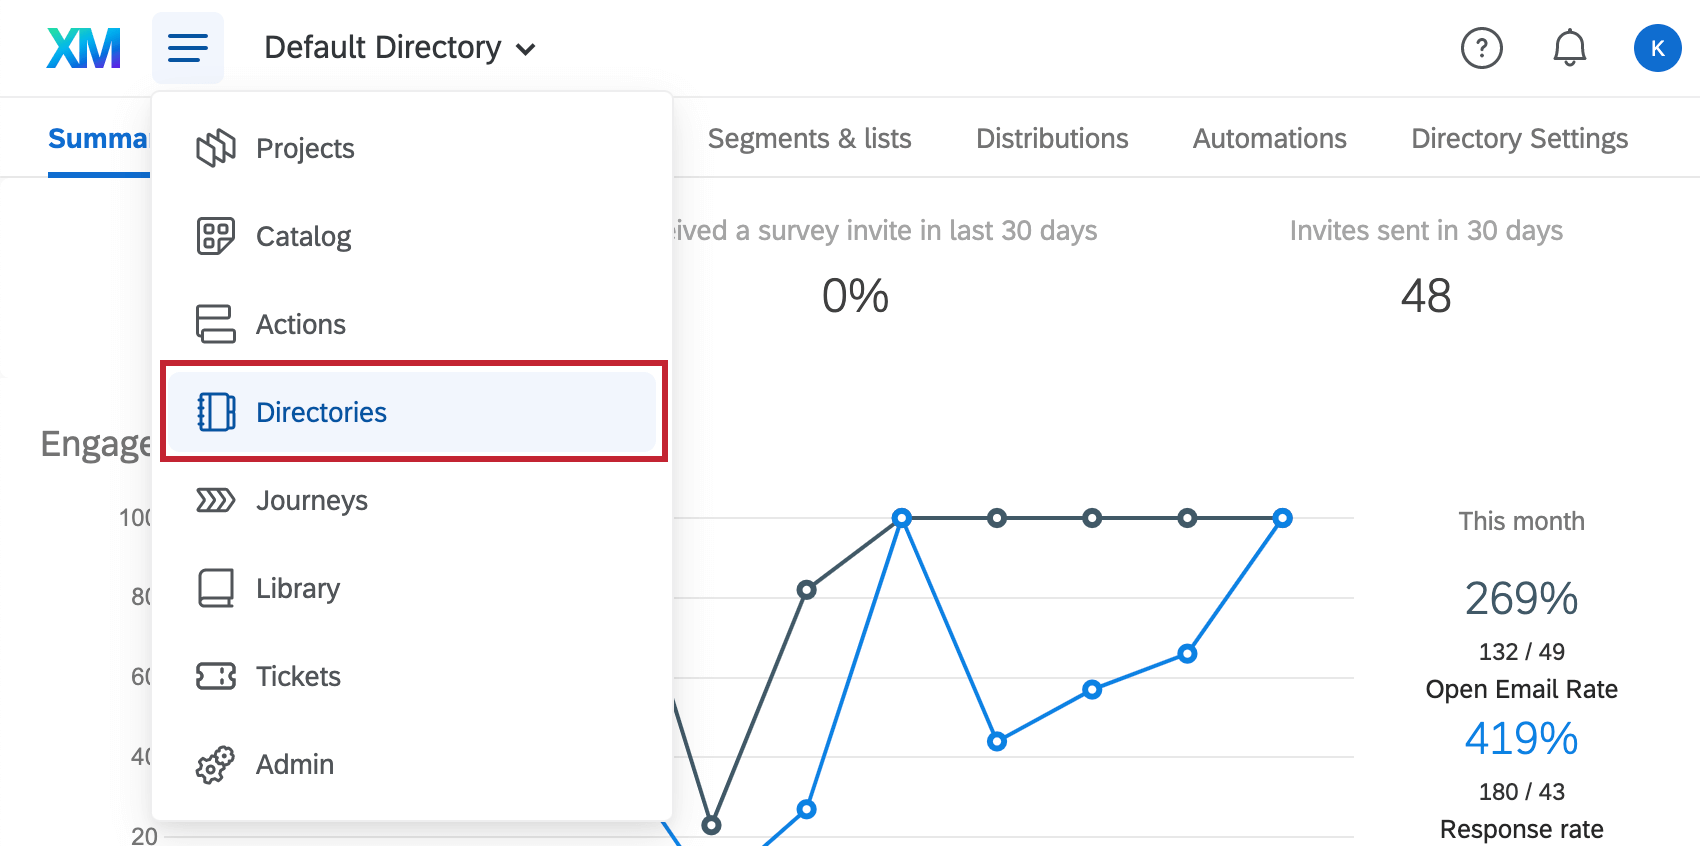
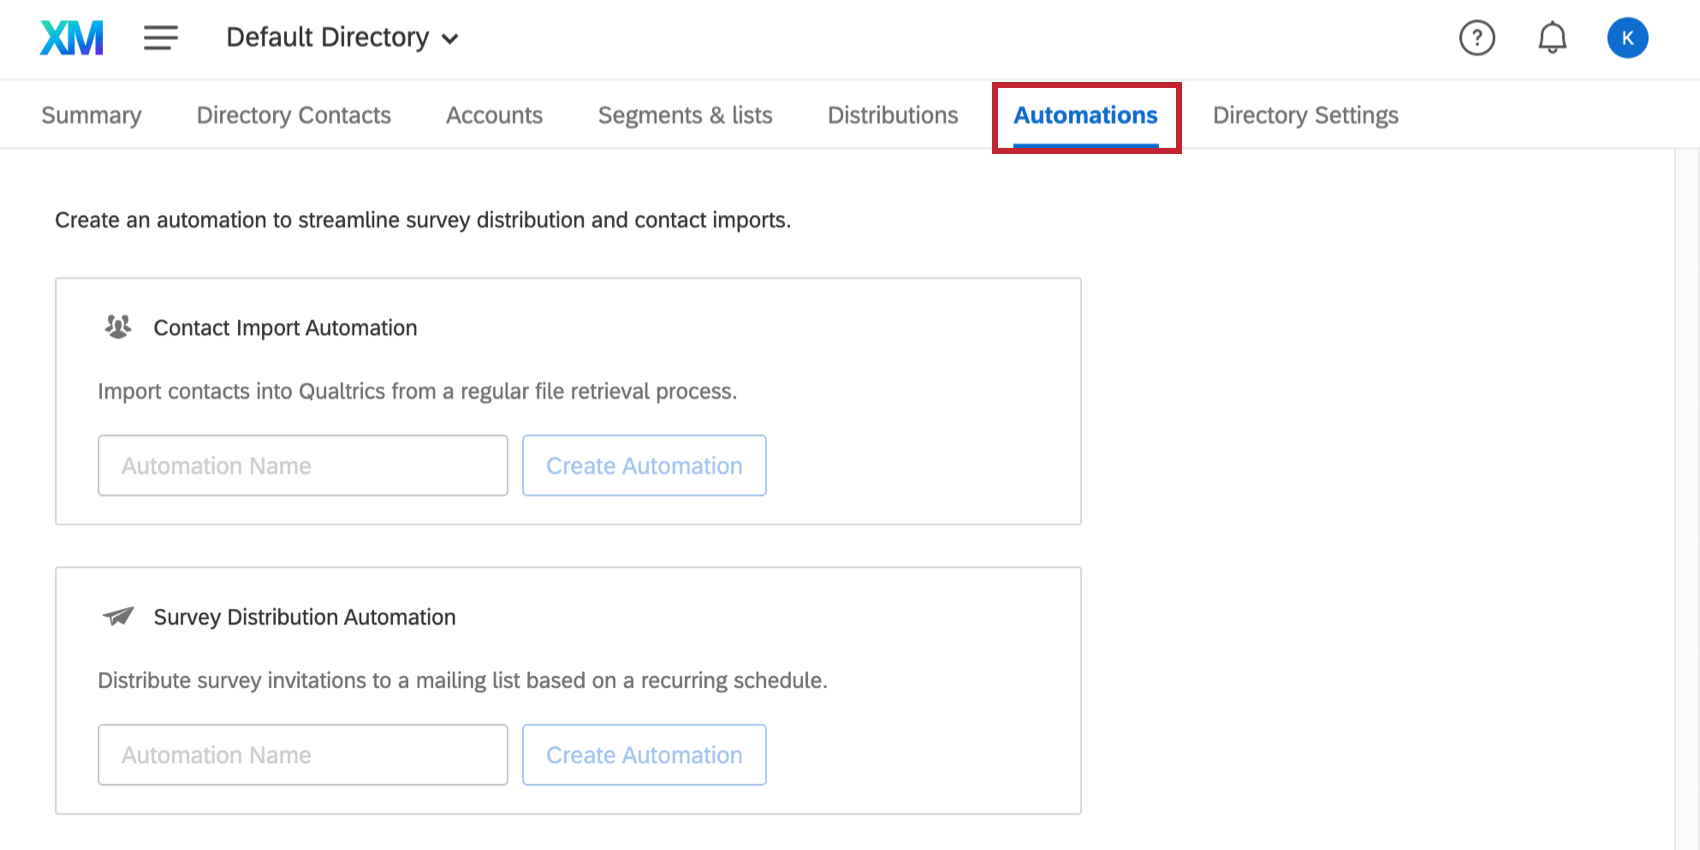
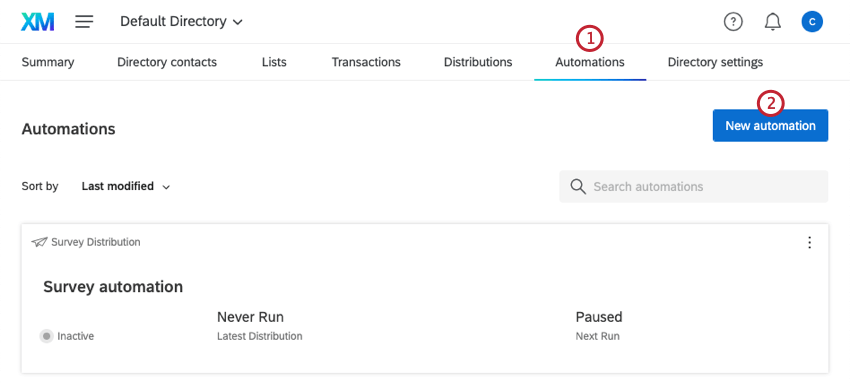
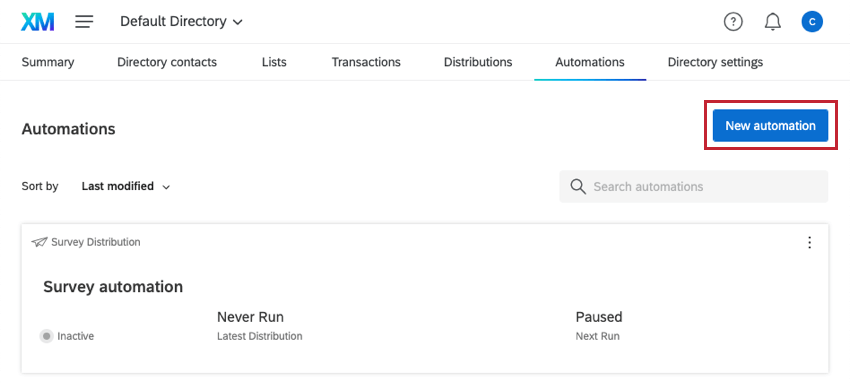
Distribution automations regularly send out survey invitations to a list of contacts. You can set these up in the Automations tab of the Directories page. These automations are only available for XM Directory.
Users often wish to import contacts from a hosted daily file drop, and then schedule survey distributions for those contacts, all under the most safe and secure transfer methods. If a distribution automation is linked to a contact import automation job, only the contacts imported from the most recent import automation run will be sent invitations.
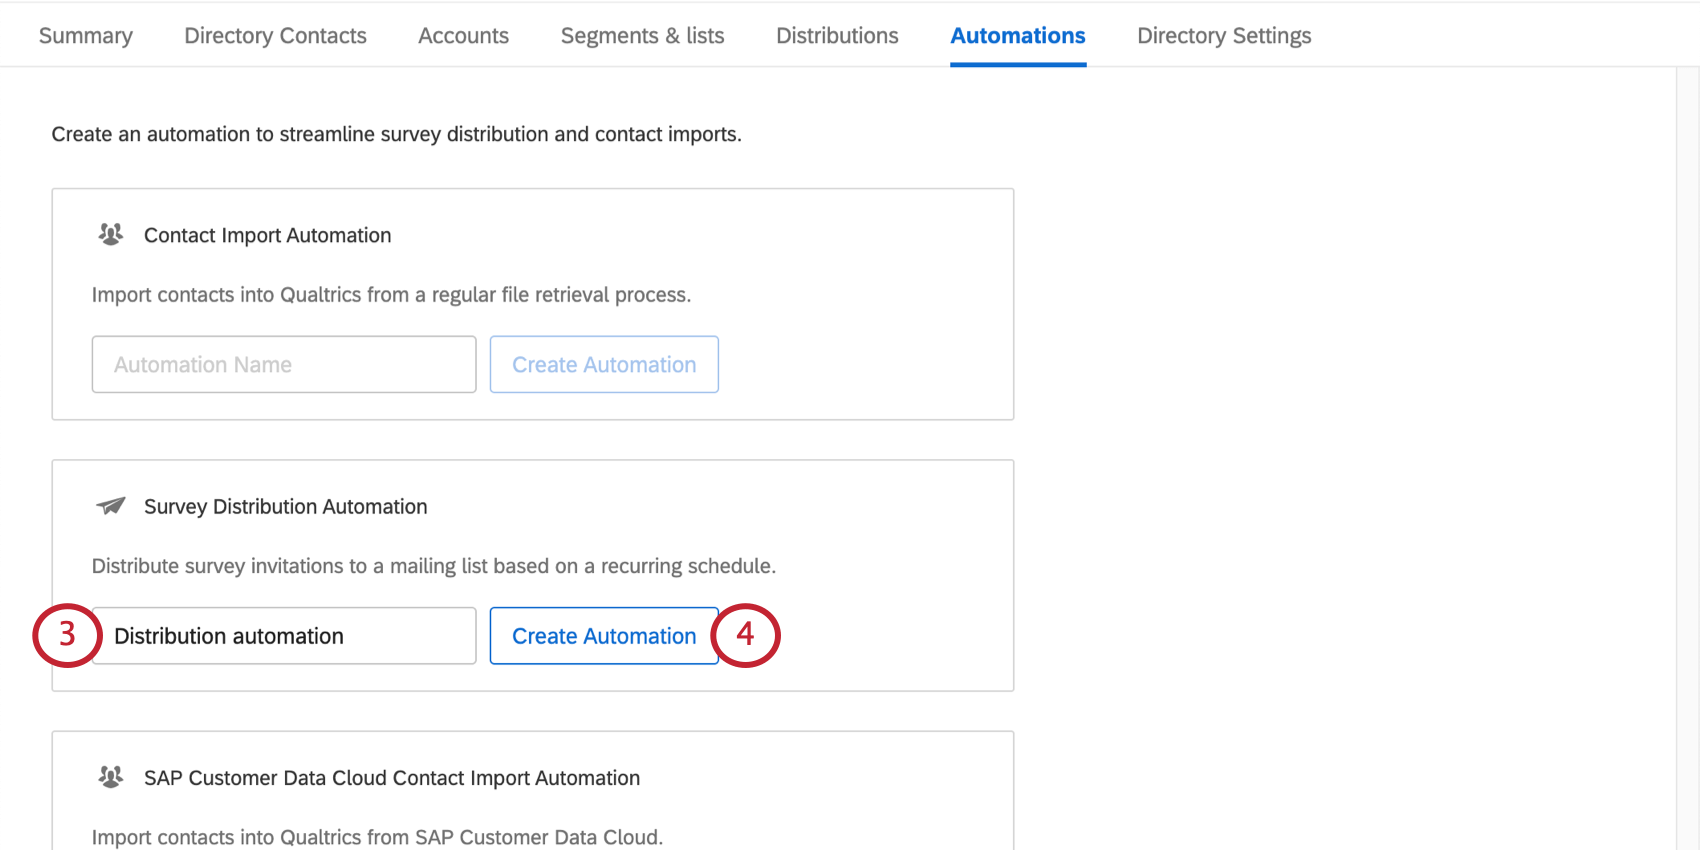
Step 1: Creating a Distribution Automation
Step 2: Linking to a Contact Import Automation
Automations support the ability to send multiple distributions from a single contact import. This is accomplished by linking a survey distribution automation to a contact import automation. Linked distribution automations will send survey invitations based on the distribution automation’s settings as soon as the contact import automation finishes.
You can only add one contact import automation to a survey distribution automation.
- Navigate to the Link Distributions section of the automation.
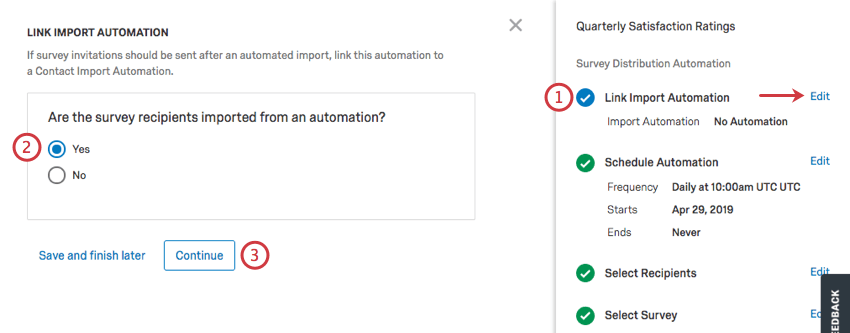
- Select Yes if you’d like to link to a contact automation or No if you would not.
- Click Continue.
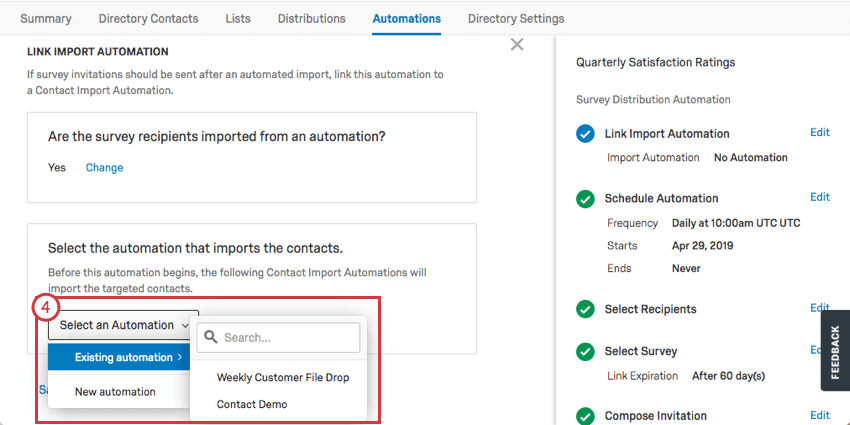
- Either select to create a new contact import automation, or select from existing automations.
- Once a contact import automation is added, you can choose to Navigate to Automation (saving your current distribution automation to edit the contact import automation) or Remove it (unlinking the automations).
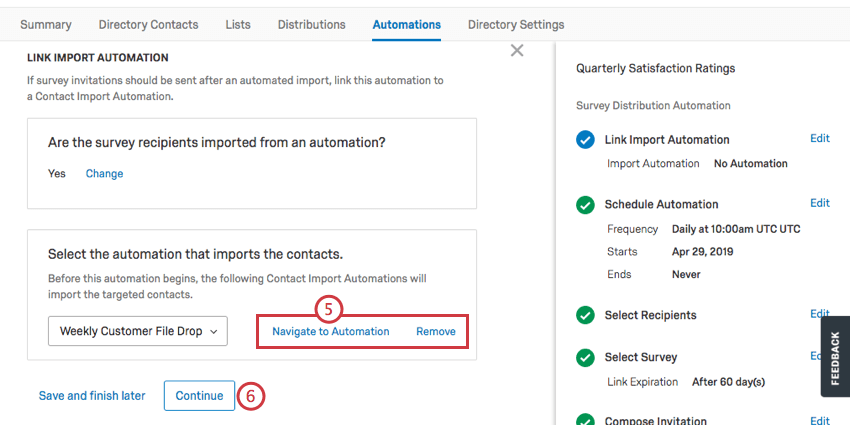
- Click Continue.
Step 3: Scheduling the Distribution & Selecting Recipients
- Decide how frequently you want this distribution to send out.
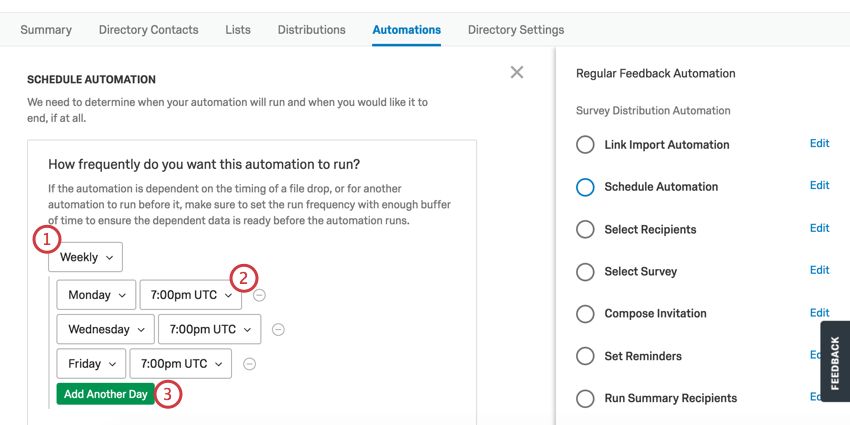 Qtip: If this automation is linked to a contact import automation, then the distribution automation will run immediately after contact imports.
 - Choose the time of day and / or day it will be sent.
- This button will vary based on whether the distribution is daily, weekly, or monthly.
- Daily: Click Add Another Time to add an additional time of day for this distribution to be sent.
- Weekly: Click Add Another Day to add another day of the week that the distribution should be sent.
- Monthly: Click Add Another Day to select between the first and last day of the month, and then determine the time of day the distribution is sent.
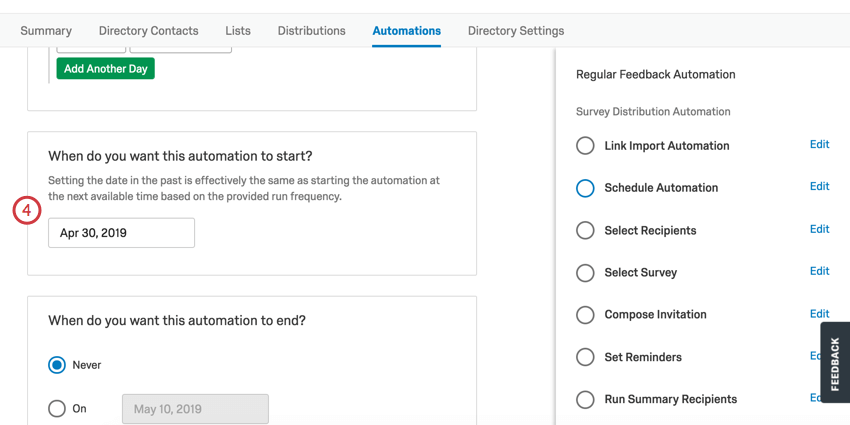
Qtip: All automations are scheduled based on UTC and therefore do not observe daylight savings time. - Decide on the date you want the first distribution in the automation to be sent.
- Decide when you want the automation to stop sending distributions.
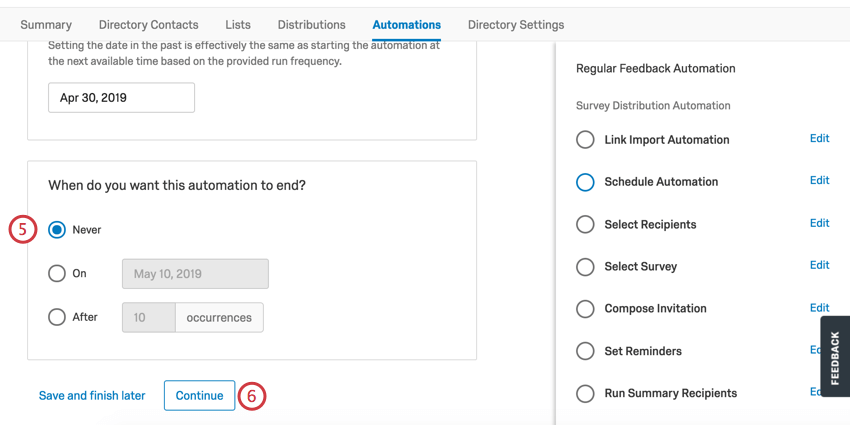
- Click Continue.
- Select the mailing list or segment to be sent the invites.
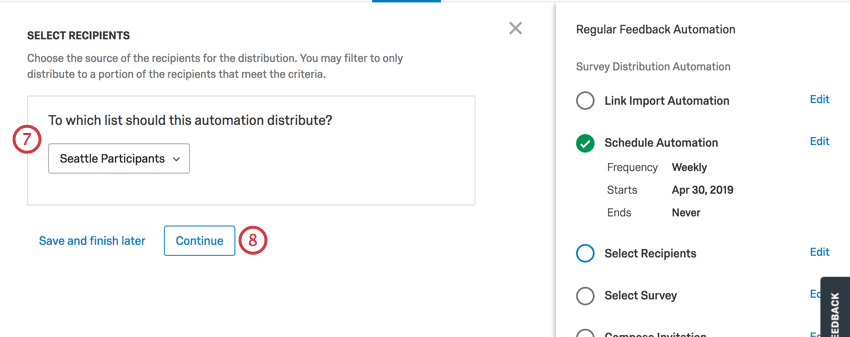 Qtip: If this automation is linked to a contact import automation, the invitations will only be sent to the contacts imported in the most recent import automation run.
 - Click Continue.
- Choose whether to send to all contacts in the mailing list, or filter for contacts who meet certain criteria. If filtering your contacts, you can add up to 10 conditions.
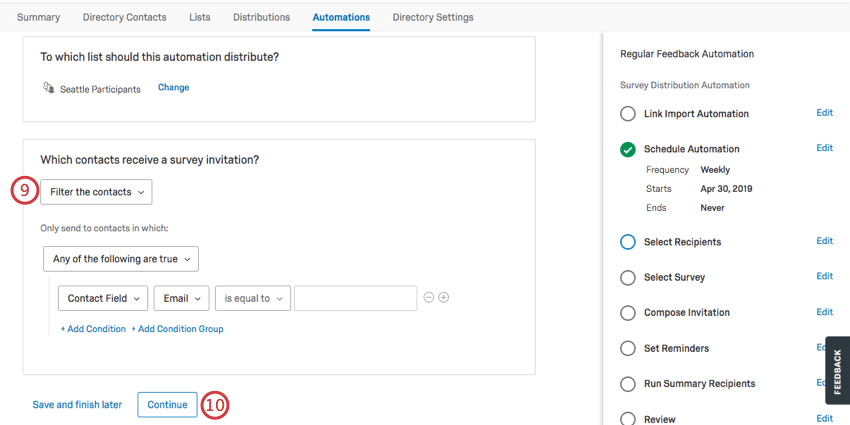 Qtip: When you select Filter contacts for distribution, you will be able to set the conditions a contact has to meet to receive the distribution. For example, you may only want to contact people from a certain office. These conditions are set up similarly to filtering contacts in your directory.Attention: Segments are not compatible with Filter contacts for distribution.Warning: If you filter for a field that does not exist in your directory and use the does not contain condition, the automation will fail when it runs.
 - Click Continue.
- Choose whether you’d like to distribute to all contacts that meet your criteria, or if you’d like to sample a limited selection of them.
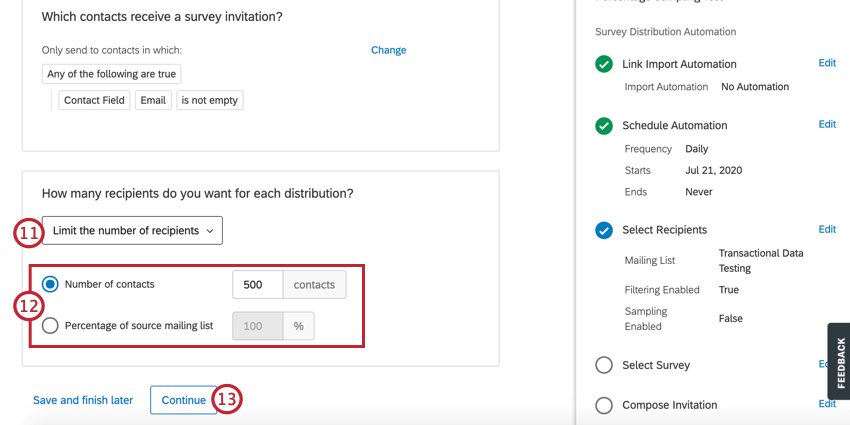
- If you chose to take a sample of contacts, select how you’d like to create the sample:
- Number of contacts: Enter the number of recipients you’d like to receive the survey. This number cannot exceed the number of contacts in your list.
Example: If you have a list of 1,000 contacts but only want to survey half of them, then enter 500.
- Percentage of source mailing list: Enter the percentage of recipients you’d like to receive the survey.
Example: If you have a list of 1,000 contacts and enter 75%, then 750 contacts will receive the survey.
- Number of contacts: Enter the number of recipients you’d like to receive the survey. This number cannot exceed the number of contacts in your list.
- Click Continue.
Step 4: Selecting the Survey
- Choose the survey that will be sent out with the distribution.
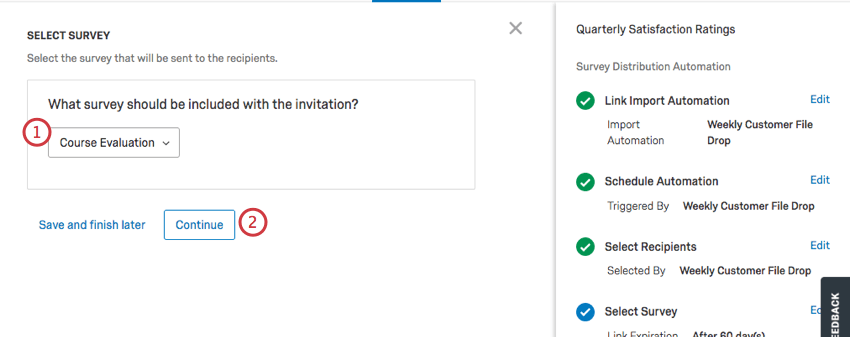
- Click Continue.
- Decide when the survey invitation link expires. You can set it for as many days into the future as you desire.
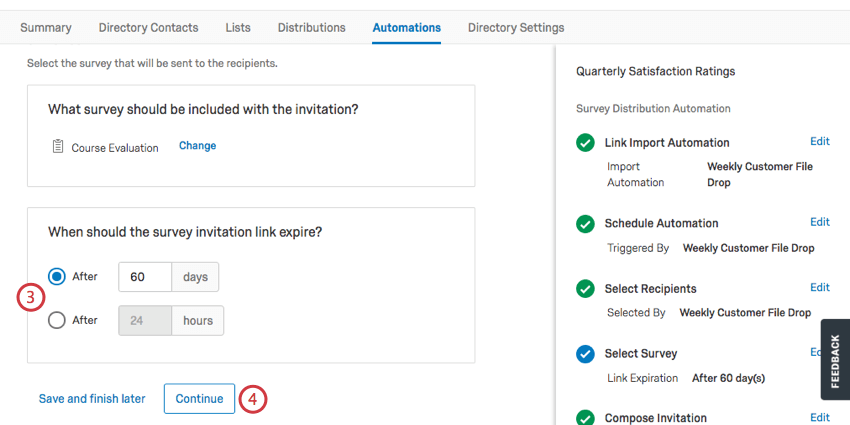
- Click Continue.
- Choose how soon after the automation run begins that the invitations should be sent.
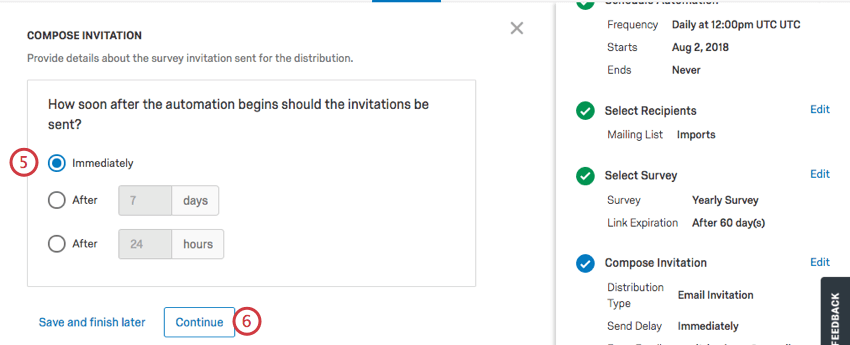 Qtip: The distribution is scheduled based on the start time of the automation run. For example, if you schedule an automation to run at 9am and delay the invitations to be sent five days later, the distribution will begin five days later at 9am. If this automation is linked to a contact import automation, the distribution is scheduled based on the start time of the import automation run.
 - Click Continue.
Step 5: Choosing the Distribution Type
Automations can send distributions in three different formats: Email Invitations, SMS Invitations (links sent over text), and Two-way SMS (survey is sent and answered over text).
This page goes over how to set each up with a survey distribution automation. For more on how these distributions work aside from the steps covered in the automation, see Email Survey Invitations and SMS Surveys.
Email Invitation
This option emails the survey invitation to the contact list.
- Choose Email Invitation.
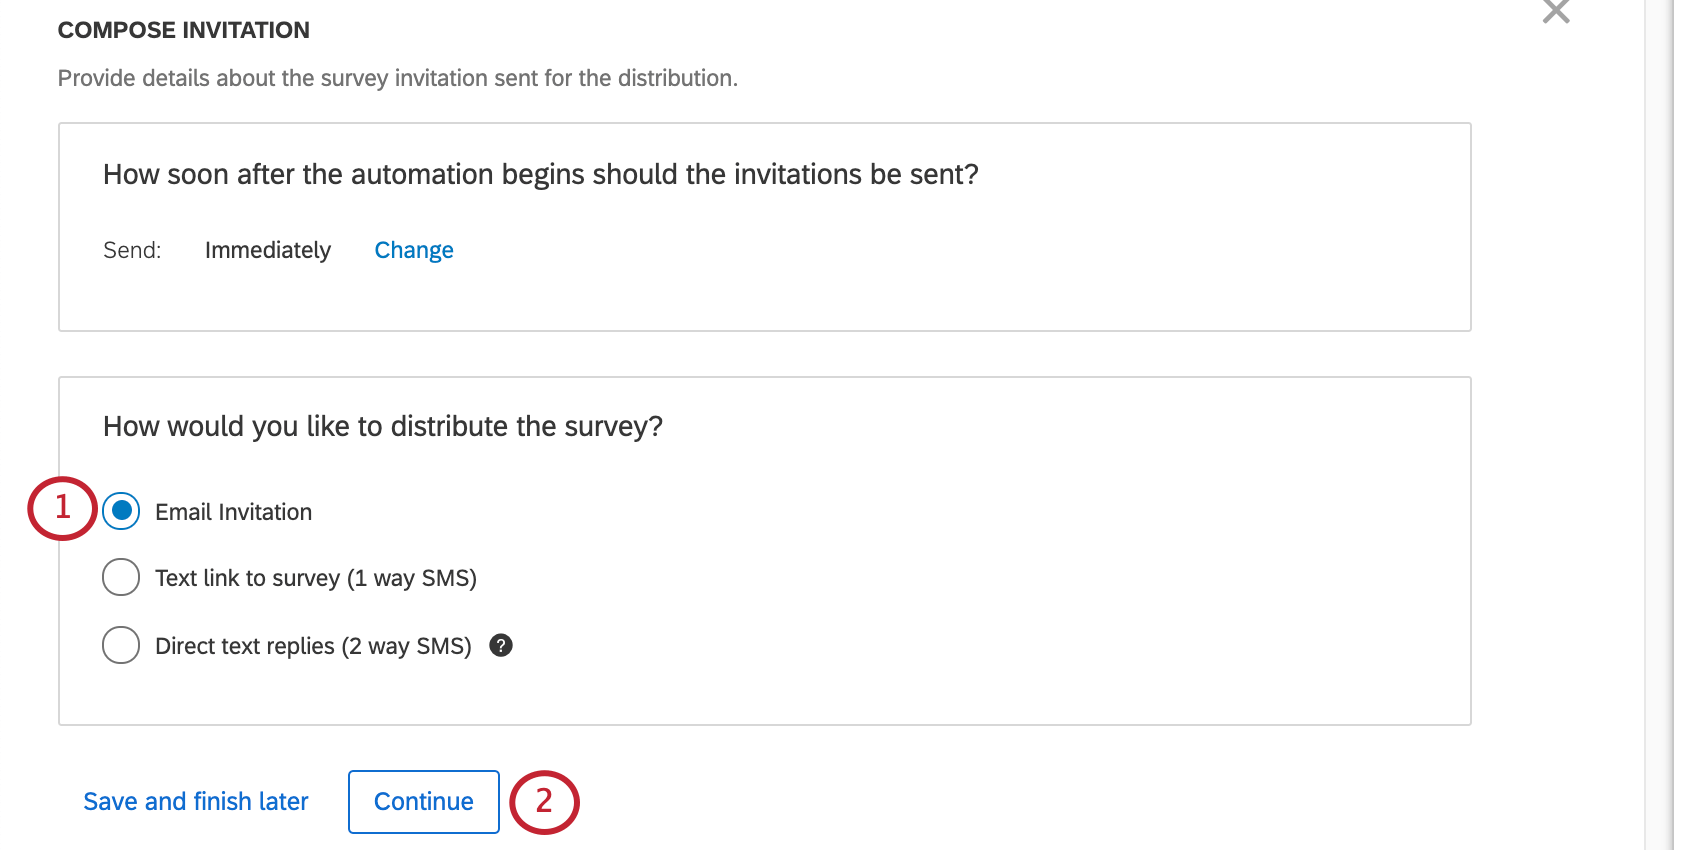
- Click Continue.
- Enter the From Email for the survey invite distribution.
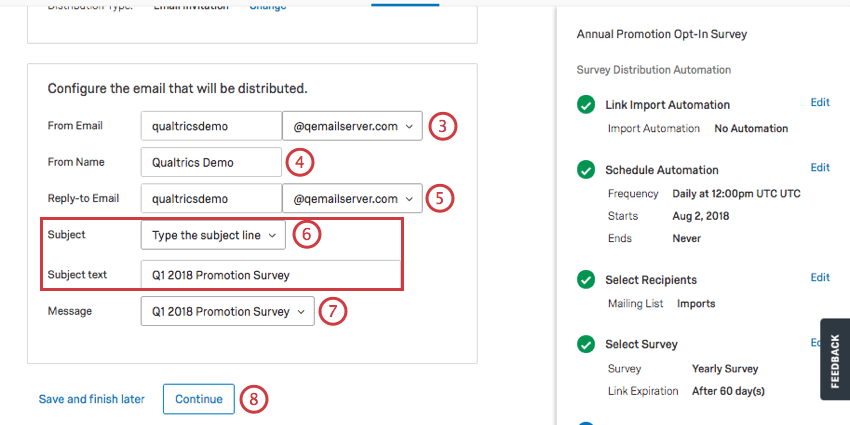 Qtip: You will only be able to select email domains that your Brand Administrator has set for your organization. See the Custom From Address page for more information.
 - Enter the From Name for the survey invite distribution.
- Enter the Reply-to Email for the survey invite distribution. This is the email that will receive replies should any of the contacts respond to the invitation.
- Enter the Subject for the survey invite distribution. You can choose from a previously saved subject line, or you can click Type the subject line to type a subject line.
- Choose a survey invitation you’ve saved to your library that will be sent as the email message.
- Click Continue.
SMS Invitation
An SMS invitation is when a link to a Qualtrics survey is sent as a text message. The recipient then opens the survey in their mobile device’s browser.
The text will be sent to the number in the Phone column of the contact import. When uploading recipient phone numbers, make sure you follow the correct formatting and adhere to country restrictions.
- Choose Text link to survey (1 way SMS).
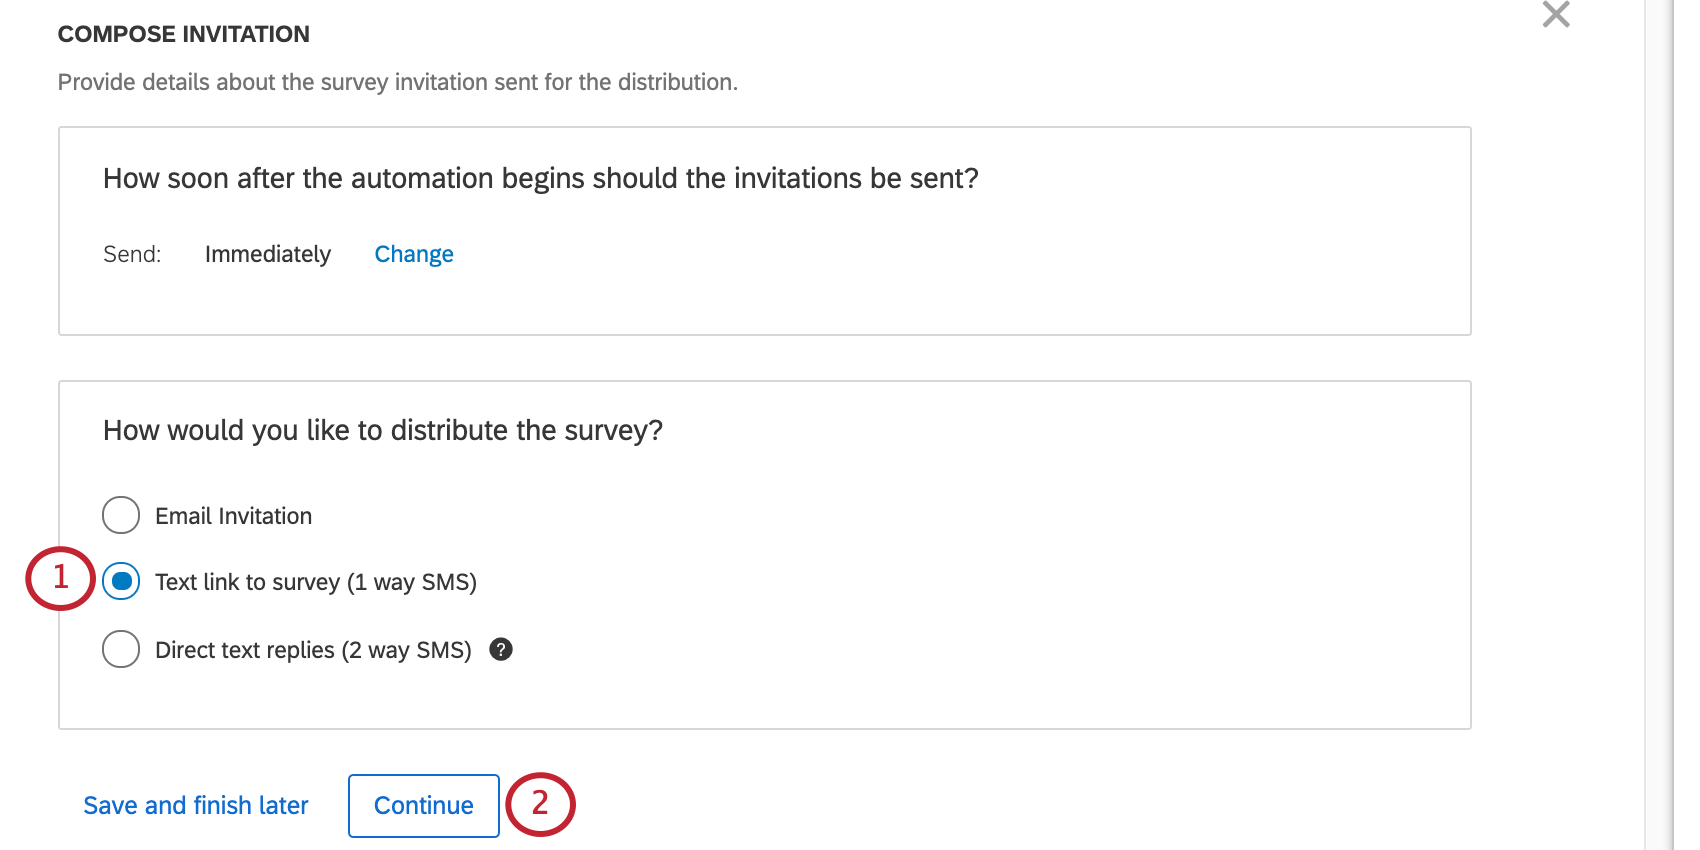
- Click Continue.
- Select a message to be sent with your distribution.
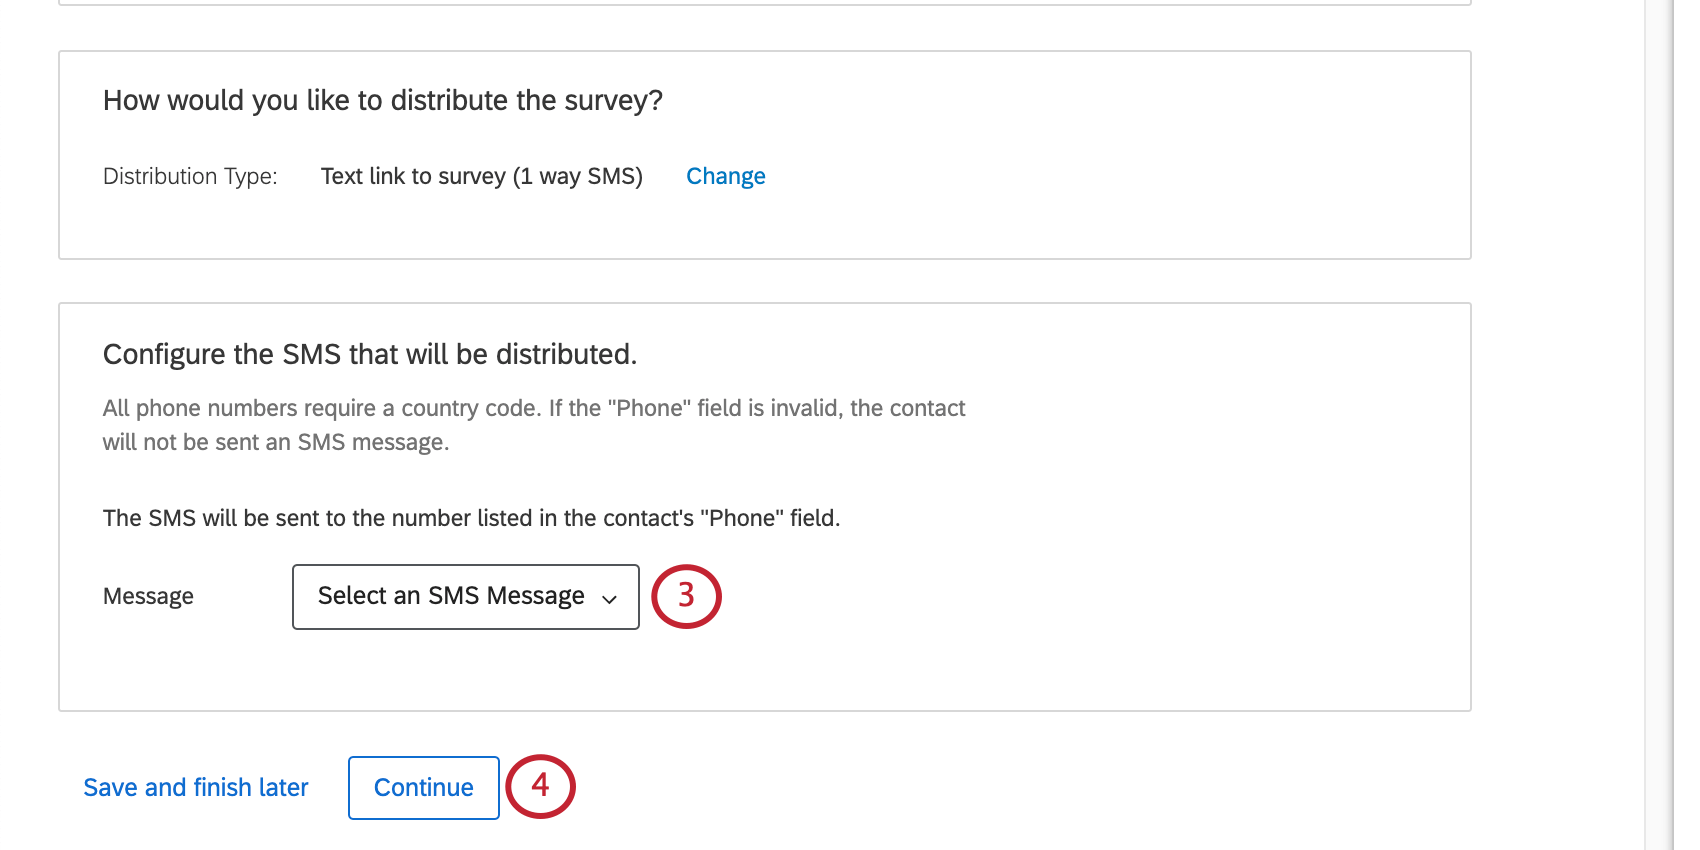 Qtip: You can create an SMS invitation in your library. Make sure the message is saved as an SMS Invite and not as a general message or email.
 - Click Continue.
- If desired, set a delivery window to determine when contacts will receive SMS messages. This will apply to all outgoing SMS distributions related to this automation.
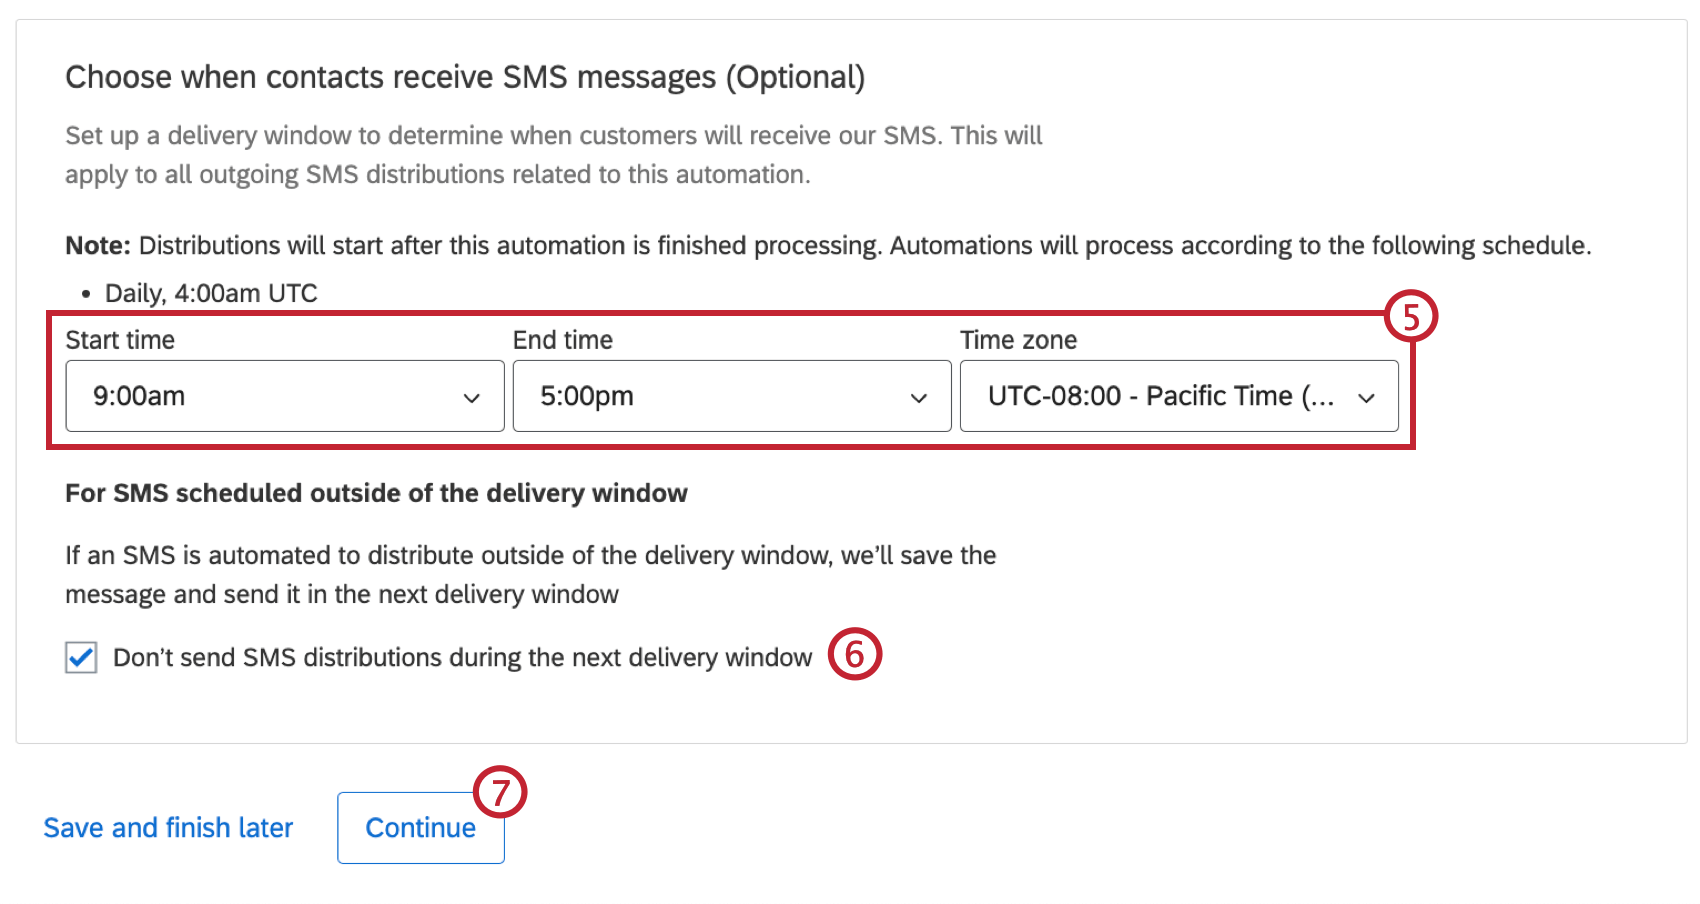 Qtip: Start time, End time, and Time zone are all required fields.Attention: Qualtrics does not store any information about SMS recipients’ time zone, so make sure the time zone you select fits your desired recipients.
 - Choose how you want to handle SMS scheduled outside of the delivery window. Check the box if you don’t want to send SMS distributions during the next delivery window. If the box is unchecked, any distributions that were scheduled to be sent outside of the delivery window will be saved and sent in the next delivery window.
- Click Continue.
Two-way SMS
Two-way SMS is when the survey questions are texted to the recipient, and the recipient responds through text. Make sure your survey is compatible with SMS before relying on this option.
The texts will be sent to the number in the Phone column of the contact import. When uploading recipient phone numbers, make sure you follow the correct formatting and adhere to country restrictions.
- Choose Direct text replies (2 way SMS).
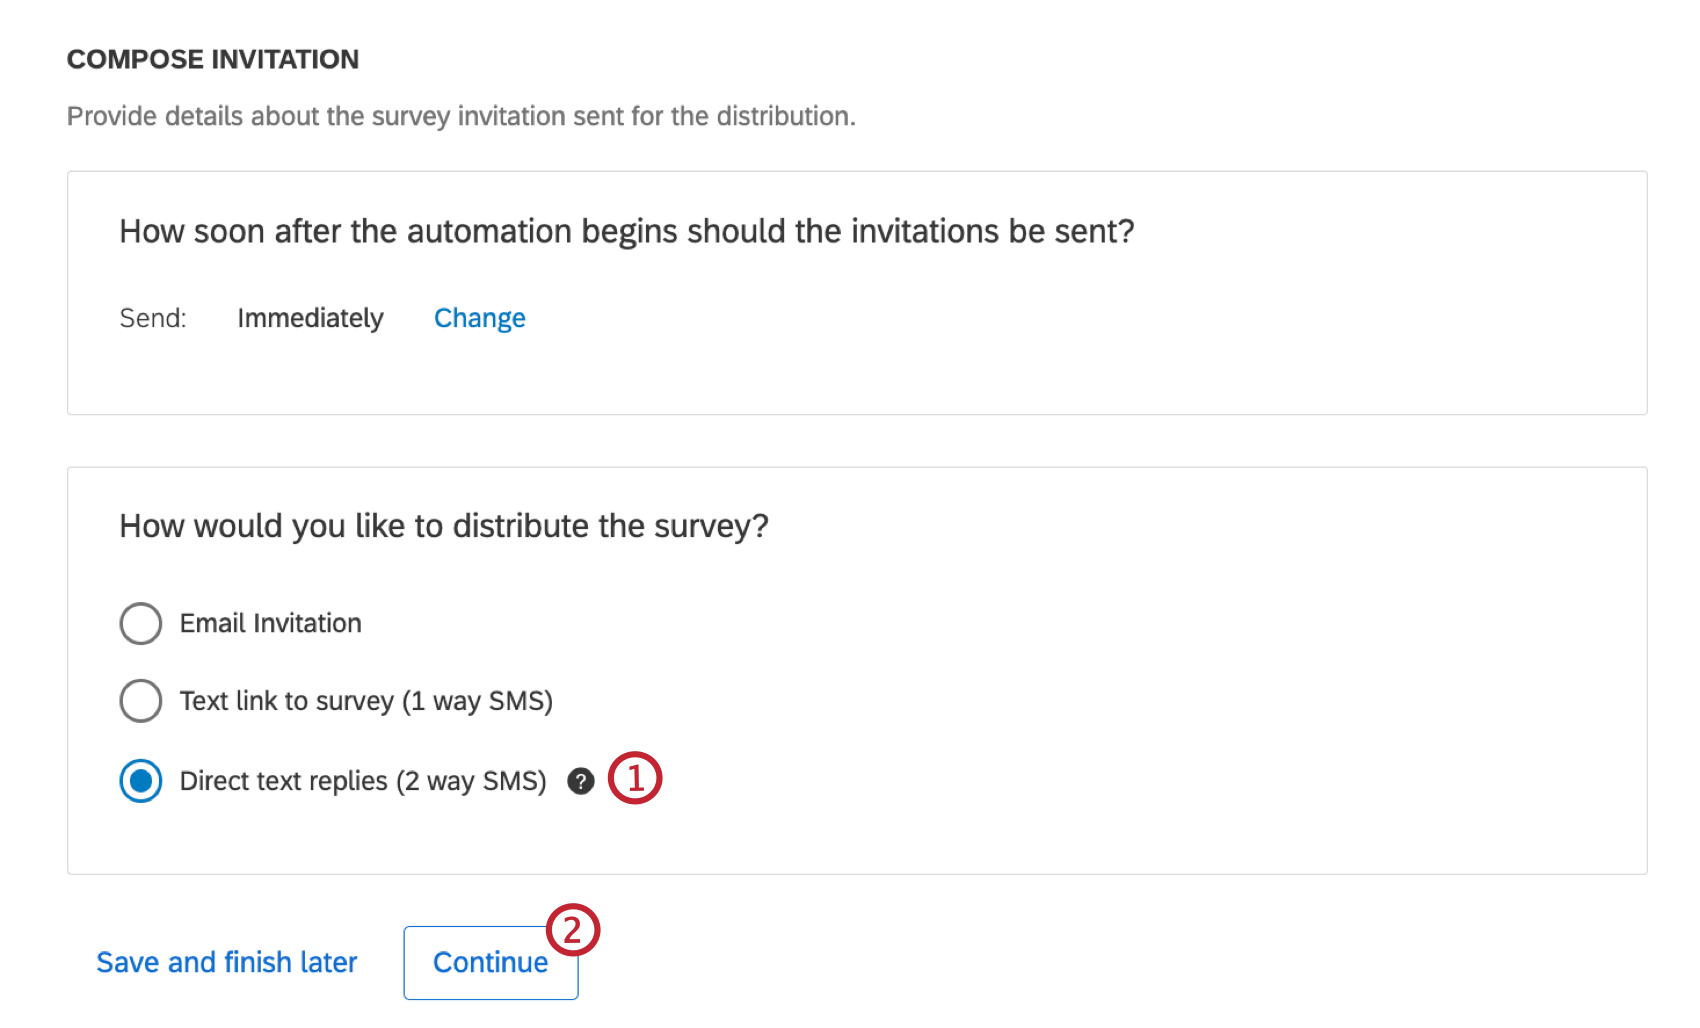
- Click Continue.
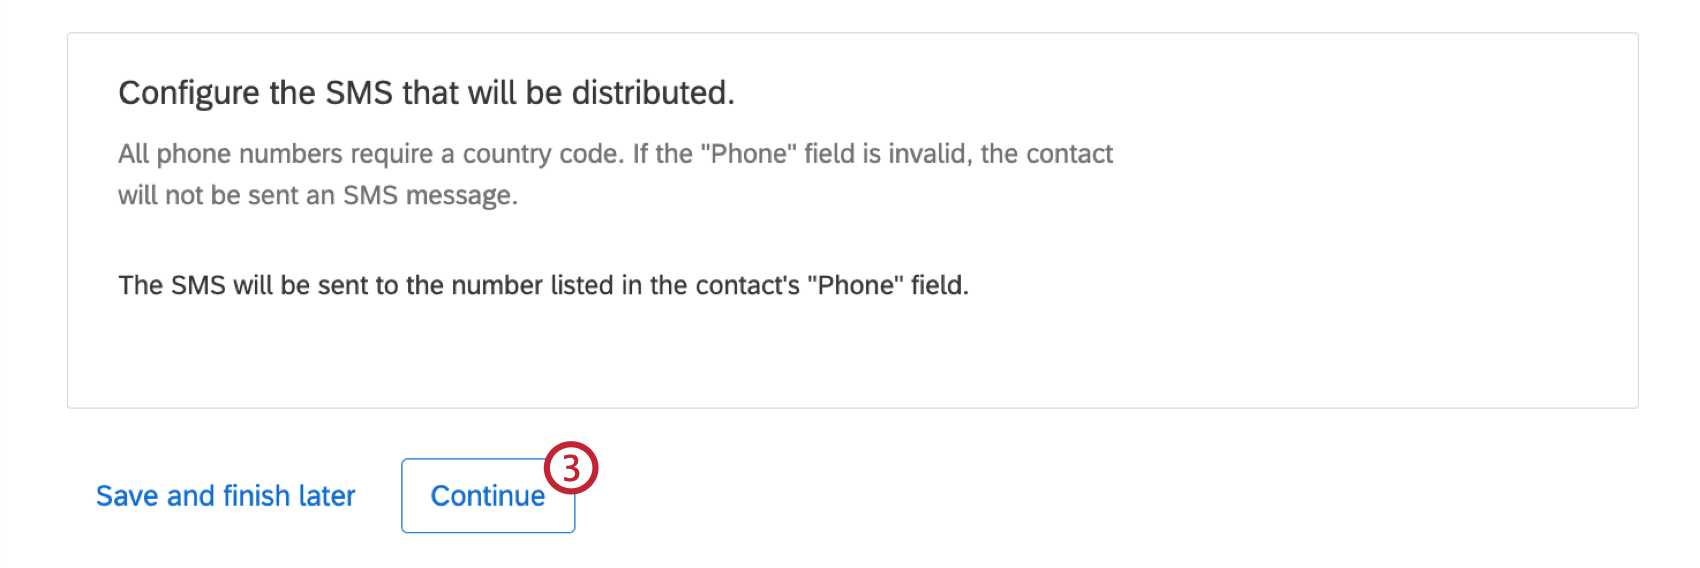
- Click Continue. You don’t need to choose a message because the survey will be texted directly to the recipient.
- If desired, set a delivery window to determine when contacts will receive SMS messages. This will apply to all outgoing SMS distributions related to this automation.
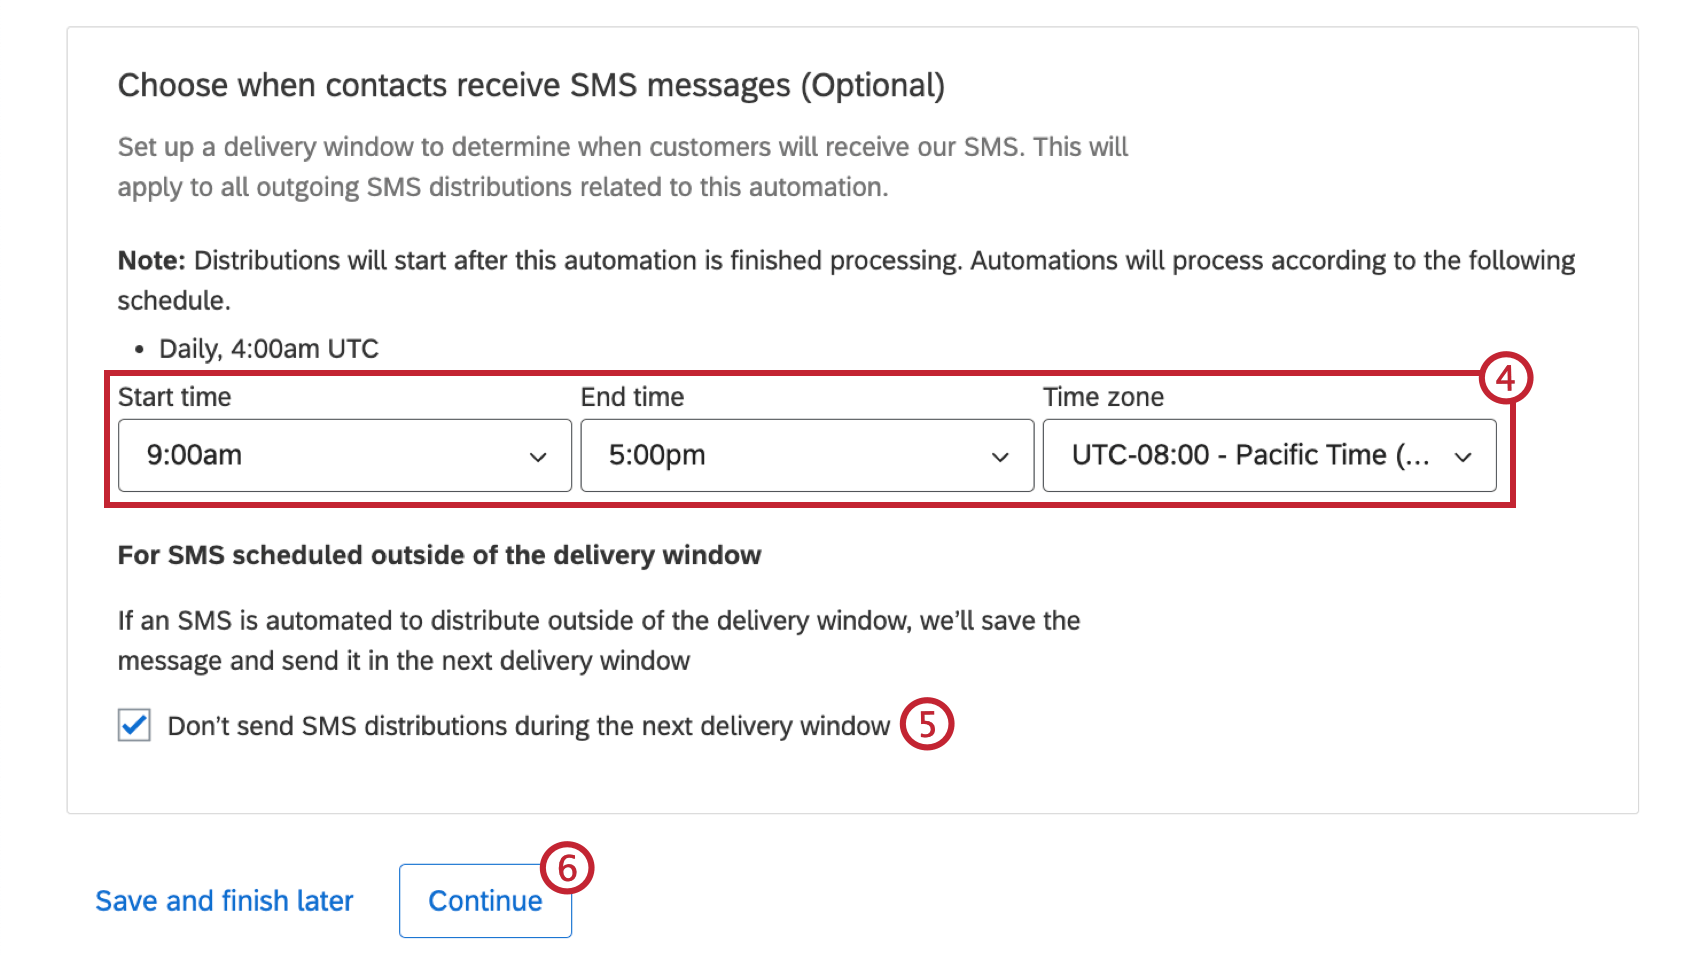 Qtip: Start time, End time, and Time zone are all required fields.Attention: Qualtrics does not store any information about SMS recipients’ time zone, so make sure the time zone you select fits your desired recipients.
 - Choose how you want to handle SMS scheduled outside of the delivery window. Check the box if you don’t want to send SMS distributions during the next delivery window. If the box is unchecked, any distributions that were scheduled to be sent outside the delivery window will be saved and sent in the next delivery window.
- Click Continue.
Step 6: Setting Reminders
You can add reminders to your automation so your recipients don’t forget to take the survey. Reminders only go to recipients who didn’t start their surveys, or who started their surveys but didn’t finish. You can add more than one reminder, or skip this step altogether.
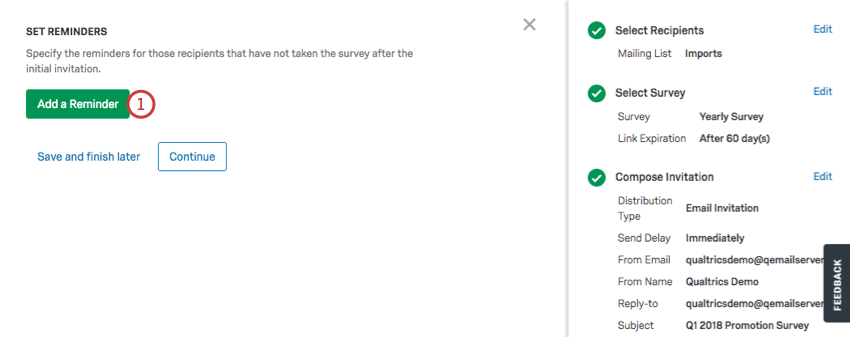
- Click Add a Reminder.
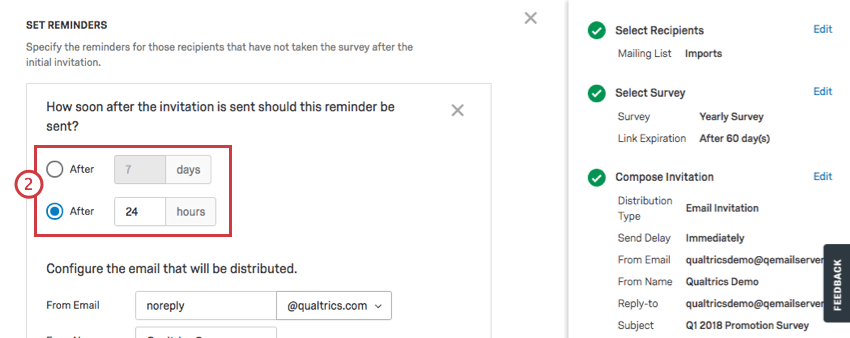
- Choose whether the reminder should be sent a certain number of days or hours after the initial invitation.
 Qtip: If you set up a delivery window when composing your SMS message, reminders will only be sent during this delivery window.
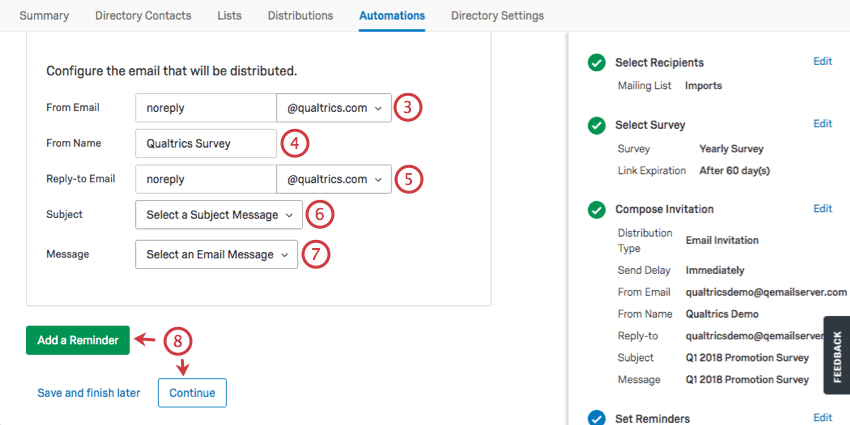
 - Enter the From Email for the survey invite distribution.
 Qtip: You will only be able to select email domains that your Brand Administrator has set for your organization. See the Custom From Address page for more information.
 - Enter the From Name for the survey invite distribution.
- Enter the Reply-to Email for the survey invite distribution. This is the email that will receive replies should any of the contacts respond to the invitation.
- Enter the Subject for the survey invite distribution. You can choose from a previously saved subject line, or you can click Type the subject line to type a subject line.
- Choose a survey invitation you’ve saved to your library that will be sent as the email message.
- You can add more reminders, or click Continue to move onto the next steps of the automation.
Step 7: Sending Run Reports & Enabling the Automation
The final steps of a survey distribution automation include determining who is emailed when an automation runs, and then enabling the automation. This encompasses the Run Summary Recipients and Review portions of the automation.
- Determine who will alerted with an email when the automation runs. Use the plus signs ( + ) or the Add Recipient Email button to add additional recipients.
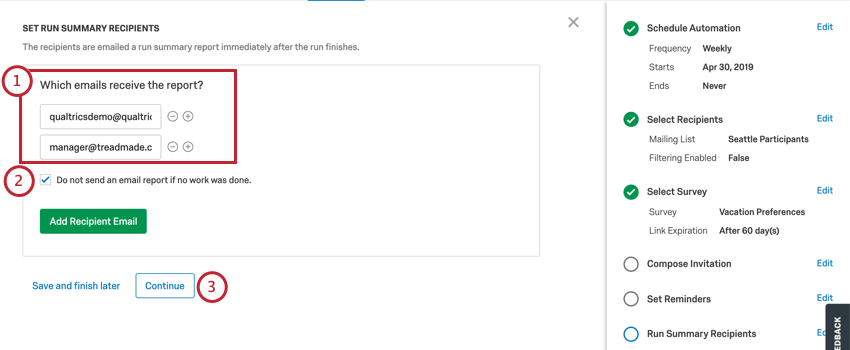
- If you do not want to email a report when there wasn’t any work done to report on, check the box.
- Click Continue.
- Review the information. Click Edit next to any section to edit the fields.
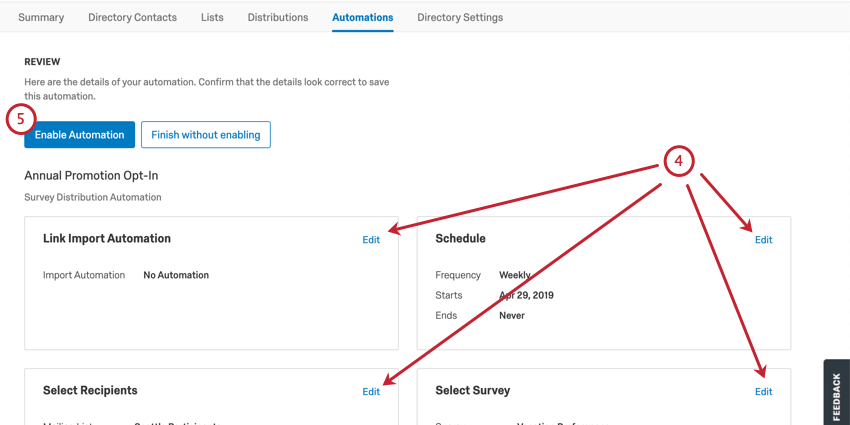
- Click Enable Automation to start your automation or Finish without enabling to save the automation but not start it.
Creating Additional Automations
Once you have created automations, you can add more by clicking New Automation in the upper-right.
