-

Qualtrics Platform -

Customer Journey Optimizer -

XM Discover -

Qualtrics Social Connect
Widget de Opinión (estudio)
Acerca de los widgets de Opinión
Los widgets de Opinión muestran los opinión y las interacciones de los clientes directamente en el Tablero de Studio. Los usuarios pueden hacer clic en las interacciones que más les interesen para ver un documento más grande y obtener más información sobre la interacción. Puede personalizar su widget para resaltado los opinión más relevantes o configurarlo para interactuar con otros widgets.
Creación de un Widget de Opinión
Este widget le ofrece muchas formas diferentes de mostrar sus opinión. A continuación, cubriremos los pasos básicos para configurar este widget , con enlaces a más información sobre cada opción.
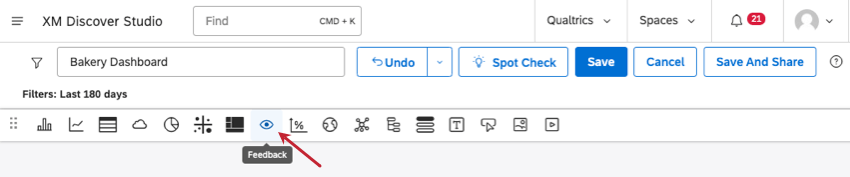
- Comenzarás en el Visualización pestaña.
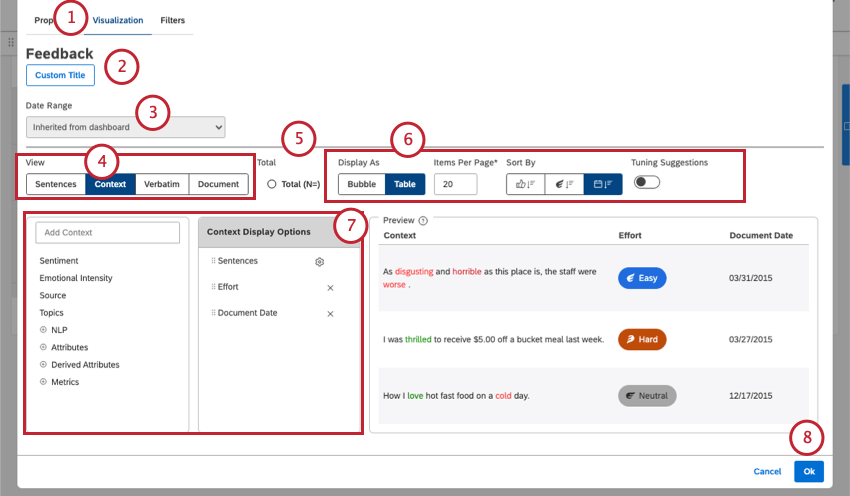
- Para darle un título al widget , seleccione Título personalizado .
Consejo Q :Haga clic Título del auto para mantener el título del informe generado automáticamente.
- Seleccione el rango de fechas para el informe. Para todas las opciones disponibles, consulte Filtros de rango de fechas .
Consejo Q :Configure su widget para que ignore el rango de fechas del Tablero para garantizar que Tablero rango reemplace el rango de fechas definido aquí.
- Elige unaVer. Esto determina la porción de cada respuesta de opinión que se muestra en el widget.
- Seleccione el Total (N=) Casilla de verificación para mostrar el número total de documentos que se muestra en el widget.
Consejo Q: Para obtener más información sobre el volumen del documento, consulte Visualización del volumen total en los widgets (Studio) .
- Seleccione una Estilo de visualización de opinión . Estas configuraciones variarán según la vista que haya seleccionado.
- Decide qué contexto mostrar . Estos son diferentes metadatos de documentos entre los que puede elegir.
- Hacer clic De acuerdo Para terminar.
Cómo seleccionar una vista de Opinión
La “vista” determina cómo aparecen los opinión en tu widget y cuántas aparecen a la vez. Dependiendo de la vista que elijas aquí, diferentes Opciones de visualización Estará disponible.
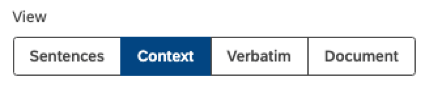
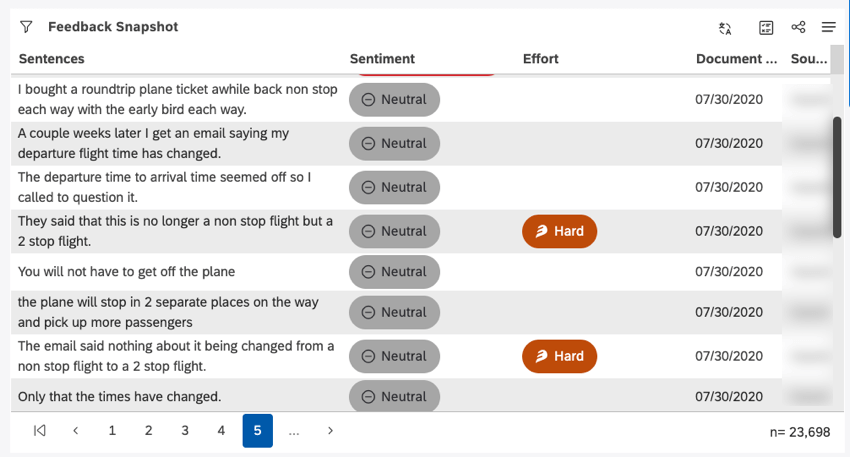
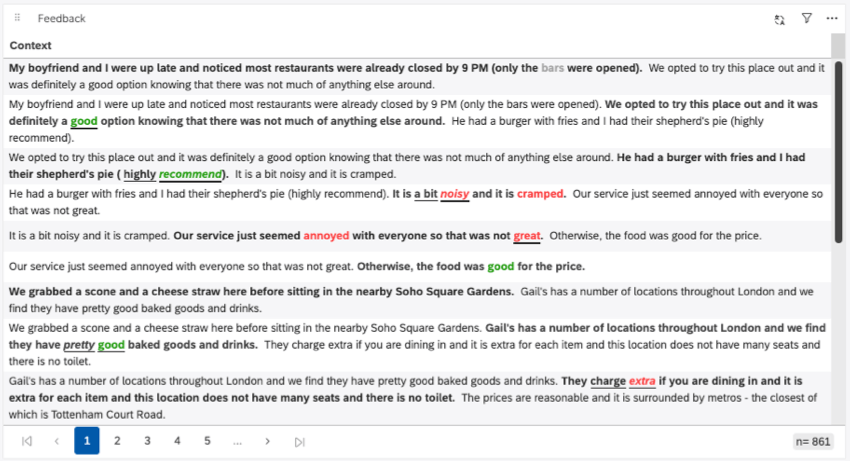
- Oraciones : Mostrar oraciones individuales. Esta vista también puede proporcionar Insight sobre las puntuaciones de sentimiento y esfuerzo de las oraciones.
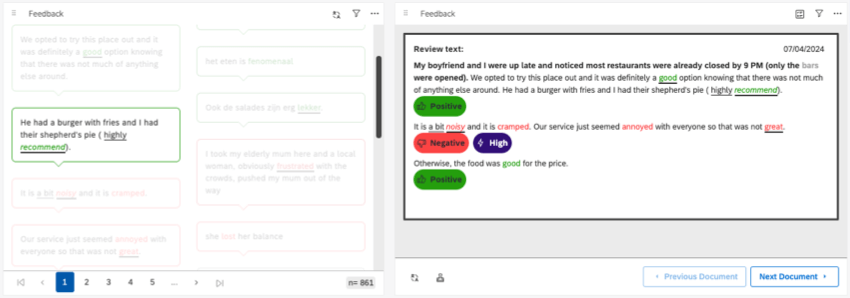
- Contexto :Muestra oraciones en el contexto de 2 oraciones adyacentes (1 oración antes y 1 después). Esta vista también puede proporcionar Insight sobre las puntuaciones de sentimiento y esfuerzo de las oraciones.
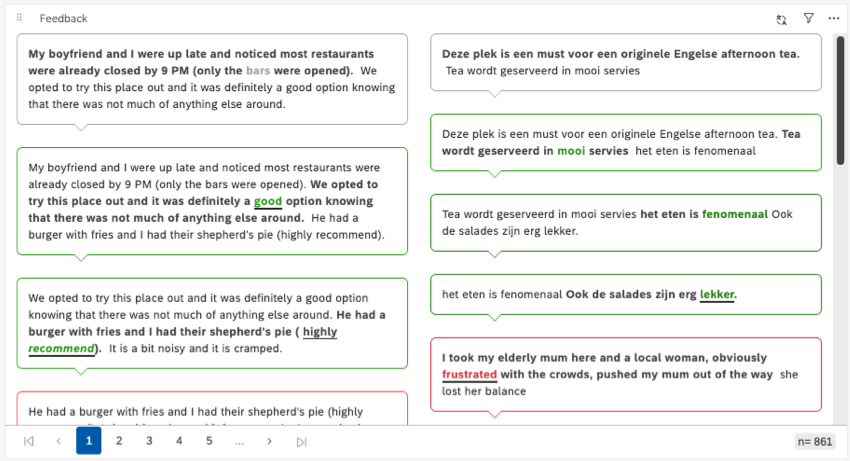 Consejo Q: En las vistas de oraciones y contexto, a menudo verá que varias oraciones del mismo documento aparecen como entradas independientes. En la captura de pantalla de contexto, puedes ver cómo las primeras 2 burbujas se refieren a la misma revisión. Esto se debe a que ambas frases cumplen los criterios de los filtros.
 - Literal : Mostrar un campo de opinión textual o literal completo. Si un documento contiene solo 1 palabra textual, entonces la vista textual es la misma que la vista del documento. Esta visión no resaltado el sentimiento ni el esfuerzo.
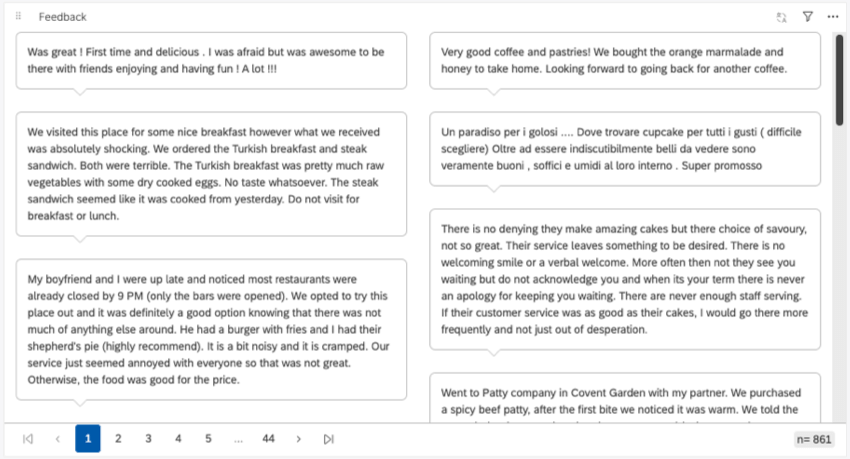
- Documento : Mostrar un documento completo.
Metadatos para cada vista
Esta tabla muestra la metadatos Puedes mostrarlo como contexto en cada vista. Tenga en cuenta que el Opciones de visualización También se enumeran para muchos de estos, ya que afectan a esta lista. (Por ejemplo, las visualizaciones de burbujas y de tablas a menudo no pueden mostrar los mismos datos).
| Oraciones y contexto – Burbuja | Oraciones y contexto – Tabla | Verbatim – Burbuja | Verbatim – Tabla | Verbatim – Panel y Documento | |
| Sentimiento | Sí | Sí | No | No | No |
| Esfuerzo | Sí | Sí | No | No | No |
| Intensidad emocional | Sí | Sí | No | No | No |
| Fuente | Sí | Sí | Sí | Sí | No |
| Fecha del documento | Sí | Sí | Sí | Sí | No |
| Temas | No | Sí | No | Sí | Sí |
| PNL | No | Sí | No | Sí | Sí |
| Atributos | No | Sí | No | Sí | Sí |
| Atributos derivados | No | Sí | No | Sí | Sí |
| Métricas | No | Sí | No | Sí | Sí |
| Cuadros de mando | No | No | No | No | Sí |
Cómo elegir las opciones de visualización de Opinión
Una vez que hayas elegido un Vista de opinión Tienes algunas opciones más que puedes ajustar para determinar cómo se muestran los opinión .
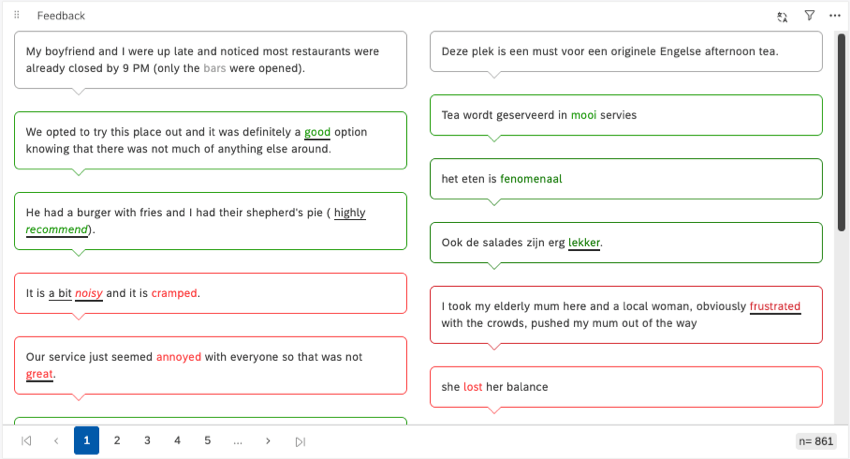
Burbuja
La configuración de Burbuja está disponible para las vistas de oración, contexto y textual. Muestra información como columnas de burbujas de diálogo.
Para la visualización de burbujas, puede configurar el número de columnas Las burbujas aparecen y el número de artículos por página . Si agrega más elementos por página de los que caben, el widget se desplazará.
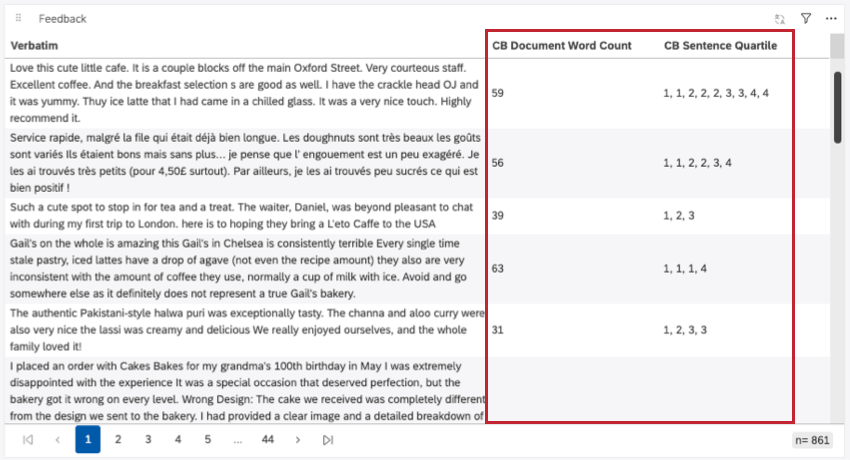
Tabla
La configuración de Tabla está disponible para vistas de oración, contexto y palabra por palabra. Muestra las respuestas como una columna de filas en una tabla. También puedes añadir columnas de metadatos A vuestras mesas.
Para la visualización de la tabla, puede establecer el número de artículos por página . Si agrega más elementos por página de los que caben, el widget se desplazará.
Clasificación
Para muchas de las vistas del widget , puedes cambiar cómo se ordena la información.
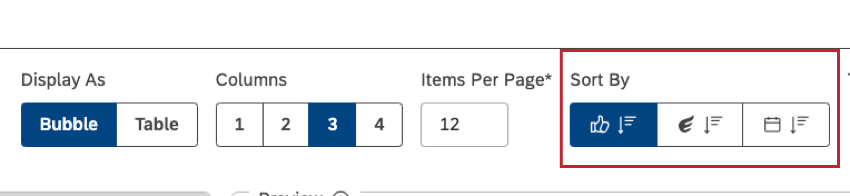
Las opciones de clasificación se enumeran en el orden en que aparecen:
- Sentimiento :Solo compatible con oración y contexto.
- Puntuación del esfuerzo: Sólo compatible con oración y contexto.
- Fecha del documento :Compatible con todas las vistas, incluidas oración, contexto, textual y documento.
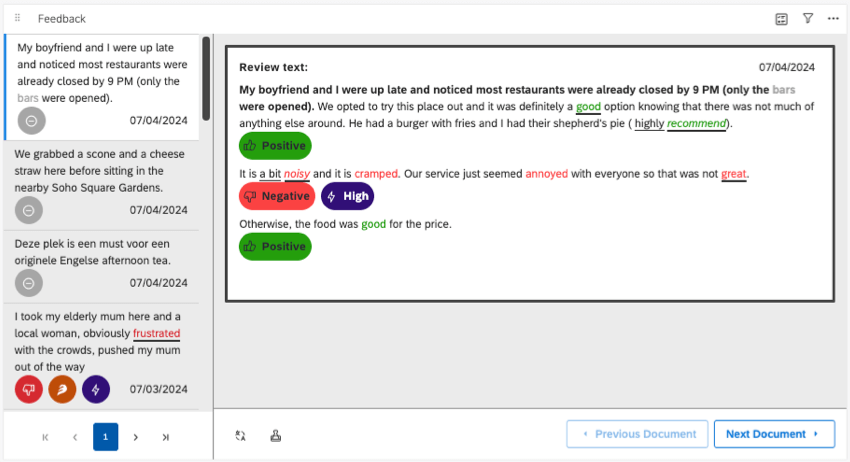
Opciones del panel
Estas configuraciones solo están disponibles si está utilizando una vista textual en el Cristal configuración, o si está utilizando la vista de documento. Estas configuraciones hacen que aparezcan nuevos paneles en tu widget.

lista las configuraciones, con cada número correspondiente al panel que se agregó en la captura de pantalla a continuación.
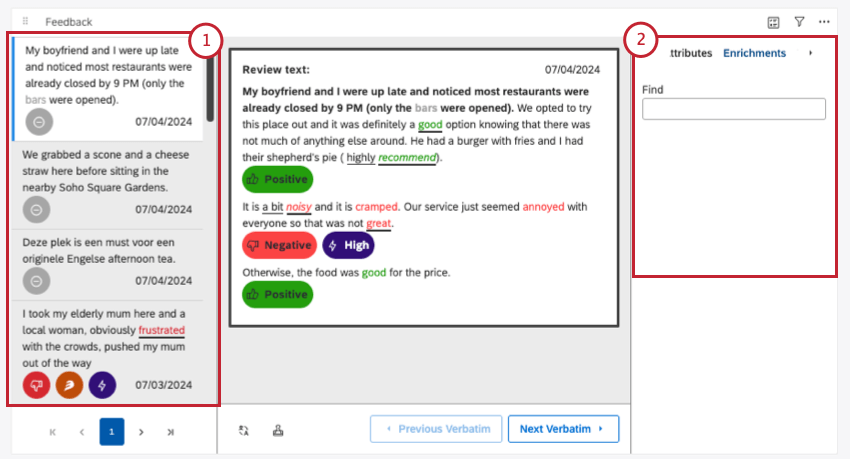
- Panel de Resultados : Vea una lista de todos los documentos y haga clic en ellos para acceder a ellos. Cuando este panel está desactivado, solo puedes navegar por un documento a la vez usando los botones de página en la parte inferior del widget.
- Panel de contexto: Vea los atributos, temas, puntuaciones, enriquecimientos y otros metadatos que haya seleccionado y que estén adjuntos a cada documento. Para obtener más información sobre cómo configurar esto, Vea la siguiente sección.
Cómo agregar contexto a los Opinión
Cuando configura su widget de opinión , puede decidir qué información desea mostrar además de sus opinión.
Cuando tu abrir el explorador de documentos , el panel de contexto muestra información adicional sobre un documento de opinión , como temas y metadatos.
En estilo de mesa widgets, el contexto aparece en nuevas columnas. Cada campo tiene su propia columna.
Habilitar el panel de contexto
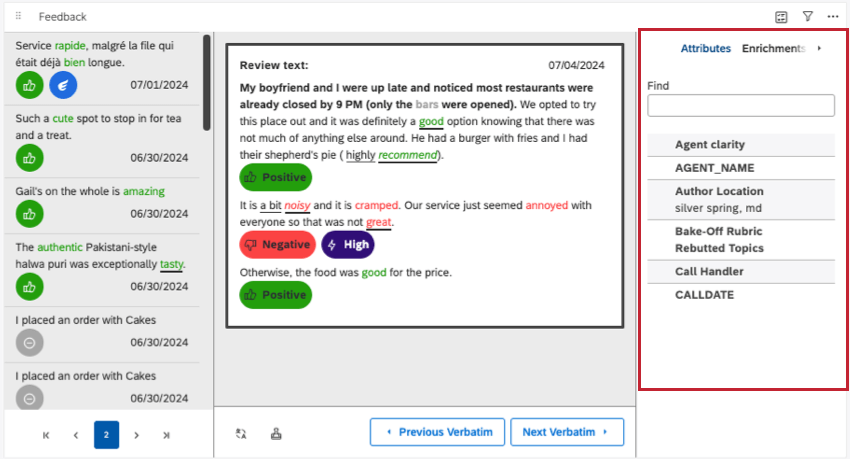
Dependiendo de la vista de widget Tú eliges, habilitas el panel de contexto de diferentes maneras.
Cuando su widget está en la vista de documento, o su verbatim está configurado para mostrar paneles, puede elegir ocultar o mostrar el panel de contexto usando el Panel de contexto configuración resaltada a continuación.
Tú haces no Debe habilitar el contexto para las vistas de oraciones y contexto. El panel de contexto siempre aparece Cuando abres un documento . Lo mismo ocurre con la mayoría de las vistas textuales, con una excepción.
Para mesa Se muestra y el contexto aparece como nuevas columnas. Si no ha agregado contexto al widget, éste no aparecerá.
Seleccionar metadatos para mostrar en el panel de contexto
Aquí, cubriremos cómo puedes agregar metadatos a cada tipo de widget de opinión .
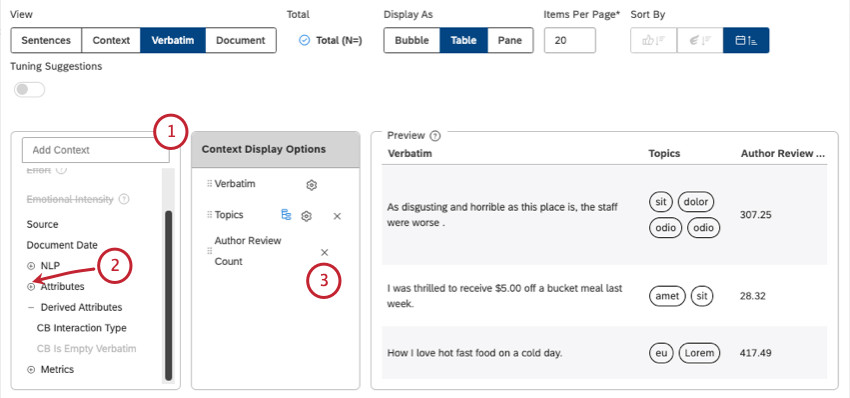
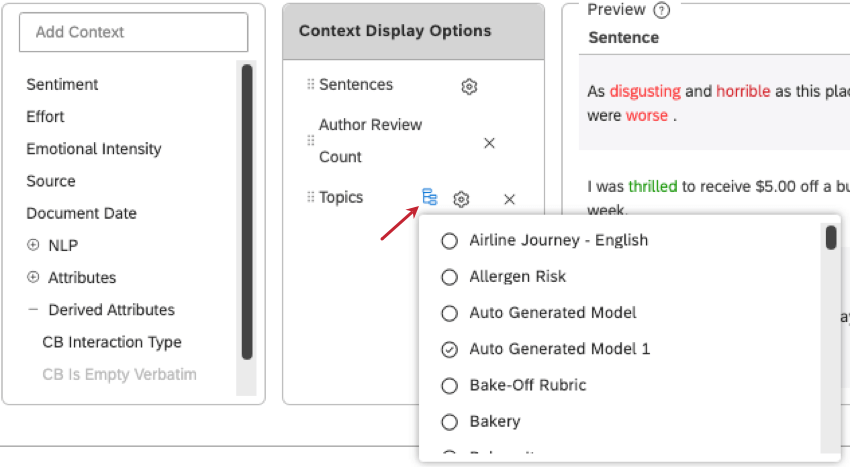
- En el Añadir contexto Menú, seleccione los elementos que desea mostrar:
- Sentimiento: Muestra el sentimiento general de la oración y permite que los espectadores aplicar comentarios basados en el sentimiento. filtros rápidos .
- Esfuerzo: Muestra la puntuación del esfuerzo de la oración y permite a los espectadores aplicar el esfuerzo filtros rápidos .
- Fuente: Mostrar la fuente de opinión (por ejemplo, Facebook o Twitter).
- Fecha del documento: Para mostrar la fecha de opinión .
- Temas: Mostrar temas relacionados.
- PNL: Mostrar atributos derivados automáticamente de la opinión del motor de procesamiento del lenguaje natural (NLP) XM Discover :
- Palabras :Muestra tipos de palabras específicas mencionadas en los opinión de los clientes.
- Enriquecimiento :Muestra tipos específicos de contenido mencionados en los opinión de los clientes.
- Idioma :Mostrar idioma de opinión .
- Atributos: Mostrar los atributos estructurados disponibles en los opinión de los clientes.
- Atributos derivados: Para mostrar atributos derivados de otros atributos o modelos de clasificación.
- Métrica: Mostrar cálculos estándar y métricas derivadas.
- Tarjetas de puntuación: Mostrar rúbricas en el Puntuación inteligente Sección de la Contexto cristal.
- Haga clic en el signo más ( + ) icono para mostrar más opciones.
- En el Opciones de visualización del contexto ventana, puede eliminar los metadatos haciendo clic en el incógnita siguiente a ellos.
- En algunas pantallas (como documentos), puedes elegir mostrar u ocultar las diferentes categorías de metadatos que hayas seleccionado.
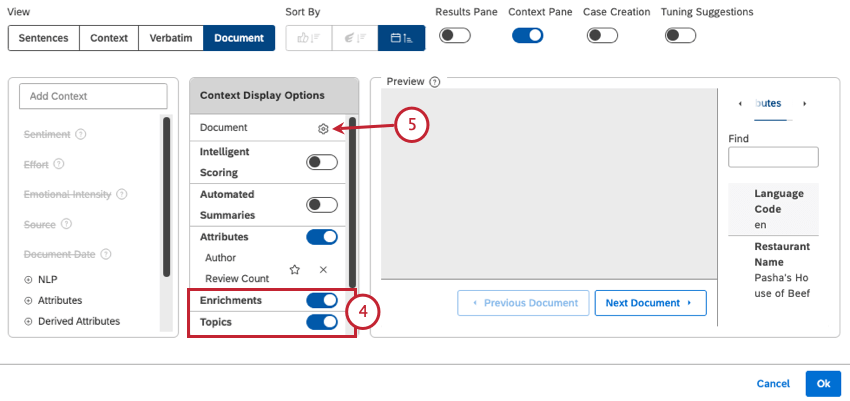
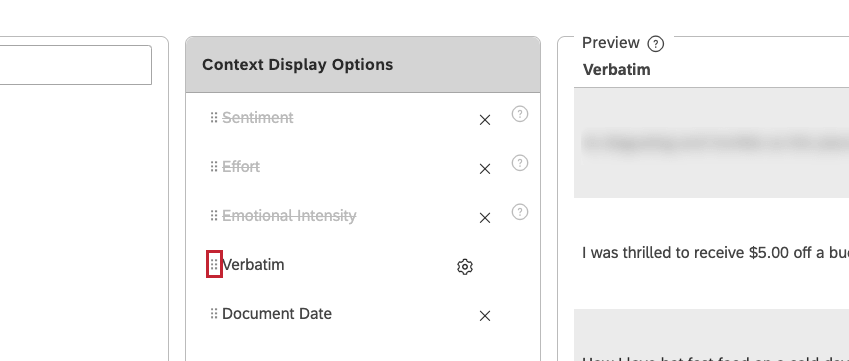
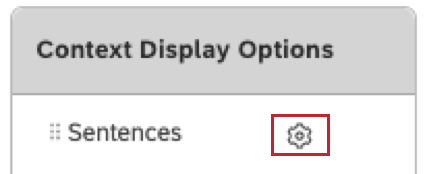
- Para algunas vistas y opciones de visualización, verá un botón de engranaje que conduce a más configuraciones. Cubriremos estas opciones en la sección siguiente.
Opciones de visualización de oraciones y contexto
Estas son las configuraciones disponibles para las vistas de oración y contexto.
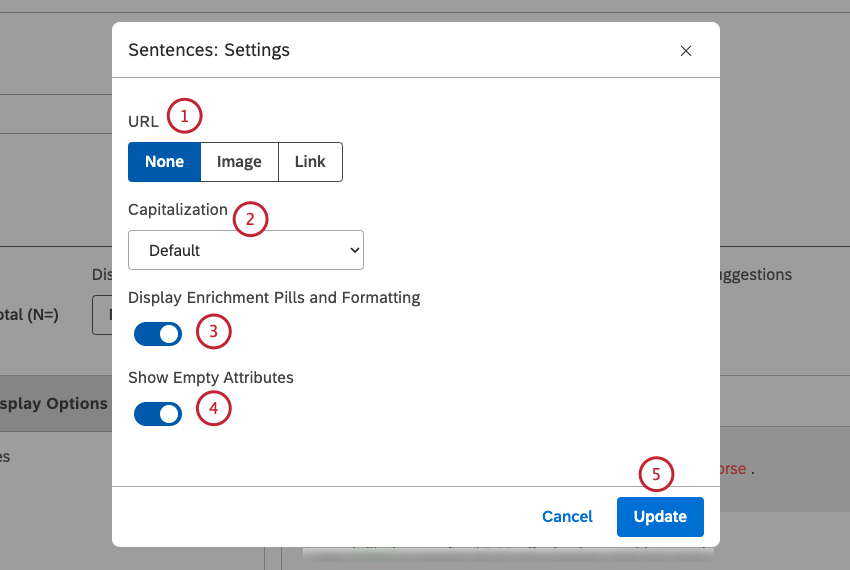
- URL :Esto determina si las URL en los atributos de opinión se muestran como URL, imágenes o hipervínculos en los que se puede hacer clic.
- Ninguno (predeterminado) :Muestra los valores de los atributo como texto sin formato.
- Imagen : Mostrar valores de atributo como imágenes. Ver Visualización de imágenes en tablas Para más detalles.
- Enlace :Muestra los valores de los atributo como enlaces en los que se puede hacer clic.
Consejo Q :Si desea mostrar una URL en el widget de opinión en la vista de tabla, proporcione la URL en un atributo que distingue entre mayúsculas y minúsculas en el Diseñador .
- Capitalización :Esto determina cómo se capitaliza la opinión en el widget.
- Por defecto :Muestra los valores tal como fueron proporcionados.
- minúscula :Muestra valores utilizando sólo letras minúsculas.
- MAYÚSCULAS :Muestra valores utilizando sólo letras mayúsculas.
- Caso de oración : Escriba con mayúscula sólo la primera letra de la primera palabra.
- Primera letra de cada palabra :Escribe con mayúscula la primera letra de cada palabra. Las letras que siguen a un guión o a un guión bajo también se escriben con mayúscula. Por ejemplo: Energía eólica, abril_encuestas.
- Píldoras de enriquecimiento de pantalla y formato :Muestra insignias de enriquecimiento (como sentimiento y esfuerzo) y formato de sentimiento . Desactive este interruptor para ocultarlos.
- Mostrar atributos vacíos : Mostrar atributos que no tienen ningún valor asociado con el documento actual en el Atributos y Información clave paneles. Desactive este interruptor para ocultar los atributos vacíos.
- Hacer clic Actualizar Cuando hayas terminado.
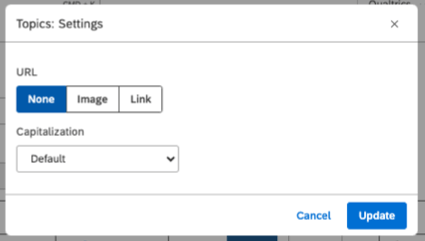
Configuración de Verbatim, Documento y Tema
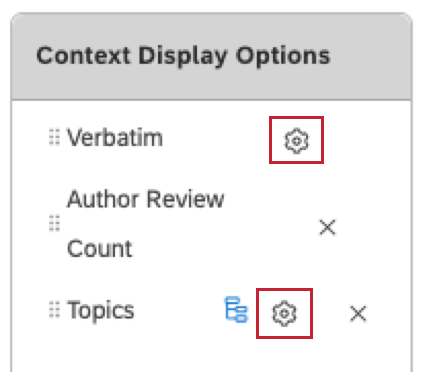
En las vistas textuales y de documentos, solo existe la URL y Capitalización configuraciones descritas en la sección anterior. Así también se ve la configuración si agrega temas y hace clic en el engranaje que está al siguiente .
Filtro temas
Esta configuración está disponible en la configuración de Tabla para las vistas de oración y contexto. Aquí puede seleccionar modelos de clasificación para mostrar.
Cómo seleccionar Opinión específicos para mostrar
Después de guardar el widget de opinión , puede seleccionar manualmente qué opinión incluir o excluir del widget.
- Abra el Tablero en Modo de edición.
- Haga clic en el menú de acciones.
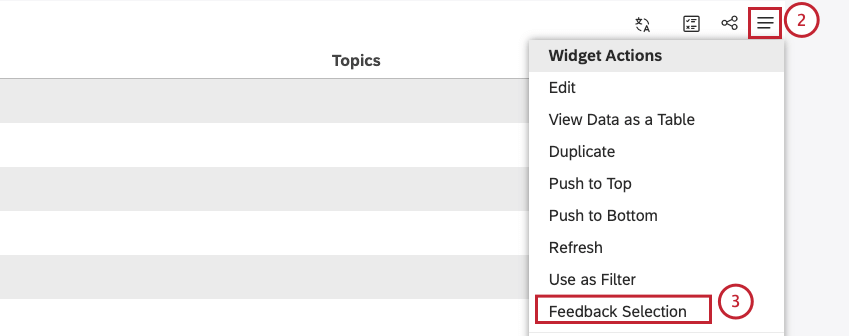
- Hacer clic Selección de Opinión .
- Seleccione la casilla de verificación siguiente a oraciones individuales, verbatims o documentos en el Seleccionar columna.
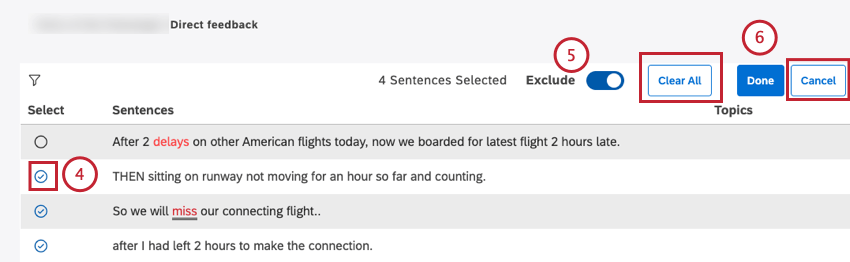 Consejo Q: Puedes hacer clic Limpiar todo para borrar todas las selecciones.
 - Girar el Excluir Activar para excluir los opinión seleccionados. Desactive este interruptor para incluir los opinión seleccionados.
- Hacer clic Hecho para confirmar la selección de opinión .
Consejo Q: Hacer clic Cancelar para cancelar la selección de opinión .
Comprender la vista del documento
Puede explorar documentos específicos utilizando una interfaz llamada explorador de documentos . Puede abrir esta vista desde su widget de opinión de dos maneras:
- Seleccionar Opinión : No importa si su widget de opinión muestra oraciones cortas o un contexto más largo, puede hacer doble clic para ver el explorador de documentos.
- Vista del documento: Si configura su widget en vista de documento Durante la configuración , siempre estará en formato de explorador de documentos.
Para aprender a utilizar el explorador de documentos, consulte los siguientes recurso:
- Navegando por el Explorador de documentos
- Diferentes vistas de oraciones
- Navegación por los Opinión por temas y enriquecimientos
- Personalización del explorador de documentos
- Exportación de datos desde el explorador de documentos
- Recortar, guardar y compartir documentos
- Visualización de cuadros de mando por documento
Filtros disponibles para los visores del Tablero
Los espectadores de su Tablero pueden filtro los opinión por sentimiento, esfuerzo o intensidad emocional utilizando filtros rápidos.
- Ir al Tablero .
- Haga clic en el icono de filtro debajo del título del widget .
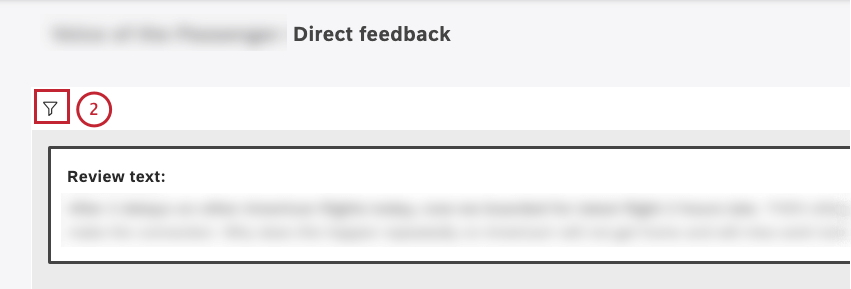
- Ampliar el Filtro rápido menú.
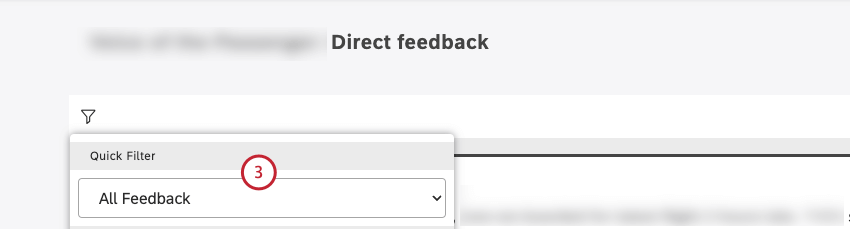
- Seleccione una de las siguientes opciones de filtrado:
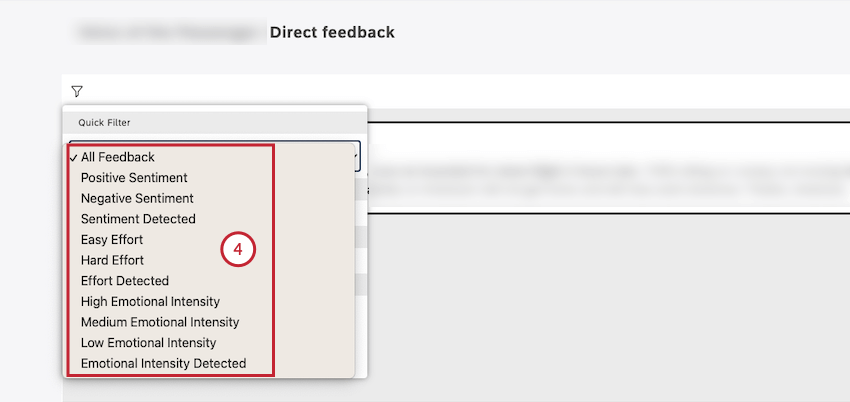
- Todos los Opinión: Mostrar todas las oraciones (incluidas registros con verbatim vacío ).
- Sentimiento positivo: Mostrar sólo oraciones con una puntuación de sentimiento de oración positiva.
- Sentimiento negativo: Mostrar oraciones con una puntuación de sentimiento de oración negativa.
- Sentimiento detectado: Mostrar todas las oraciones excepto Talones de actas vacías .
- Esfuerzo fácil: Mostrar sólo oraciones donde la puntuación del esfuerzo sea fácil o muy fácil.
- Esfuerzo duro: Mostrar sólo oraciones donde el puntaje de esfuerzo sea difícil o muy difícil.
- Esfuerzo detectado: Mostrar todas las oraciones donde se detecta una puntuación de esfuerzo.
- Alta intensidad emocional: Mostrar sólo oraciones donde la intensidad emocional sea alta.
- Intensidad emocional media: Mostrar sólo oraciones donde la intensidad emocional sea media.
- Baja intensidad emocional: Mostrar sólo oraciones donde la intensidad emocional sea baja.
- Intensidad emocional detectada: Mostrar todas las oraciones donde se detecta intensidad emocional.
Filtrar un Widget de Opinión por otro
En Studio, puedes Utilice widgets como filtros para otros widgets . Esta funcionalidad hace que su Tablero sea mucho más interactivo, permitiendo a los visitantes desglose sus datos.
Un caso de uso común es filtro un widget de opinión por otro.
Ejemplo: Enlazas un vista de oración widget de estilo de tabla y un widget de vista de documento. Al hacer clic en una oración en el primer widget, se muestra el documento correspondiente en el segundo widget.
Tenga en cuenta que esto no abra el documento en la oración exacta en la que hizo clic, ni resaltado la oración en la que hizo clic de ninguna manera.
Solución de problemas de widgets de Opinión vinculados
Si decide filtro un widget de opinión por otro widget de opinión , hay algunas cosas que debe tener en cuenta:
- Vista : Si sus dos widgets de opinión están configurados en vistas diferentes, esto puede afectar lo que sucede cuando los filtro entre sí.
Ejemplo: Usar un widget de oración para filtro lo que aparece en un widget de documento.
- Filtros: Filtros rápidos y filtros de widget Puede afectar los datos que se muestran en el widget. Si los dos widgets tienen filtros diferentes entre sí, no siempre tendrán resultados similares.
Ejemplo: Su primer widget está filtrado para mostrar solo datos de 2023. El segundo widget está filtrado para mostrar solo datos de 2024. Si hizo clic en opinión en el primer widget, no podrá devolver resultados en el segundo.
- Selección de Opinión:La selección de Opinión le permite personalizar los documentos exactos incluidos en un widget. Si alguno de los widget tiene una selección de opinión personalizada, es posible que no obtenga los resultados que espera, ya que los extraen de diferentes listas de documentos.