Conector de entrada de Trustpilot
Acerca del conector de entrada de Trustpilot
Puede utilizar el conector entrante de Trustpilot para importar calificaciones y reseñas de Trustpilot a XM Discover. Esto le permite agregar y estudiar los opinión de los clientes utilizando Funciones de análisis e informes de XM Discover.
Consejo Q: Necesitarás tu token de API de Trustpilot para configurar la conexión.
Configuración de un trabajo entrante en Trustpilot
Consejo Q: “Gestionar trabajos” permiso Es necesario para utilizar esta función.
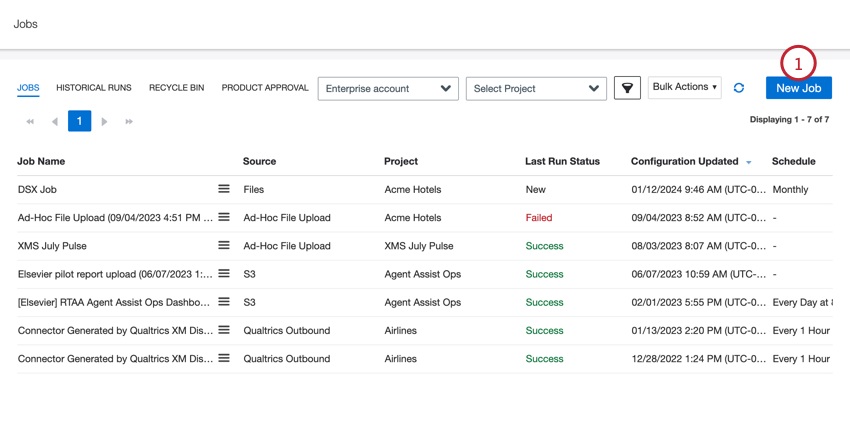
- En la página de Empleos, haga clic en Nuevo trabajo.
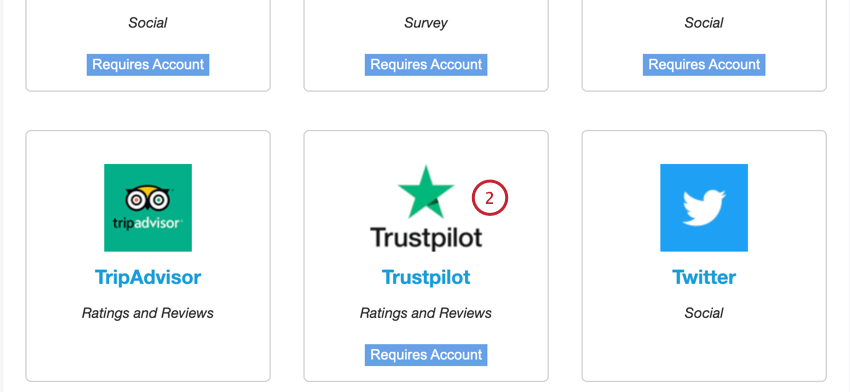
- Seleccionar Trustpilot .
- Seleccione el proyecto en el que desea cargar datos.
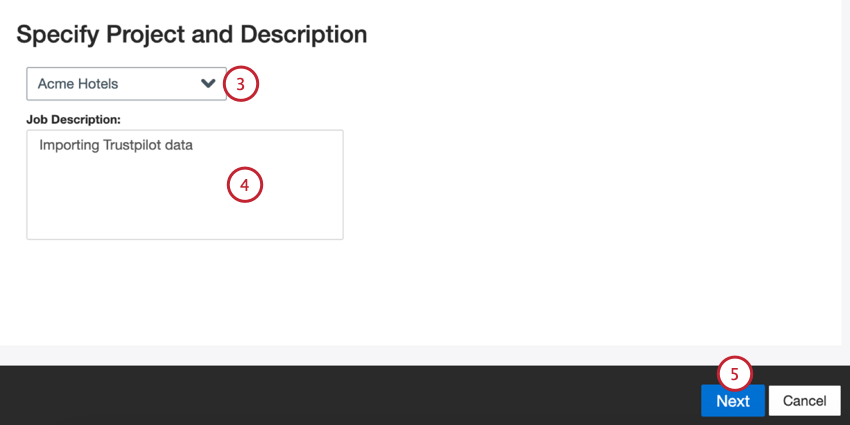
- Dale una descripción a tu trabajo para que conozcas su propósito.
- Haga clic en Siguiente.
- Elija una cuenta de Trustpilot para utilizar o seleccione Agregar nuevo para agregar uno nuevo.
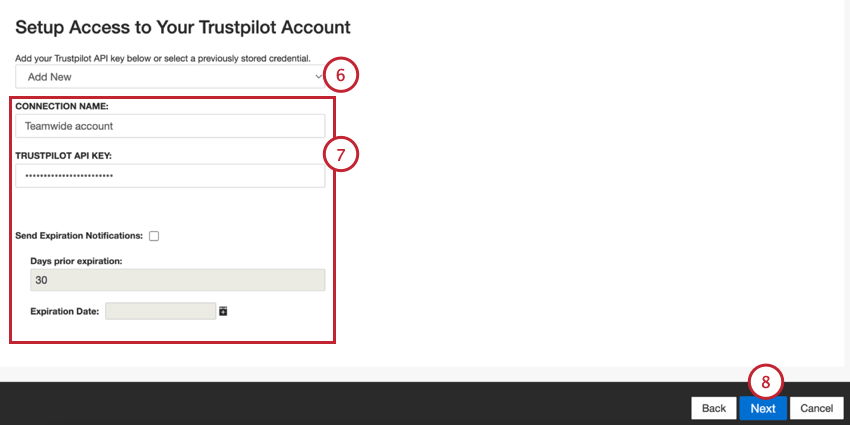
- Si desea agregar una nueva cuenta, ingrese lo siguiente:
- Nombre de la conexión : Dale un nombre a la conexión para que puedas identificarla.
- Clave API de Trustpilot : Su Clave API de Trustpilot .
- Enviar notificaciones de vencimiento :Si desea que las credenciales de su cuenta expiren después de un cierto período de tiempo, seleccione esta opción.
- Días antes del vencimiento:Si habilita las notificaciones de vencimiento, ingrese cuántos días desea recibir notificaciones antes del vencimiento. Puede ingresar un valor entre 1 y 100 días.
- Fecha de expiración:Establezca la fecha en la que caducarán las credenciales. Haga clic en el cuadro para abrir un calendario para seleccionar la fecha.
- Haga clic en Siguiente.
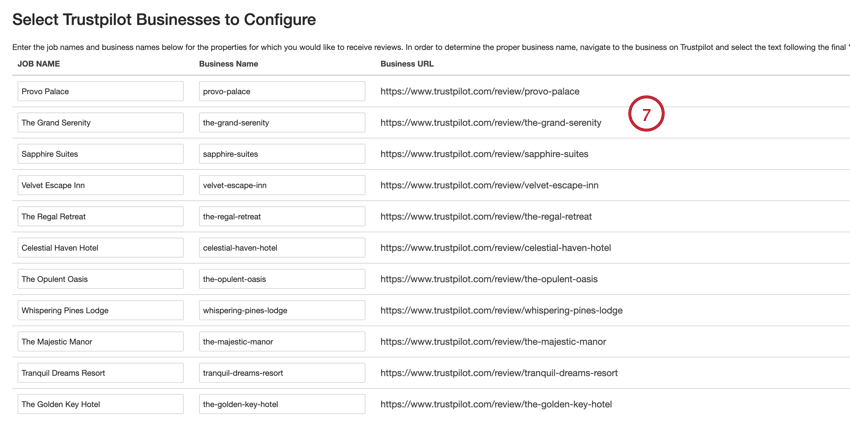
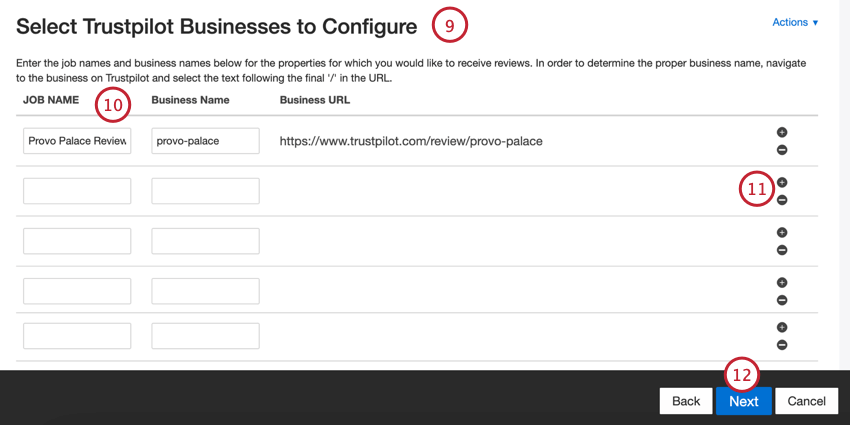
- Proporcione uno o más nombres de propiedades de un hotel, restaurante o atracción para los que desea extraer datos. Puedes hacerlo manualmente o mediante un archivo.
 Consejo Q: Estos pasos cubren la adición manual de propiedades. Ver Cargar propiedades a través de un archivo para conocer los pasos sobre cómo cargar un archivo.
 - Si agrega propiedades manualmente, ingrese la siguiente información:
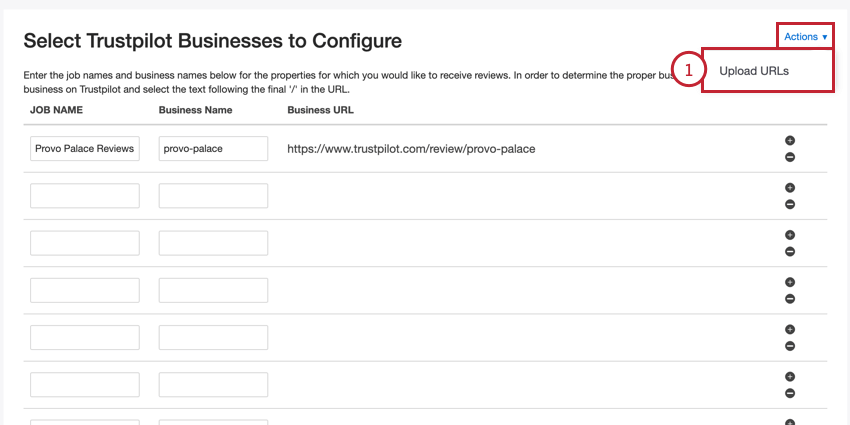
- Nombre del puesto:Un nombre para la propiedad y para el trabajo de datos. Este es el nombre que aparecerá para el trabajo en XM Discover
- Nombre de la empresa :La parte final de la URL de la propiedad de Trustpilot.
Consejo Q: Para encontrar el nombre comercial correcto, navegue hasta la empresa en Trustpilot y seleccione el texto que sigue al ‘/’ final en la URL.Ejemplo: Si la URL de la propiedad es “https://www.trustpilot.com/review/provo-palace, deberá ingresar “provo-palace”.Consejo Q: El Negocio URL El campo se actualizará automáticamente según el nombre de la empresa. Puede verificar que esta URL coincida con la URL de Trustpilot.
- Puede agregar propiedades adicionales haciendo clic en el signo más ( + ) o elimine propiedades haciendo clic en el signo menos ( – ).
- Haga clic en Siguiente.
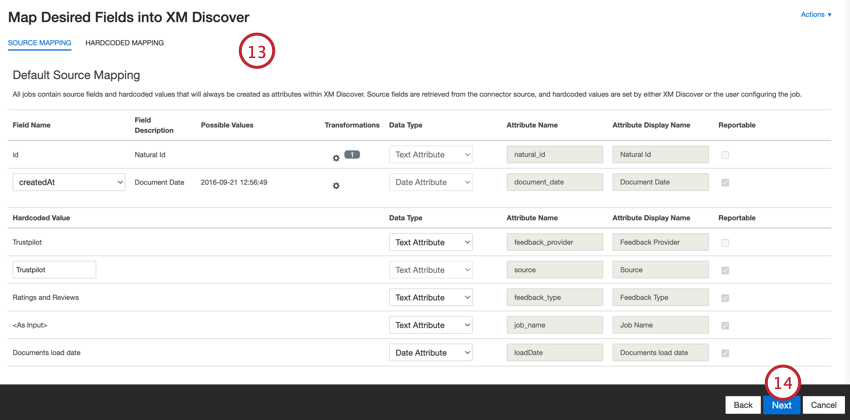
- Si es necesario, ajuste su asignaciones de datos . Ver el Página de soporte de mapeo de datos para obtener información detallada sobre el mapeo de campos en XM Discover. El Sección de mapeo de datos predeterminados Tiene información sobre los campos específicos de este conector.
- Haga clic en Siguiente.
- Si lo desea, puede agregar un filtro de conector para filtro los datos entrantes y limitar qué datos se importan.
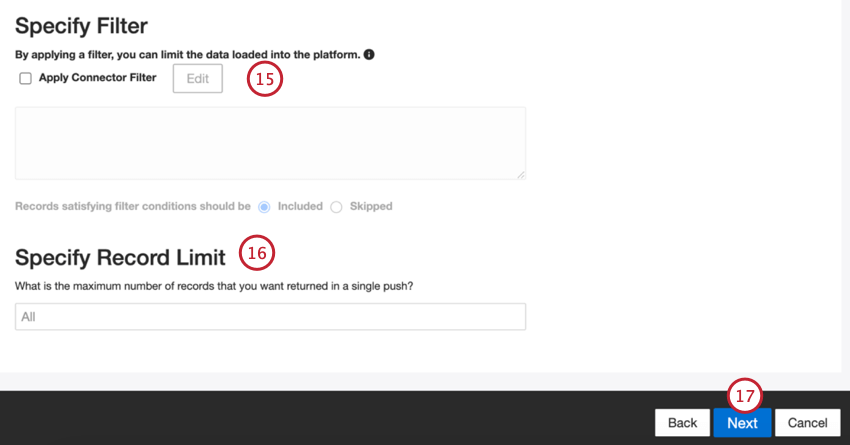
- También puede limitar la cantidad de registros importados en un solo trabajo ingresando un número en el campo Especificar límite de registro caja. Introduzca “Todos” si desea importar todos los registros.
- Haga clic en Siguiente.
- Elige cuándo quieres recibir notificaciones. Ver Notificaciones de trabajo Para más información.
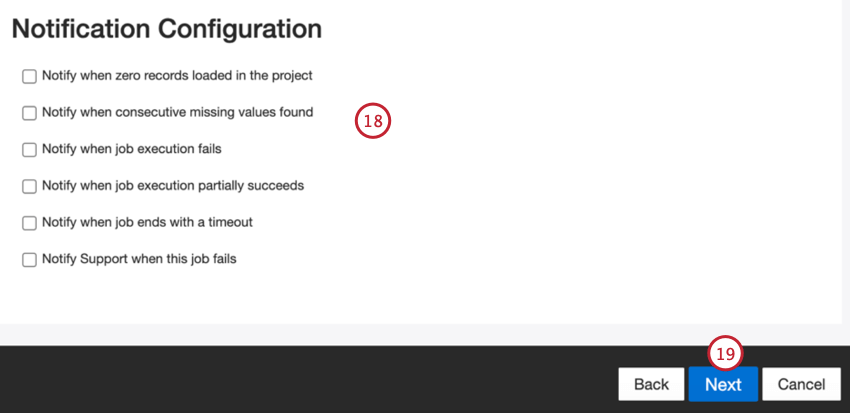
- Haga clic en Siguiente.
- Elija cómo se gestionarán los documentos duplicar . Ver Manejo de Duplicar Para más información.
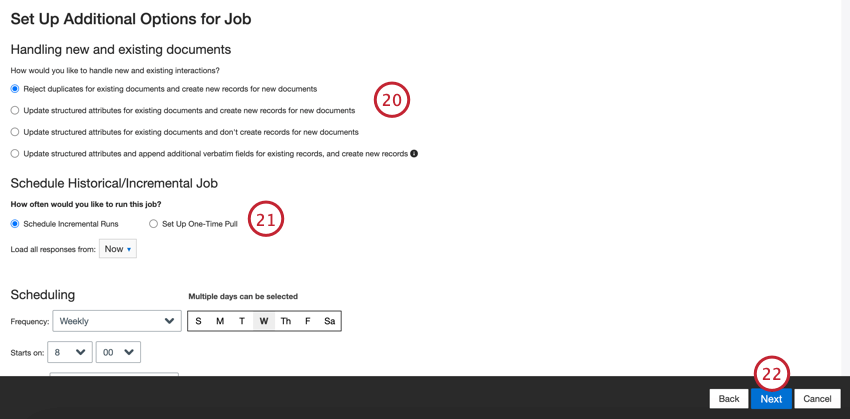
- Elegir Programar ejecuciones incrementales Si desea que su trabajo se ejecute periódicamente según un cronograma, o Configurar extracción única Si desea que el trabajo se ejecute solo una vez. Ver Programación de trabajos Para más información.
- Haga clic en Siguiente.
- Revise su configuración. Si necesita cambiar una configuración específica, haga clic en el Editar Botón para ir a ese paso en la configuración del conector.
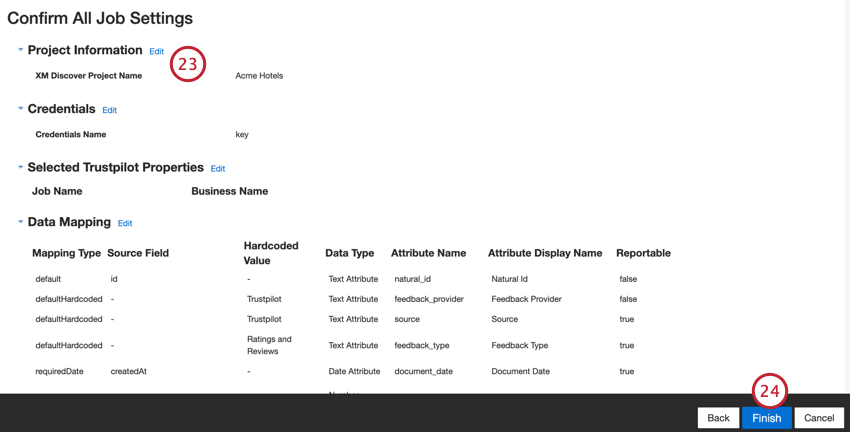
- Hacer clic Finalizar para salvar el trabajo.
Asignación de datos predeterminada
Esta sección contiene información sobre los campos predeterminados para los trabajos entrantes de Trustpilot.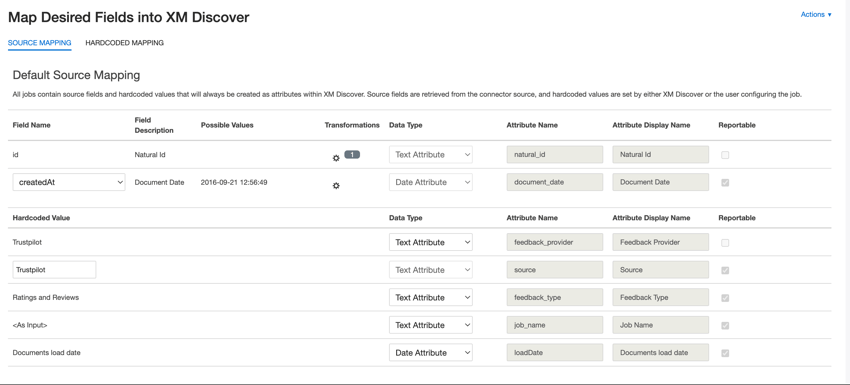
- identificación natural :Un identificador único de un documento. Es muy recomendable tener un ID único para cada documento para procesar los duplicados correctamente. Para Natural ID, puede seleccionar cualquier campo de texto o numérico de sus datos. Alternativamente, puede hacerlo automáticamente generar identificaciones agregando un campo personalizado. Para Natural ID, XM Discover utiliza ID de origen prefijados por el nombre del conector a través de una transformación personalizada: Natural ID = Connector-name;Source-ID.
- fecha del documento :El campo de fecha principal asociado a un documento. Esta fecha se utiliza en informes , tendencias, alertas, etc. de XM Discover . Puedes utilizar uno de los siguientes:
- createdAt (predeterminado): La fecha en que se publicó la reseña.
- actualizadoEn: La fecha en que se actualizó la reseña.
- Creado en: La fecha en que la empresa respondió a una reseña, si está disponible.
- Si sus datos de origen contienen otros campos de fecha, puede seleccionarlos para la fecha del documento.
- También puedes Establezca una fecha específica agregando un campo personalizado.
- proveedor de retroalimentación :Identifica los datos obtenidos de un proveedor específico. Para las cargas de Trustpilot, el valor de este atributo se establece en “Trustpilot” y no se puede cambiar.
- valor_fuente :Identifica datos obtenidos de una fuente específica. Esto puede ser cualquier cosa que describa el origen de los datos, como el nombre de una encuesta o una campaña de marketing móvil. De forma predeterminada, el valor de este atributo se establece en “Trustpilot”. Usar transformaciones personalizadas para establecer un valor personalizado, definir una expresión o asignarlo a otro campo.
- tipo_de_retroalimentación :Identifica datos según su tipo. Esto es útil para generar informes cuando su proyecto contiene diferentes tipos de datos (por ejemplo, encuestas y opinión en las redes sociales). De forma predeterminada, el valor de este atributo se establece en “Calificación y reseñas” y no se puede cambiar.
- nombre_del_trabajo :Identifica los datos según el nombre del trabajo utilizado para cargarlos. Puede modificar el valor de este atributo al agregar propiedades mientras configura el trabajo.
- Fecha de carga :Indica cuándo se cargó un documento en XM Discover. Este campo se configura automáticamente y no se puede cambiar.
Cargar propiedades a través de un archivo
Esta sección cubre cómo cargar propiedades a través de un archivo Excel en lugar de ingresarlas en XM Discover manualmente.
- Al agregar información de la propiedad, haga clic en Comportamiento y luego Subir URL.
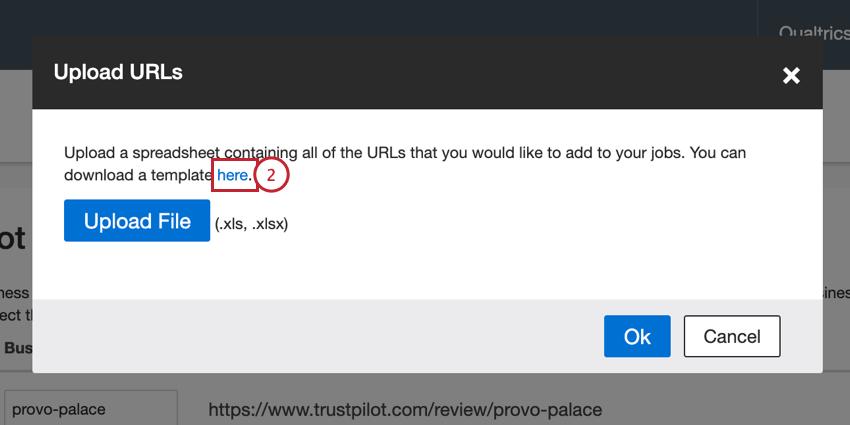
- Haga clic en el hipervínculo “aquí” para descargar un archivo de plantilla XLSX . Abra este archivo en Excel u otro editor de hojas de cálculo en su computadora.
- Agregue la información de su propiedad en las primeras 2 columnas:
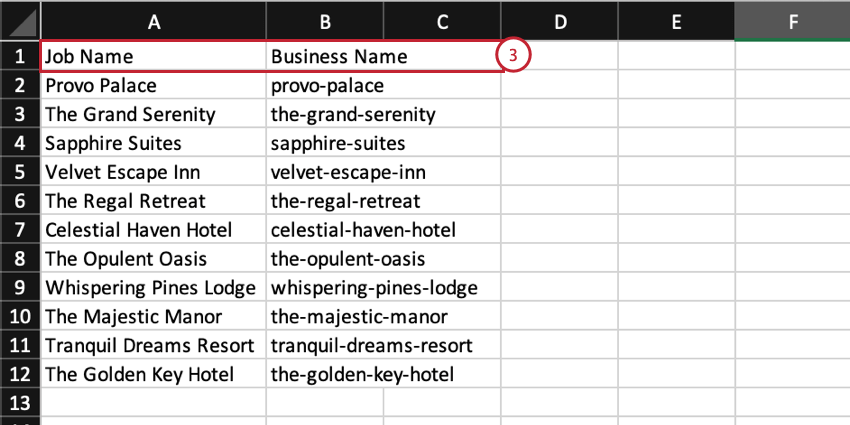
- Nombre del puesto:Un nombre para la propiedad y para el trabajo de datos. Este es el nombre que aparecerá para el trabajo en XM Discover
- Nombre de la empresa :La parte final de la URL de la propiedad de Trustpilot.
- Guarde su archivo como un XLS o XLSX archivo.
- En XM Discover, haga clic en Subir archivo y elige el archivo guardado en tu computadora.
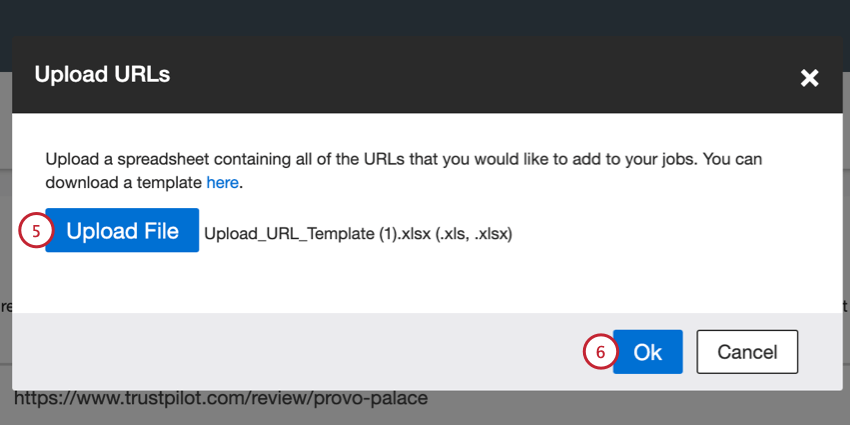
- Hacer clic De acuerdo.
- Verifique nuevamente sus propiedades para detectar cualquier error. Puede corregir manualmente cualquier nombre de trabajo o nombre comercial o cargar un archivo actualizado.
