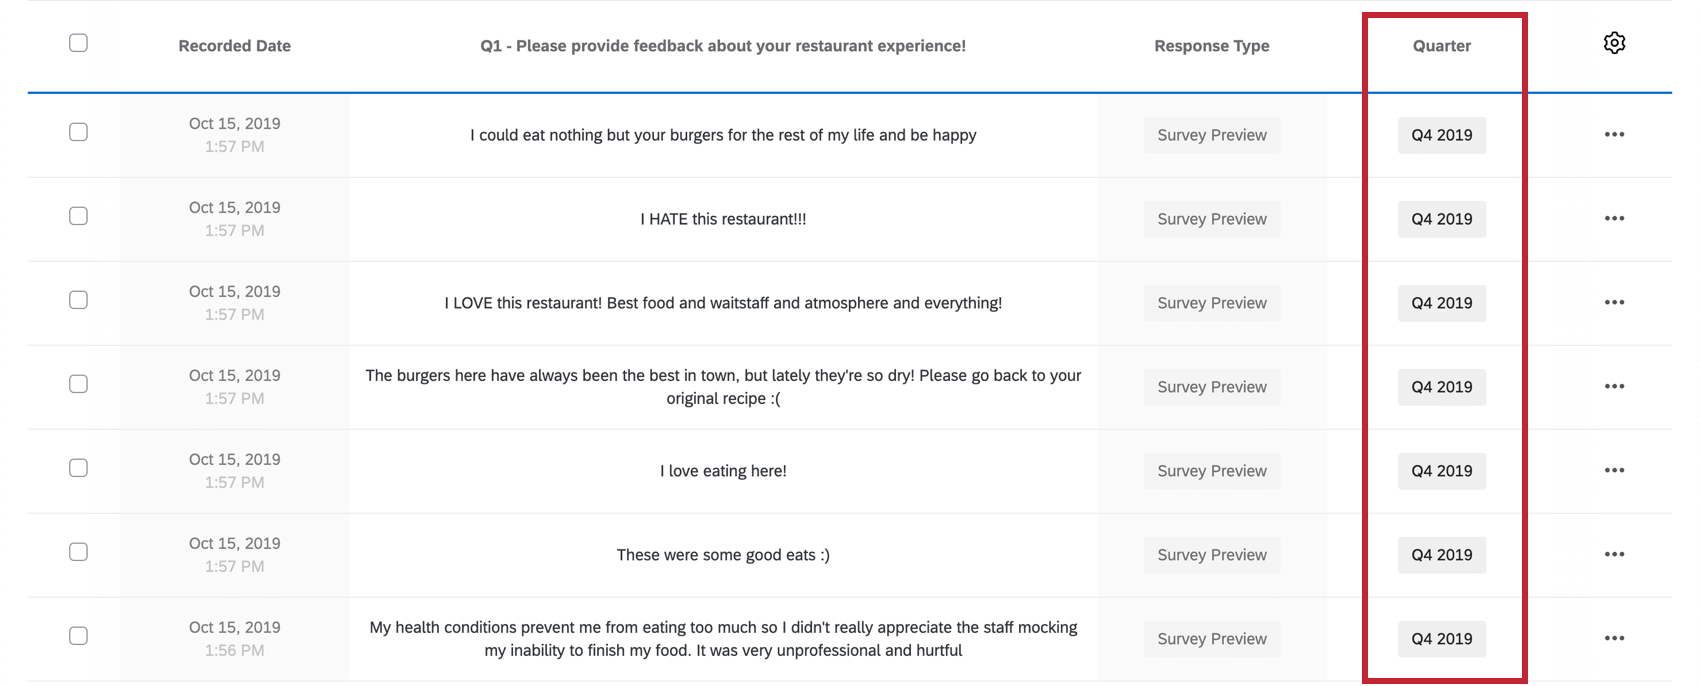
Campos manuales
Acerca de los campos manuales
Puede agregar nuevos campos personalizados a las respuestas incluso después de que ya hayan sido grabado, mejorando sus datos e informes. Puede agregar cualquier información personalizada que desee, ya sea en formato de texto, fecha, numérico e incluso de respuestas múltiples. Los campos personalizados pueden ser una gran alternativa si no los configuraste lógica de ramificación con datos embebidos campos antes de iniciar la encuesta.
Tipos de campos manuales
- Fecha: Registre la información de fecha exacta para sus respuestas. En los informes, estos se pueden utilizar para filtrar fechas, lo que le permite establecer períodos de tiempo que le interesa presentar o investigar.
- Numérico: Introduzca datos numéricos sin otros símbolos, como comas, barras o signos de moneda ( $ ). Se admiten decimales.
- Texto: Acepta cualquier carácter de texto, número o símbolo. Esta opción puede ser ideal tanto para notas detalladas como para datos categóricos.
- Etiquetas: Categorizar datos con etiquetas cortas. Puede agregar varias etiquetas a la misma respuesta.
Creación de un campo personalizado manual
- Ir a Datos y análisis.

- Asegúrate de estar en el Datos sección.
- Seleccionar Editor de campo.
- Hacer clic Crear campo.
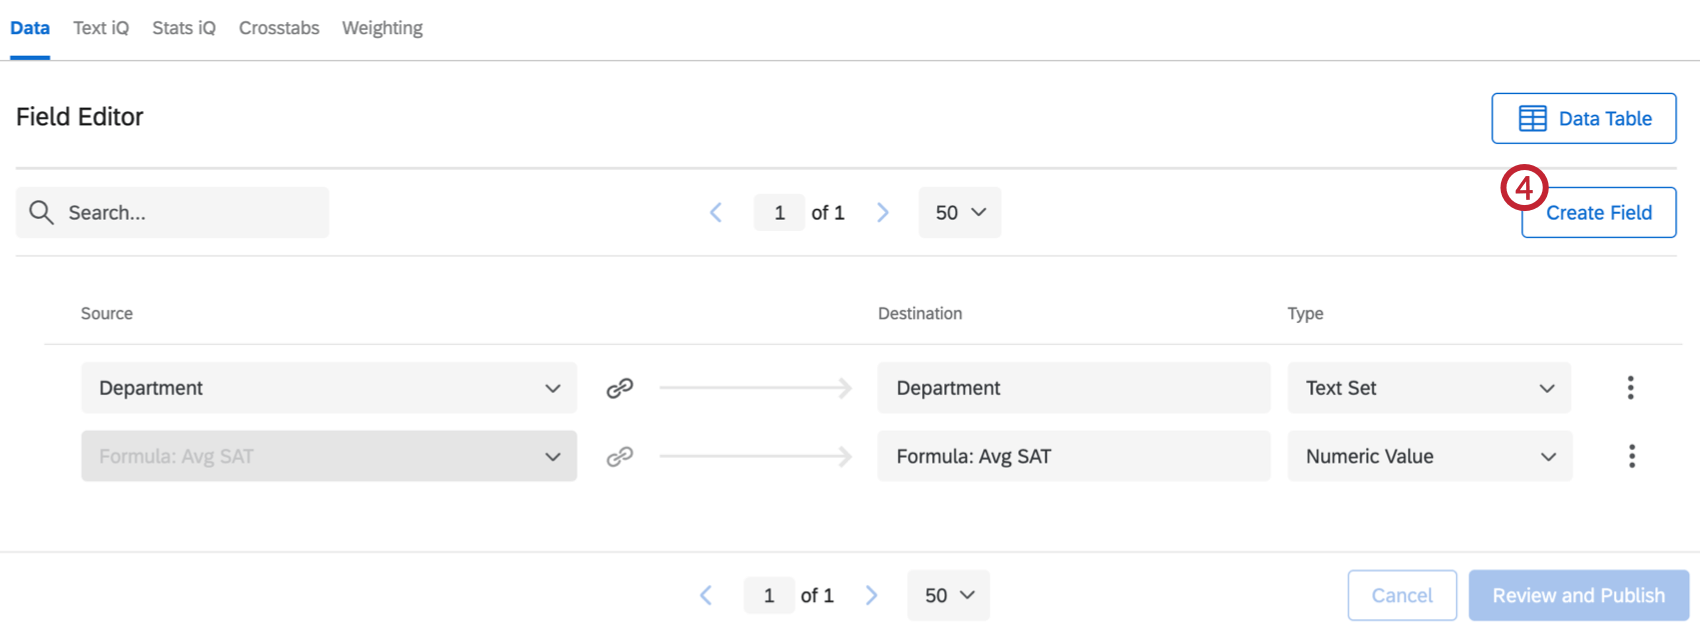
- Elegir Manual.
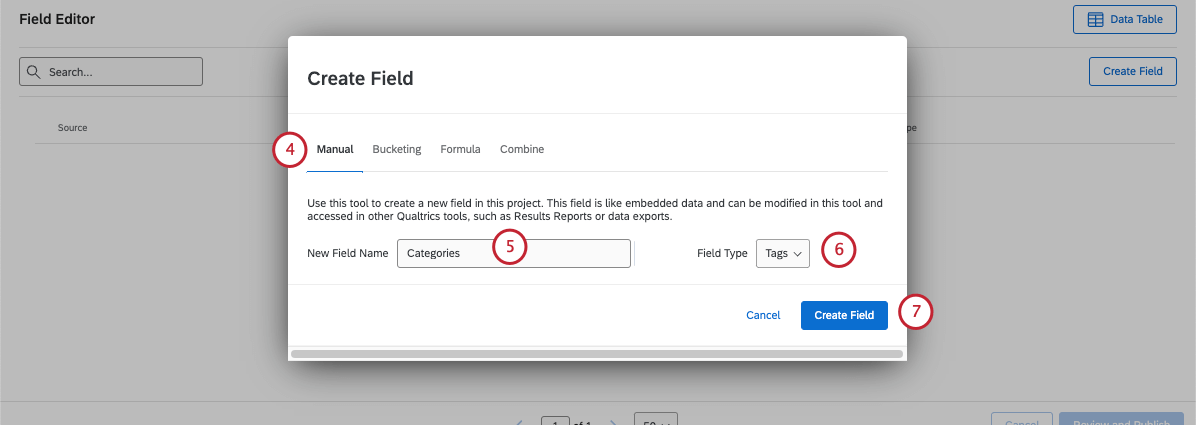
- Añade un nombre para tu campo.
- Elija un tipo de campo. Vea nuestro lista de campos manuales.
- Seleccionar Crear campo.
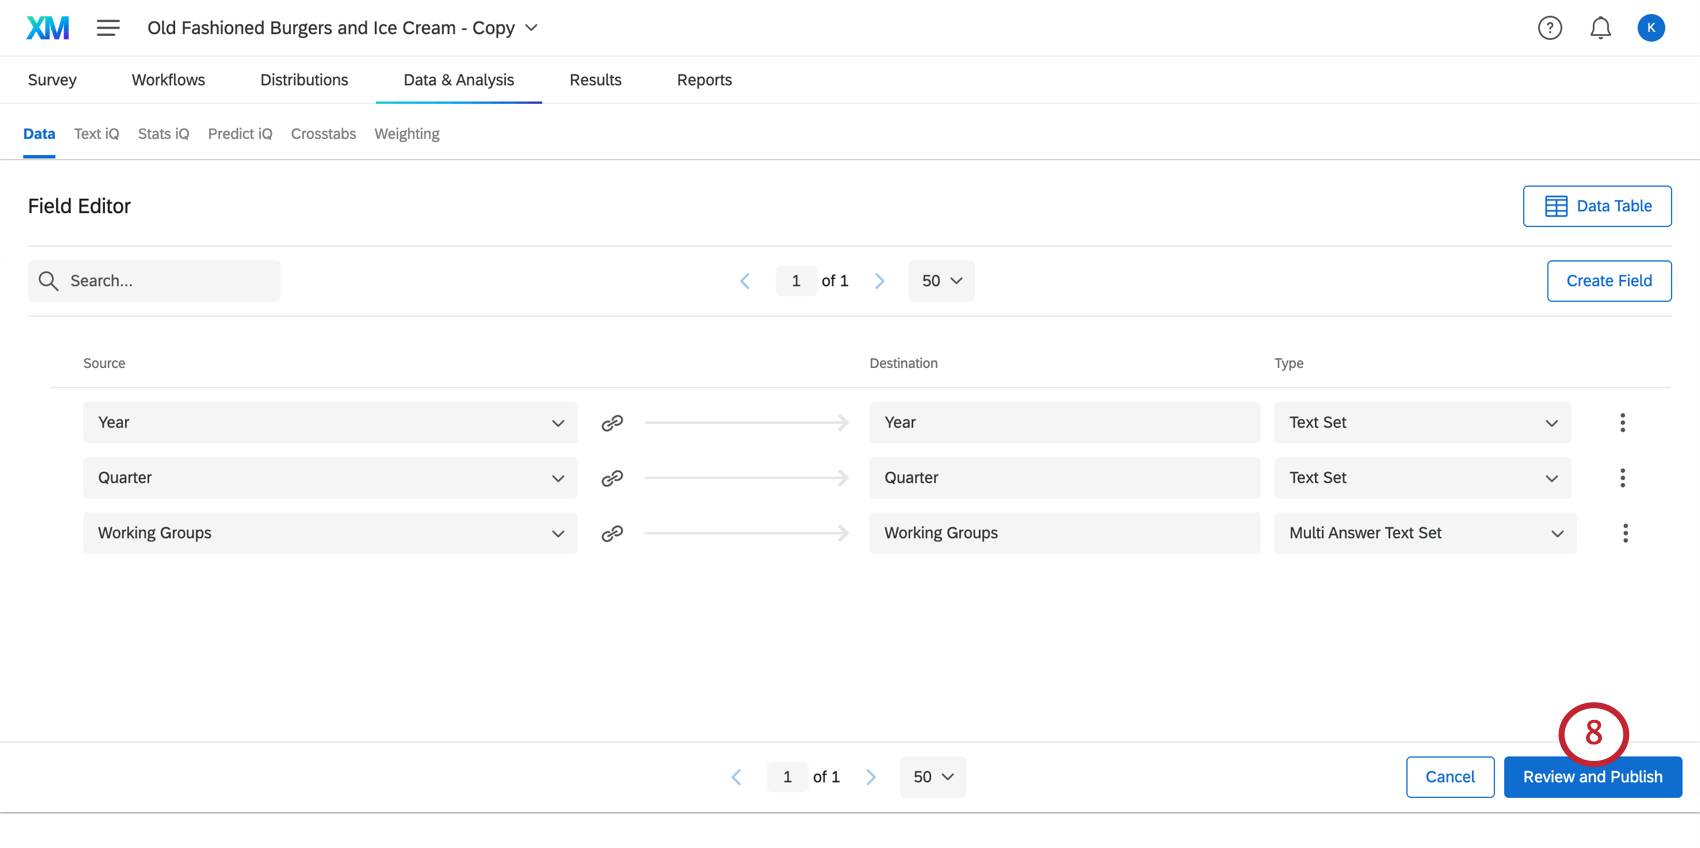
- Hacer clic Revisar y Publicar.
- Hacer clic Publicar tus cambios para guardar su nuevo campo.
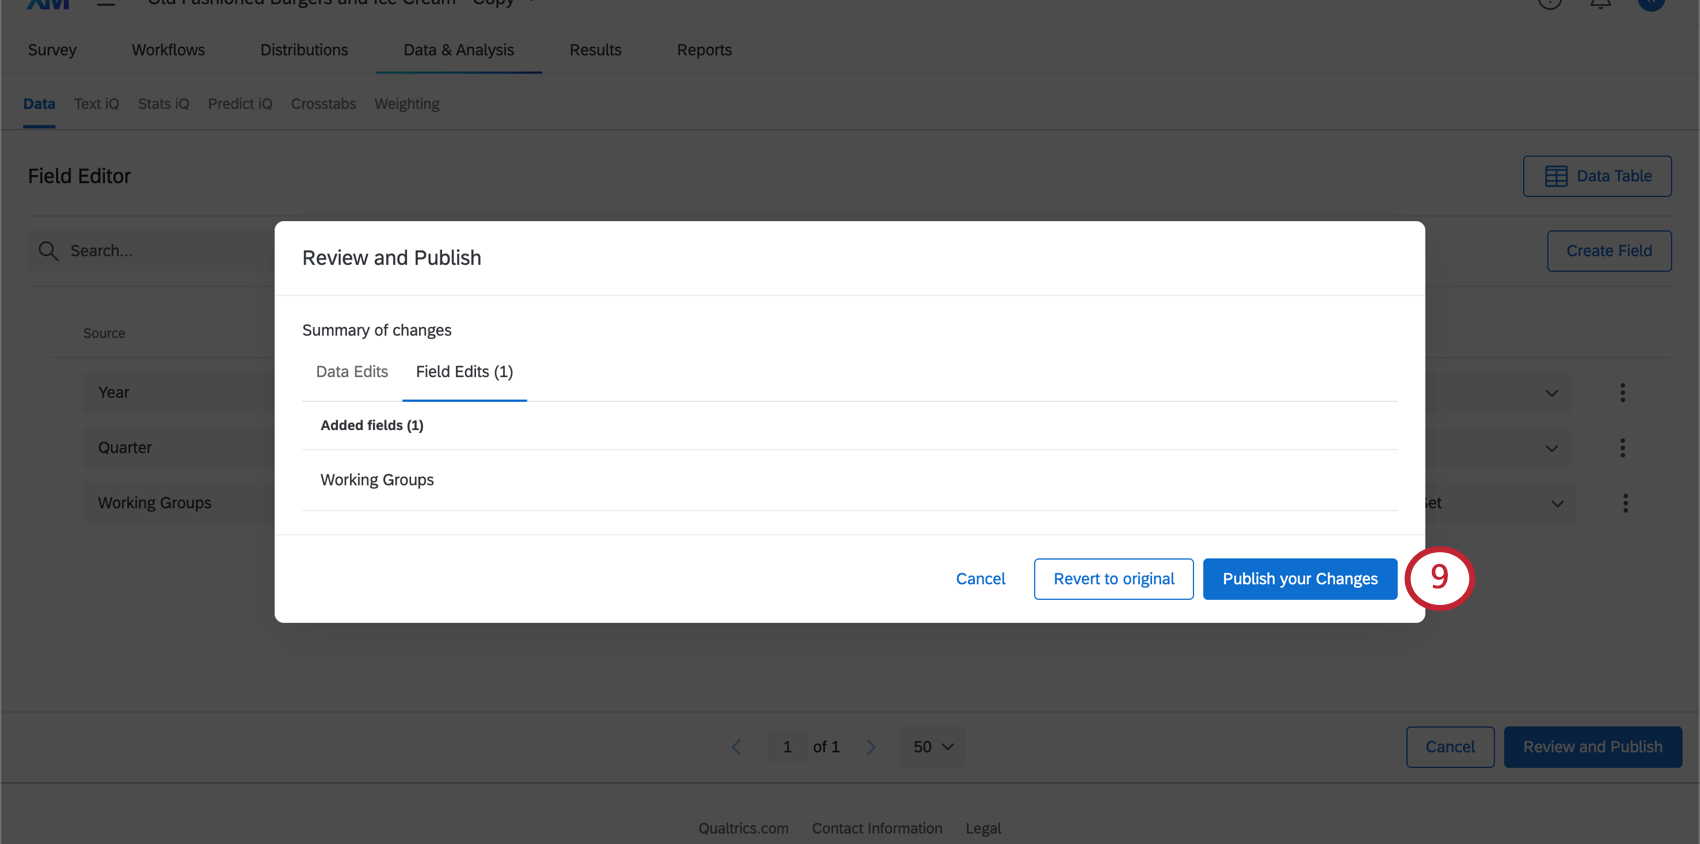 Consejo Q: También puedes seleccionar Revertir al original para revertir las ediciones de su campo.Consejo Q: Puede pasar algún tiempo hasta que su conjunto de datos termine de actualizarse. Es seguro abandonar esta página mientras espera.
 - Ahora puedes Agregar valores para una respuesta o Múltiples respuestas a la vez.
Asignar un valor a un campo manual
Ahora que ha creado su campo, es momento de establecer sus valores. En esta sección, le mostraremos cómo cambiar el valor de su nuevo campo manual en una respuesta a la vez.
- Navegar hasta el Datos y análisis pestaña.
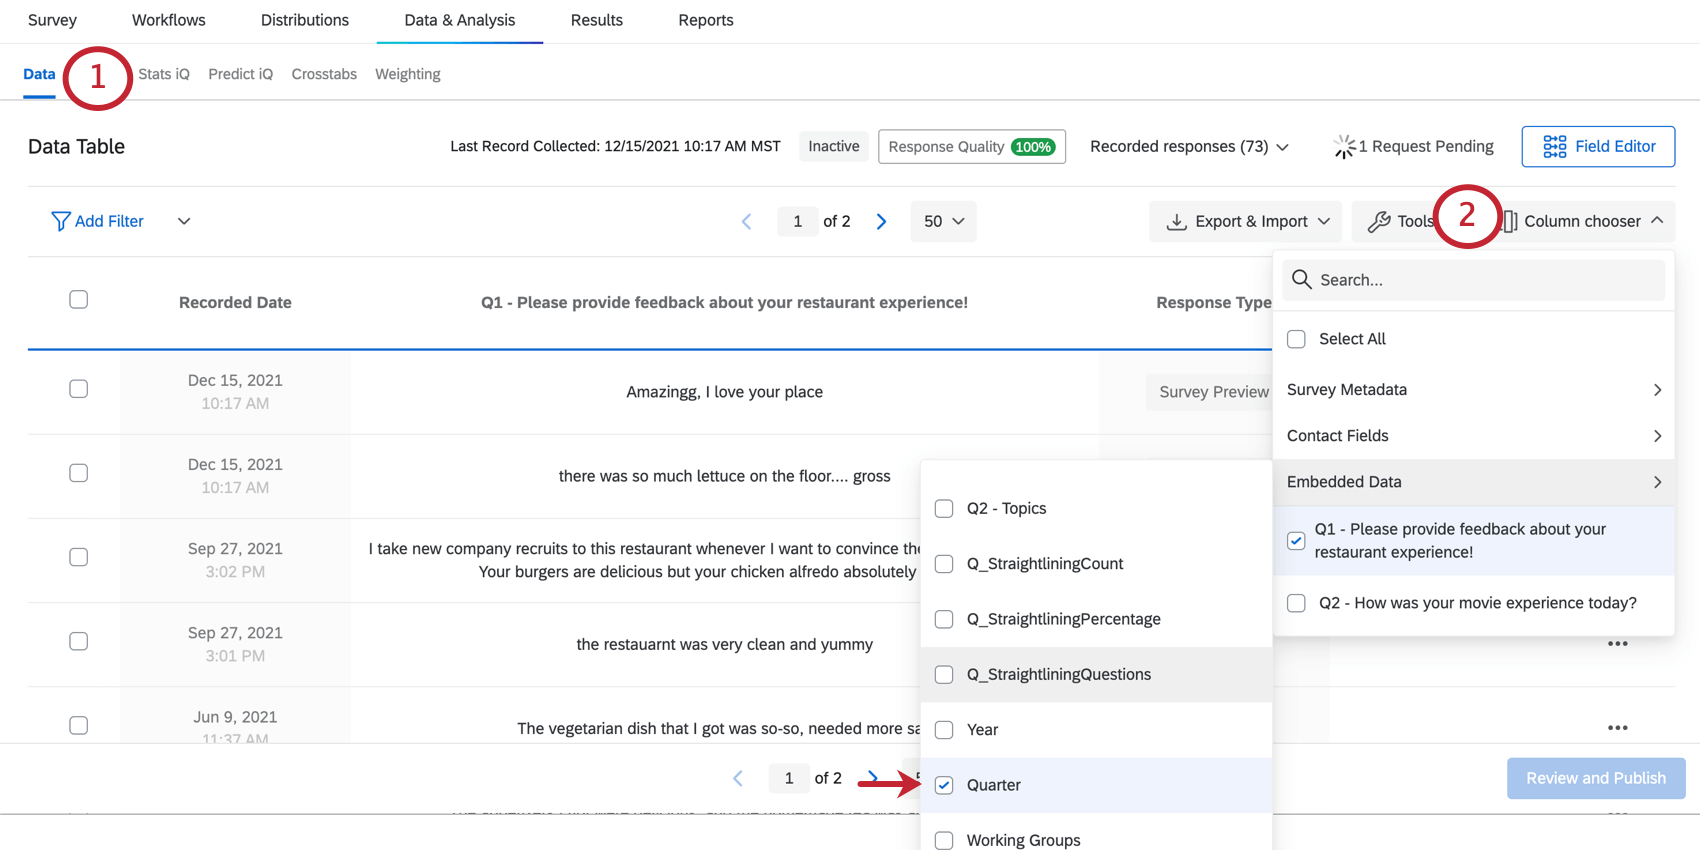
- Seleccionar columnas, mira debajo Datos integradosy asegúrese de mostrar el campo que acaba de crear.
- Encuentra la respuesta que deseas editar.
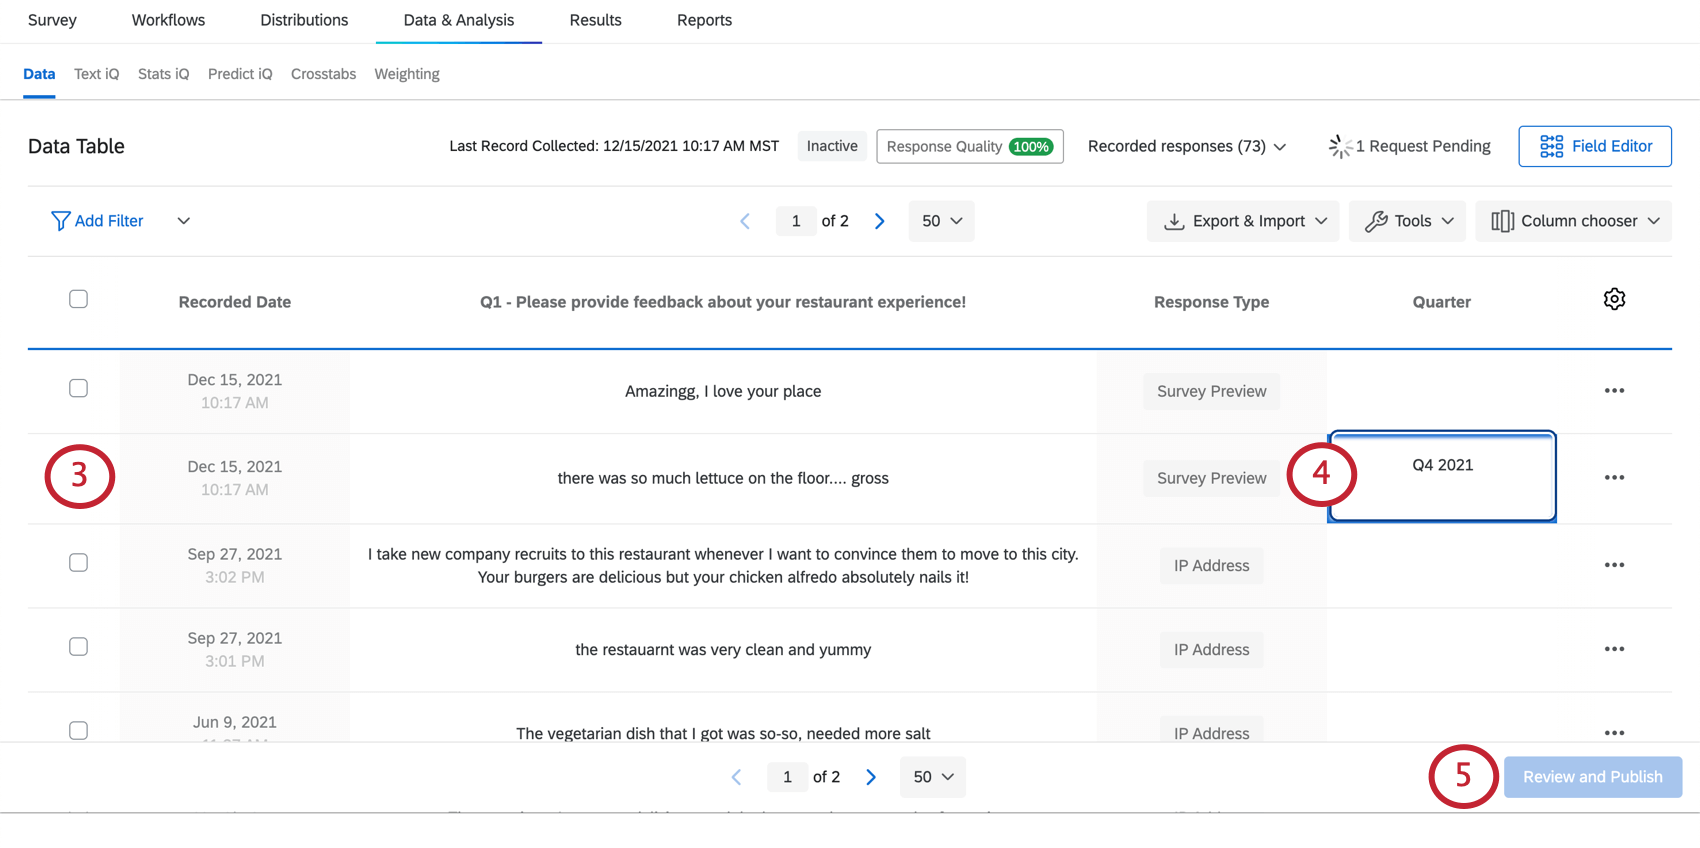 Consejo Q: Puedes hacer esto mediante Navegar manualmente por las páginas o Filtrando sus datos.
 - Escriba el valor deseado para cada respuesta.
Consejo Q:golpear Pestaña o Ingresar (Ventanas) / devolver (Mac) Al presionar dos veces el cursor se moverá al siguiente cuadro de campo inmediatamente debajo.
- Hacer clic Revisar y Publicar.
Consejo Q: Es posible que tengas que hacer clic en algún lugar fuera del campo que acabas de editar antes de que se pueda hacer clic en este botón. Por ejemplo, haga clic en el espacio en blanco en el pie de página de la página o haga clic en la barra de desplazamiento del navegador.
- Hacer clic Publicar tus cambios.
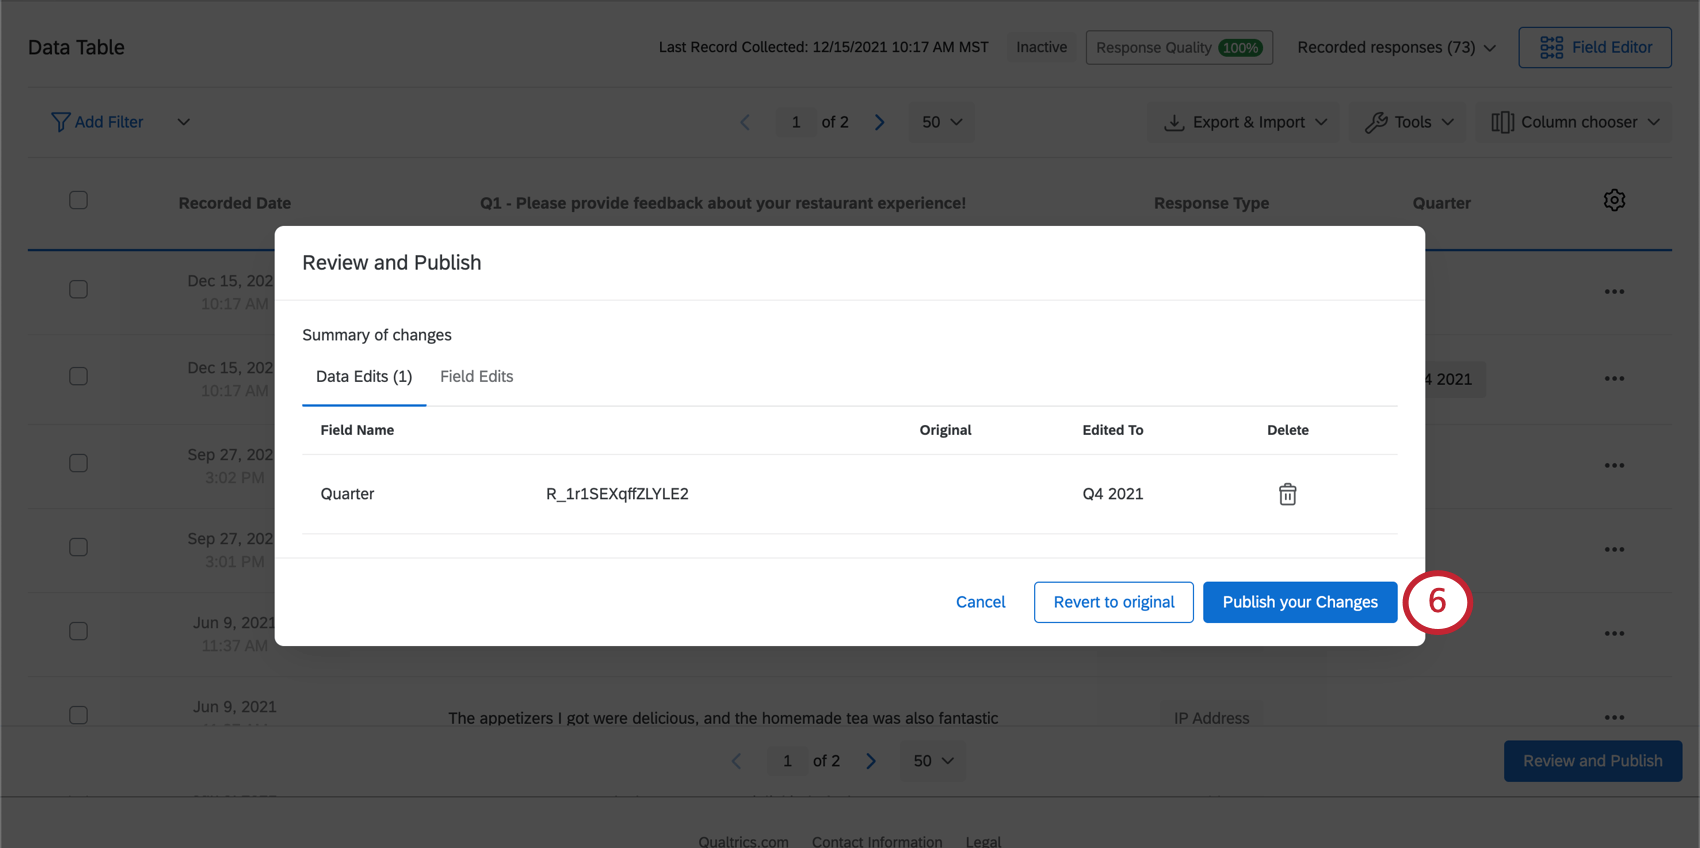
Asignar un valor a varias Respuestas a la vez
Ahora que ha creado su campo, es momento de establecer sus valores. En esta sección, le mostraremos cómo cambiar el valor de su nuevo campo manual en muchas respuestas a la vez.
Este método es el mejor para dar a muchas respuestas el mismo valor a la vez. Por ejemplo, encontrar todas las respuestas registradas en 2024 y etiquetar un campo “Año” como “2024” para todas ellas.
- Navegar hasta el Datos y análisis pestaña.
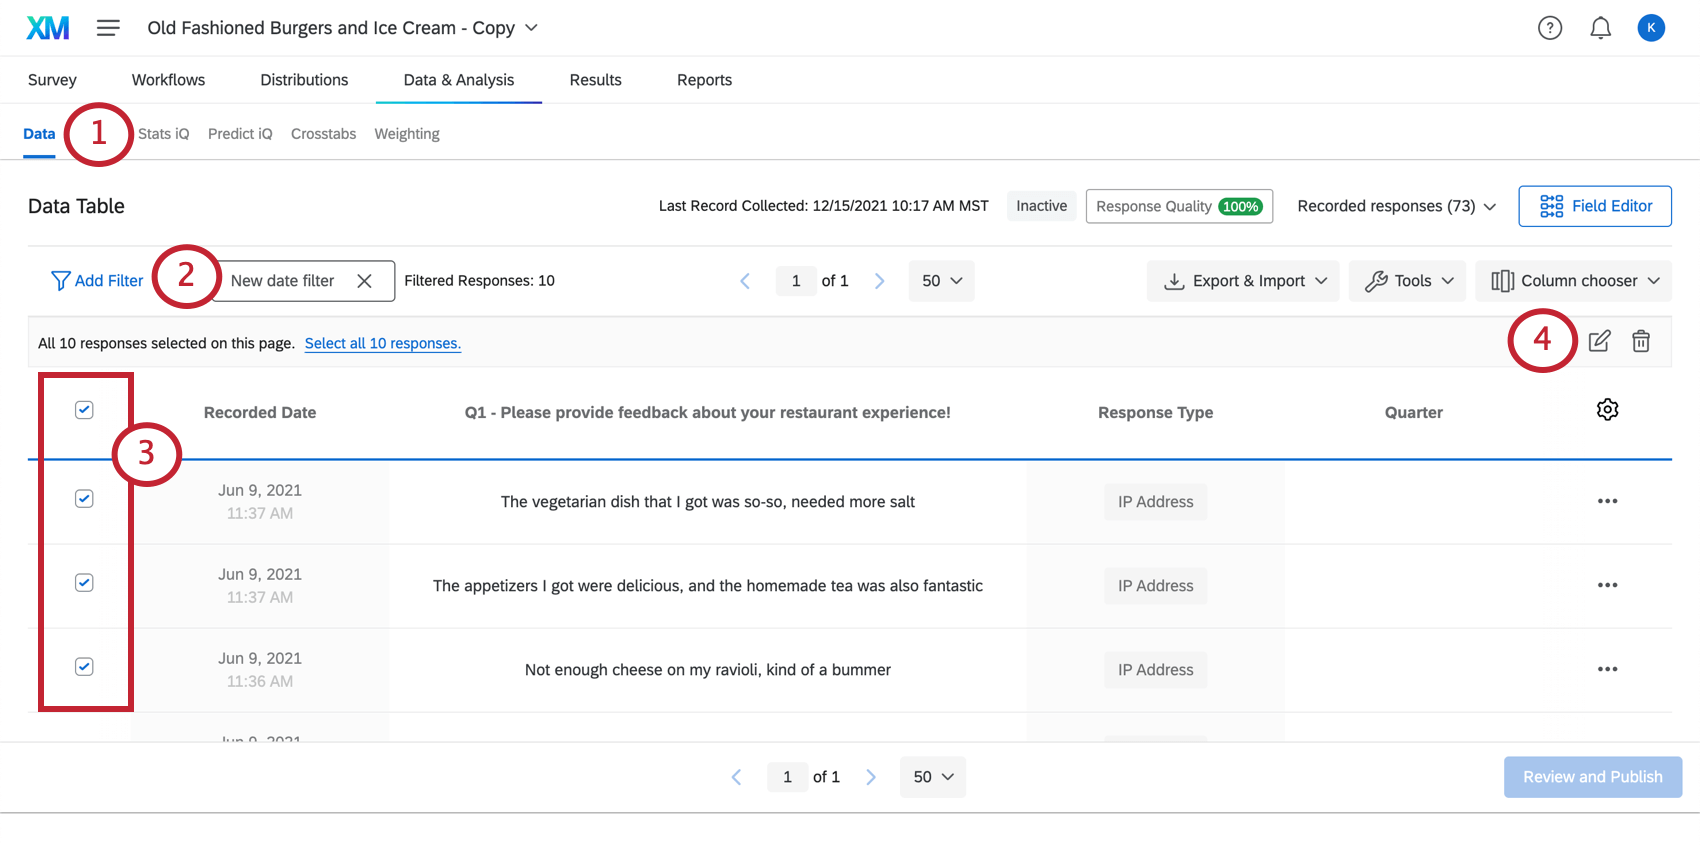
- Si quieres, puedes filtro las respuestas Quieres editar.
Ejemplo: Filtro todas las respuestas recopiladas entre el 1 de enero de 2020 y el 31 de diciembre de 2020 para etiquetarlas con la misma etiqueta todas a la vez.
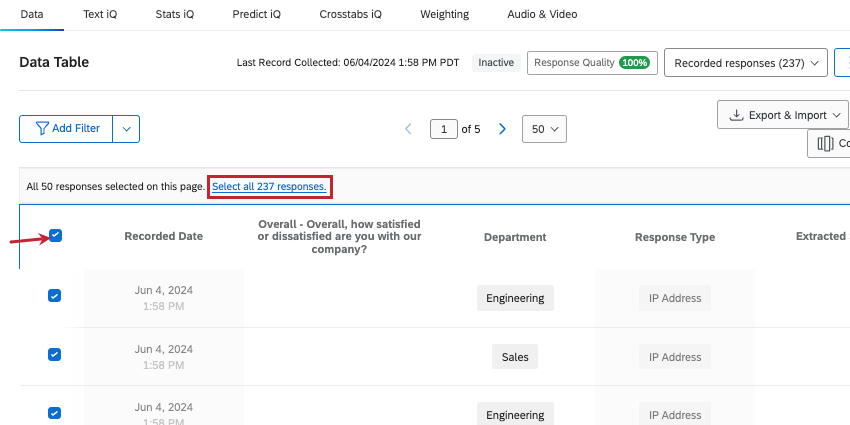
- Seleccione las respuestas que desea editar.
- Haga clic en el icono editar.
- Bajo Nombre del campo, seleccione el campo que desea editar.
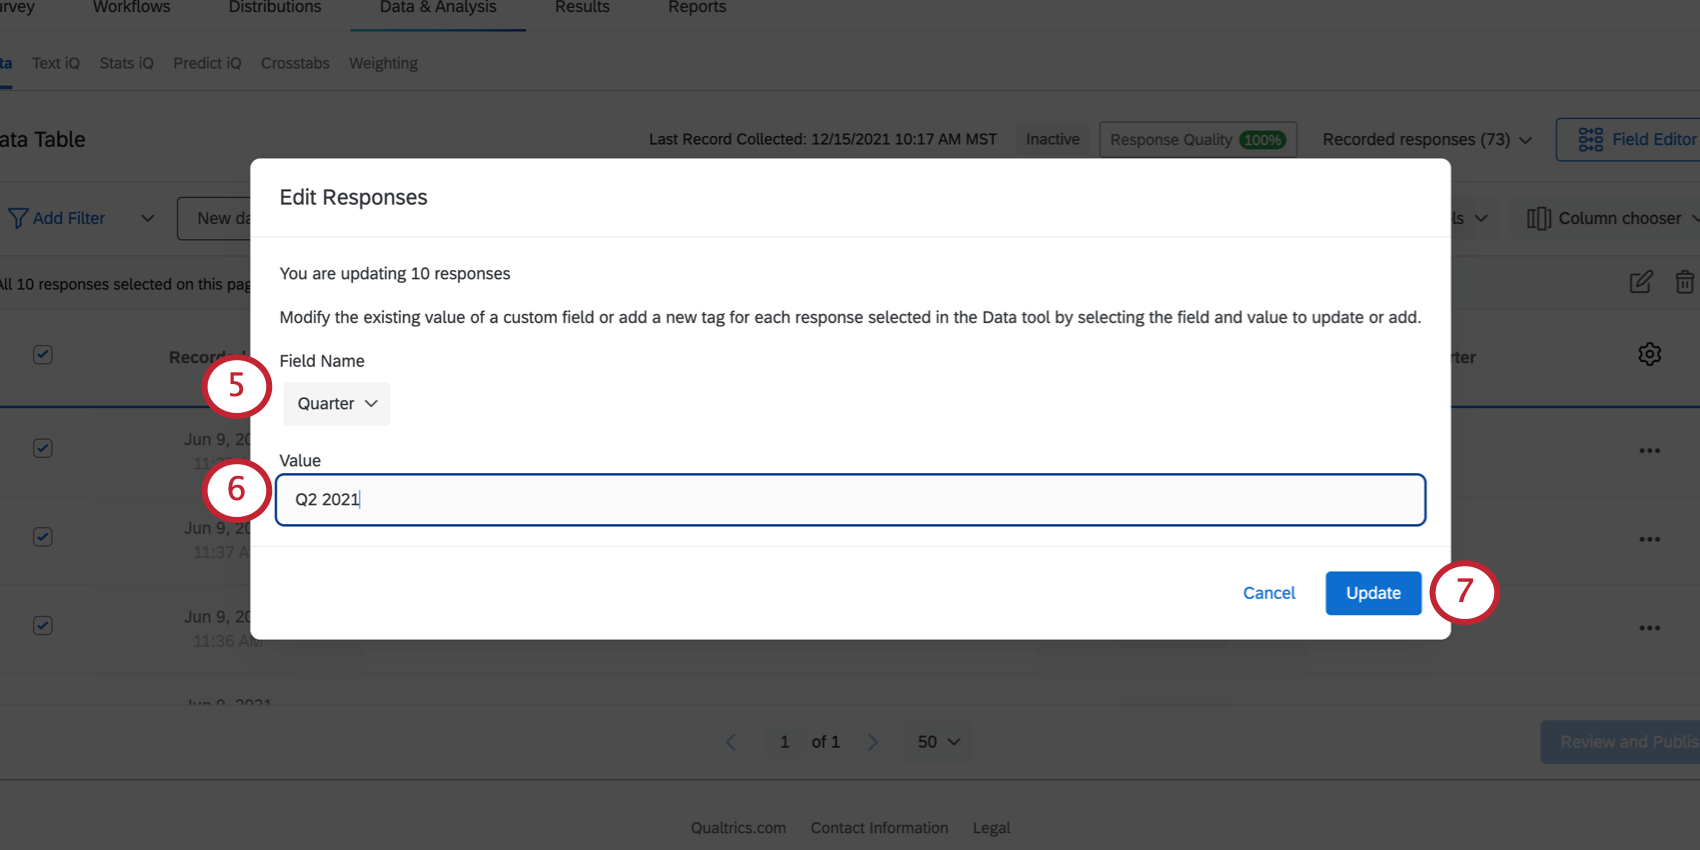
- Escriba el valor que deben tener todas estas respuestas .
- Hacer clic Actualizar.
Edición y eliminación de campos
Incluso después de haber creado un campo manual, puedes realizar cambios en él. Por ejemplo, puede cambiar el nombre del campo, marcarlo como sensible o eliminarlo. Para los campos de fecha, puede establecer un formato.
Para conocer los pasos detallados, consulte Edición de campos personalizados.
Informes sobre campos manuales
Los campos manuales se pueden utilizar en la mayoría de los mismos informes y análisis de datos en los que se pueden utilizar otros datos de respuesta, incluidos los paneles de resultados y los informes avanzados. Esto significa que los campos manuales se pueden usar en filtros, gráficos, tablas y desgloses.
Cuando estas creando Paneles de resultados, no está limitado a los widgets que funcionan con sus campos manuales de forma predeterminada. Puede ajustar el tipo de cada campo para cambiar su formato de datos y permitirle visualizar sus datos de diferentes maneras. Por ejemplo, mientras que los gráficos de barras y líneas desglosan mejor los datos del conjunto de texto, las nubes de palabras son mejores widgets para la opinión de texto abierto.
Ver más sobre Asignación de tipos a campos manuales. De forma predeterminada, los tipos de campo para cada campo manual son:
- Fecha – Fecha
- Numérico – Valor numérico
- Texto – Texto abierto
- Etiqueta – Conjunto de texto
Para informes avanzadosPuedes consultar la página de cada visualización para obtener más información sobre qué campos son compatibles. Ver un lista completa de visualizaciones de informes avanzados.
Proyectos en los que se pueden crear campos manuales
Dependiendo de su licencia, puede tener acceso a varios servicios diferentes. tipos de proyectos que tienen una pestaña de Datos y análisis. Los campos manuales descritos en esta página están disponibles en:
- Proyectos de encuesta
- Soluciones XM
- Proyectos de datos importados
- proyectos 360
Consejo Q: Ver Creación de nuevos campos (360) Para más detalles.
- Conjunto
- MaxDiff
- Tableros de CX
Si bien la funcionalidad está técnicamente disponible, no no Recomendamos utilizar estos campos personalizados con Otros tipos de proyectos de Employee Experience. Ver Creación de nuevos campos (EX) Para más detalles.
