
Survey Tools (EX)
What's on this page
Qtip: This page describes functionality available to Engagement, Lifecycle, Ad Hoc Employee Research, Pulse, and 360 projects. For more details on each, see Types of Employee Experience Projects.
About Survey Tools
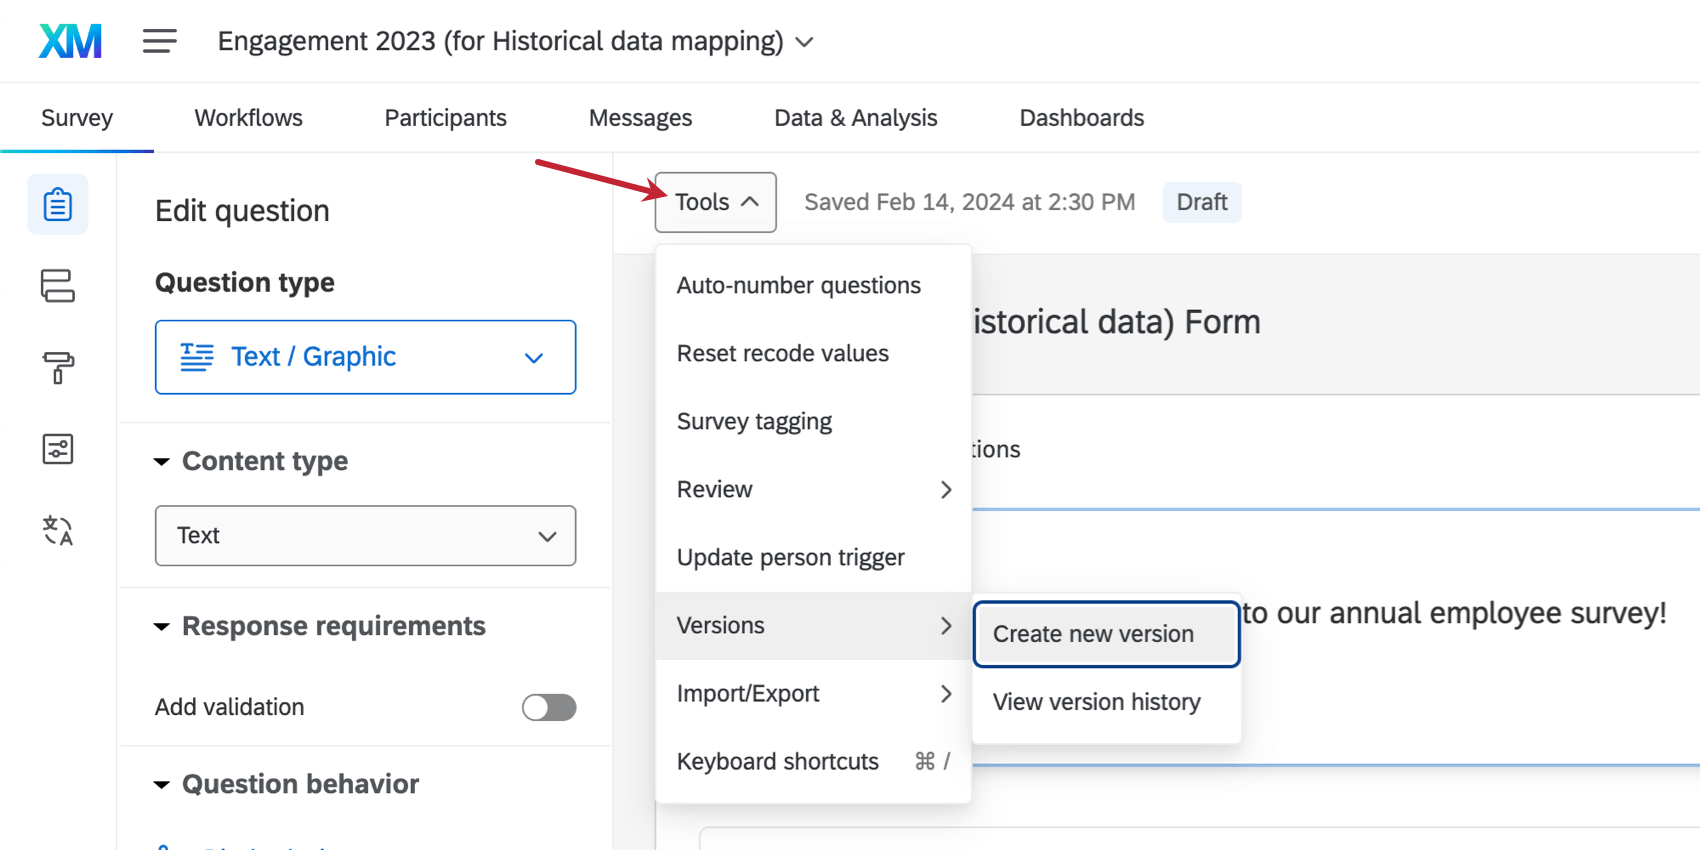
Survey tools are features that help you create surveys and give them advanced functionality. These features include options like auto-number questions, survey versions, and more. You can access the survey tools by clicking on Tools in the Survey tab.

The available survey tools for Employee Experience projects are:
- Auto-number questions: Change the question numbers for all of your questions. You can auto-number sequentially, by block, or by the internal ID number. The page linked is for the Survey Platform, but it works exactly the same way in an Employee Experience survey.
- Reset recode values: This removes the recode values you edited from all choices in all questions, replacing the values with the default. (For example, the first choice is usually equal to 1.)
- Manage Reusable Choices: This option is only available in 360 projects. Create a list of choices that you can reuse throughout the survey. The page linked is for the Survey Platform, but all the features described there work exactly the same way in a 360 survey.
- Survey tagging: If a Brand Administrator has created usage tags, you can tag your project for internal tracking purposes. See this support page for more information about tagging surveys as a project editor.
- Generate test responses: This option is available for Engagement, Lifecycle, Ad Hoc, and Pulse project types. Use this option to generate test responses that are linked to a hierarchy, allowing you to build and test your dashboard and participant roles before going live with your project. Qtip: You can generate test responses for regular survey projects, but the steps are different. See Generating Test Responses for more information.

- Review:
- Search and replace: Quickly find specific words in a survey and replace them with another word.
- Strip formatting: Remove all formatting from the selected questions. Use this option if questions in your survey have different fonts or styles that you want to remove. You have to select questions to strip of their formatting before clicking this option. Example: If I copy and paste an article from a website, I can use strip formatting to remove all the styling (bolds, italics, font sizes, etc.) from the pasted content. I can then format the content to match my survey.

- Check survey accessibility: Determine whether your survey is accessible for respondents who use screen readers, and receive suggestions for improving your survey’s accessibility.
- Analyze Survey: Open ExpertReview‘s suggestions for your survey.
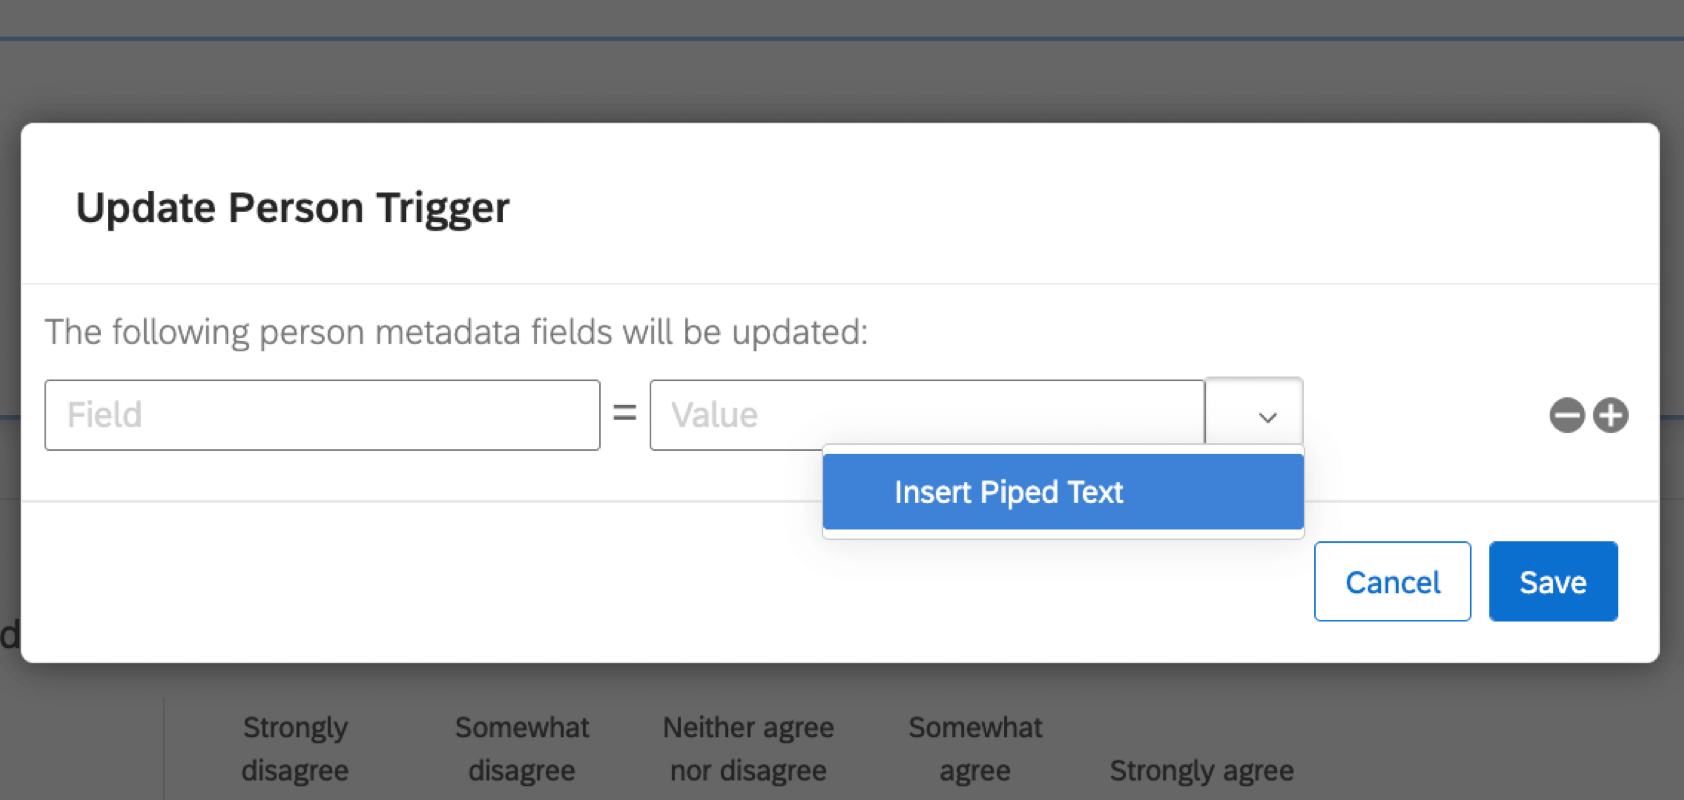
- Update person trigger: Update each participant’s metadata every time they complete the survey. This option only updates the participant’s metadata in the project, not the Employee Directory. Enter the name of the metadata to be updated under Field and what the value should change to under Value. You can even make this value piped text so it will dynamically update based on responses the participants give in the engagement survey.

- Versions:
- Create new version: Save a version of your survey in order to view and restore it later if needed. By default, Qualtrics will also periodically create versions for you that can be viewed and restored. The page linked is for the Survey Platform, but all the features described there work exactly the same way in an Employee Experience project.
- View version history: See past versions of your survey and, if desired, restore them so they become the current survey revision. The page linked is for the Survey Platform, but all the features described there work exactly the same way in an Employee Experience project.
- Import / Export:
- Print survey: Use this option to print or save a PDF version of your survey. This PDF file can also be exported to your computer or mobile device. The page linked is for the Survey Platform, but printing a survey works exactly the same way in an Employee Experience project.
- Export survey: Export your survey as a QSF file to be imported into another account.
- Export survey to Word: Export your survey as a DOCX Word document that contains the plain text of your survey questions and answer choices. The page linked is for the Survey Platform, but exporting to Word works exactly the same way in an Employee Experience project. Qtip: The exportable Word document can also be used as a “data dictionary” or “codebook” for those who need to know which recode values are associated with each answer choice. The linked page is for the Survey Platform, but recode values function the same way in an Employee Experience project.
- Keyboard shortcuts: See a list of keyboard shortcuts for the survey builder. You can also see this list on the support page, Survey Builder Keyboard Shortcuts.
Generating Test Responses for EX Projects
Qtip: This option is available for Engagement, Lifecycle, Ad Hoc Employee Research, and Pulse project types.
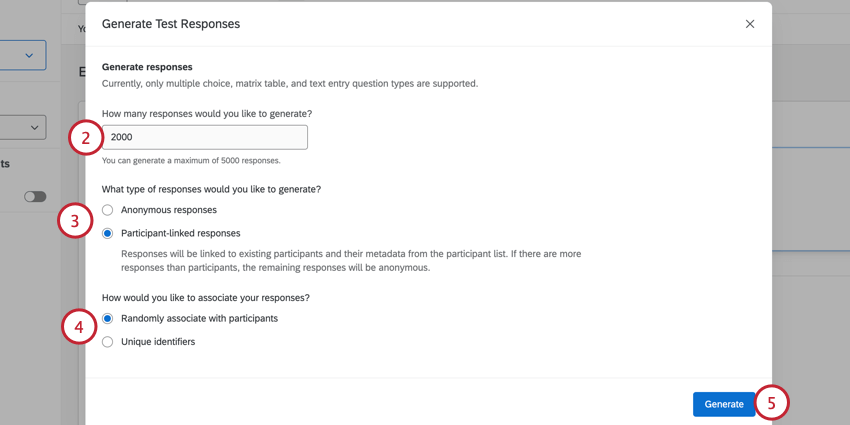
You can generate test responses for your EX projects. These responses can be associated with participants in your project, or they can be anonymous. You can then use these responses as a sample dataset to build a dashboard and test how the dashboard will look to different participants based on their roles.
When generating test responses, please be aware of the following:
- Test responses do not count towards any response limit on your license.
- You can only generate test responses for multiple choice, matrix table, and text entry question. Other questions will be skipped. Responses for scale-based questions are randomly distributed. Lorem ipsum text is used for responding to text entry questions.
- You must have the Edit Survey Response permission enabled to use this feature.
- If there is a pseudonymization policy on the brand, generated test responses will not be pseudonymized according to the policy.
- Test responses ignore survey logic, such as display and skip logic, question validation, and survey flow logic. Qtip: If you want to test the survey taking experience, try previewing your project instead.
To generate test responses:

Qtip: You can generate more than 5000 test responses by repeating these steps.
- Anonymous responses: Responses cannot be tied to specific participants or assigned a unit in an org hierarchy.
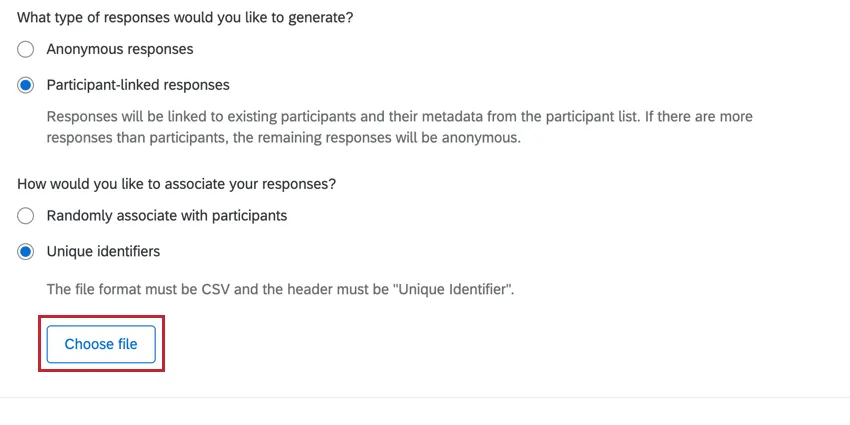
- Participant-linked responses: Response can be tied to a specific participant and assigned a unit in an org hierarchy.
- Randomly associate with participants: Responses are randomly assigned to participants.
- Unique identifiers: Upload a file containing the participants’ unique identifiers that you want associated with responses. Make sure any empty columns and rows are deleted, as they may cause your upload to fail. Qtip: An easy way to get your participants’ unique identifiers is to export your project’s participant list and then delete all data from the exported file except for the “Unique Identifiers” column. To upload your file, click Choose file and select the file on your computer.
Once your responses are generated, you can use them as test data when building your dashboard and participant roles. After you’ve finished your testing, you can delete your test responses by following the instructions on Deleting Test Responses.
Qtip: If you’ve generated test responses but they don’t appear in your dashboard when you use org hierarchy filters, it’s likely your participant metadata or org hierarchy changed after you generated test responses. To fix this issue, navigate to Participant Tools and select Update all responses with current metadata.
That's great! Thank you for your feedback!
Thank you for your feedback!