-

Qualtrics Platform -

Customer Journey Optimizer -

XM Discover -

Qualtrics Social Connect
Adding & Removing Participants (EX)
About Adding & Removing Participants
You can add participants for your Employee Engagement or Lifecycle project in the Participants section of the Participants tab. You can add these participants in large batches with a CSV/TSV made in Excel, or you can manually enter in information for just a few at a time. During this process, you can also include additional information called metadata for your participants that will later help you build hierarchies (EE) and organize data on your dashboards.
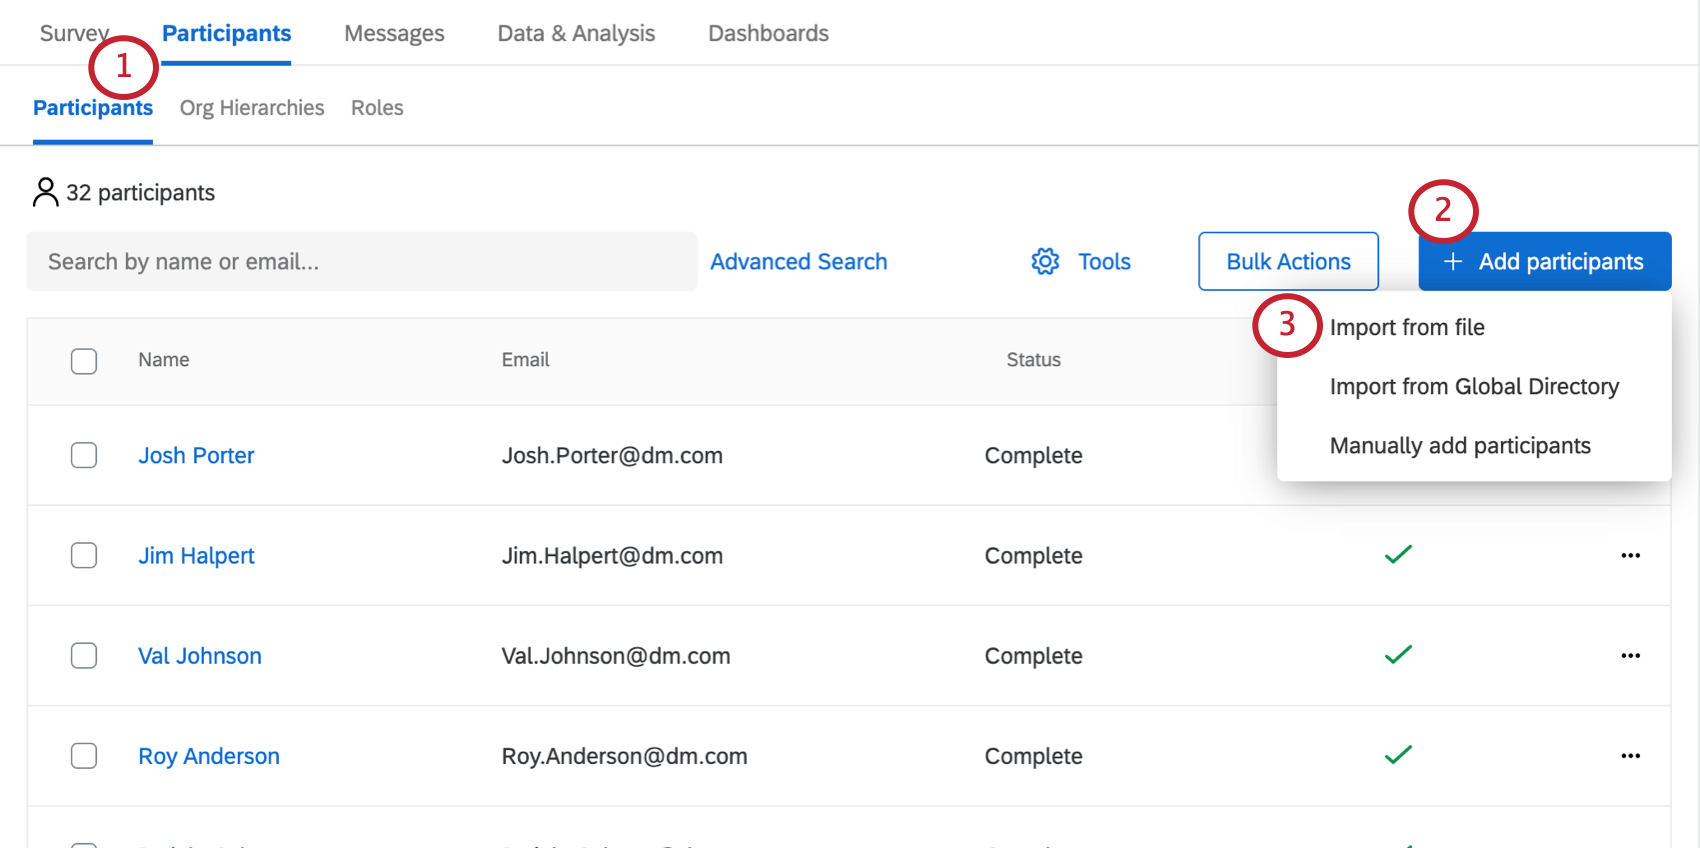
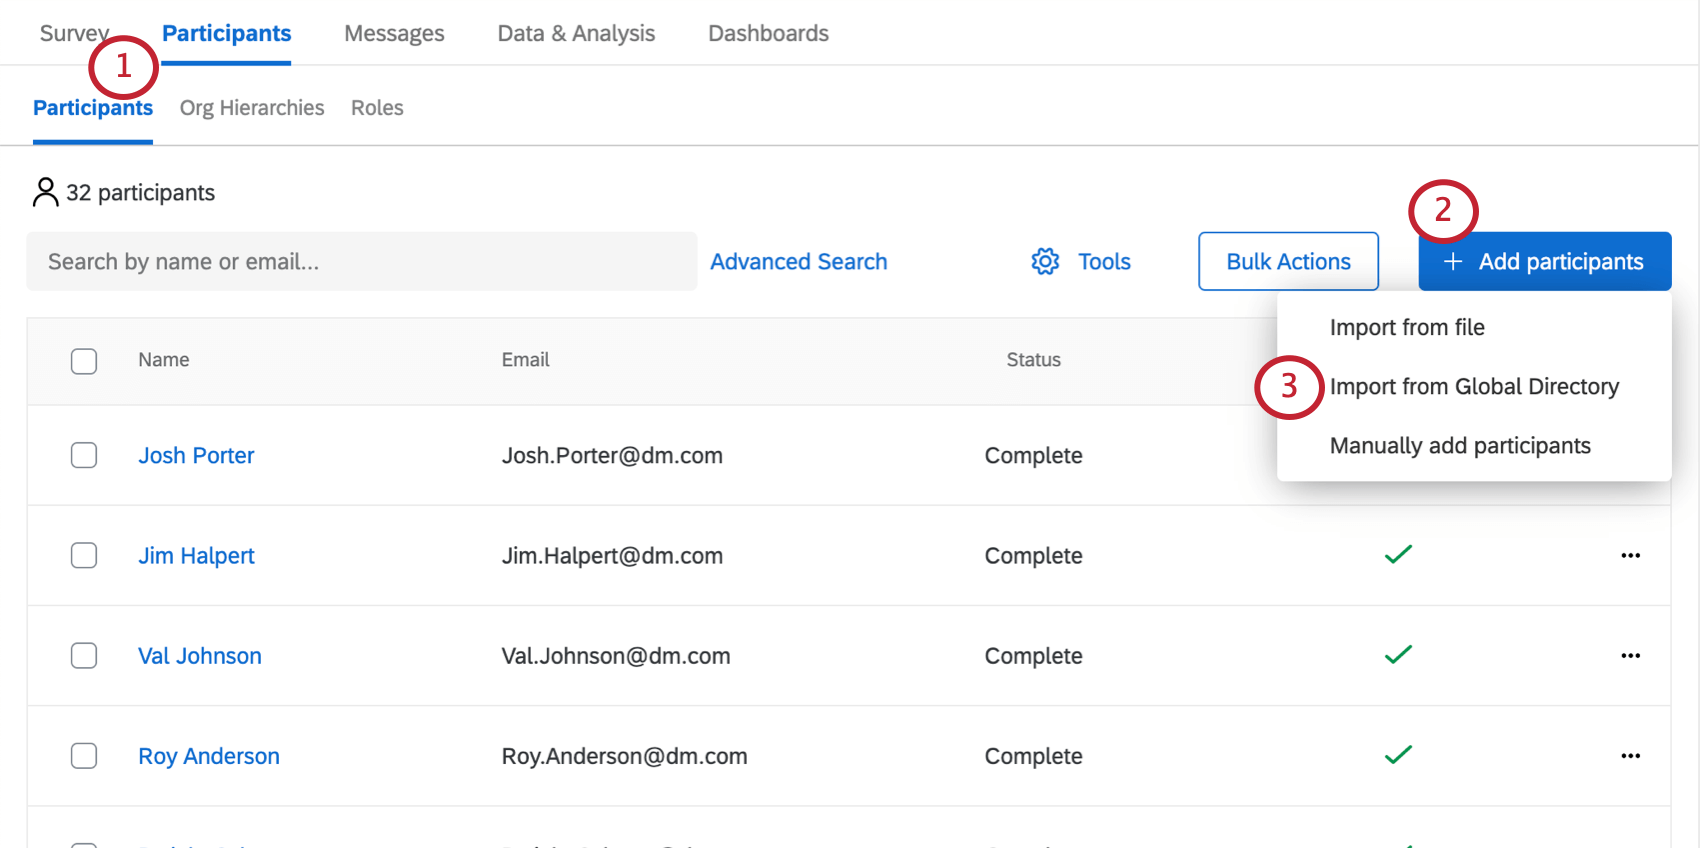
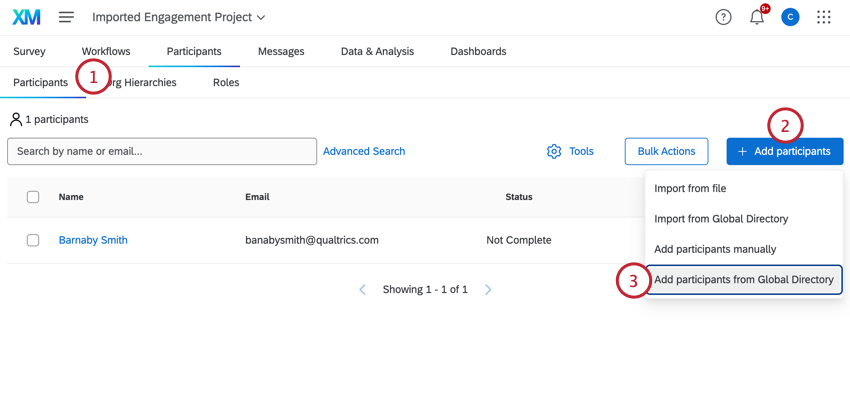
To add participants to your project, click the Add participants button and then choose how you’d like to add participants: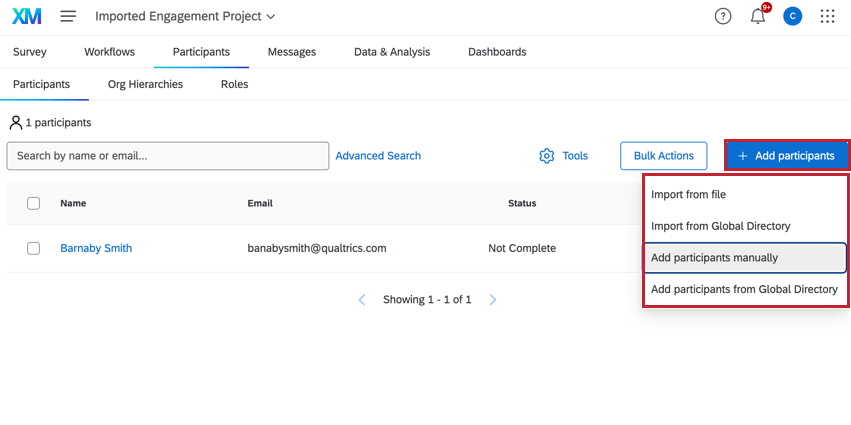
- Import from file: Upload a file containing participant data.
- Import from Global Directory: Sample existing participants from your EX directory.
- Add participants manually: Manually enter participant data.
- Add participants from Global Directory: Search for individual participants that exist in your EX directory.
Manually Adding Participants
You can manually add participants to your project which is useful if you only have a handful of participants to add. You can use this method to search for participants that already exist in your EX directory and import them, or to create new participants if they do not exist.
- Navigate to the Participants section of the Participants tab.
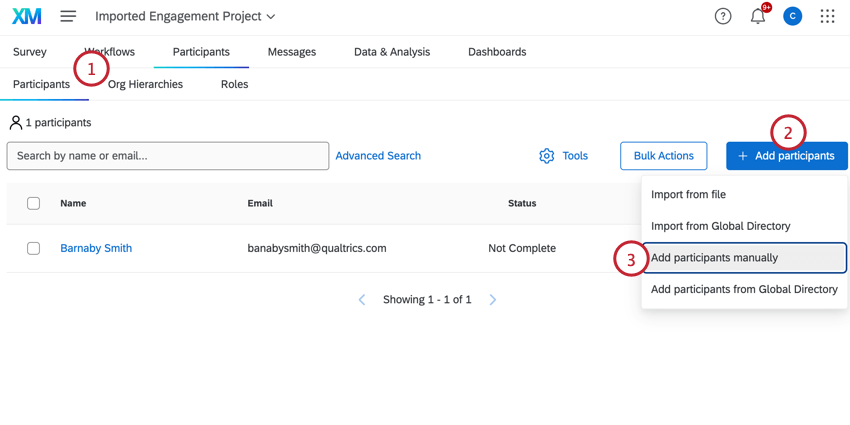
- Click Add participants on the top-right.
- Select Add participants manually.
- Enter the personal information for the participant you’d like to add.
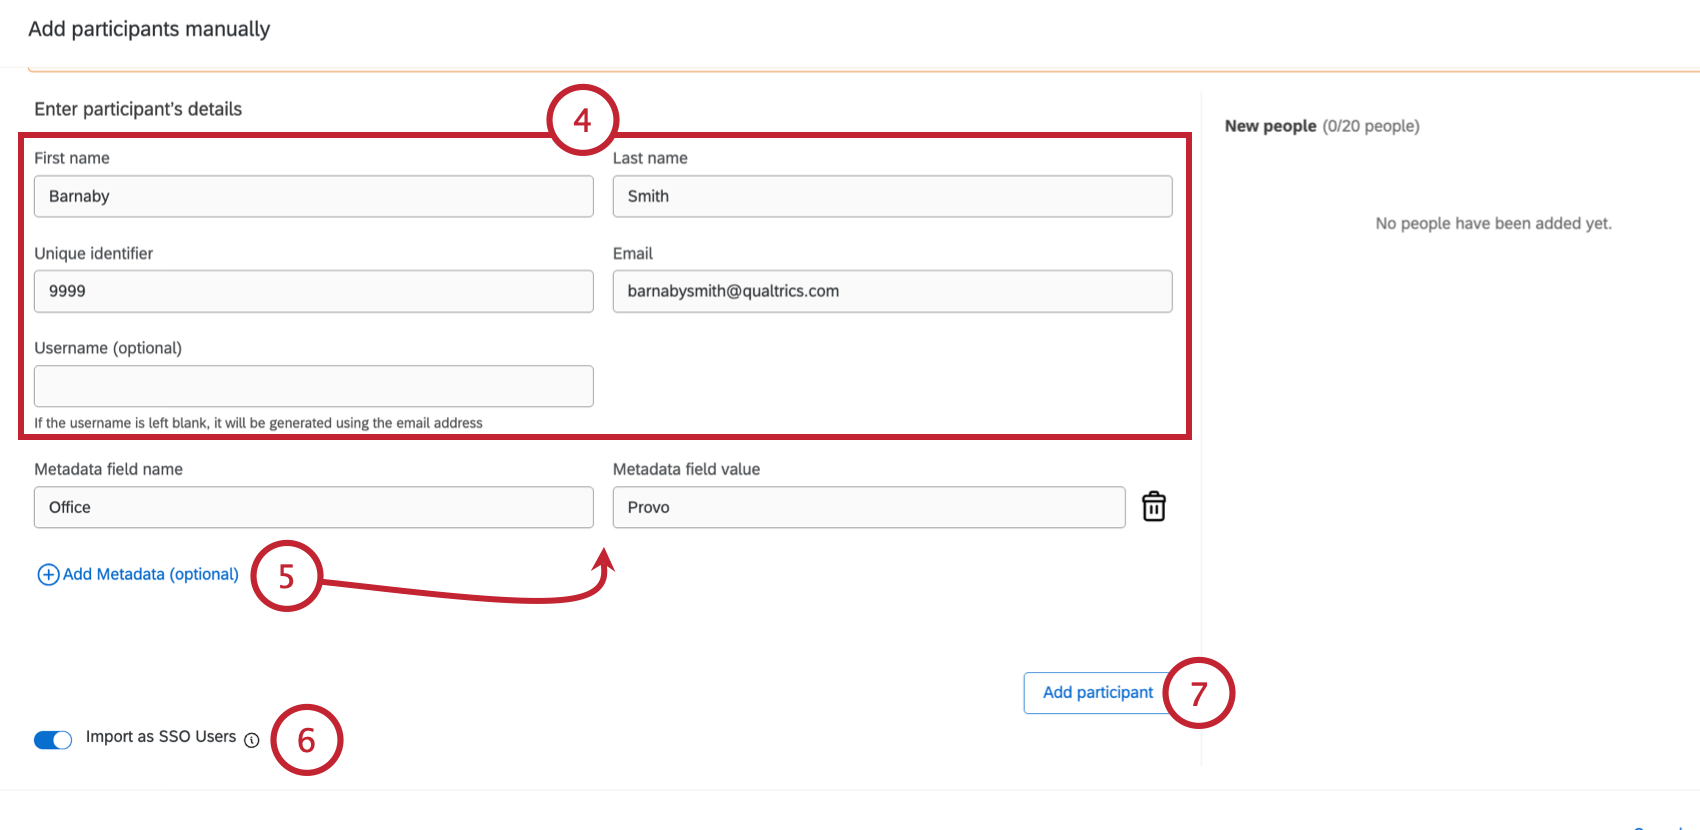 You must add the following:
- First name
- Last name
- Unique identifier
- Username (optional)
- Click Add Metadata for each additional metadata field you’d like to add to the participant. For example, this can be useful for adding the participant’s language or the location where they work.
Qtip: You’re allowed to add as many metadata fields as you want, and you can make the names whatever you want. However, please only use “Language” for the language metadata field.
- If your license uses SSO, you can enable or disable the Import as SSO Users option. When this option is enabled, any newly created participants will be added as an SSO user. Your organization ID will be automatically added to the end of their email address to create their SSO login username. When disabled, the new participants will be added as standard users who log in with a unique Qualtrics username and password.
- Click Add participant when you’re done adding details.
- Repeat steps 4-7 for each participant you want to add.
- When you’re finished entering participants, click Save.
Importing Participants with a File
You can upload a file that contains your participant data. This method is useful if you have a lot of participants to add to your project. If your file contains data for participants that already exist in the EX directory, then those participants will be added to the project. If there is no match in the EX directory, then new participants will be created.
- Navigate to the Participants section of the Participants tab.
- Click Add Participants on the top-right.
- Select Import Participants.
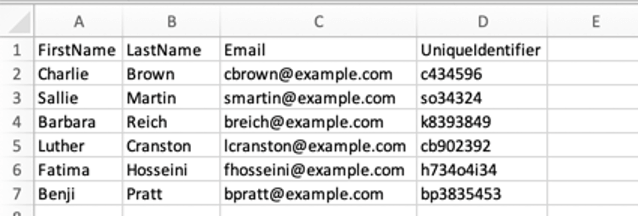
- Download the example CSV or TSV file. These are both spreadsheet files that can be opened in Excel and other similar programs.
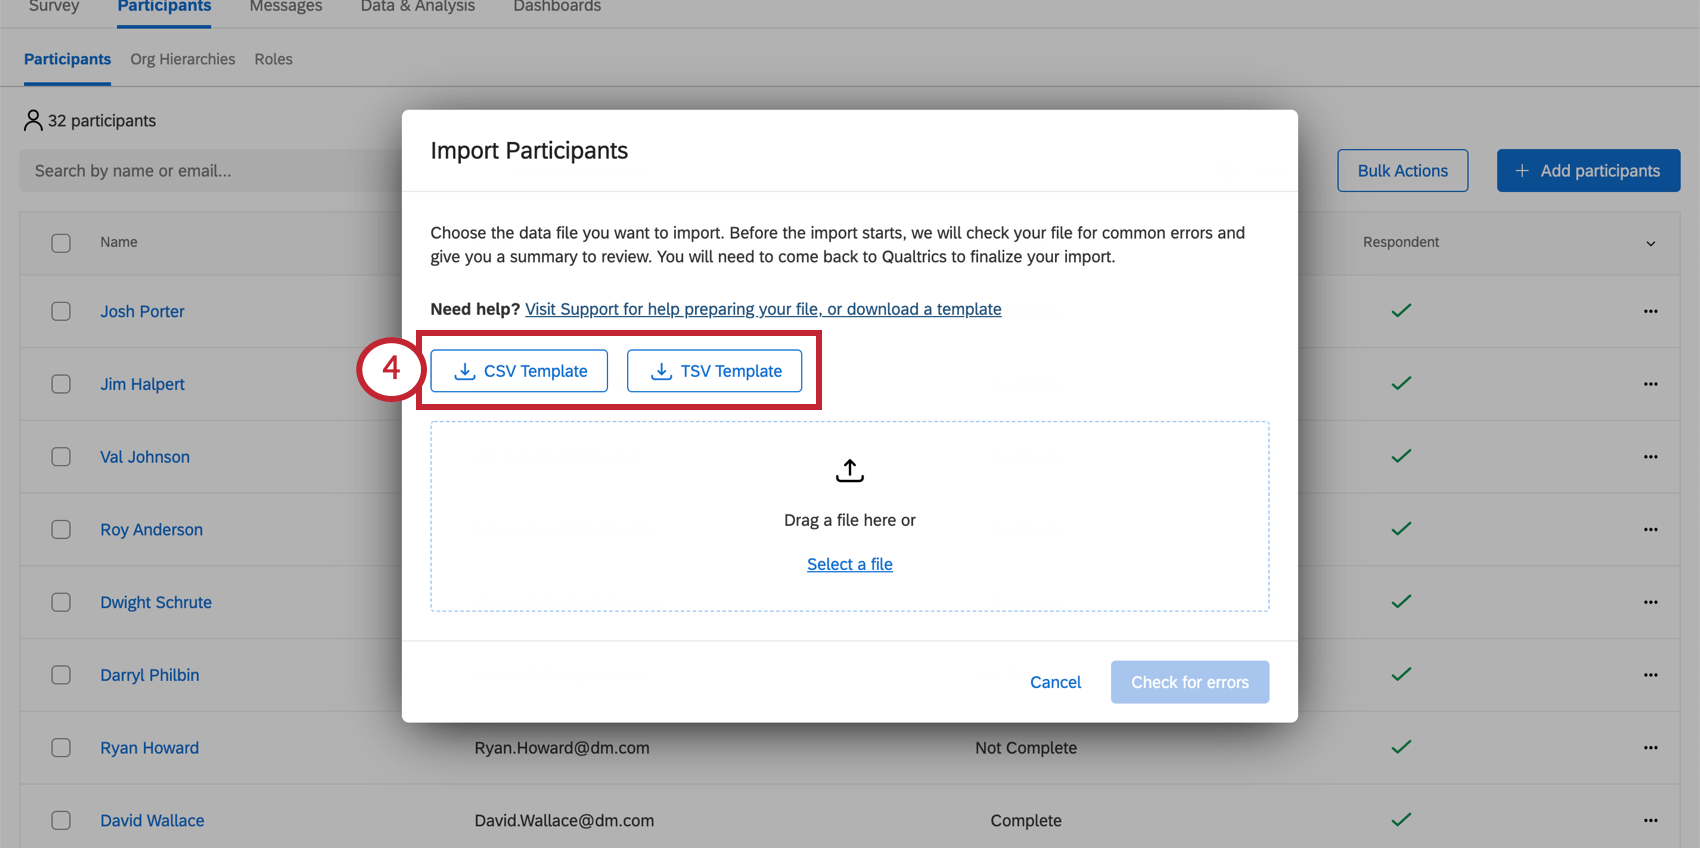 Qtip: We recommend the TSV file if any of your fields, such as names of participants, contain characters other than numbers or the English alphabet.Attention: If you use comma delimiters to separate multiple values in a metadata field, you will not be able to use Participation Summary Widgets that filter by that field.
 - Add participants to your spreadsheet, with one row for each participant (each participant must have an entry in the UniqueIdentifier, Email, FirstName, and LastName columns, though other columns may have blank cells). See our Preparing Your Participant File for Import support page for more information on what information to include in order to build hierarchies.
 Qtip: The participant username will by default be the same value in the Email column. If you’d like to specify a different username for your participants, add a column titled UserName and specify a username. This username is what your participants will use to login to view dashboards. All uppercase characters will be converted to lowercase for the username.
 - Save the file as a UTF-8 encoded CSV (Comma Separated Values) or TSV (Tab Separated Values).
Qtip: The maximum file size for a contact list upload is 100 MB.
- Click Select a file to browse your files.
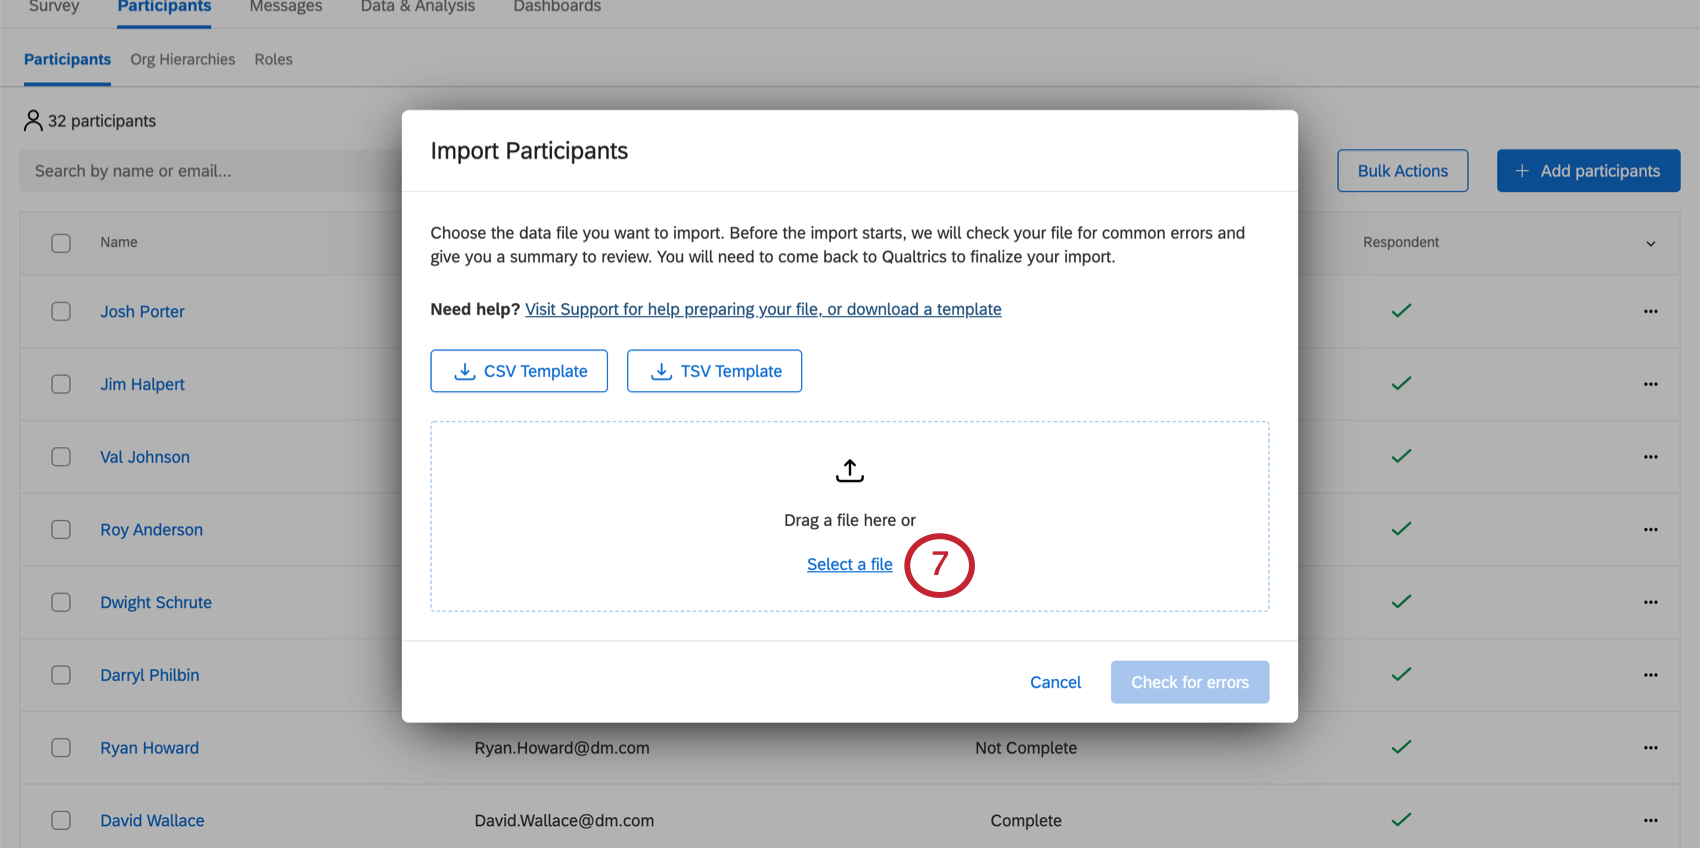
- If the importer detects initial issues, it will not let you proceed, and will list issues in red. Read these descriptions and make corrections to your file. After you’ve saved the changes, click Select a different file and re-upload the file.
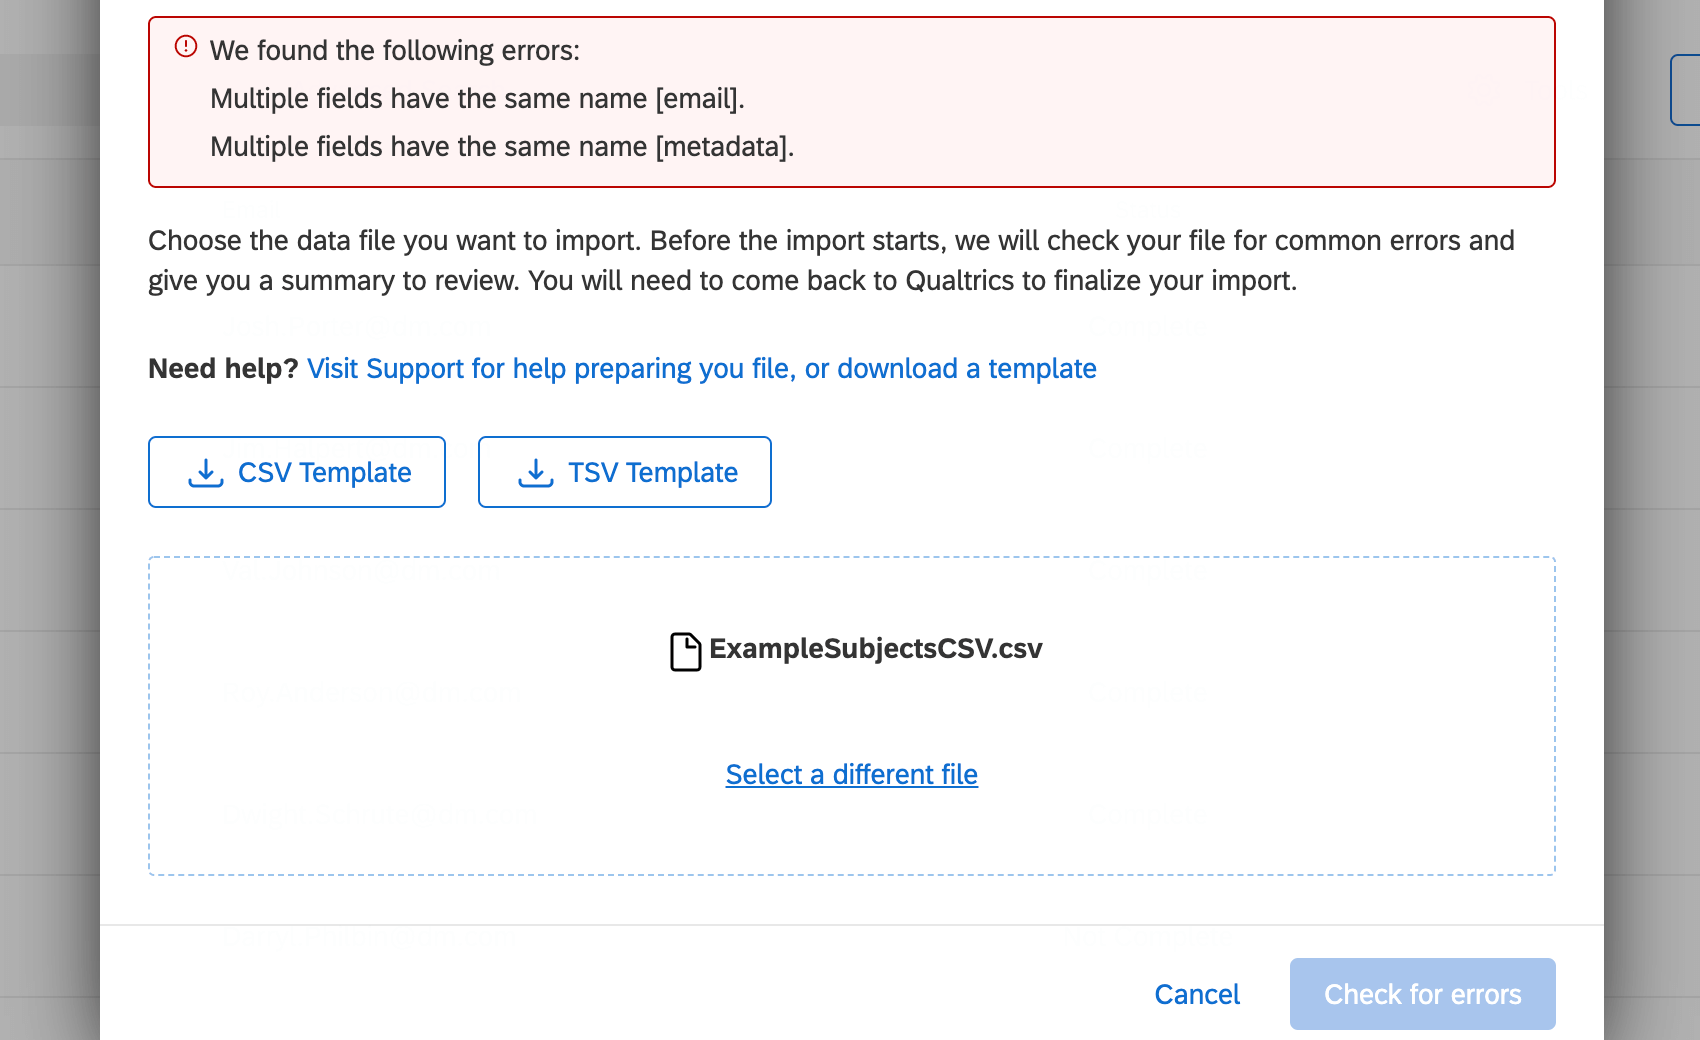
- If no issues are detected, click Check for Errors.
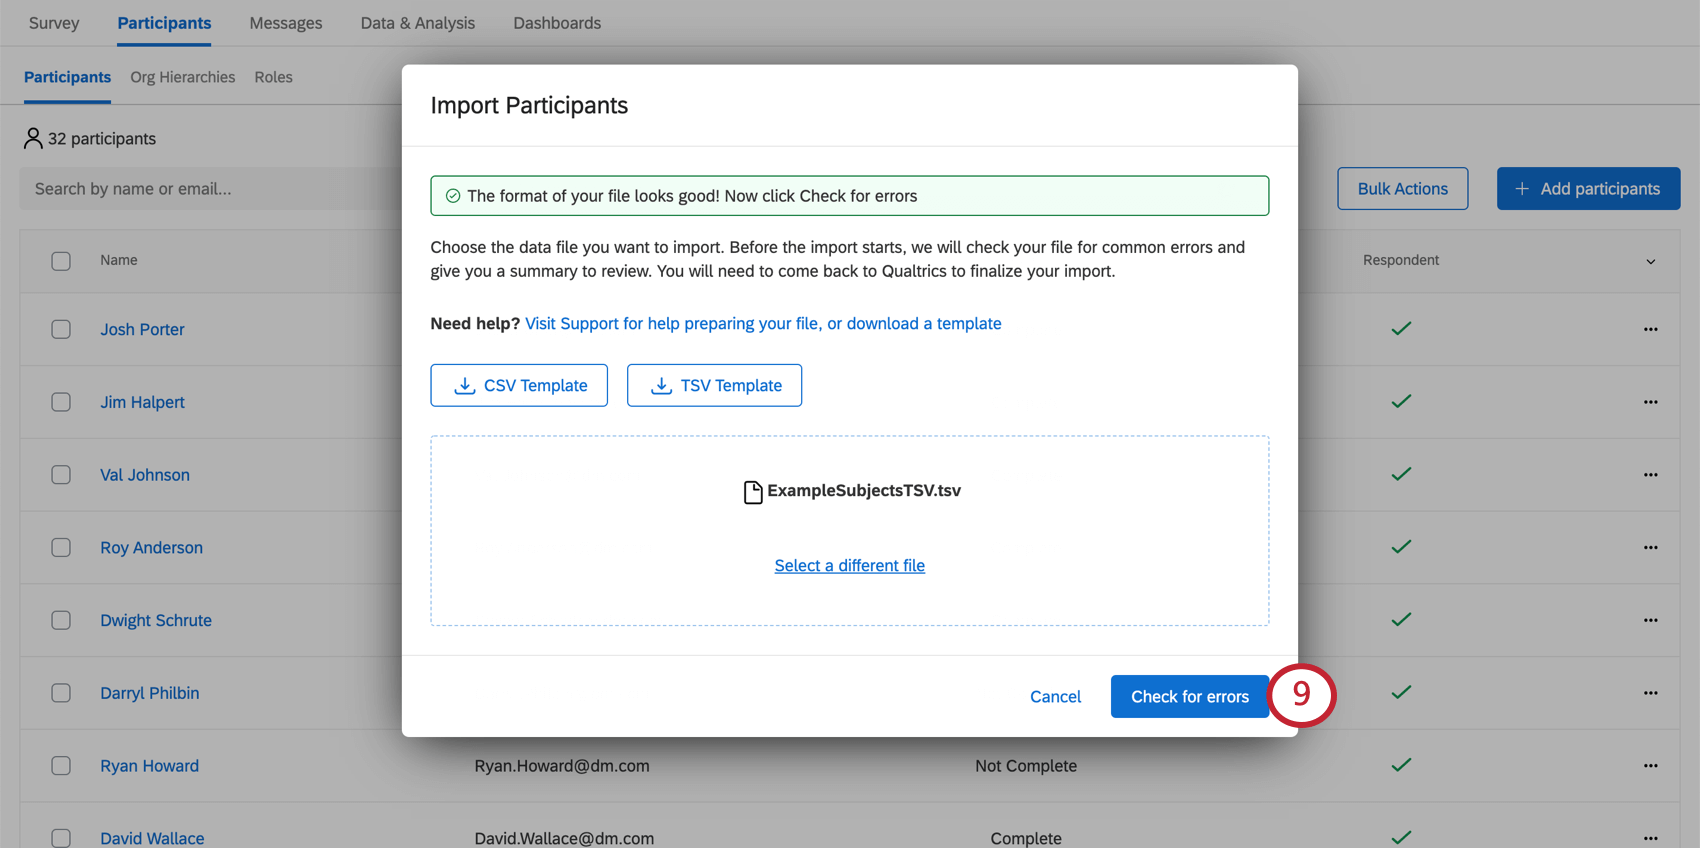
- While the importer is loading, you can return to your participant list.
 Qtip: After your file has finished processing, return to your project and click Review your import.
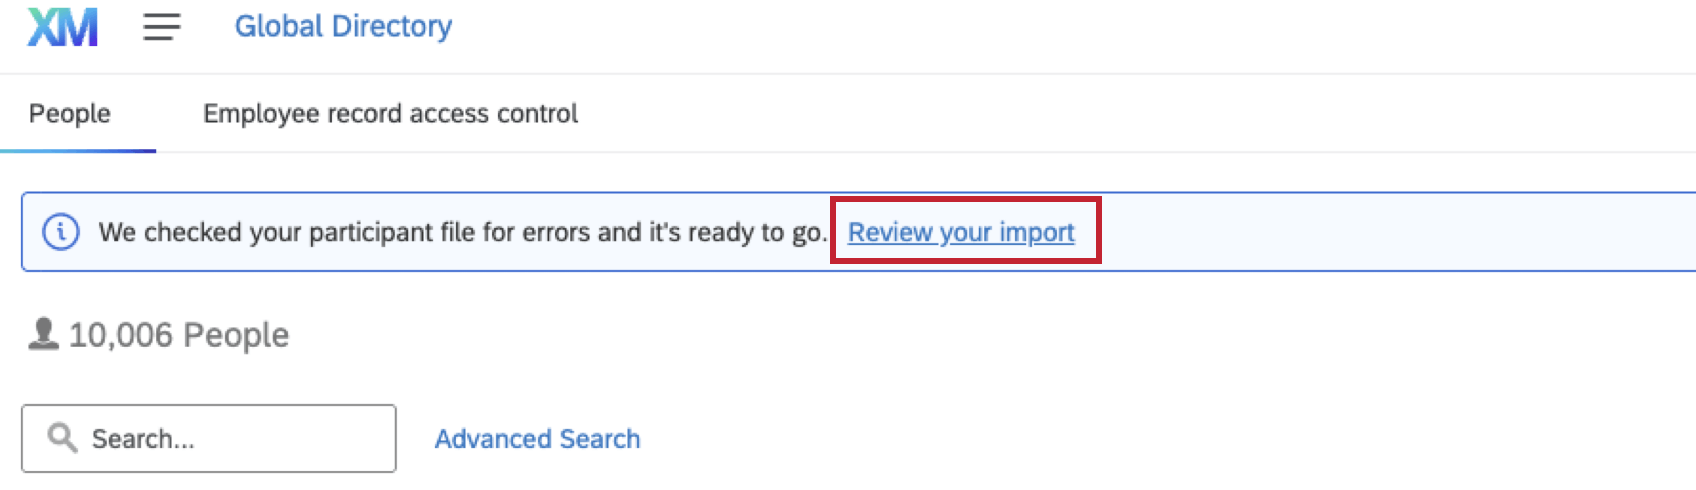
- When loaded, the importer will summarize what participants will be updated or added to the project, and what impact this will have on your directory, too. The importer will also warn you if there are any errors in your rows.
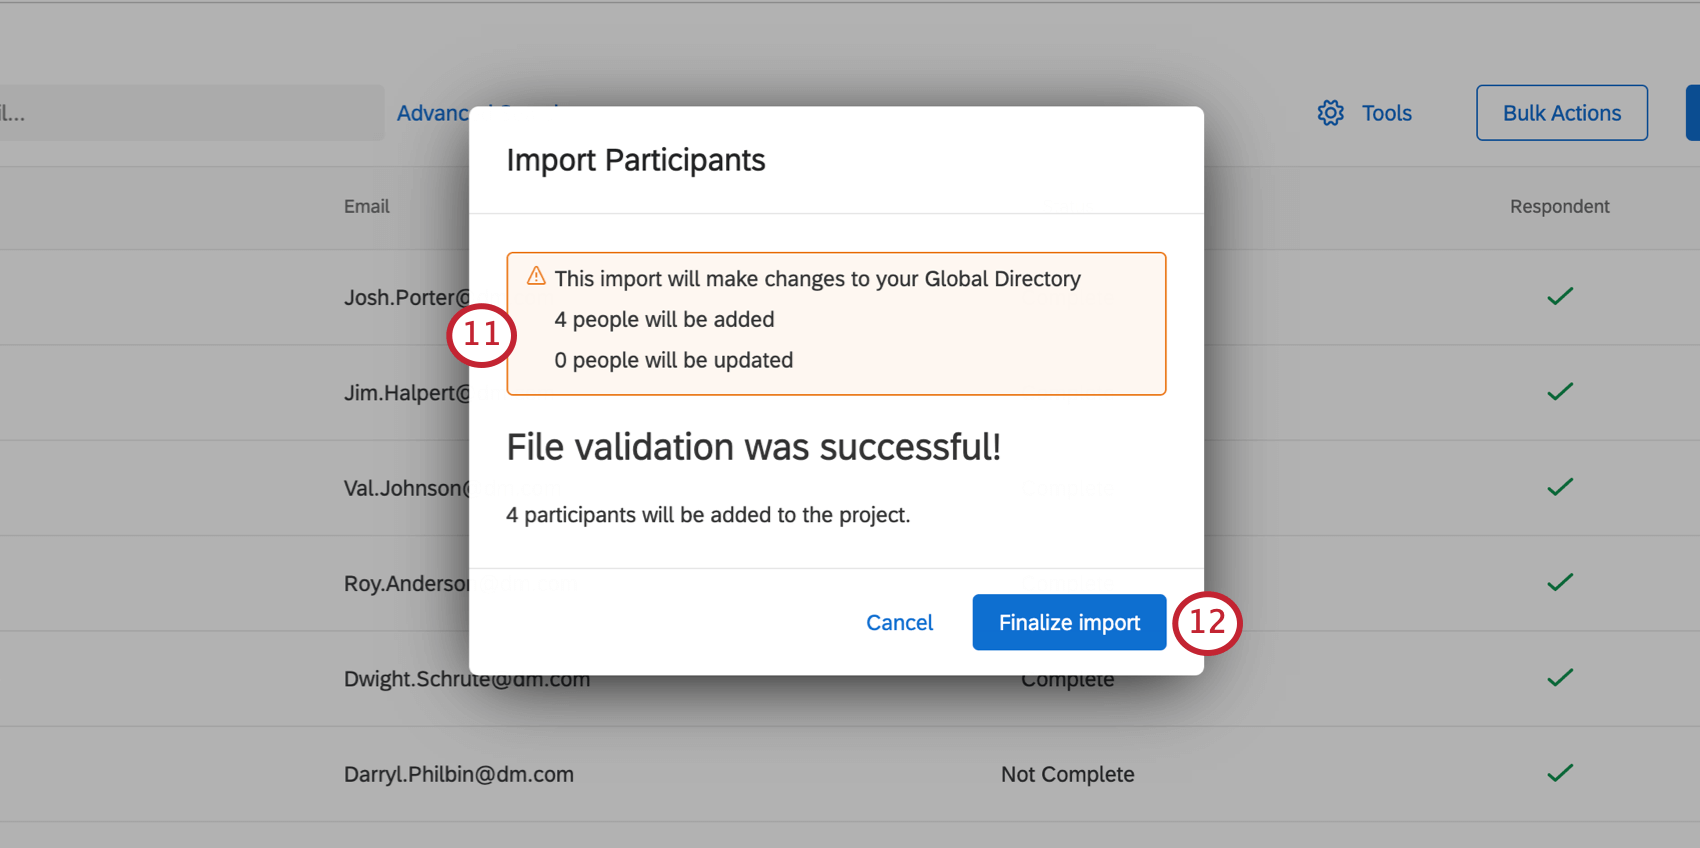
- If you are happy with these changes, click Finalize import.
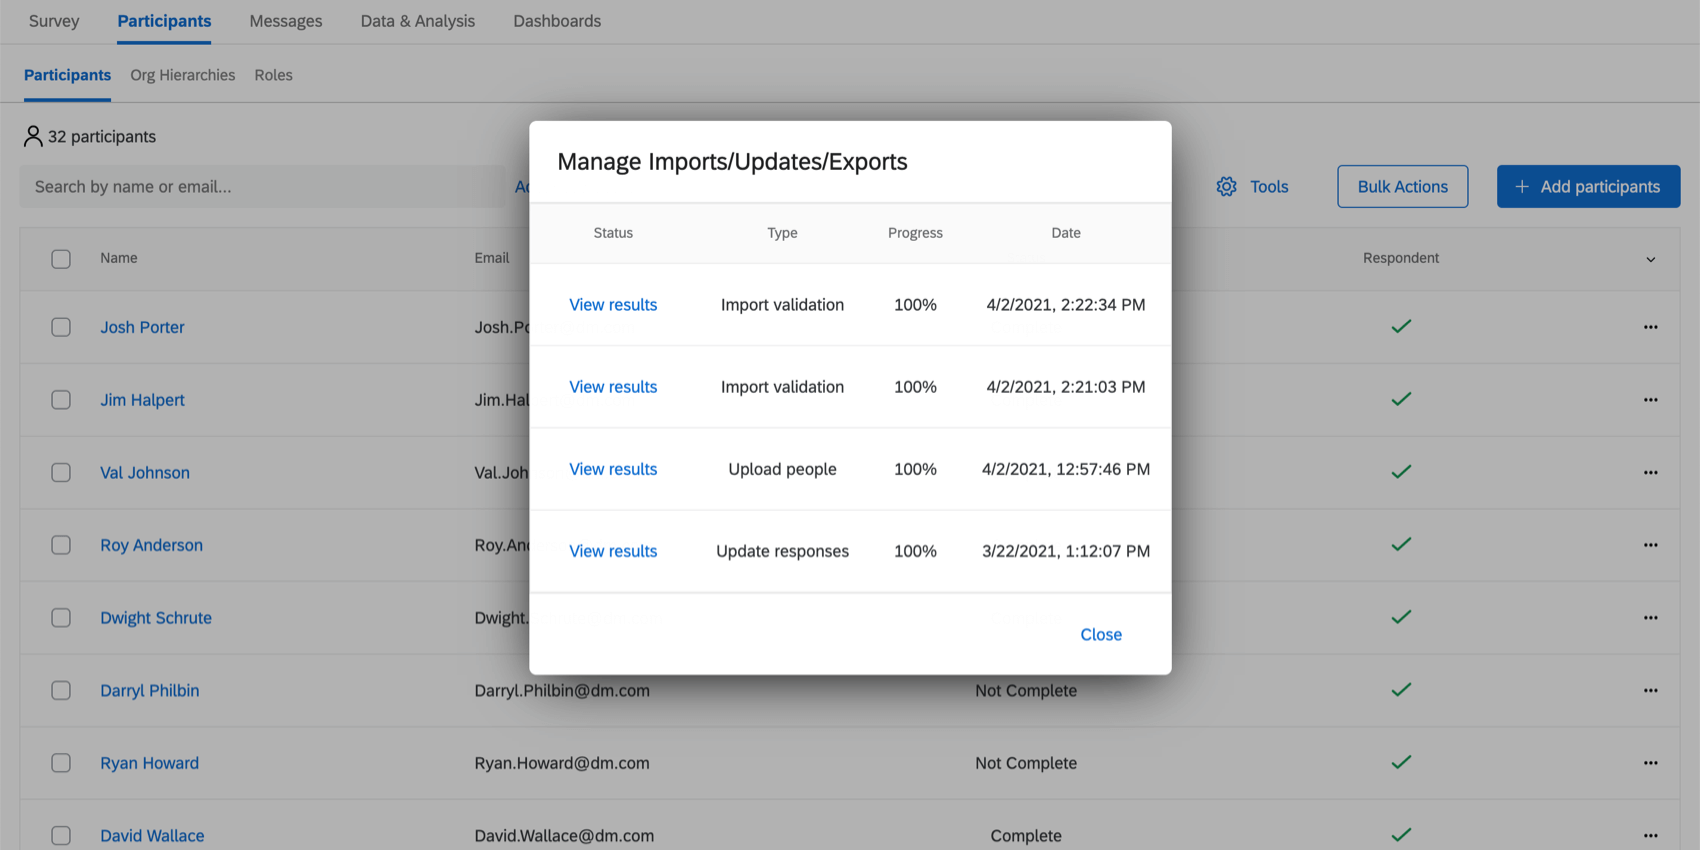
- You will be shown the status of your recent imports / exports.
Errors Detected
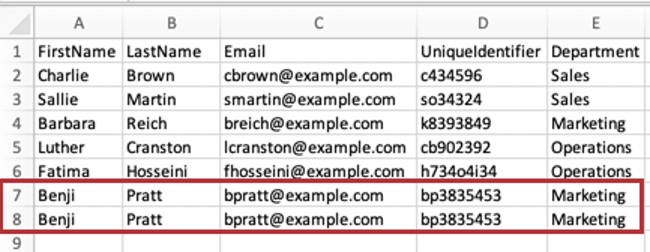
If you allow the importer to check for errors and some are detected, you will be given an error report you can download as a CSV, in case you have a large file that necessitates a large report.
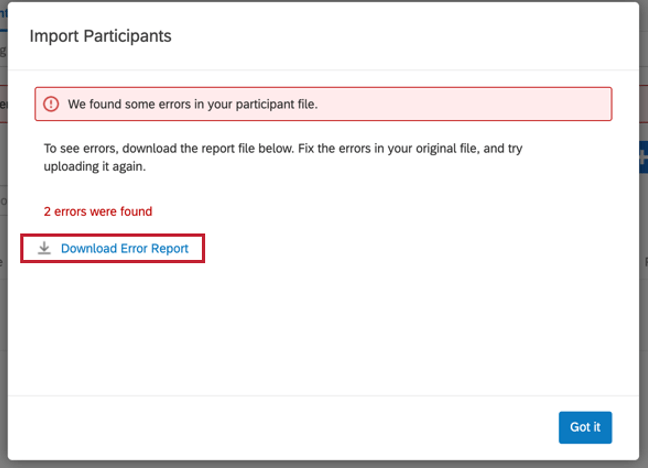
Click Download Error Report to view this.
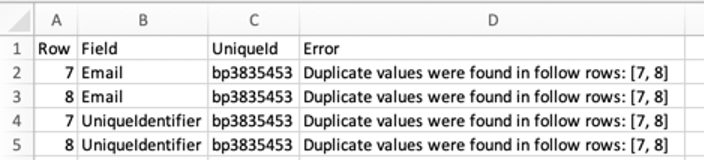
The report will give the exact row of the file that had the error, the field that had the issue, and the unique identifier of the participant who had the errors.
Example: We accidentally uploaded our user with the unique identifier “bp3835453” twice. Both the unique identifier and email address are the exact same on each of the two rows. If we erase one of the rows, the issue will be resolved when we go back to upload the file.
Common Errors to Watch Out For
Although this is not an exhaustive list, here are some general tips for building your file to help you avoid issues uploading participants:
- Make sure the first row of the file has UniqueIdentifier, First Name, Last Name, and Email.
- Your file headers should not contain any special characters – this includes characters that are not numbers or the English alphabet.
Qtip: This rule only applies to headers, not column values.
- Headers cannot exceed 100 characters.
- Your file headers should not use terms from existing Qualtrics fields:
- SID
- RID
- Auditable
- EndDate
- RecordedDate
- StartDate
- Status
- Points
- Be careful not to include duplicates of the same row – no two participants should have the same unique identifier or email.
- The file should not have more than 200 header fields.
- The file should not have more headers than columns.
- Make sure column values do not exceed 1000 characters.
Importing Participants from the Directory
One common way to balance how frequent a survey goes out with the “survey fatigue” respondents may feel being asked to complete the survey over and over is to only survey a filtered subset. For example, you can survey one region or business unit at a time, or survey a random sample of the employees. This can allow higher levels of the organization to get representative engagement feedback without surveying the same employees as often.
When you add participants to a project from the Employee Directory, you can choose to add a randomized sample, with or without filter criteria.
- Go to the Participants tab of your project.
- Click Add Participants.
- Select Import from Global Directory.
- Decide between importing all participants from the directory or participants who only meet the following criteria.
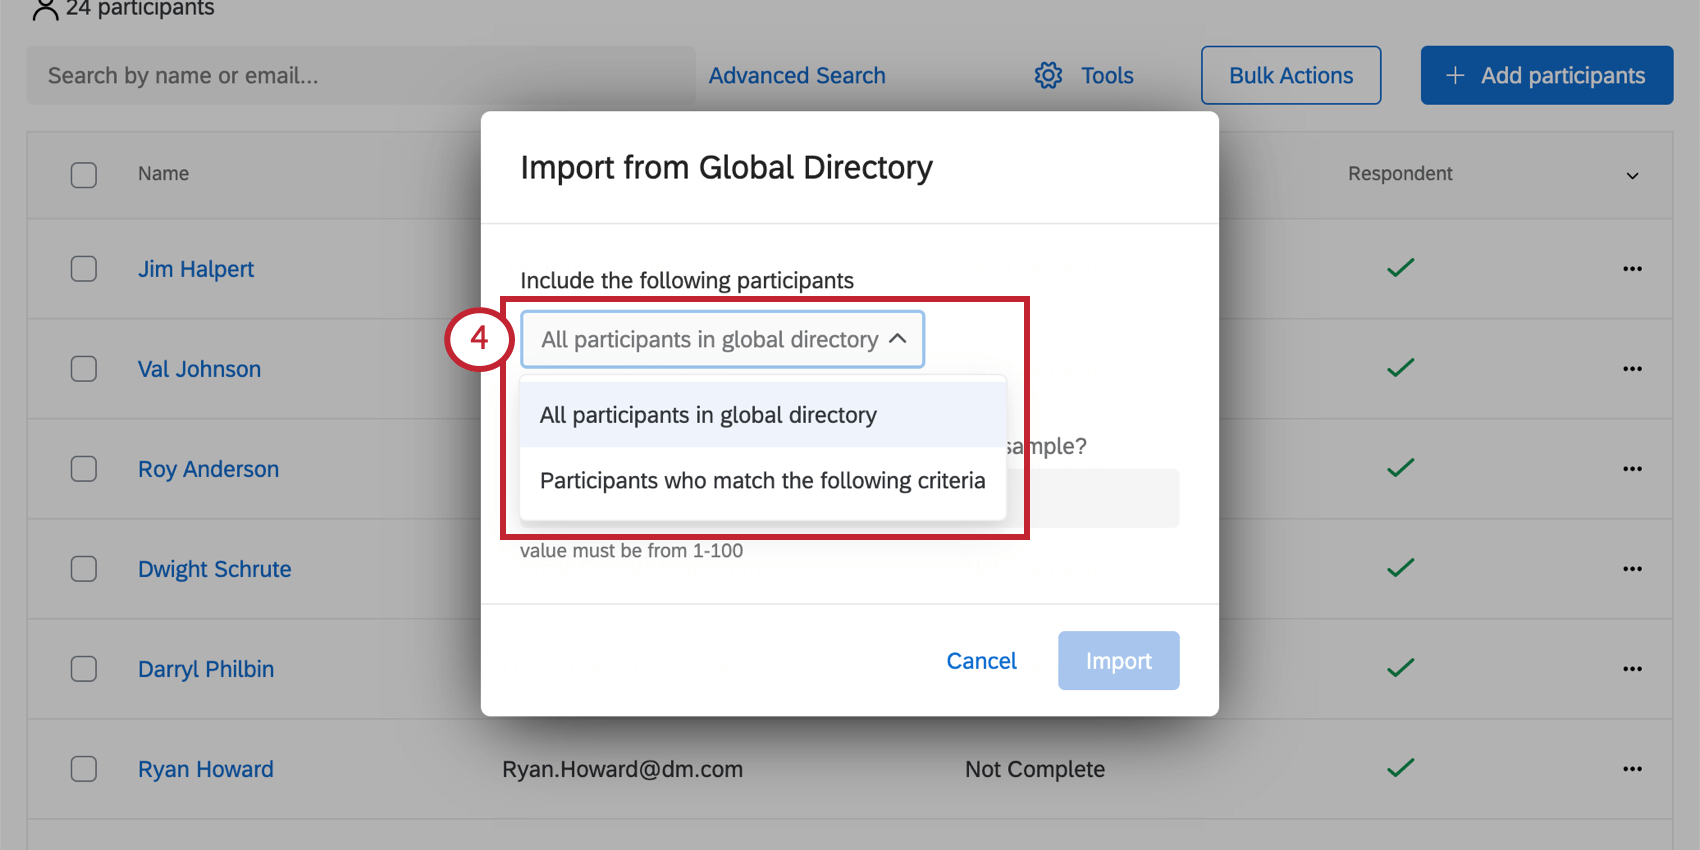 Qtip: If you choose to import all participants, skip Steps 5-7.
 - Choose a metadata value you’d like to filter the directory by.
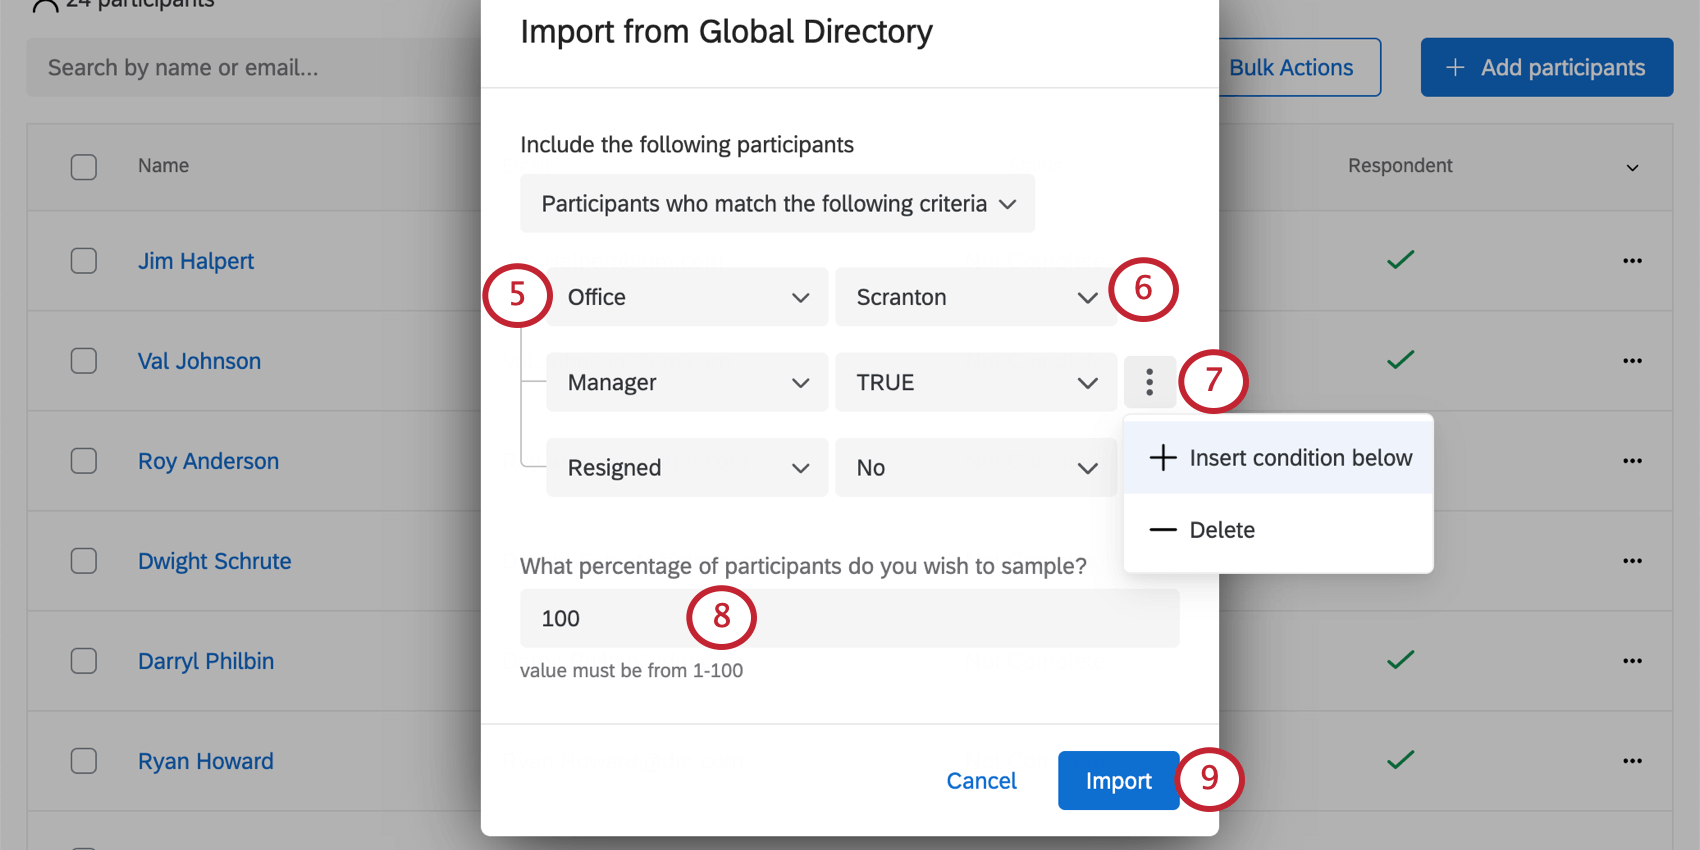
- Choose the value of this metadata you’d like to filter the directory by. You can choose multiple values.
Qtip: These values will be joined by “or;” for example, choosing France and Germany for country looks for employees with France or Germany listed as their country.Qtip: If there are no options, that means no one in the directory has a value for that field. Remember, you can remove metadata fields from your directory, but should only do so if you are totally sure you don’t use these fields or plan to use them.
- To add more criteria, click the dots and select Add condition below.
Qtip: Multiple criteria are joined by an “And” clause. For example, saying Country should be France and Department should be Finance means you’ll only import the Finance department members located in France.
- Choose the percentage of participants you want to sample from the directory.
Qtip: When combined with a filter, this is the percentage of participants who meet the filter’s criteria. When not paired with a filter, this is the percentage of the entire employee directory.
- Click Import.
Adding Participants from the Employee Directory
You can manually add individual participants from the employee directory. With this method, you can upload participants as either survey participants or dashboard users (non-respondents).
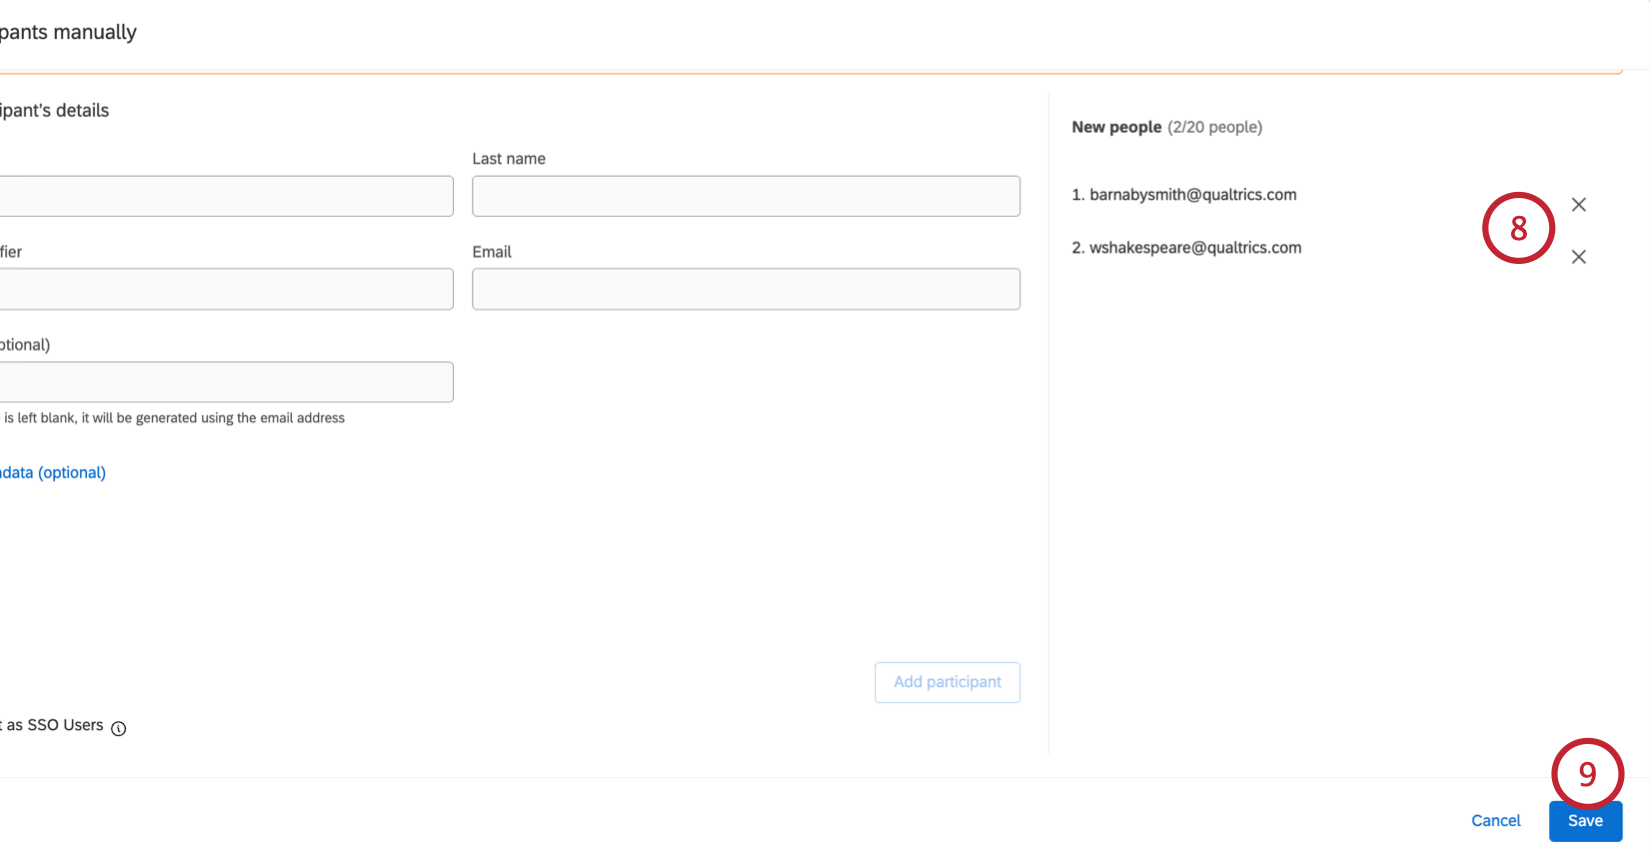
You can add up to 20 participants at a time using this method. When adding participants from the Employee Directory, you can only add participants that already exist in the directory, and you cannot edit their metadata until after they’ve been added to the project. When these participants are added to the project, all of their metadata in the employee directory will be added.
- Navigate to the Participants section of the Participants tab.
- Click Add participants.
- Select Add participants from Global Directory.
- Choose if you’d like to add the participant as a survey participant or a dashboard user (non-respondent). See Respondents vs. Non-Respondents for more information about these 2 types of project participants.
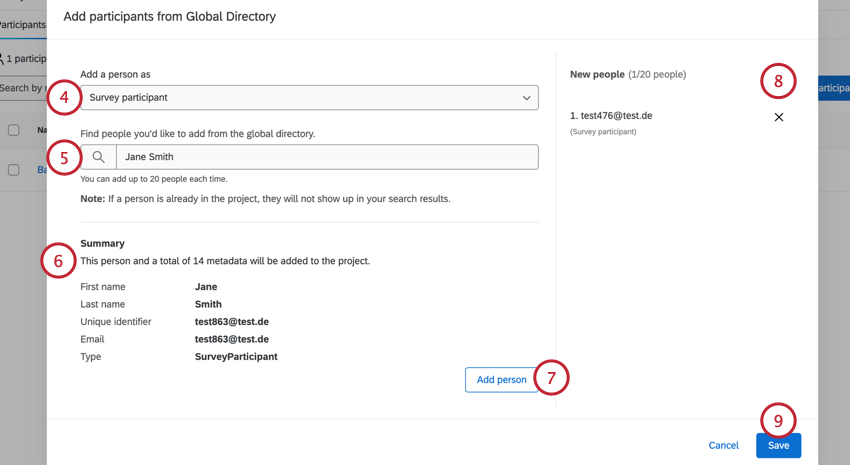
- Use the search bar to find users already uploaded into your employee directory. Select the user to add them to the list.
- The Summary section will show you basic information about the participant and if any new metadata fields will be added to the project.
Qtip: If adding participants to an Engagement or Pulse program with an org hierarchy, the participant will NOT be automatically added to the hierarchy. If the participant has metadata in the directory that corresponds with the hierarchy, then an “Add person to the hierarchy” checkbox will appear for you to select if you’d like them to be added to the hierarchy once they’re added to the project.
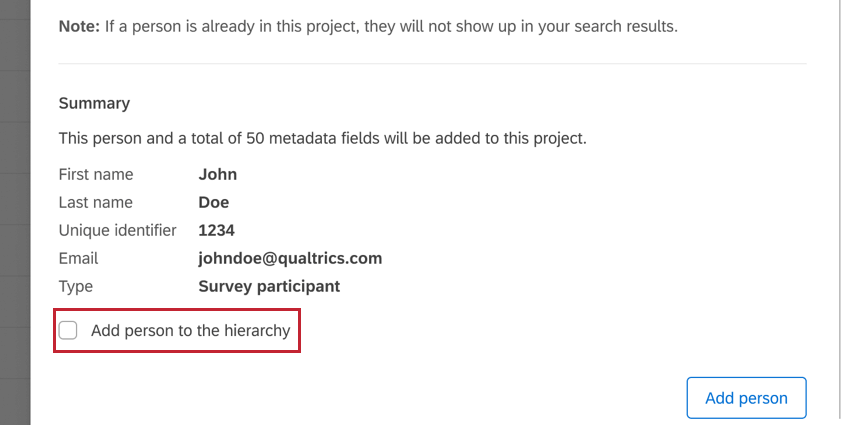
If the participant does not have hierarchy metadata, then you will see a message about this in the “Summary” section.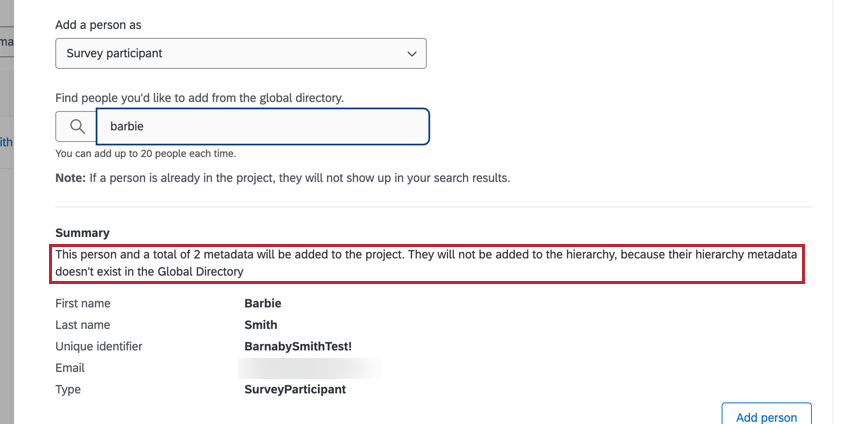
- Click Add person.
- Participants will appear in the New people section. You can repeat the above steps to add up to 20 participants at a time. If you want to remove a participant from the list, then click the X next to their name.
- Click Save to add the selected participants to the project.
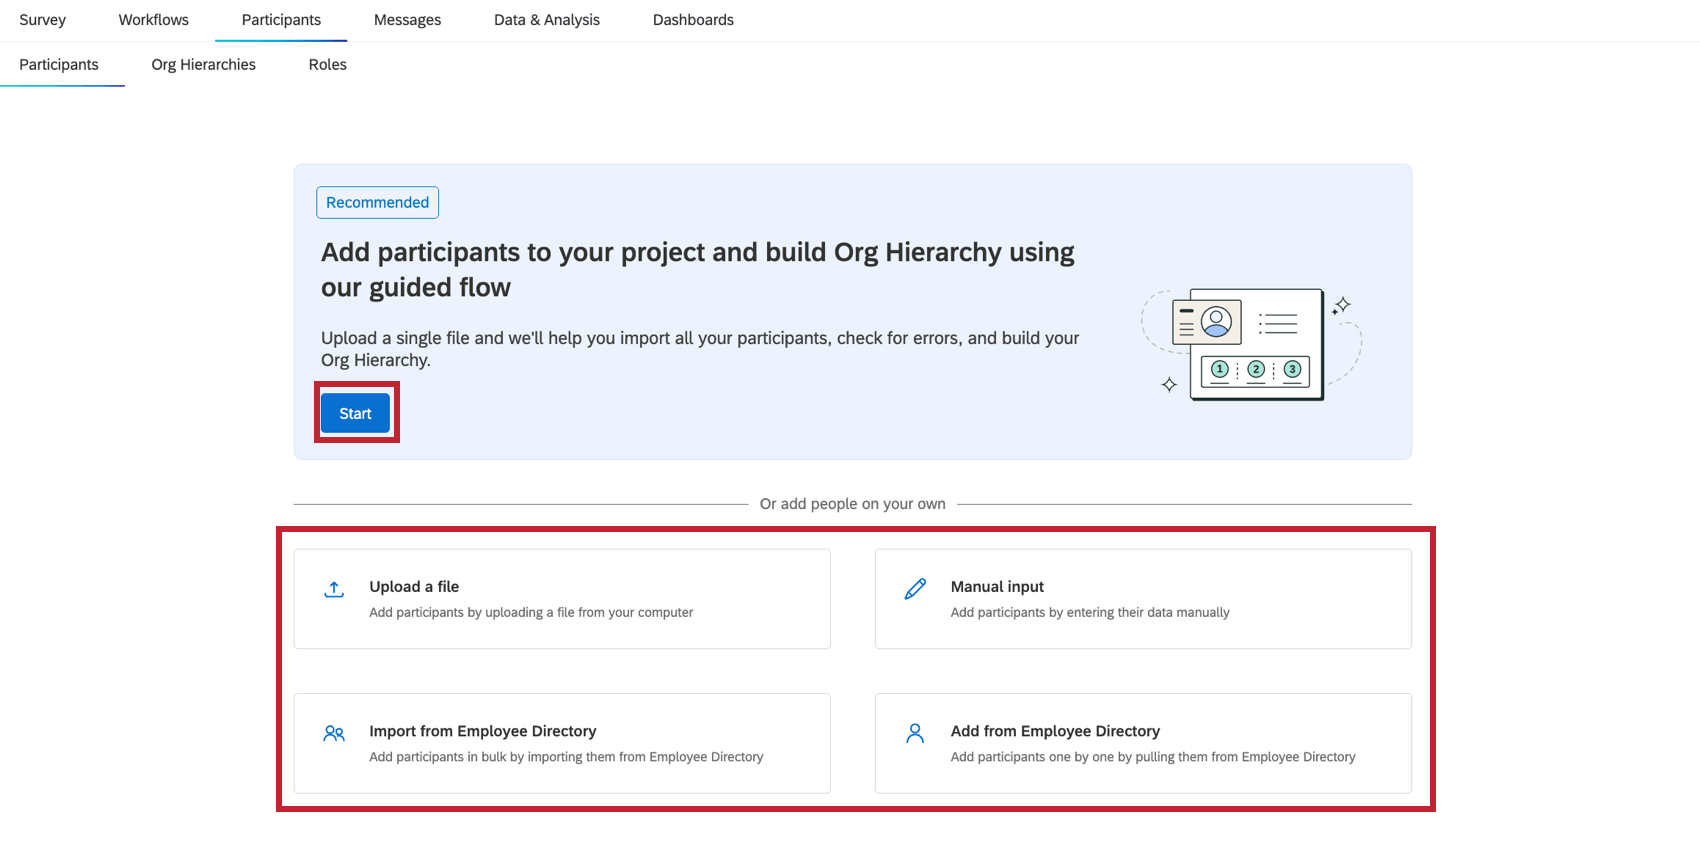
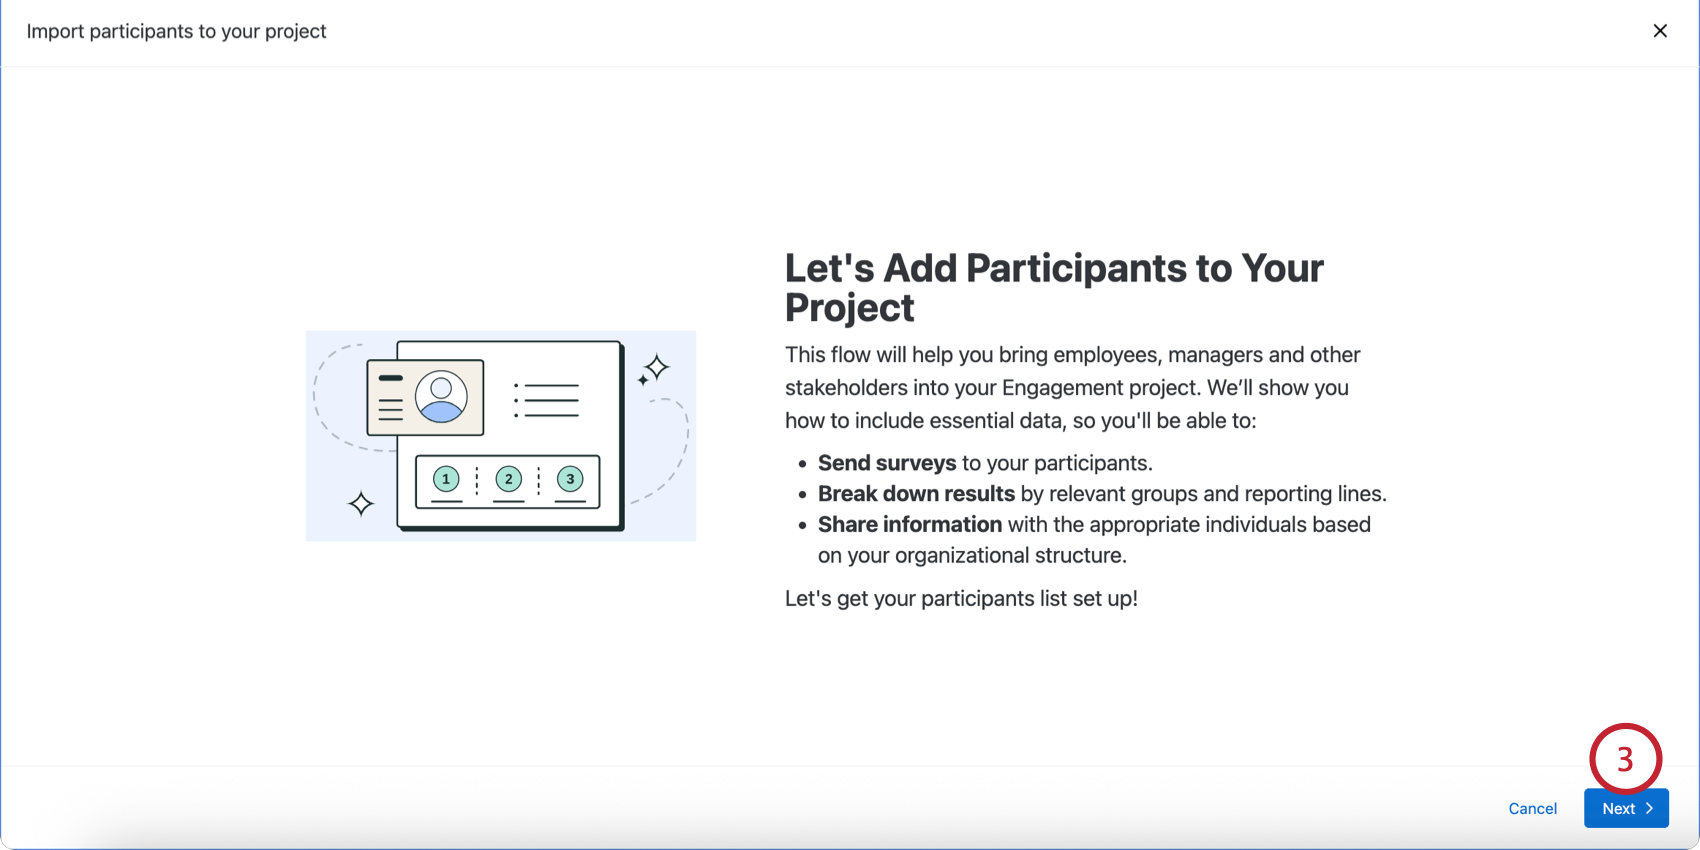
Import Participants & Build Org Hierarchy with Guidance
Feeling stuck on adding participants and building an org hierarchy? The guided flow for importing participants and building an org hierarchy will walk you through the steps needed to get your project up and running.
- Navigate to the Participants tab of your project.
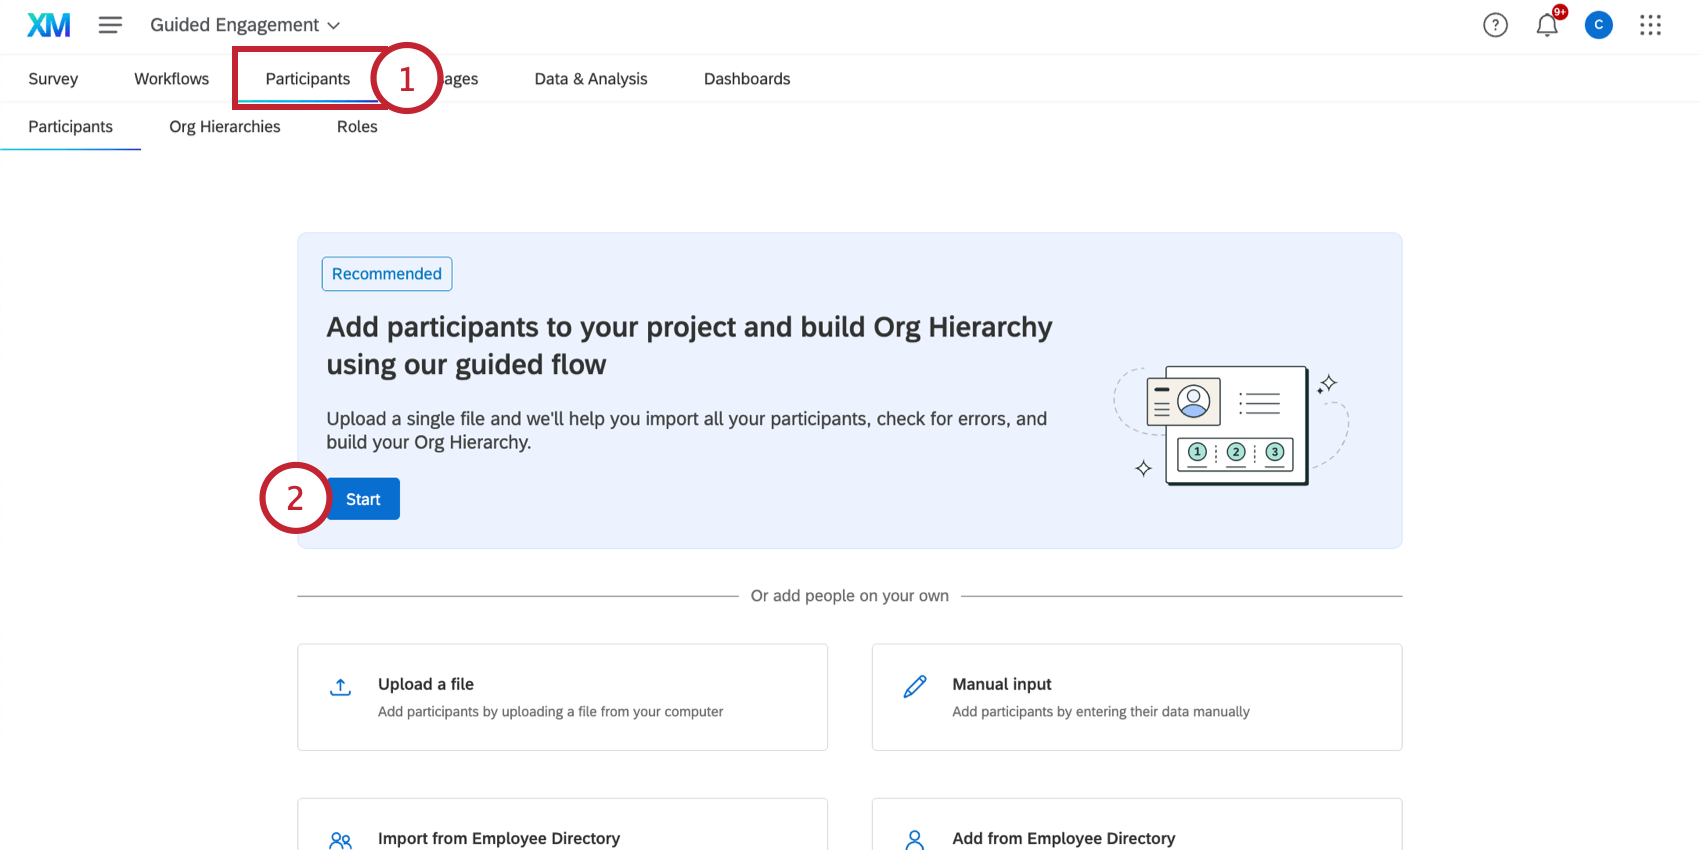
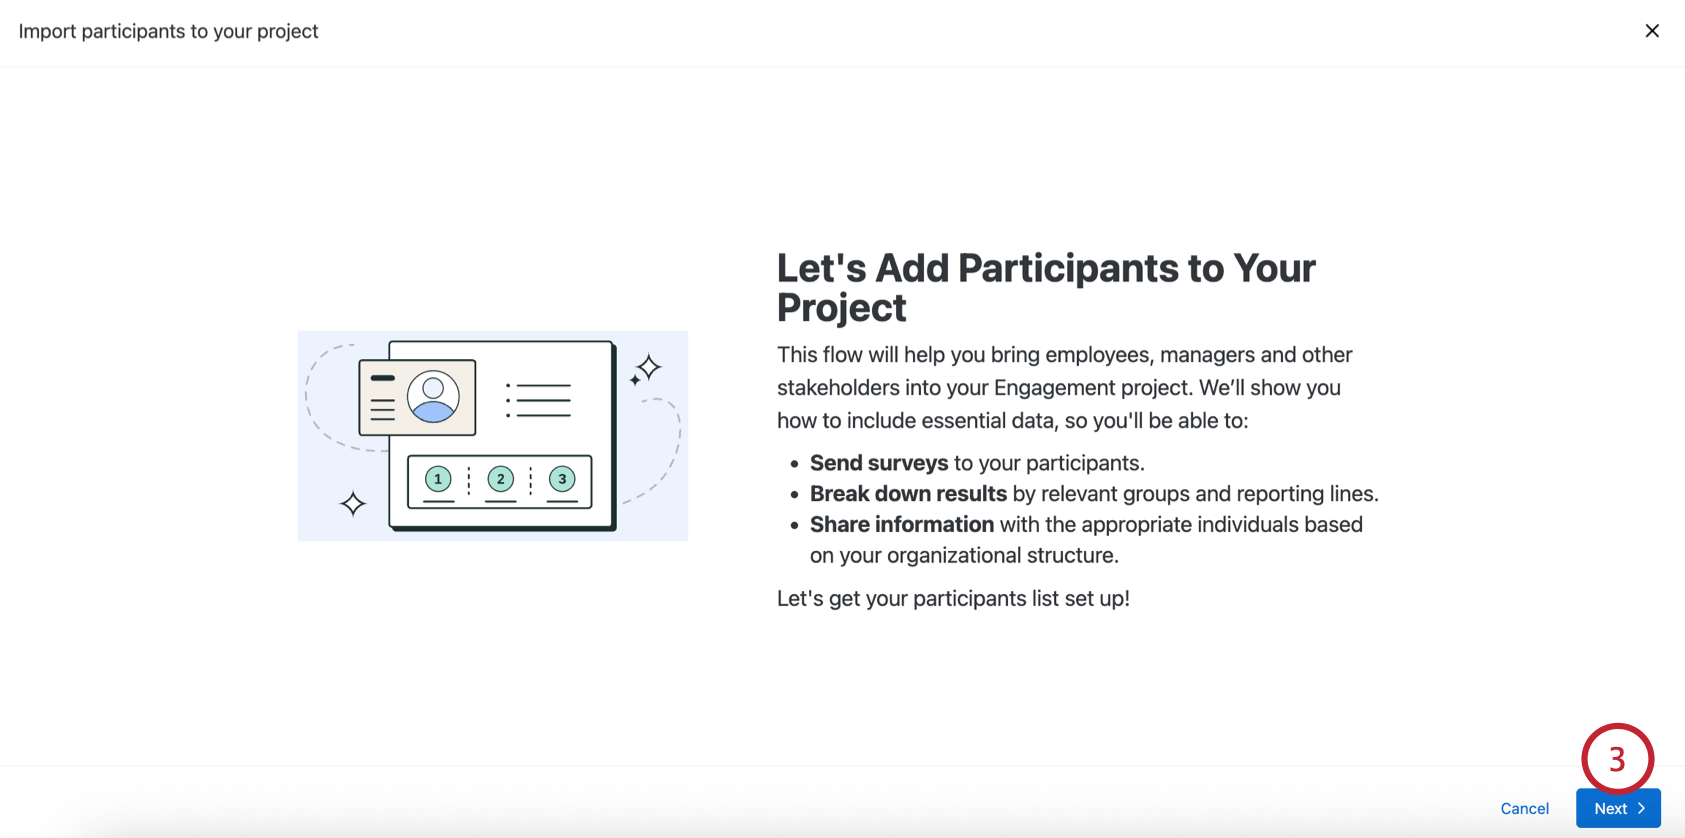
- In the guided flow section, click Start.
Qtip: This option is only available in a fresh Engagement project with no prior participants.
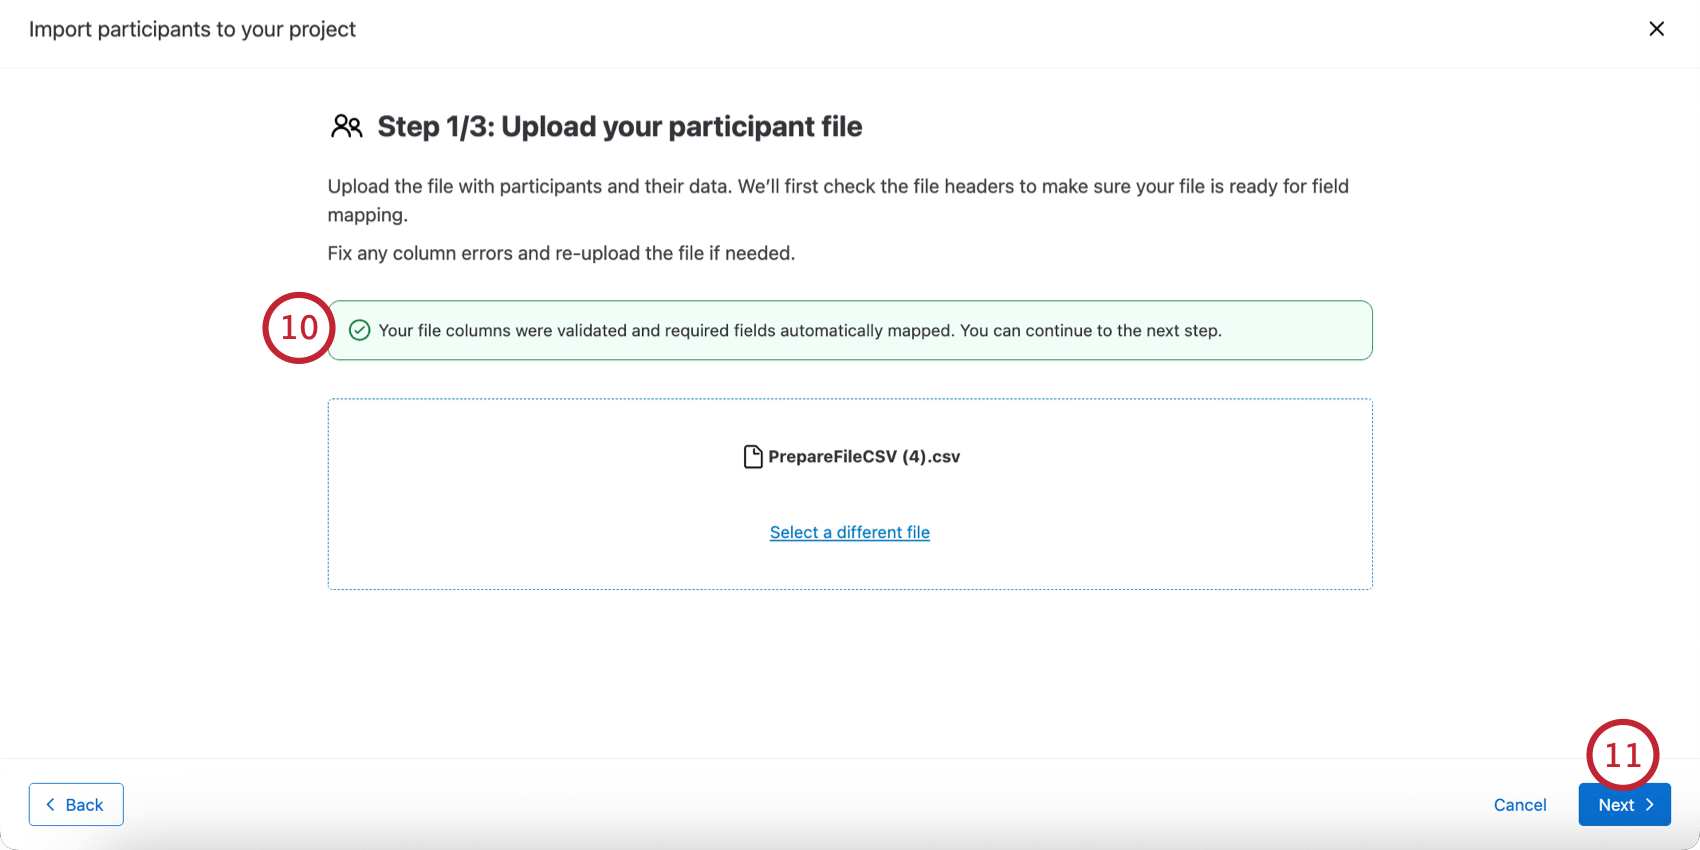
- Click Next.
- Click Download a file template.
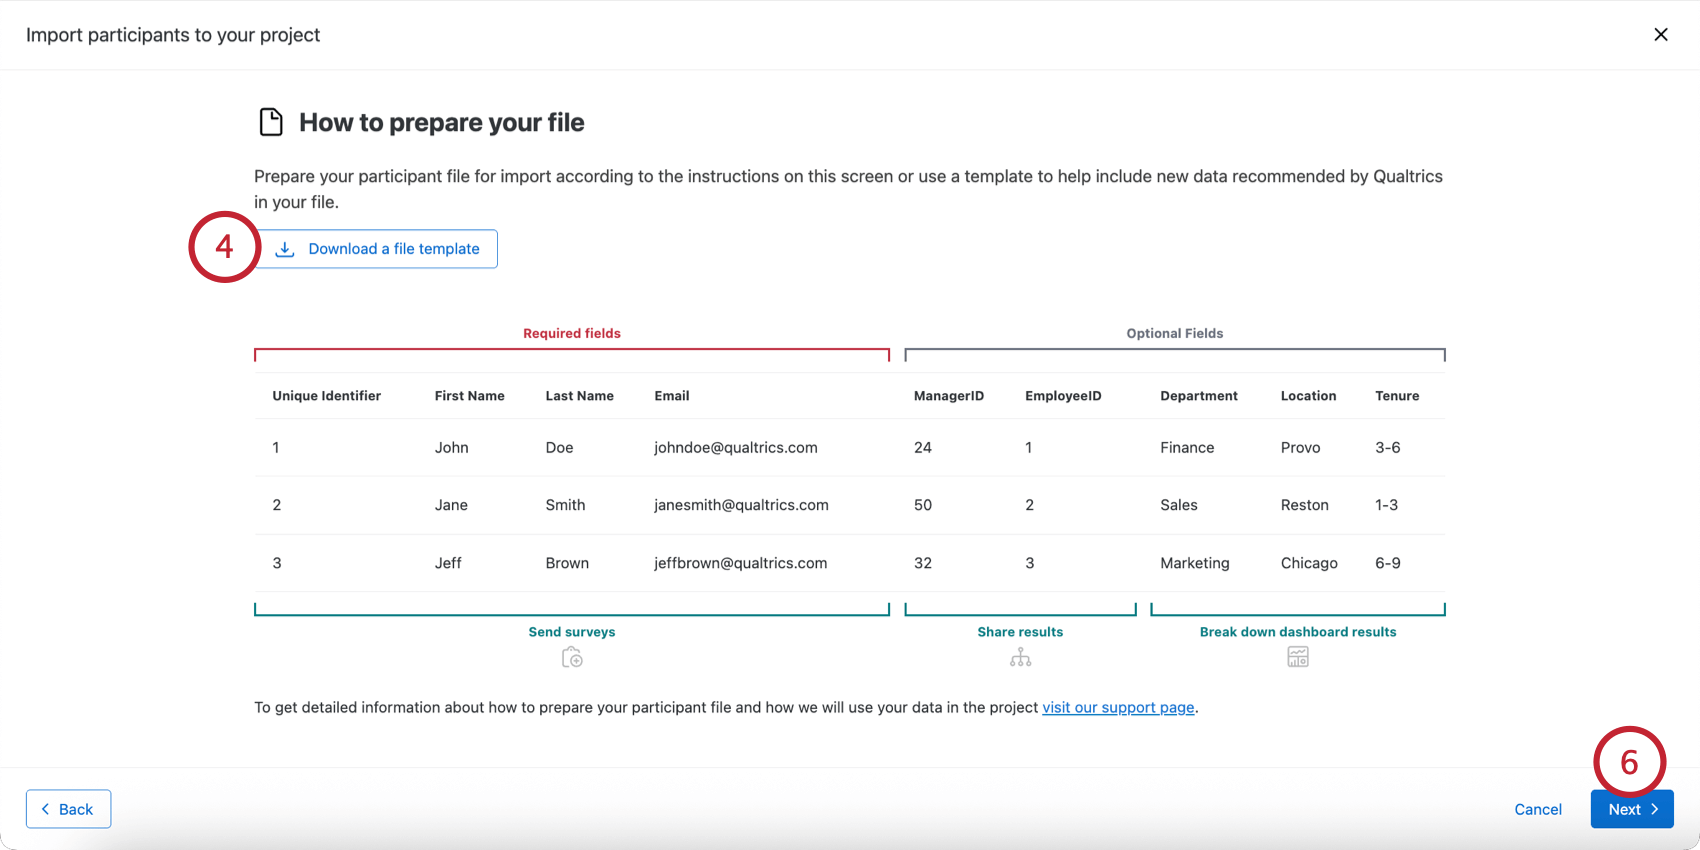
- Open the file in a spreadsheet editor on your computer and add your participant data. The Qualtrics interface contains some guidance; see Preparing Your Participant File for Import for additional help.
- Click Next.
- Choose if you’d like to build an org hierarchy:
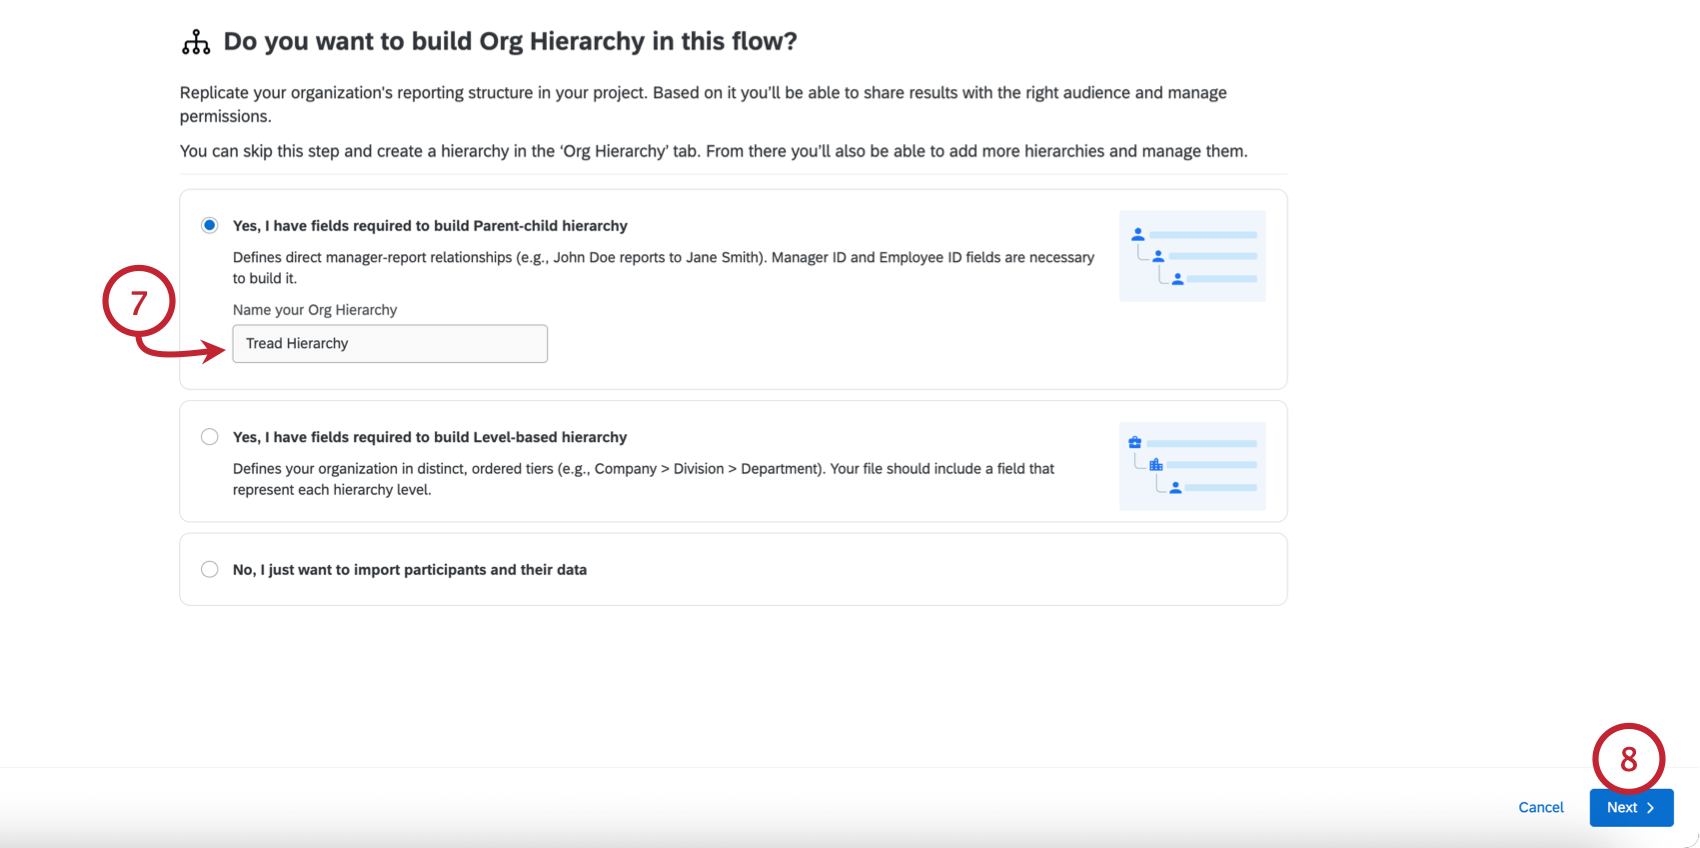
- Yes, I have fields required to build Parent-child hierarchy: Create a parent-child hierarchy. If chosen, enter a name for the hierarchy.
- Yes, I have fields required to build Level-based hierarchy: Create a level-based hierarchy. If chosen, enter a name for the hierarchy.
- No, I just want to import participants and their data: Do not create a hierarchy. You can always manually add org hierarchy fields and build a hierarchy later.
- Click Next.
- Click Select a file and choose the participant file saved on your computer.

- You’ll see a confirmation message if your file can be successfully uploaded. Any errors with the file will be displayed here for you to fix before continuing.
 Qtip: See Importing Participants with a File for help preventing and fixing the most common errors.
 - Click Next.
- Qualtrics will automatically map your file fields to the required participant fields. Double check the mappings. If you see any errors with these fields, then fix your participant file headers to make sure they match the required field names, and then click “Back” to reimport the file before continuing.
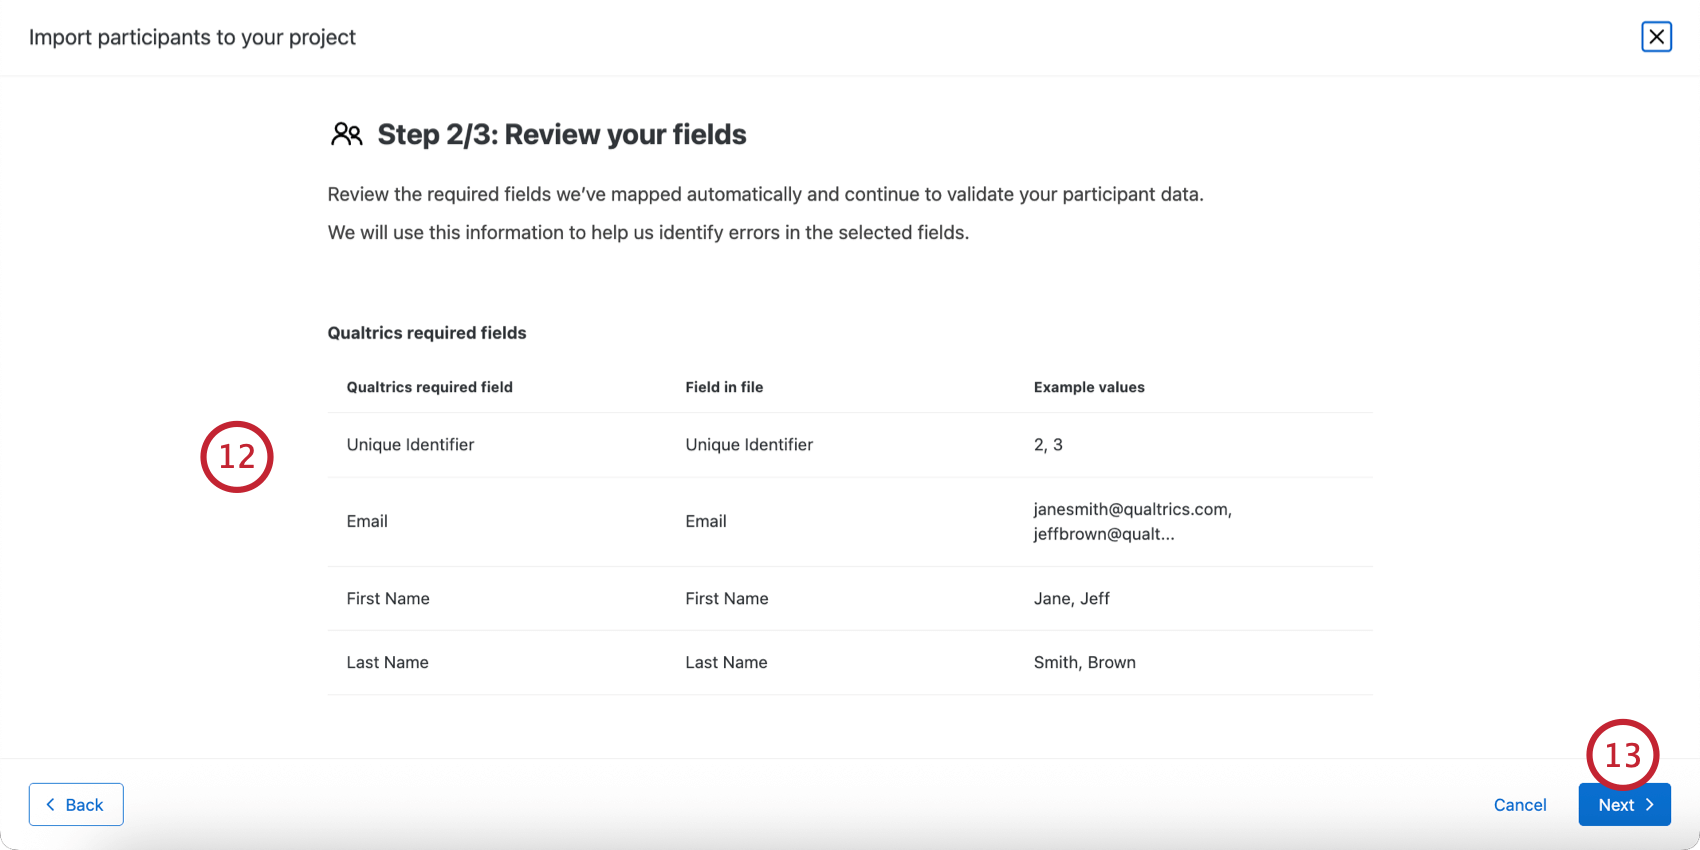 Qtip: If you are importing fields for an org hierarchy, then you can adjust your hierarchy fields using the dropdown menus.
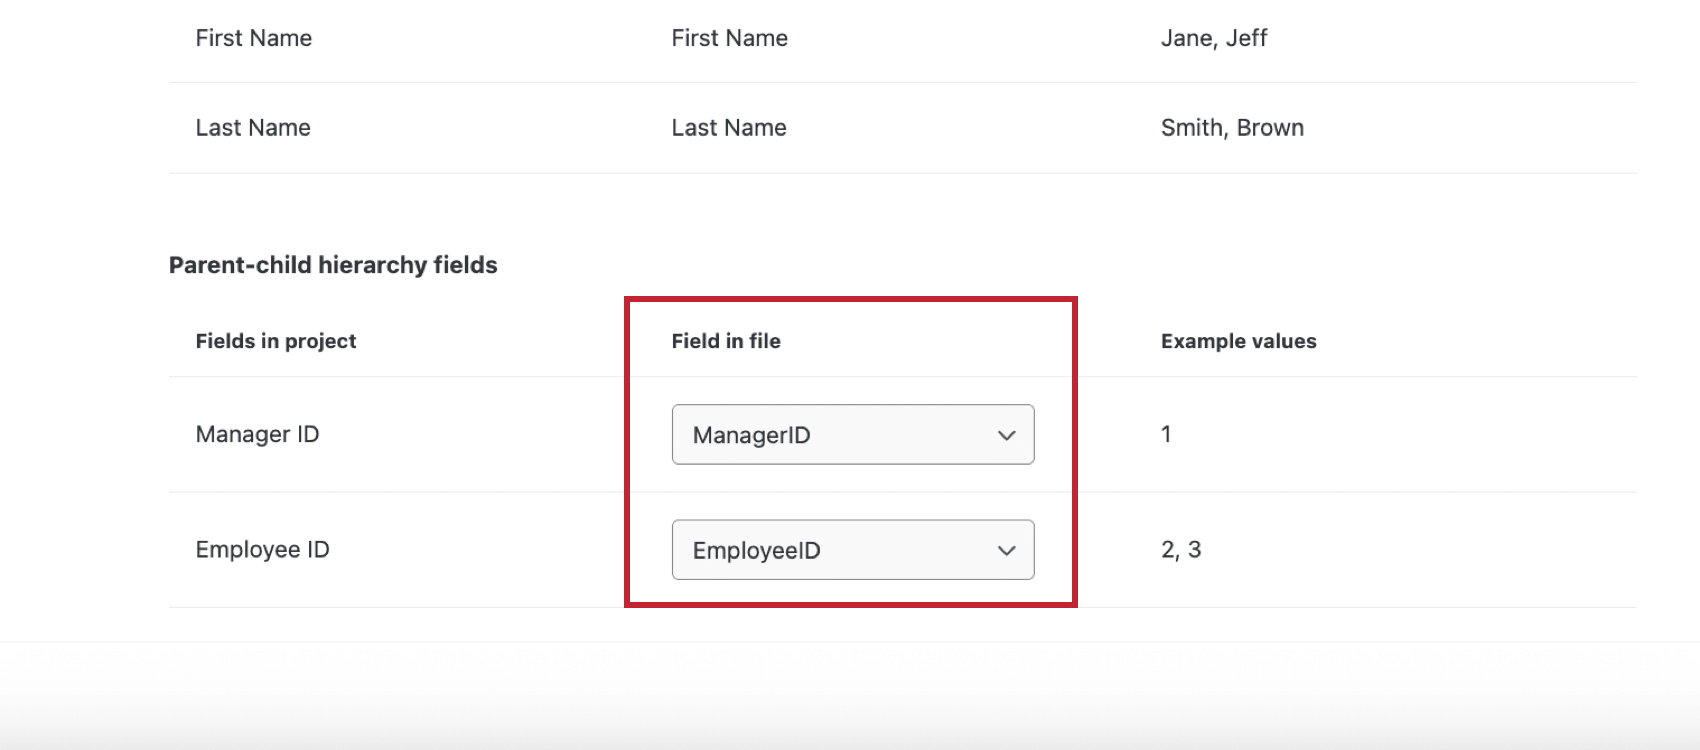
- Click Next.
- Review the import details, which includes the number of participants to add, the number of participant fields included, and information about the org hierarchy.
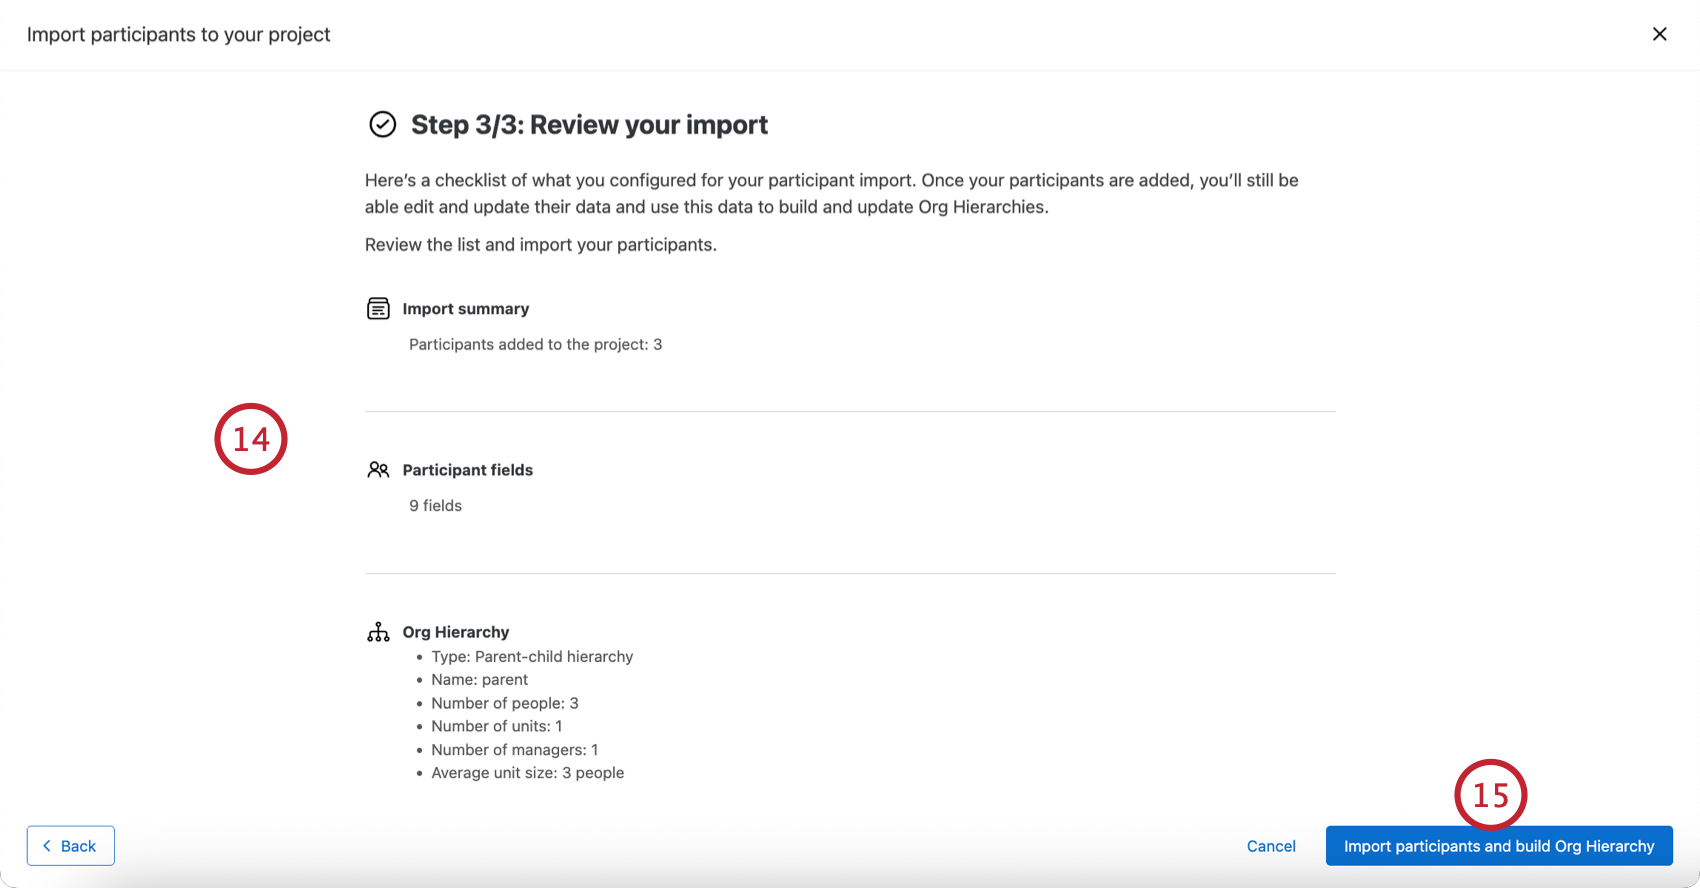
- Click Import participants and build Org Hierarchy.
You can monitor the progress of your import from the Manage Imports/Updates/Exports page.
Updating Participants
Let’s say you already uploaded your participants, but realize you forgot to include some metadata. Maybe you accidentally uploaded the wrong values for your hierarchy, or you just want to add the location of each participant so you can add the option for your participants to filter their dashboard by the country their office is in. The good news is that you can upload another CSV/TSV file to update this metadata, so long as you follow the steps below.
Importing an Updated File
Follow the instructions on the Importing Participants section of this page to learn where to get an example file, and then upload it to your employee project. Remember to always include a Unique Identifier column so Qualtrics knows which participants to update. You may exclude participants and metadata columns you don’t want to change.
Qtip: If a participant is updated with a new value for Email, their username will also be updated to match the new email address. This will happen unless one of the following is true:
- The participant’s username has been specified in a separate column titled UserName.
- The participant’s username has been manually changed in the participant information window, Employee Directory, or Admin tab so that it no longer matches the email address.
Pushing Metadata Updates to Responses and Dashboards
If you have made changes to your participants’ information by importing new metadata or through the participant information window, you will want to make sure these updates are reflected in your dashboards and with your responses. There are several ways to update participant metadata, depending on the level of edits you have made:
You can update participants one at a time in the Participants tab, using the dropdown to the right of their name.

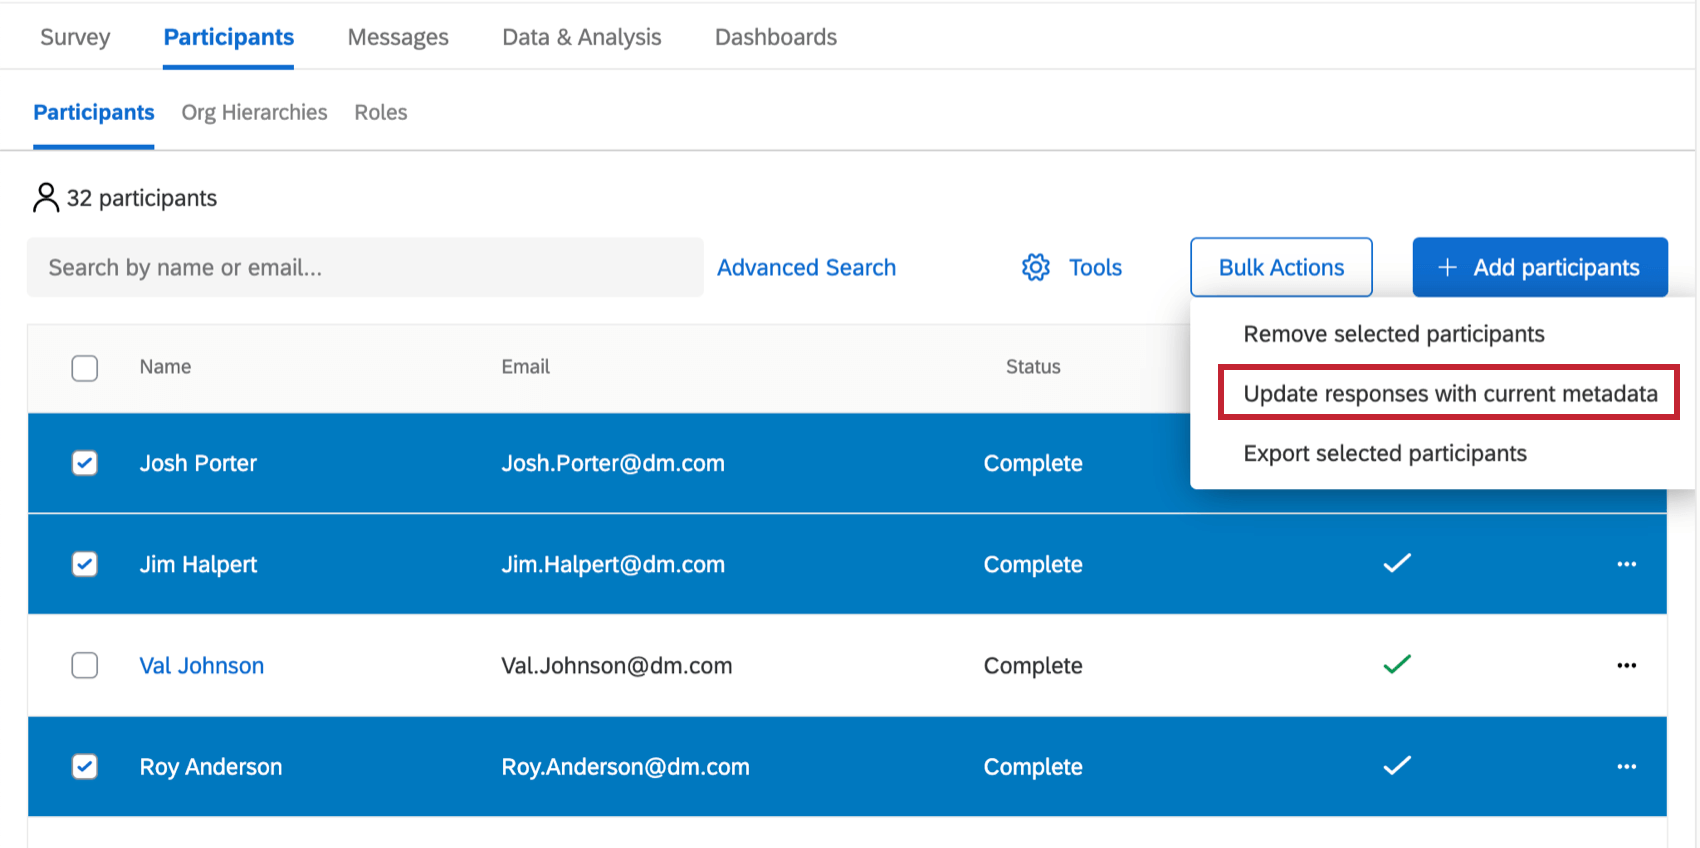
If you have updated only a few participants, you can update metadata by selecting people you want to update, clicking Bulk actions, then selecting Update responses with current metadata.
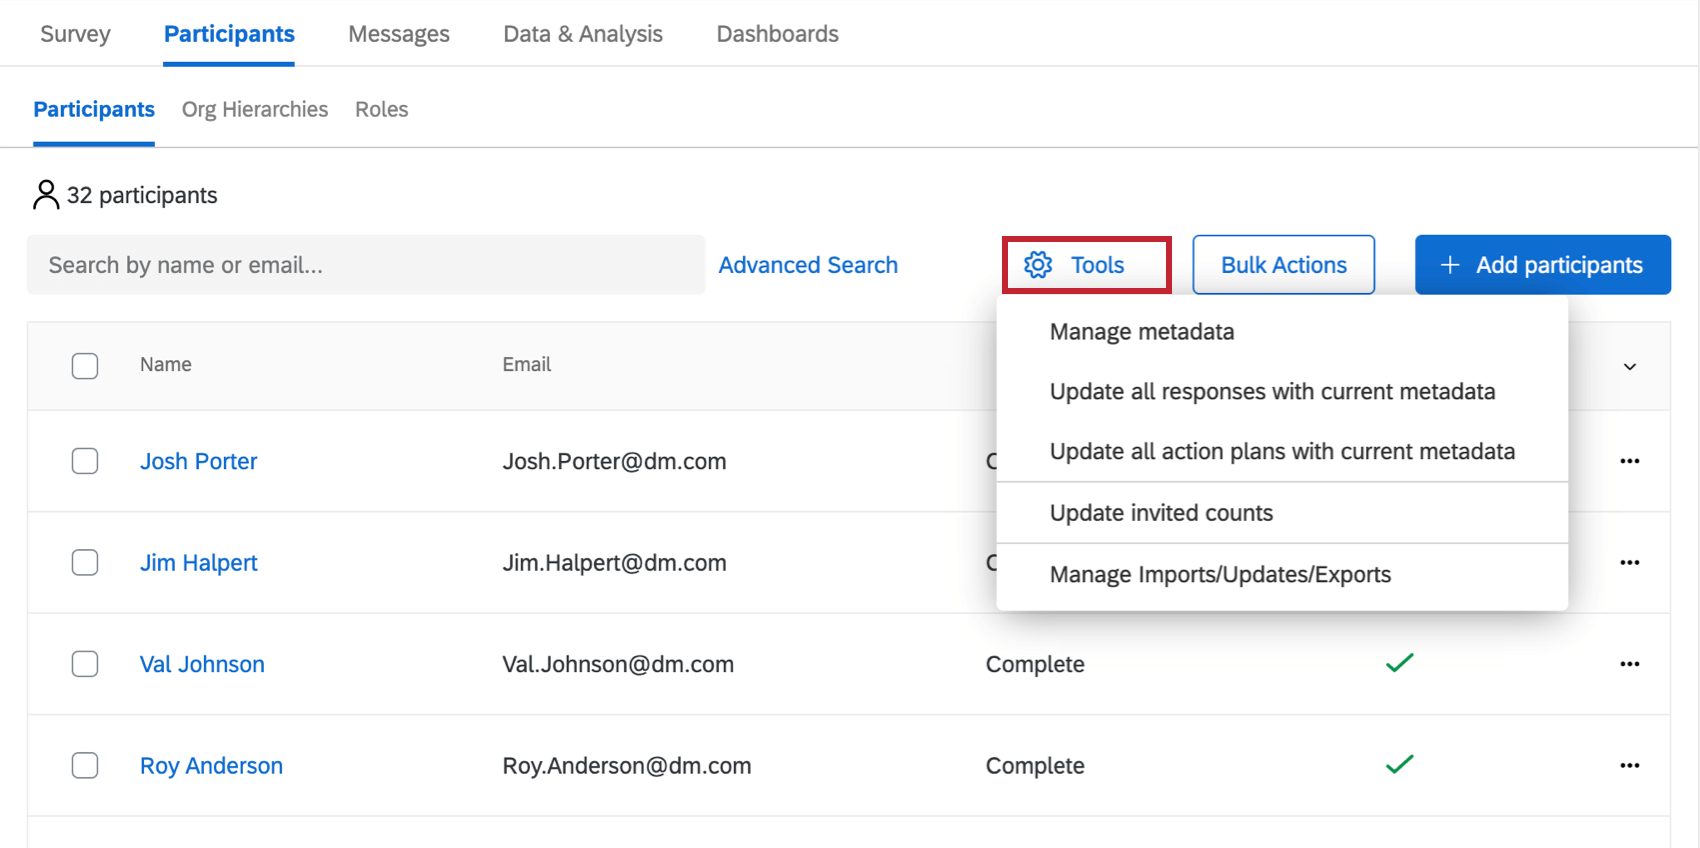
If you made many changes to many participants, you can update all metadata under Tools.
Metadata
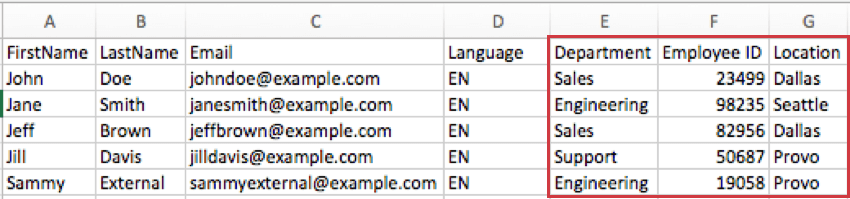
When adding participants, your file must contain metadata. Metadata are variables containing information about your participants, such as employee identification number, role in the company, or start date. Metadata can be used to create your hierarchy in Employee Engagement or to filter data in your dashboards in both Employee Lifecycle and Engagement.
In an imported file, metadata is represented as a column of data. The header becomes the name of the variable in Qualtrics.
Removing Participants
There are a couple different ways to remove participants. One is a manual approach where you select participants and remove them by pages of the Participants tab. The other is a convenient import process where you can upload a list of Unique IDs for the participants you’d like to remove.
Manual Removal
- If desired, search to narrow down the participants you see.
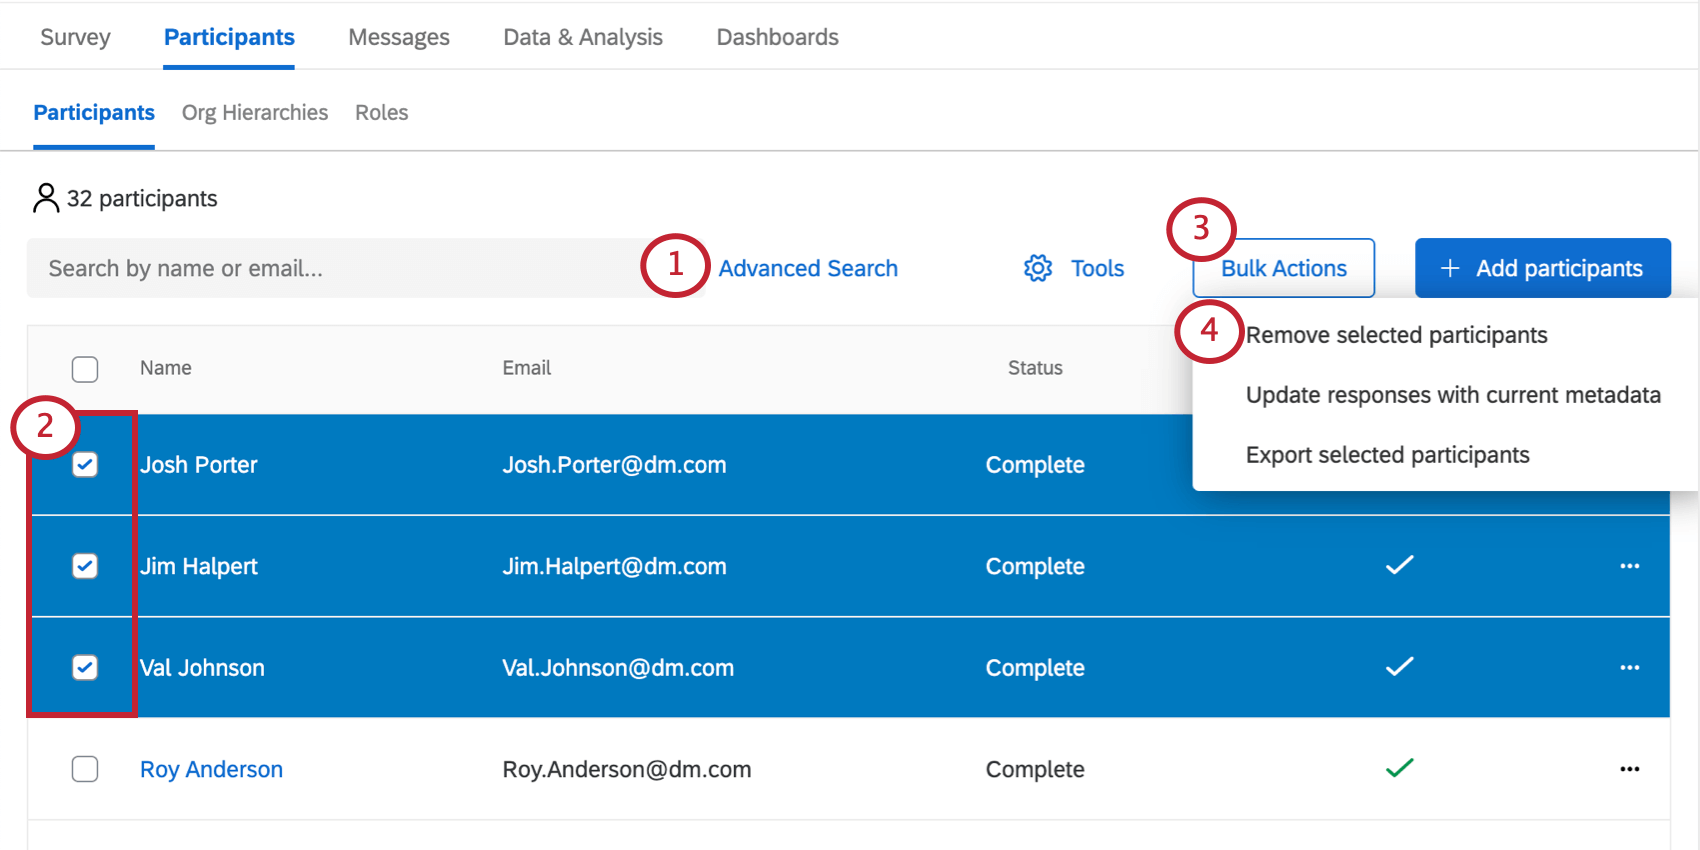
- Select users you’d like to remove.
- Click the Bulk actions dropdown.
- Select Remove selected participants.
- Type “remove.”
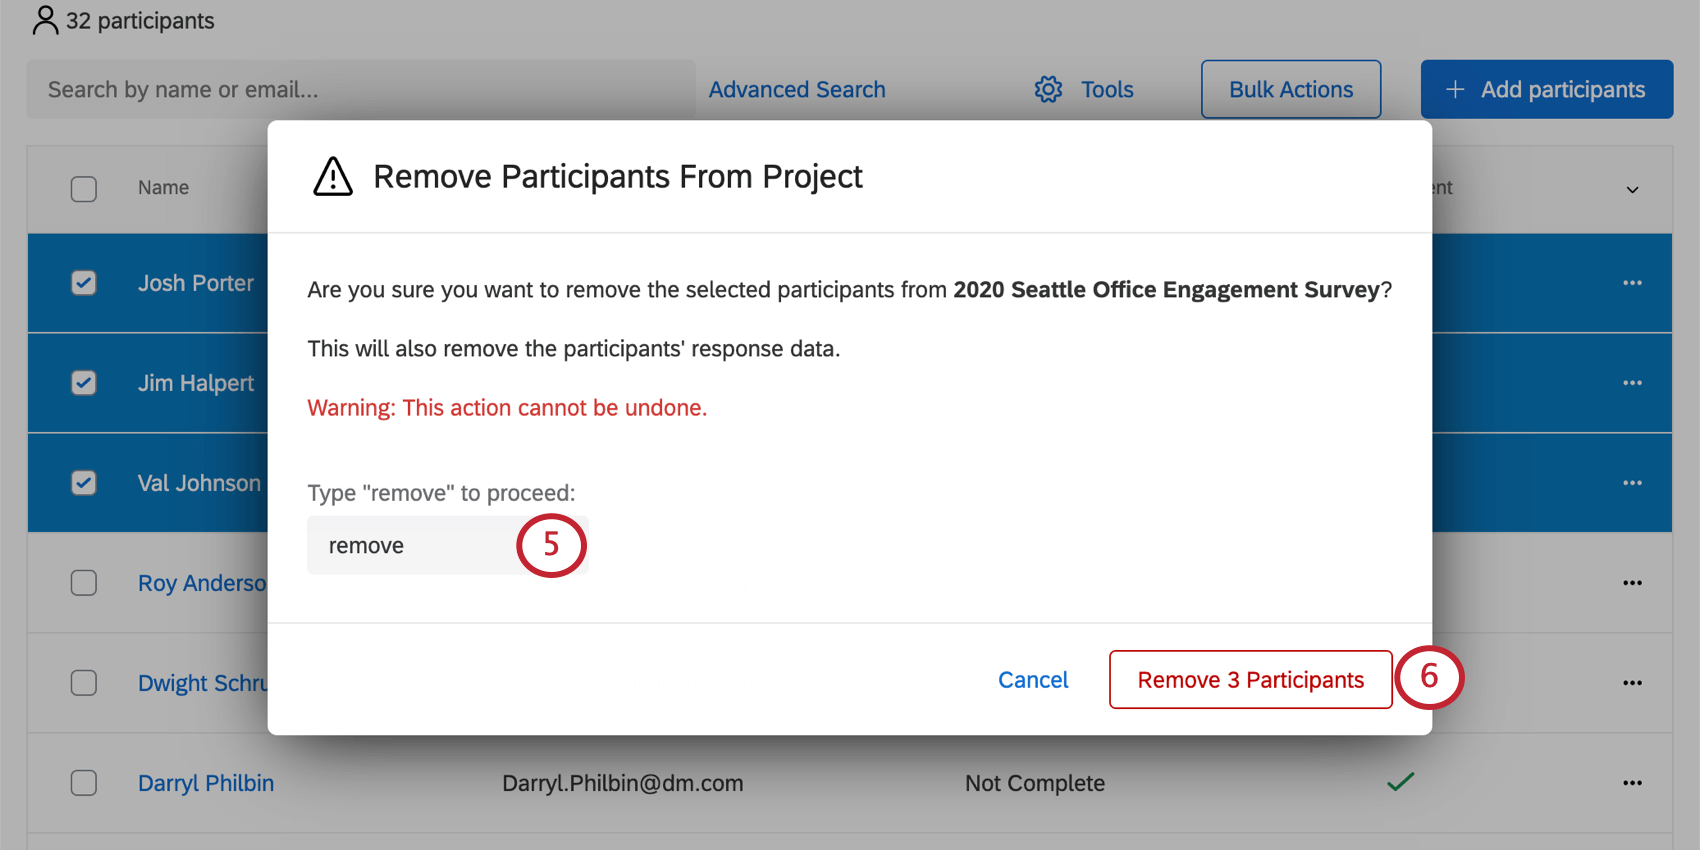
- Click Remove Participant(s).
Bulk Removal Through Import
- Make sure you do not have any participants selected.
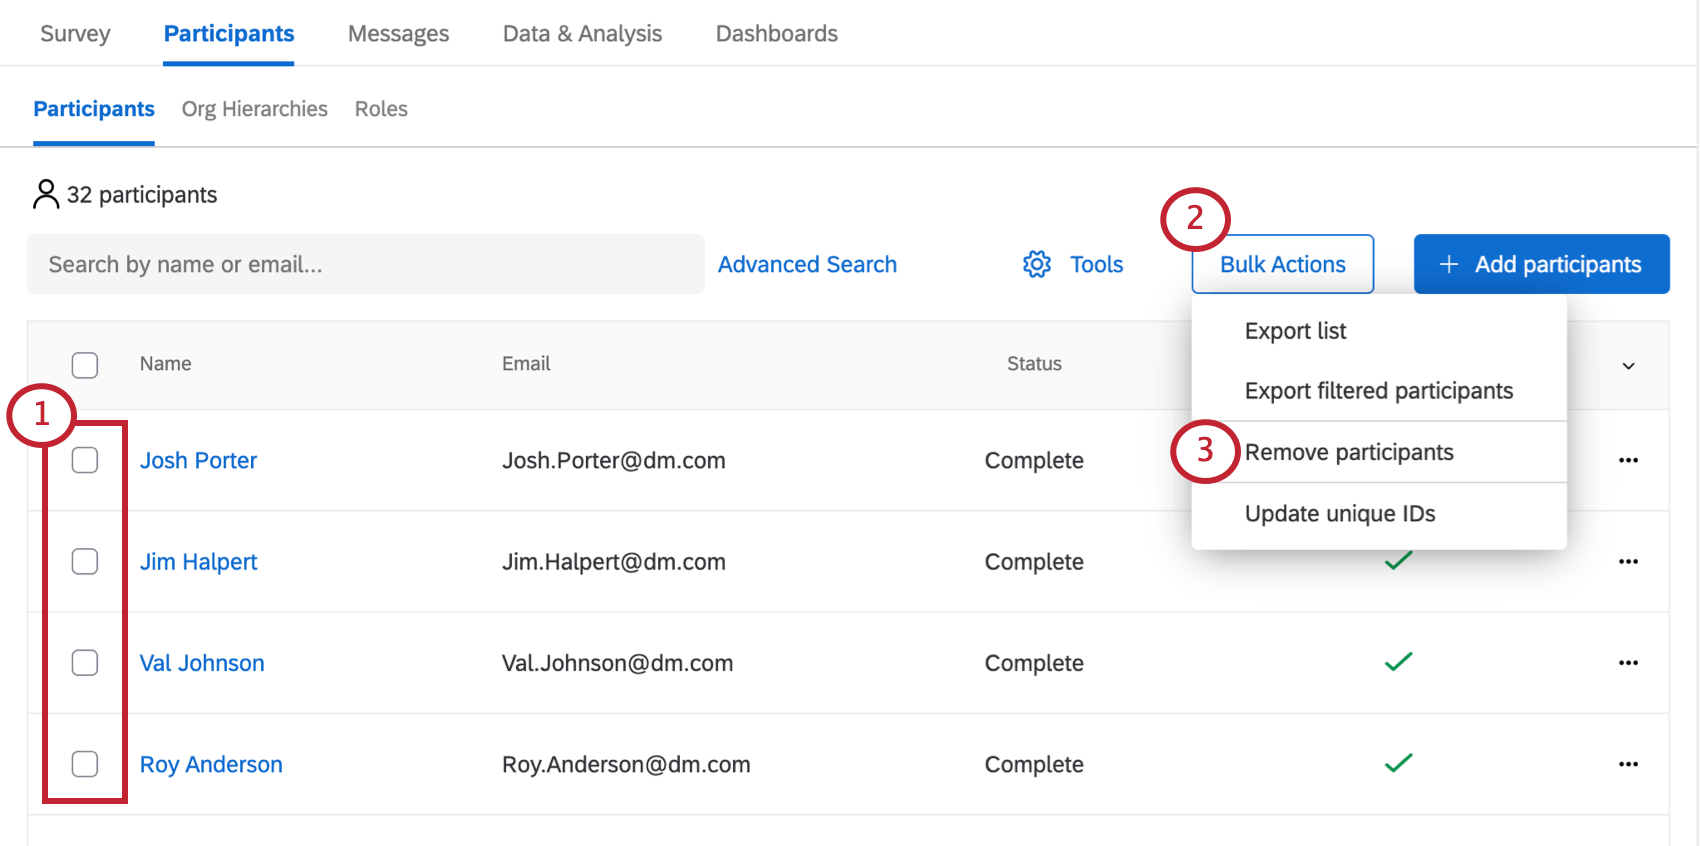
- Go to Bulk actions.
- Select Remove participants.
- Click Download to export a template CSV for import.
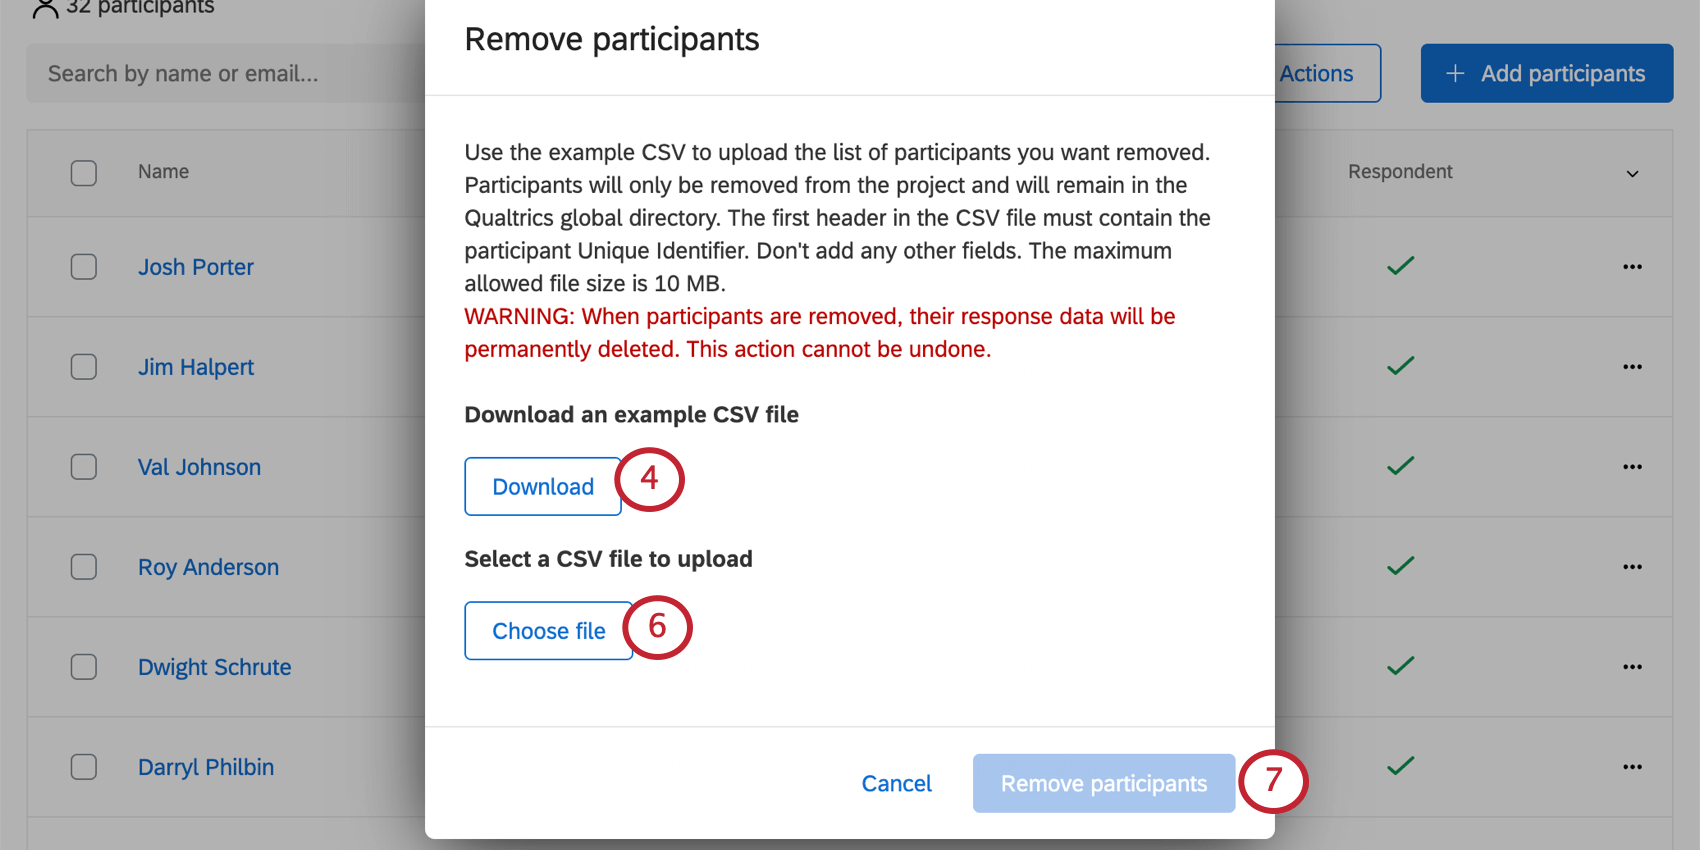
- Enter the corresponding IDs in the Unique Identifier column. Save your file.
Qtip: If you’re not familiar with your participants’ unique IDs, you may want to export your participants list.
- Click Choose file and select the file.
- Click Remove participants.
You may remove up to 25,000 participants at one time with this method. If you need to remove more than 25,000 participants, you will need to perform multiple removals.