Generating a Level-Based Hierarchy (EX)
Qtip: This page describes functionality available to Engagement and Pulse projects, but not Lifecycle or Ad Hoc Employee Research projects. For more details on each, see Types of Employee Experience Projects.
About Level-Based Hierarchies
Level-Based hierarchies are a good option if your HR data includes each level the employee reports to, from the top of the hierarchy all the way down to where the employee sits. With Level-Based hierarchies, you don’t necessarily have to know who the employee’s manager is; you just need to know the chain of command for each employee you’re including in the project. This data format is often more common with companies that organize employee data by distinct levels, location, or functional breakout.
Qtip: Not sure what type of hierarchy fits your HR data best? Check out a basic comparison of your options on the Hierarchies Basic Overview page.
Generating a Level-Based Hierarchy
Warning: You may have up to 10 hierarchies in a project. Once you reach 7 hierarchies, you will receive a warning that you’re approaching the hierarchy limit. If you have 10 hierarchies, you will not be able to create another without deleting a hierarchy.
Qtip: Hierarchy units with more than 100 sub units can’t be used as a breakout in widgets.
- Prepare a file of participants for a Level-Based hierarchy by following the directions on the linked support page.
- Import your participants file by following the steps on the linked support page.
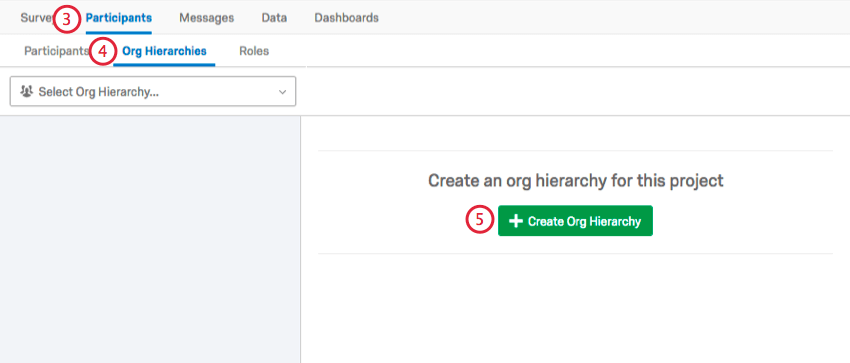
- Navigate to the Participants tab.

- Navigate to the Org Hierarchies section.
- Click Create Org Hierarchy.
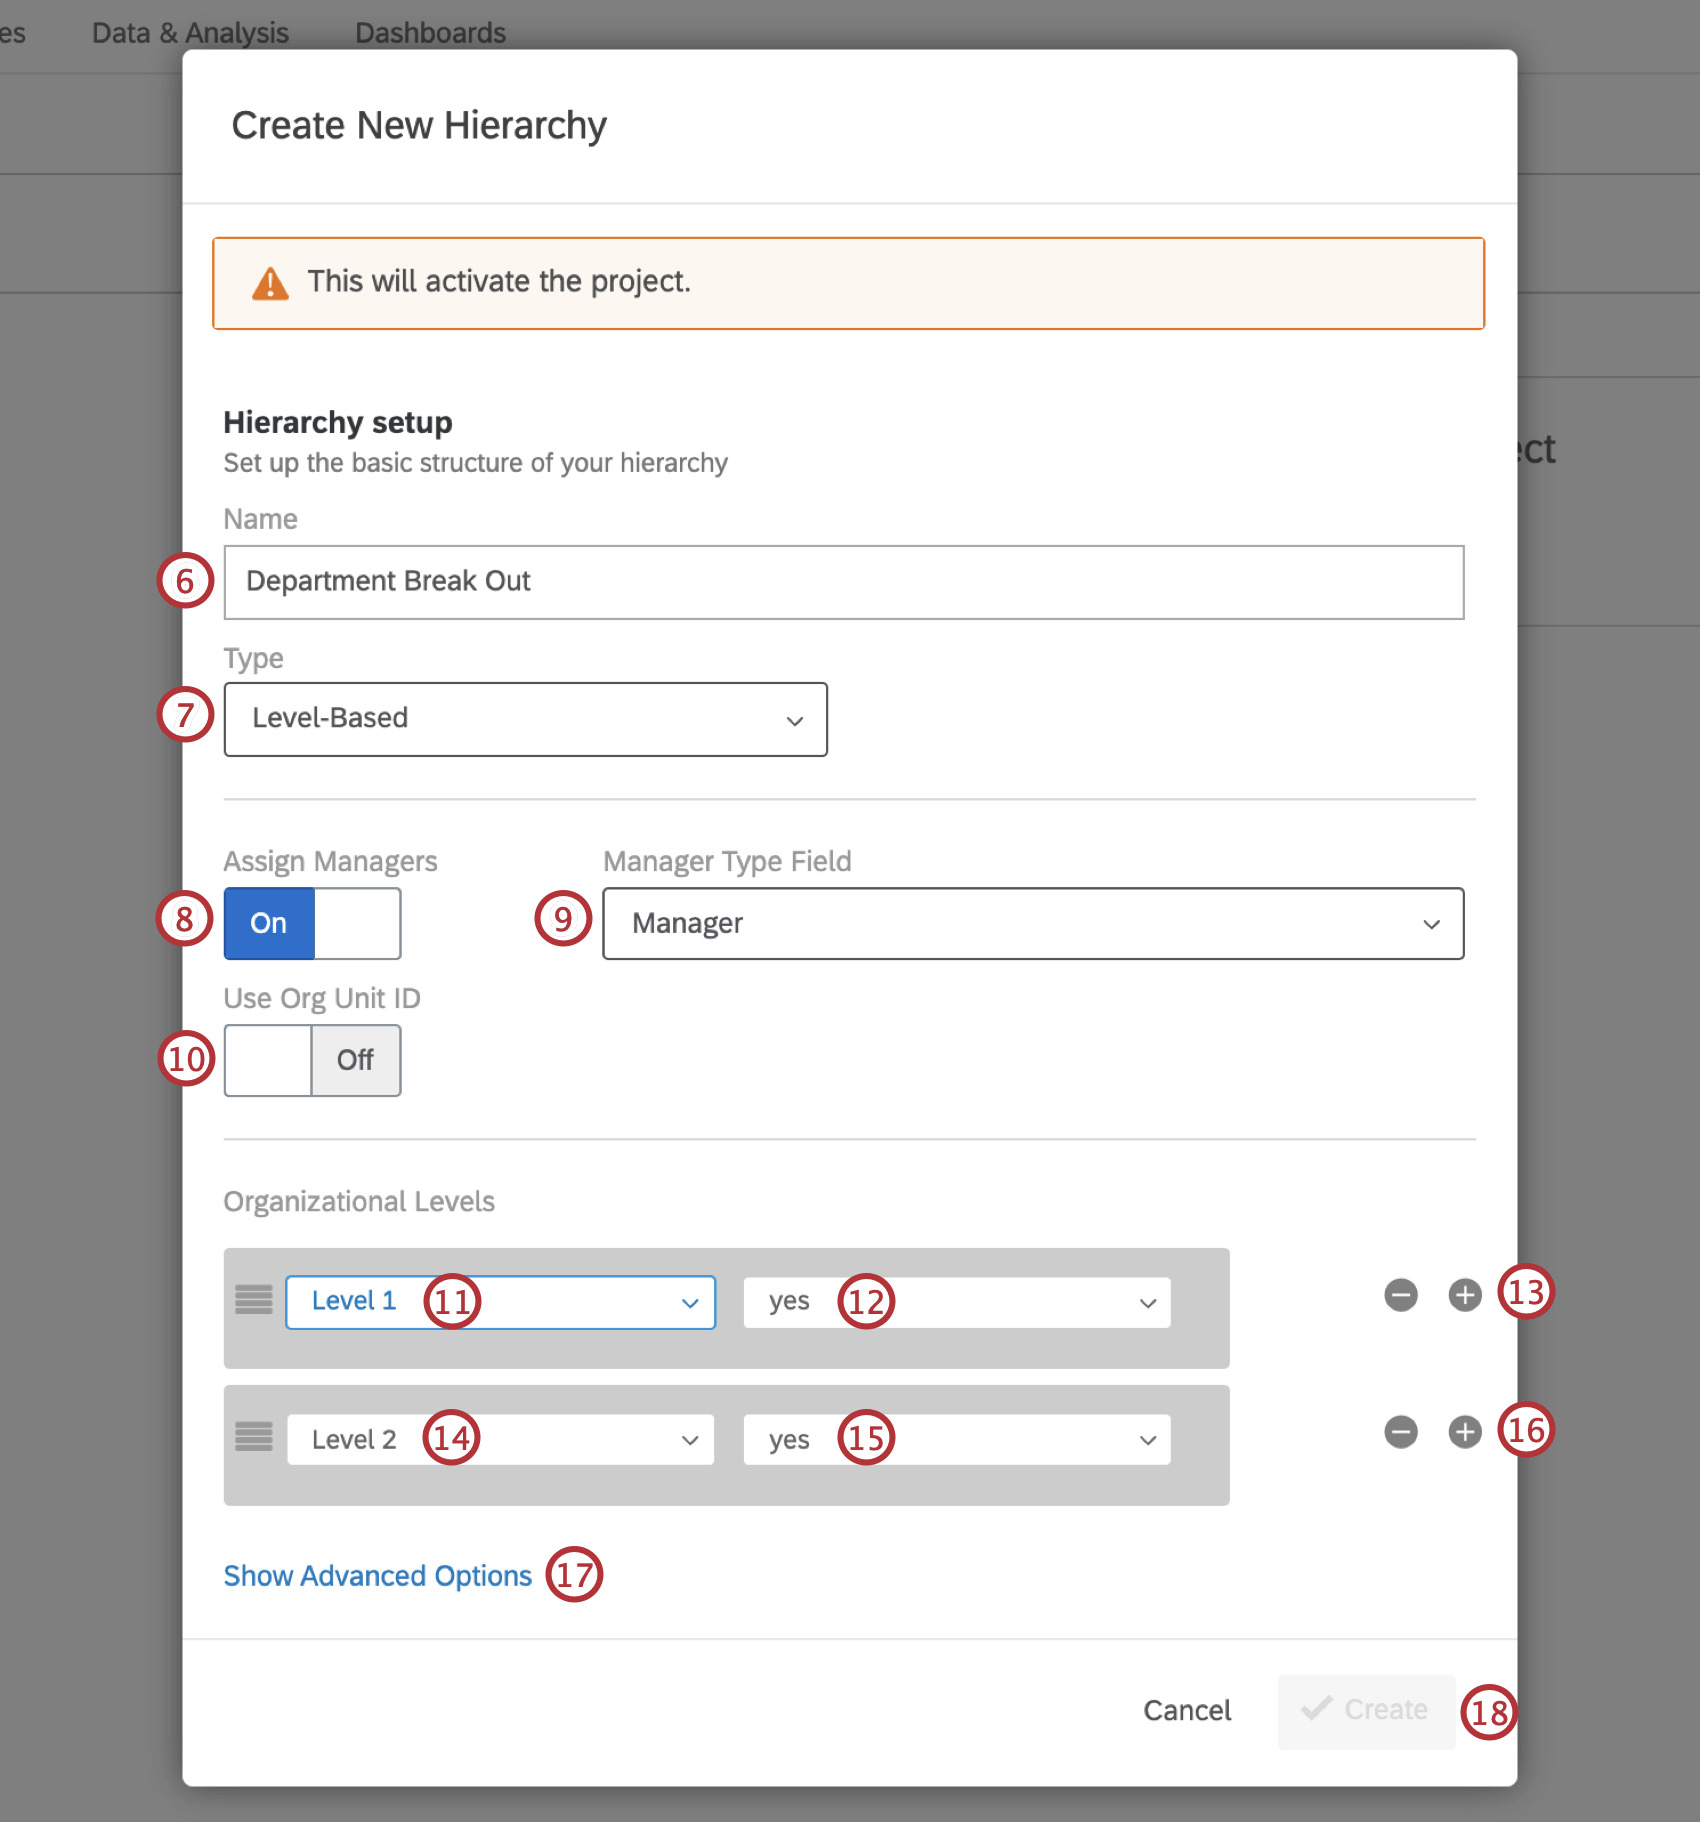
- Type a Name for your hierarchy.

- Under Type, select Level-Based.
- If you want your units to have managers, turn Assign Managers to On.
- Under Manager Type Field, select the metadata field where you indicate the managers in your hierarchy.
- If you have Org Unit IDs uploaded with your participants, turn the Use Org Unit ID setting On.
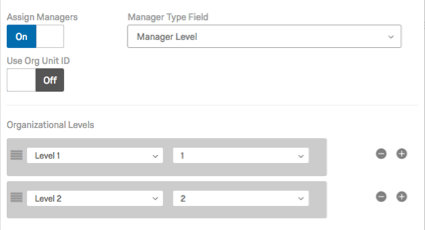
Qtip: When you use Org Unit IDs, you do not have to manually map your hierarchy units from other projects so you can compare data across projects in your dashboards; instead, units with the same ID will be recognized as the same, even if their names have changed.Qtip: There must be a unique Org Unit ID column for each level in the Level-Based hierarchy. For example, if your organization has two levels, “Level 1” and “Level 2”, then you will need two columns for Org Unit IDs: “Org Unit ID 1”, which contains the Org Unit ID for anyone in Level 1, and “Org Unit ID 2”, which contains the Org Unit ID for anyone in Level 2. You must also be careful not to reuse Org Unit field names, which is why we recommend numbering them.
- Under Organizational Levels, select the metadata field where you define your first level. For example, we simply call our first level “Level 1.”
Qtip: If you turned on Use Org Unit ID, map each of the metadata fields where you saved Org Unit ID to each level.
- If you’re assigning managers, select the value that indicates someone is a manager in this level. In this example, we indicated managers with the value “Yes.” This was the same for all level columns.
- Click the plus (+) sign to add another level.
- Select the metadata field where you define your second level. For example, we simply call our second level “Level 2.”
- If you’re assigning managers, select the value that indicates someone is a manager in this level.
- Add additional levels and manager values as needed.
- If you’d like, select Show Advanced Options. See the section below for more details.
- When all of your levels have been added, click Create.
Advanced Options
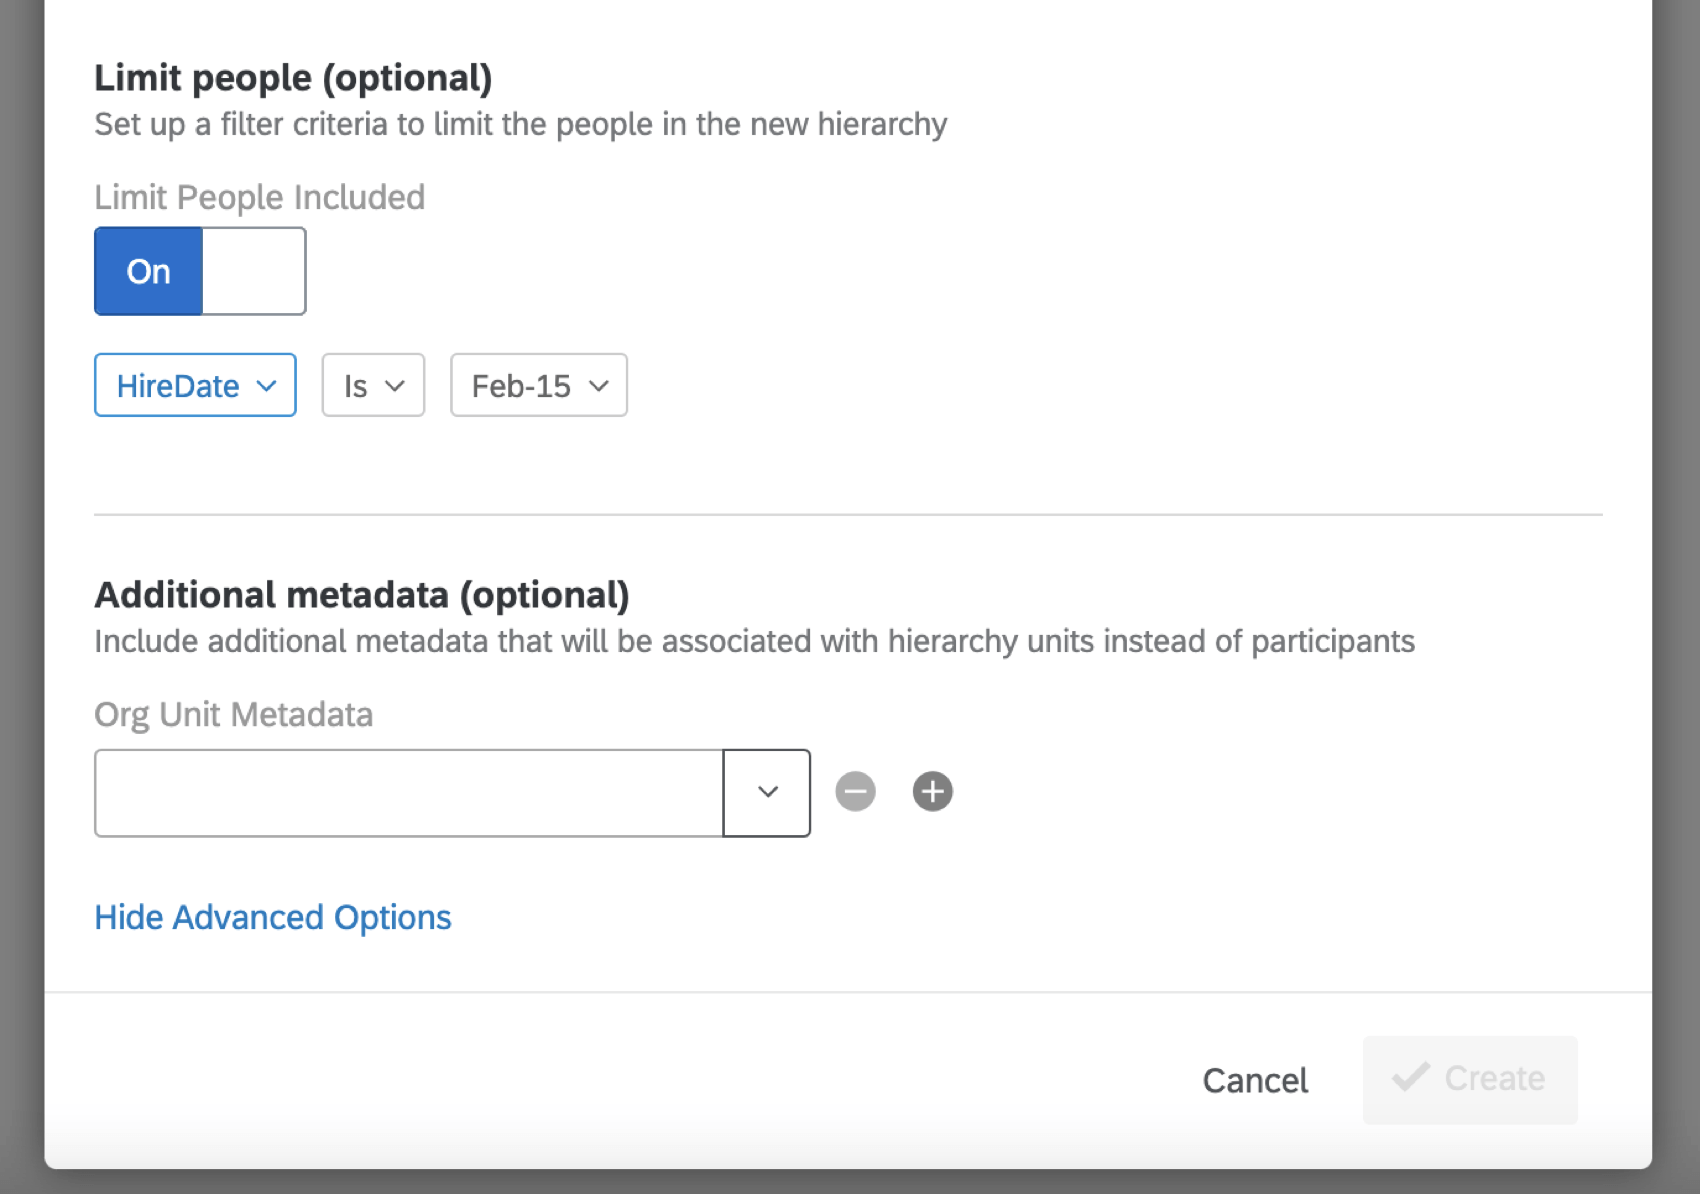
If you click Advanced Options, you will have several additional options when building your Level-Based hierarchy.
- Limit people: If you would like to limit the people included in the hierarchy based off of a metadata value, turn this option On. In the example above, only participants from a certain hiring date are being included in the hierarchy.
- Additional metadata: If there are any other metadata that are unit-specific, add them here. You can add multiple fields at a time by clicking the plus (+) sign to the right of the field.
Qtip: You cannot select fields that are already being used for org hierarchy generation (e.g., ManagerID, EmployeeID). You also cannot select fields that are already being used to configure other org hierarchies in your project. Any fields already being used as additional metadata for another hierarchy in your project will not show up in the field dropdown.

