Administration (EX)
About the Admin Page
Creating, managing, and organizing users is an important part of Qualtrics. Employee Experience projects come with a unique set of administrative needs and features. Read on to learn more about them.
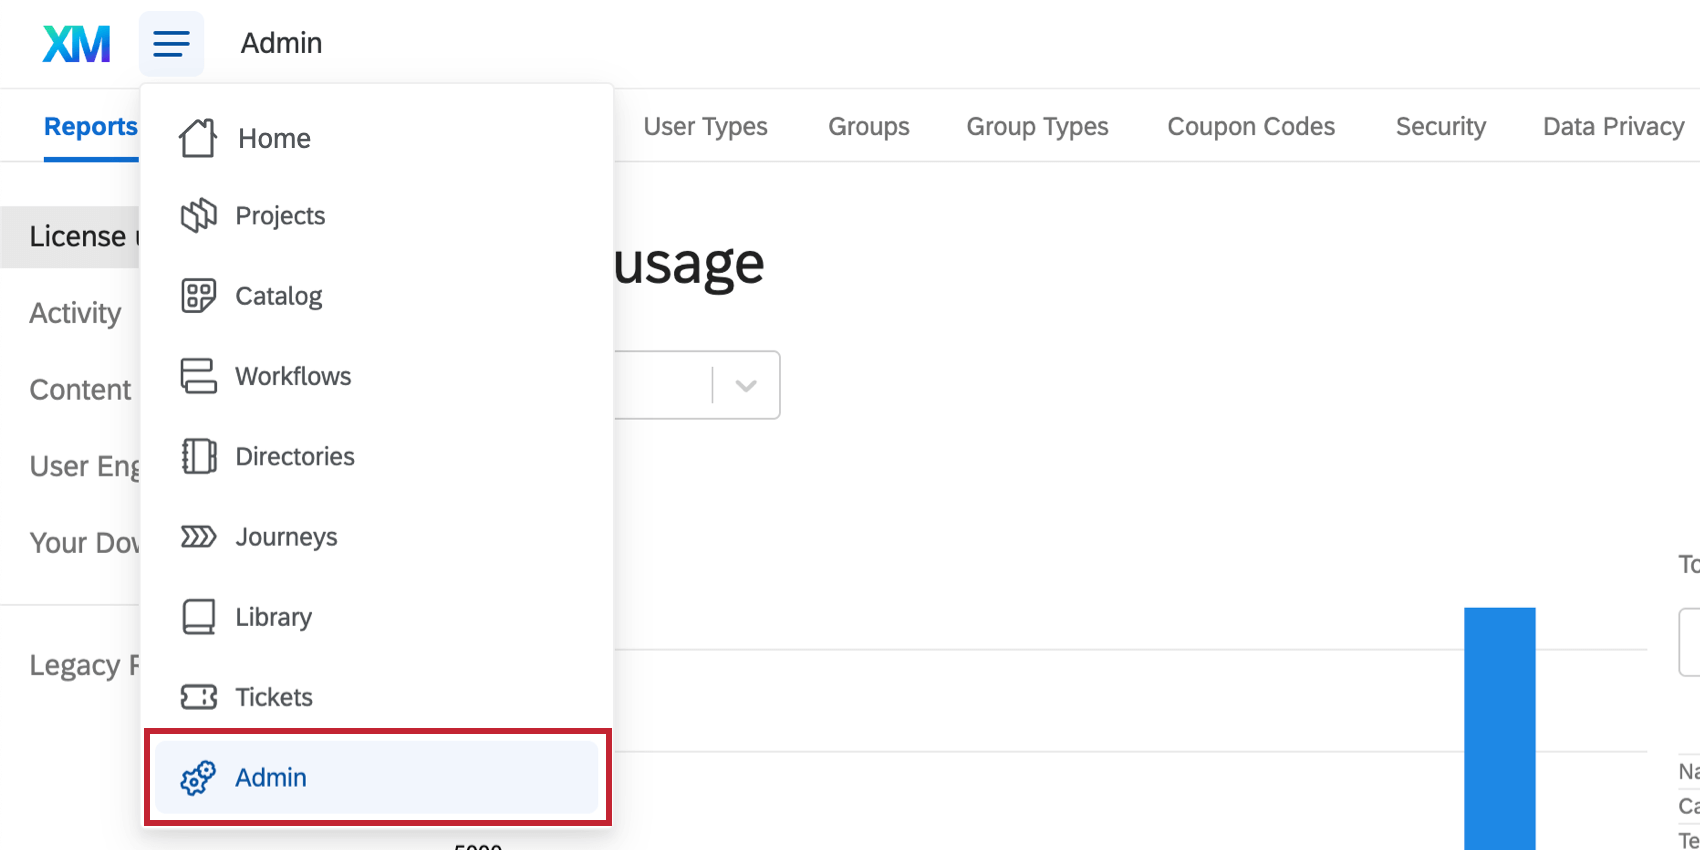
In the product, these features can all be found on the Admin page.
Admin Report
The Report tab is your primary resource for understanding the usage for your license. It will include both the Survey Platform and Employee Experience projects. You can see graphs for number of responses, surveys, and users. If your organization has purchased SMS distributions, you’ll also see a graph for your organization’s SMS usage. This page also includes a list of the most active surveys within your organization. These admin reports work the exact same way in Employee Experience as they do in the Survey Platform. For more information, see the Admin Reports support page.
Projects
The Projects tab allows you to search for and manage all of the Employee Experience projects in your organization.
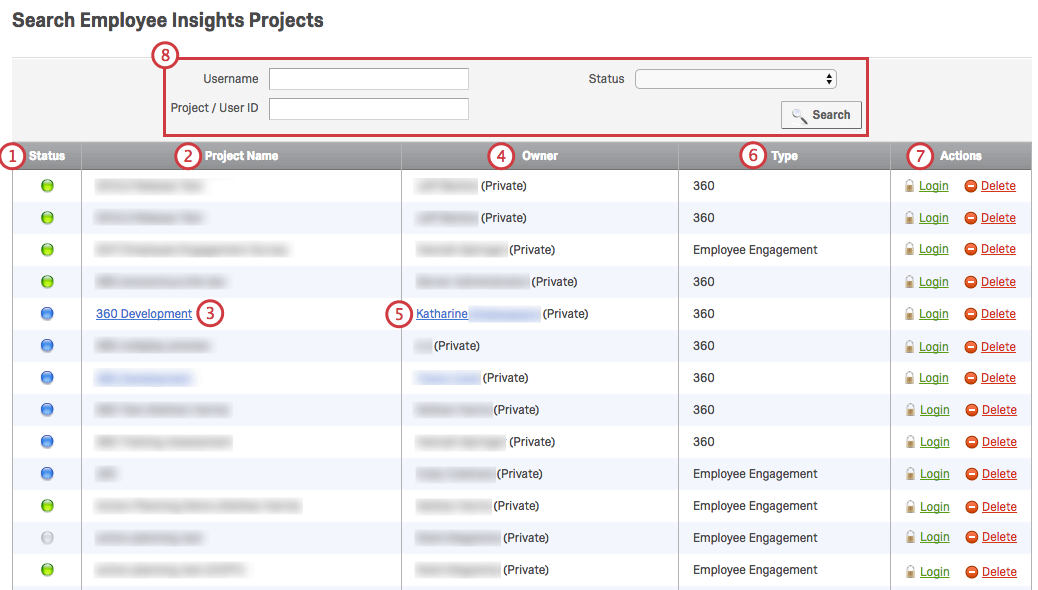
- Status: Gives the status of the project. Blue means Not Started, green means Active, and gray means Closed.
- Project Name: The name of the project.
- If you click on the project’s name, this will allow you to transfer ownership of the project to another individual in your organization. Simply search using the first and last name of the user you would like to transfer the project to, and once you locate the user, select Transfer.
Attention: When transferring EX projects, dashboards will not automatically transfer. If you would like the transferee to have access to the dashboards, make sure that the original owner has made the transferee a participant of the project and gives them editing access to the dashboard.Qtip: The Projects tab allows you to transfer ownership of most EX project types, including Pulse programs, Engagement, 360, Lifecycle, and Ad Hoc Employee Research.
- Owner: The owner of the project. This is the individual who created the project to begin with, unless ownership has been transferred.
- If you click on the project owner’s name, this will allow you to change the owner’s user permissions. See the Users section below for more details on how to edit user permissions.
- Type: This is the type of Employee Experience project. It will be Engagement, Lifecycle, or 360.
- Actions: Selecting Login will log you into the project owner’s account. Selecting Delete will delete the project.
- You can search all Employee Experience projects in your organization based off of Username, Project / User ID, and/or Status.
- Username: The username can be found in the Username section when editing a user’s permissions. This often matches the user’s email, however, this is not always the case. You must enter the entire username.
- Project / User ID: The ProjectID (i.e., TS_….) can be found in your URL when in the Survey tab for a project. This is a unique ID assigned to a project. The UserID (i.e., UR_…) can be found by following the instructions in the Locating Qualtrics IDs by Inspecting the Element section.
- Status: Matches the Status column.
360 Billing
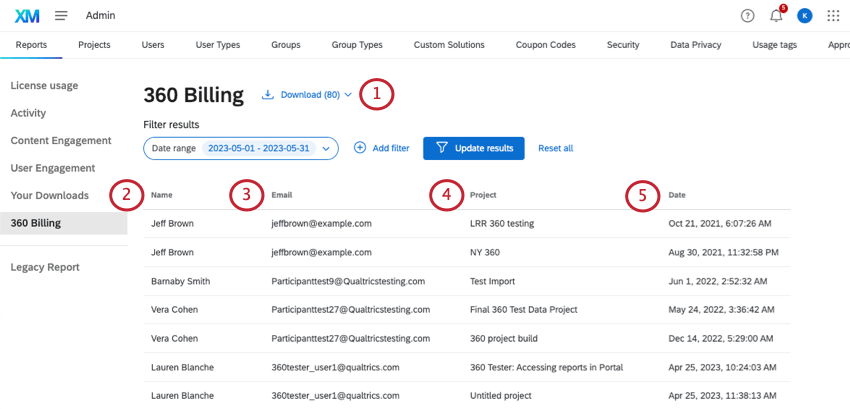
360 billing information can be found on the Admin Reports page.
The 360 Billing tab only lists subjects that you will be billed for. It is possible for a subject to be listed in your billing twice if they participate in multiple 360 surveys.
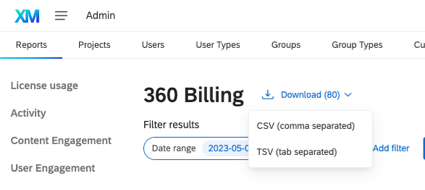
- Click Download to export your billing to CSV (comma separated values) or TSV (tab separated values). If you filter results and then export, only the filtered results will export.
- Name: The subject’s name. This is the individual that the 360 survey was about.
- Email: The subject’s email. This is the individual that the 360 survey was about.
- Project: The name of the project that the subject participated in and that you are being billed for.
- Date: The date on which the subject was billed. A subject will not be billed until at least 1 response is completed for the subject.
Qtip: 360 bills per subject for each 360 project. This means that you can have as many people as you would like to evaluate one subject in one 360 project, however, you will want to be mindful of the number of subjects in your project.
Filtering Results
You can search all billed 360 subjects in your organization based on last name, first name, email address, and/or date range.
- Click Add Filter.
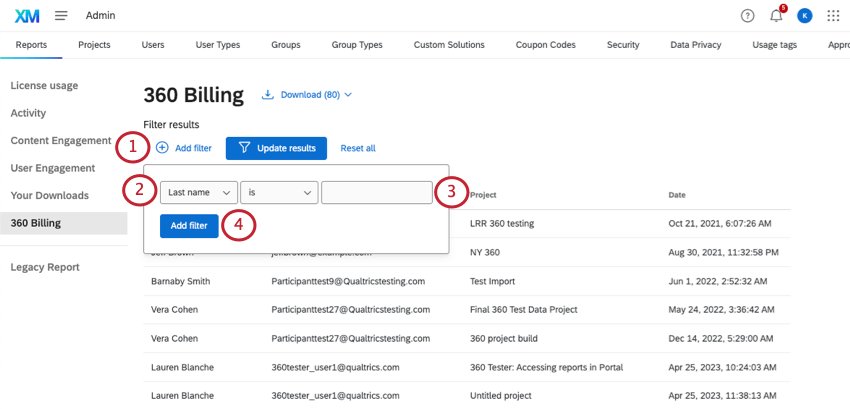
- Choose between the following fields to filter by:
- Last Name, First Name, Email: This will be the subject’s personal information. It must match the subject’s information that was uploaded in the Participants tab.
- Date Range: Allows you to select a date range for your billing.
- Type the value your filter should match exactly, or select start and end dates from the calendars if you’re filtering by date range.
- Click Add Filter.
- If you’d like to add more filters, click Add filter.
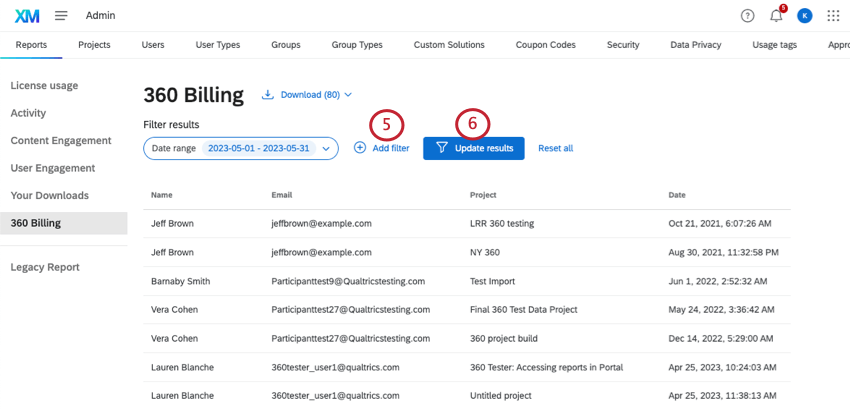 Qtip: Participants must meet all filter criteria to be included in results.
 - To apply your filters, click Update results.
Users
There are two key differences when creating each Employee Experience user and determining their permissions: you will have to specify if you want to edit the General, Survey Platform, or Employee Experience permissions, as well as specify one of the three Employee Experience-specific user types detailed below. For information regarding what each Employee Experience permission does, see the Employee Experience Permissions section below. Employee Experience users should be one of three user types:
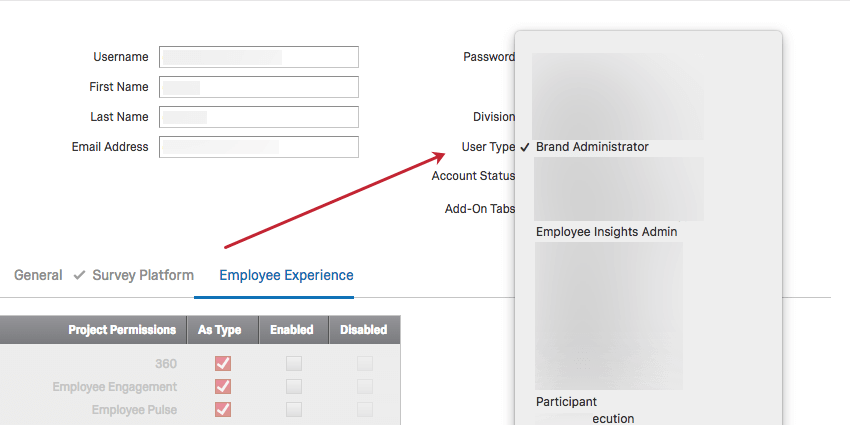
- Brand Administrator: Can work on projects, access the Admin page, and can also be participants/dashboard users.
- Employee Insights Administrator: Can work on projects and can be participants/dashboard users. A user will be considered an EI Administrator if they have any of the following permissions enabled: 360, Employee Engagement, Employee Pulse, Employee Lifecycle, or Ad Hoc Employee Research.
- Participant: Can take surveys and view dashboards. These individuals are created automatically when you add individuals in the Participants section of your Employee Experience project.
With the differences detailed above and below in mind, Users work the exact same way for Employee Experience as they do for the Survey Platform. For more information, visit the Survey Platform’s Creating and Managing Users support page.
Employee Experience Permissions
Employee Experience permissions are ones that affect 360, Employee Engagement, and Employee Lifecycle projects. For permissions that affect standard Qualtrics surveys, make sure you adjust the Survey Platform permissions instead.
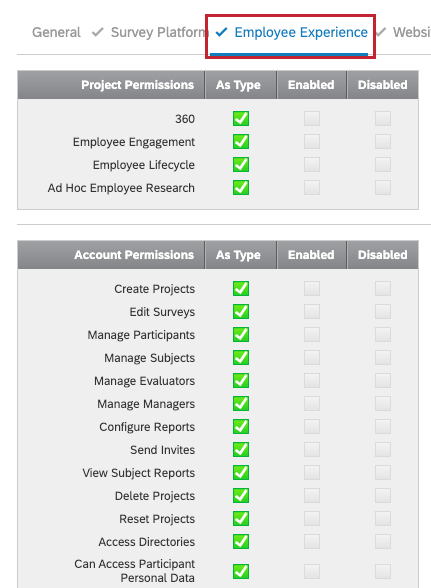
Project Permissions
- 360: Gives the user the ability to view and edit 360 projects. When disabled, you will not be able to access any 360 projects and 360 will not be an option once you select Create Project (if the Create Projects permission is enabled).
- Employee Engagement: Gives the user the ability to view and edit Employee Engagement projects. When disabled, you will not be able to access any Employee Engagement surveys and Employee Engagement will not be an option once you select Create Project (if the Create Projects permission is enabled).
- Employee Lifecycle: Gives the user the ability to view and edit Employee Lifecycle projects. When disabled, you will not be able to access any Employee Lifecycle projects and Employee Lifecycle will not be an option once you select Create Project (if the Create Projects permission is enabled).
- Ad Hoc Employee Research: Gives the user the ability to create an Ad Hoc Employee Research project. When disabled, you will not be able to access any Ad Hoc Employee Research projects and Ad Hoc Employee Research will not be an option once you select Create Project (if the Create Projects permission is enabled).
Account Permissions
- Create Projects: Gives the user the ability to create any Employee Experience project. When disabled, you cannot create any Employee Experience project, including 360, Engagement, Lifecycle, Ad Hoc Employee Research, and Pulse.
- Edit Surveys: Gives the user the ability to edit an Employee Experience project in the Survey tab. When disabled, the Survey tab will disappear from within an Employee Experience project.
- Manage Participants: Gives the user access to the Participants tab in an Employee Experience project. When disabled, it will make the Participants tab disappear from within an Employee Experience project.
- Manage Subjects: Gives the user access to the Subjects section of the Participants tab in a 360 project. When disabled, the Subjects section will disappear from within a 360 project.
- Manage Evaluators: Gives the user access to the Evaluators section of the Participants tab in a 360 project. When disabled, the Evaluators section will disappear from within a 360 project.
- Manage Managers: Gives the user access to the Managers section of the Participants tab in a 360 project. When disabled, the Managers section will disappear from within a 360 project.
- Configure Reports: Gives the user the ability to edit reports in a 360 project. When disabled, it will make the Edit Subject Report and My Reports sections disappear from the Reports tab in a 360 project.
Qtip: This does not prevent the user from releasing, viewing, or downloading Subject Reports in the Subjects section of the Participants tab.
- Send Invites: Gives the user access to the Messages tab in an Employee Experience project. When disabled, it will make the Messages tab disappear from within an Employee Experience project.
- View Subject Reports: Gives the user the ability to access 360 Subject Reports from the Participants tab. When disabled, it will make Subject Reports inaccessible from the Participants tab in a 360 project.
Qtip: This does not prevent the user from releasing reports in the Subjects section of the Participants tab, viewing Subject Reports in the Reports tab, or viewing Subject Reports by proxy logging in to the subject’s Participant Portal. This option is most frequently used in conjunction with the Configure Reports permission. If you don’t want administrators to be able to edit reports but you would like them to be able to view reports, disable the Configure Reports option and leave the View Subject Reports permission turned on.
- Delete Projects: Gives the user the ability to delete an Employee Experience project. When disabled, the Delete Project option will disappear from the Projects page for an Employee Experience project.
- Reset Projects: Gives the user the ability to Reset Participants for an Employee Experience project. When disabled, it will make Reset Participants disappear from the Tools menu of the Participants section.
- Access Directories: Gives the user the ability to access the Employee Directory. When disabled, the Employee Directory will not be available. If your account also has other directories, like non-employee contacts and locations, these are not affected by this permission.
Attention: We highly advise using Employee Record Access Control on users with directory access. Employee record access control is a way of restricting what employees your users have access to in the directory.
- Can Access Participant Personal Data: When disabled, the Complete / Not Complete status column is hidden on the Participants tab, and you cannot proxy log into participants dashboards.
- Can Access Project Data: Gives the user the ability to access the Data tab in their Employee Experience projects. When disabled, it will make the Data tab disappear from Employee Experience projects, and it will make the Reports tab disappear from 360 projects.
- Create Ad Hoc Employee Research: Gives the user the ability to create Ad Hoc Employee Research projects.
- Use Ad Hoc Employee Research: Gives the user the ability to edit and distribute Ad Hoc Employee Research projects.
- Access EX Dashboards project: Allows users to create Employee Journey Analytics projects.
- Cross XM Analytics Project: Allows the user to use CrossXM Analytics
- Access EX Team Portal: This permission is for a feature in preview.
- Access EX25 XM Solution for Healthcare: Grants access to the EX25 Healthcare Solution template for EX projects.
- EX25 XM Solution for K-12: Grants access to the EX25 K-12 template for EX projects.
- Pulse: Lets the user create pulses or access ones that were shared with them.
- Access Guided Engagement: Allows the user to create an Engagement project via the guided flow.
Qtip: You’ll still need the other permissions you typically need to create and manage an Engagement project (e.g., “Create Projects,” “Employee Experience,” etc).
Question Types
- Tree Select: Gives the user the ability to use the org hierarchy question type in their Employee Engagement surveys.
User Types
Setting user permissions one account at a time can be tedious. Through user types, you can quickly update and maintain permissions for many users at once. User types are sets of permissions that can be assigned to user accounts. Whenever you want to make a widespread permission change, just edit the user type and all associated user accounts will update automatically.
Using Specialized User Types
Employee Experience comes with pre-built user types specialized to EX use cases. These are:
- EX Administrator
- Employee Insights Admin
- Participant
The 2 administrator user types allow you to assign users who can exclusively administrate EX projects and directories, without having to give these users Brand Admin access to your entire Qualtrics organization.
To learn more about these user types and which ones are best for you, check out Existing User Types.
Creating Custom User Types
For information regarding Employee Experience-specific user types and what each Employee Experience permission does, visit the Users section of this page.
With the differences detailed above in mind, user types work the exact same way for Employee Experience as they do for the Survey Platform. For more information, visit the Survey Platform’s User Types support page.
Groups
As an administrator, you can use groups to allow two or more users to share projects, graphics, files, and messages in libraries. Groups can include everyone in your organization, everyone in a specific division, or only specific users that you manually select. The key difference when creating groups for Employee Experience is that for one particular user’s editing rights within a group, you will have to specify if you want to edit the General, Survey Platform, or Employee Experience permissions. For information regarding what each Employee Experience permission does, visit the Users section of this page. To edit a specific user’s permissions in a group, click on the group name in the Groups tab and then click on the user’s name to view the editing window below.
With the difference detailed above in mind, groups work the exact same way for Employee Experience as they do for the Survey Platform. For more information, visit the Survey Platform’s User Groups support page.
Group Types
Group types, similar to User Types, are sets of permissions that determine what a user is allowed to do with content owned by a group. The group type permissions will apply to all group members, unless otherwise specified for an individual member. The key difference when creating groups for Employee Experience is that for one particular user’s editing rights within a group, you will have to specify if you want to edit the General, Survey Platform, or Employee Experience permissions. For information regarding what each Employee Experience permission does, visit the Users section of this page.
With the difference detailed above in mind, group types work the exact same way for Employee Experience as they do for the Survey Platform. For more information, visit the Survey Platform’s Group Types section of the User Groups support page.
Coupon Codes
As a Brand Administrator of a large organization, Coupon Codes (or Upgrade Codes) make managing user permissions easier. Rather than changing permissions one-by-one for several users, you can create Coupon Codes that change User Type or Division. Once you’ve created the code, you simply email it to your users and they’ll enter the code into their account to update permissions on their existing accounts, or use these codes during the sign-up process. Coupon Codes work the exact same way in Employee Experience as they do in the Survey Platform. For more information, visit the Survey Platform’s Coupon Codes support page.
Data Privacy
The Data Privacy tab is available to all Brand Administrators, and comes with special features that allow you to manage the data in your Qualtrics organization.
For Employee Experience (EX) customers, the Data Privacy tab has access to the following tools:
- Personal Data (GDPR Compliance): Locate data for an individual or a group of individuals by searching for their email address, and then delete or export this information as needed.
- Sensitive Data Policy: Regulate the private personal information collected by your organization by flagging questions and data that may violate your organization’s standard for respondent data privacy.
- Pseudonymization: Enable a default pseudonymization policy for the entire brand to remove personal identifying data from EX responses in real time. This tool is exclusive to EX.
- Retention Policy: Set a brand-wide policy for how long Qualtrics stores survey response data before deleting it.
Attention: The Anonymization policies described here are not available in EX licenses. Instead, see Pseudonymization.
- Anonymous Responses: Set anonymity thresholds for all dashboards in a brand, to determine when data is displayed in a dashboard. This tool is exclusive to EX.
- Data Access Settings: Control which members of your Qualtrics organization have access to employee metadata. This tool is exclusive to EX.
Organization Settings
The Organization Settings tab allows you to view and manage options that apply to your whole license. From here, you can set up contact info, password parameters, logout redirects, and more. Organization settings work the exact same way in Employee Experience as they do in the Survey Platform. For more information, visit the Survey Platform’s Organization Settings support page.
